Gitblit介绍
Gitblit 是一个纯 Java 库用来管理、查看和处理 Git 资料库.相当于 Git 的 Java 管理工具,支持linux系统。
Git是分布式版本控制系统,它强调速度、数据一致性,并且支持分布式、非线性工作流。它最初由Linus Torvalds在2005年为Linux内核设计和开发,使用GPLv2证书,
并从此成为软件开发中使用最广泛的版本控制系统。
Gitblit是完全开源的软件,它基于纯粹的Java堆栈,被设计以在Git仓库速度和效率方面胜任从小型到极大型的项目。它很容易学习和上手,并有着闪电般的性能。它在很
多方面远胜Subversion、CVS、Perforce和ClearCase等SCM(版本控制)工具,比如,如快速本地分支、易于暂存、多工作流等。
下面介绍Gitblit的安装(Ubuntu/Fedora/CentOS)
Git是一款注重速度、数据完整性、分布式支持和非线性工作流的分布式版本控制工具。Git最初由Linus Torvalds在2005年为Linux内核开发而设计,如今已经成为被广
泛接受的版本控制系统。和其他大多数分布式版本控制系统比起来,不像大多数客户端-服务端的系统,每个Git工作目录是一个完整的仓库,带有完整的历史记录和完整的版本
跟踪能力,不需要依赖网络或者中心服务器。像Linux内核一样,Git也是在GPLv2许可证下分发的自由软件。
[root@gitblit-server ~]# yum -y install java-1.7.0-openjdk*         //要提前安装java环境
[root@gitblit-server ~]# mkdir -p /opt/gitblit
[root@gitblit-server ~]# cd /opt/gitblit
[root@gitblit-server gitblit]# wget http://dl.bintray.com/gitblit/releases/gitblit-1.6.2.tar.gz
[root@gitblit-server gitblit]# tar -zvxf gitblit-1.6.2.tar.gz
[root@gitblit-server gitblit]# ls
add-indexed-branch.sh  ext                   gitblit-stop.sh            java-proxy-config.sh  reindex-tickets.sh
authority.sh           gitblit-1.6.2.tar.gz  install-service-centos.sh  LICENSE               service-centos.sh
data                   gitblit.jar           install-service-fedora.sh  migrate-tickets.sh    service-ubuntu.sh
docs                   gitblit.sh            install-service-ubuntu.sh  NOTICE

默认配置文件在data/gitblit.properties,可以根据需要自己修改。

启动gitlit服务:

第一种方式:通过service命令:
[root@gitblit-server gitblit]# cp service-centos.sh /etc/init.d/gitblit
[root@gitblit-server gitblit]# chkconfig --add gitblit
[root@gitblit-server gitblit]# service gitblit start
Starting gitblit server
.
[root@gitblit-server gitblit]# ps -ef|grep gitblit
root      7421     1 99 11:19 pts/0    00:00:13 java -server -Xmx1024M -Djava.awt.headless=true -jar /opt/gitblit/gitblit.jar --httpsPort 8443 --httpPort 0 --baseFolder /opt/gitblit/data --dailyLogFile
root      7447  7217  0 11:19 pts/0    00:00:00 grep gitblit

第二种方式,手动启动:
[root@gitblit-server gitblit]# java -jar gitblit.jar --baseFolder data
2017-05-31 11:51:17 [INFO ] *****************************************************************
2017-05-31 11:51:17 [INFO ]             _____  _  _    _      _  _  _
2017-05-31 11:51:17 [INFO ]            |  __ (_)| |  | |    | |(_)| |
2017-05-31 11:51:17 [INFO ]            | |  / _ | |_ | |__  | | _ | |_
2017-05-31 11:51:17 [INFO ]            | | __ | || __|| '_  | || || __|
2017-05-31 11:51:17 [INFO ]            | |_ | || |_ | |_) || || || |_
2017-05-31 11:51:17 [INFO ]             \____/|_| \__||_.__/ |_||_| \__|
2017-05-31 11:51:17 [INFO ]                          Gitblit v1.6.2
2017-05-31 11:51:17 [INFO ]
2017-05-31 11:51:17 [INFO ] *****************************************************************
2017-05-31 11:51:17 [INFO ] Running on Linux (2.6.32-642.el6.x86_64)
2017-05-31 11:51:17 [INFO ] Logging initialized @1233ms
2017-05-31 11:51:17 [INFO ] Using JCE Unlimited Strength Jurisdiction Policy files
2017-05-31 11:51:17 [INFO ] Setting up HTTPS transport on port 8443
2017-05-31 11:51:17 [INFO ]    certificate alias = localhost
2017-05-31 11:51:17 [INFO ]    keyStorePath   = /opt/gitblit/data/serverKeyStore.jks
2017-05-31 11:51:17 [INFO ]    trustStorePath = /opt/gitblit/data/serverTrustStore.jks
2017-05-31 11:51:17 [INFO ]    crlPath        = /opt/gitblit/data/certs/caRevocationList.crl
........

确保gitblit的8443端口已打开
[root@gitblit-server gitblit]# lsof -i:8443
COMMAND  PID USER   FD   TYPE  DEVICE SIZE/OFF NODE NAME
java    7421 root   94u  IPv6 1224421      0t0  TCP *:pcsync-https (LISTEN)
打开浏览器,依据你的配置进入https://localhost:8443。 输入默认的管理员授权:admin / admin 并点击Login 按钮


添加用户操作


添加仓库操作


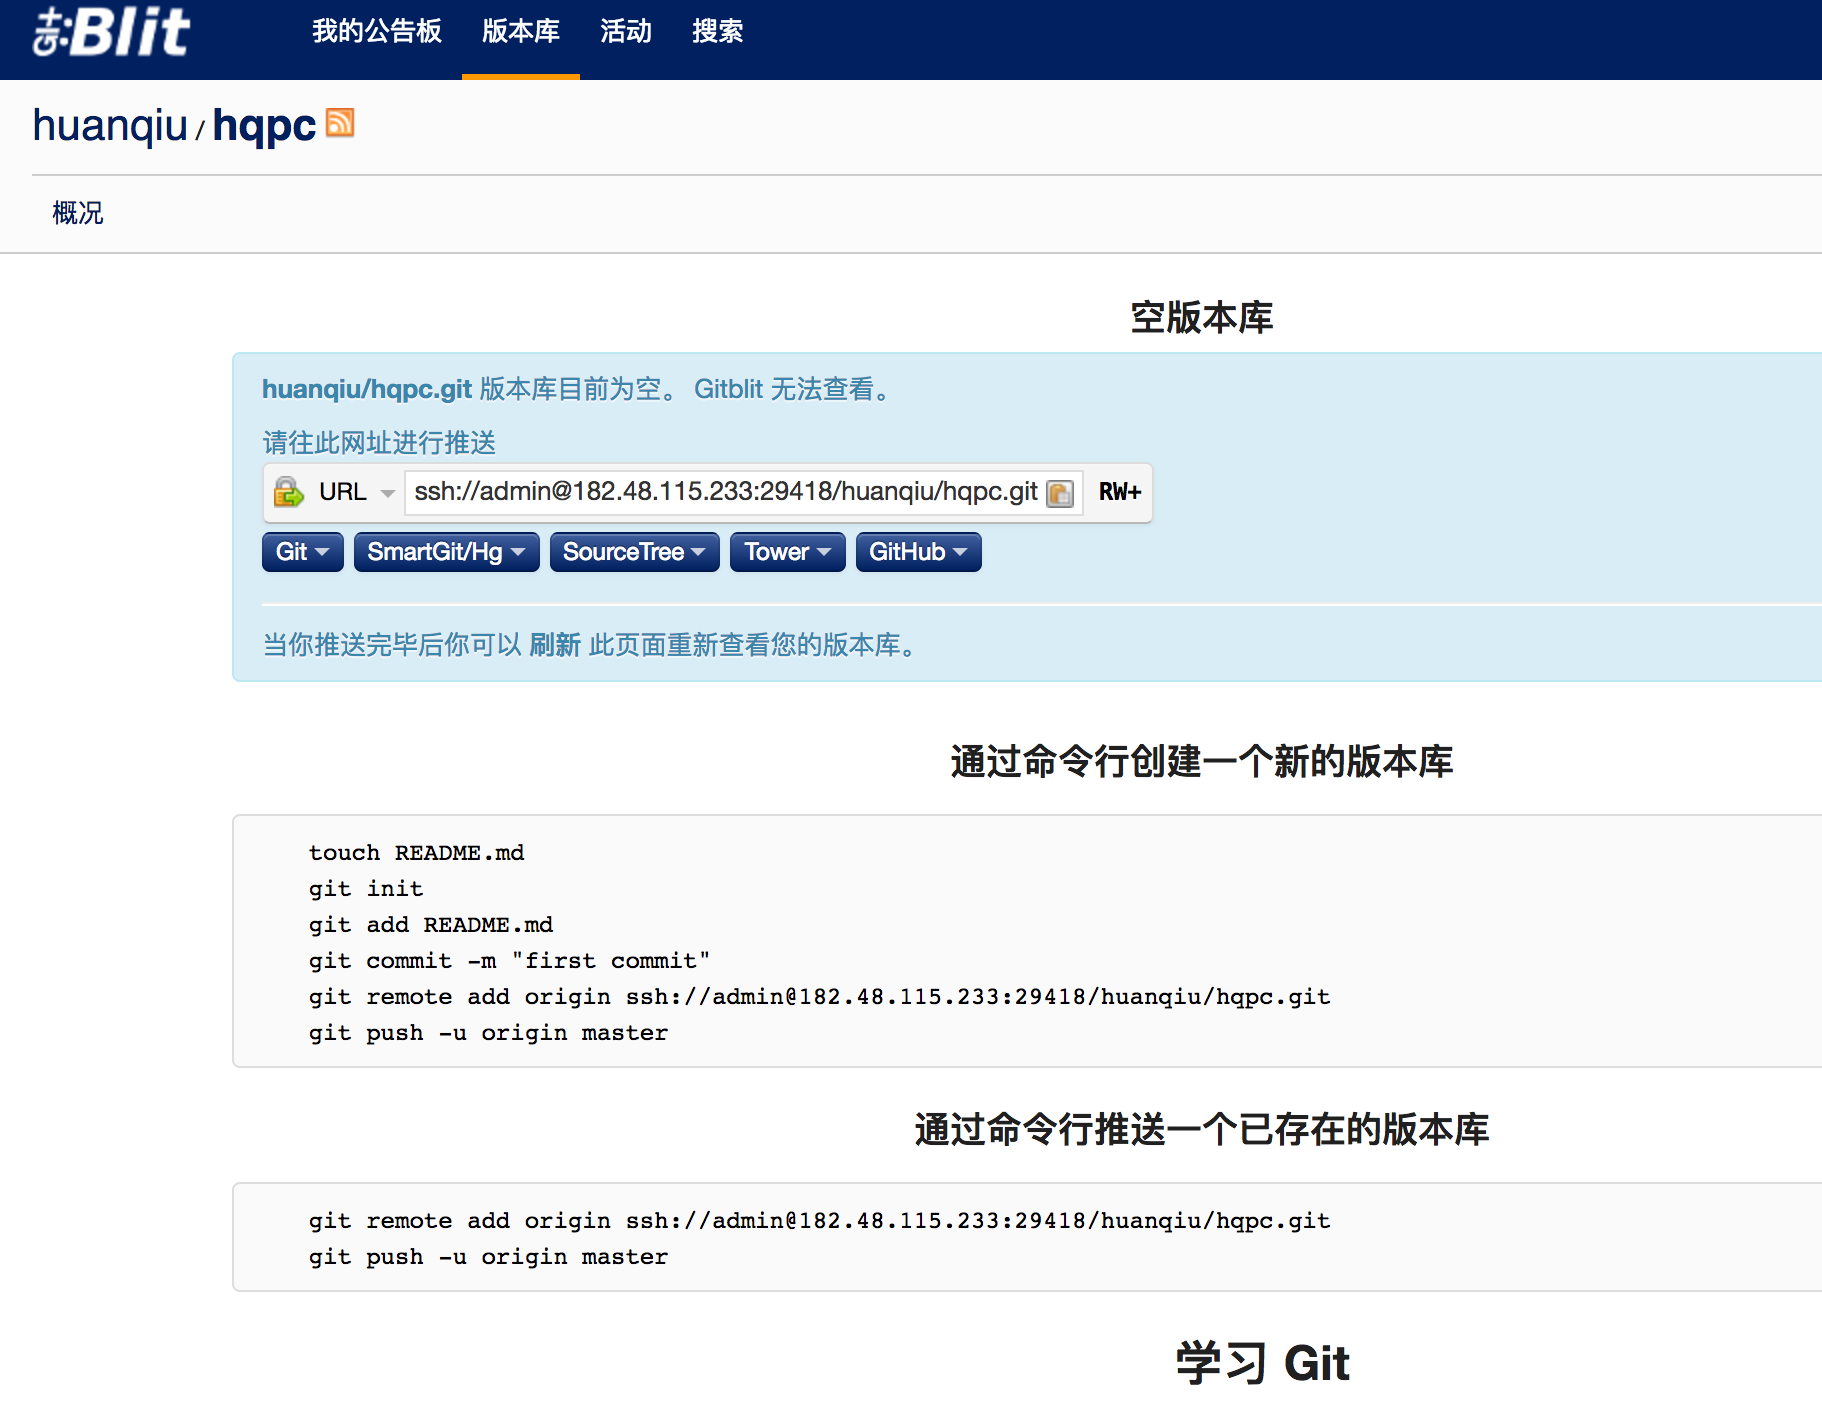

这样就在组huanqiu下创建了hqpc的代码仓库。还可以在huanqiu组下创建其它的仓库
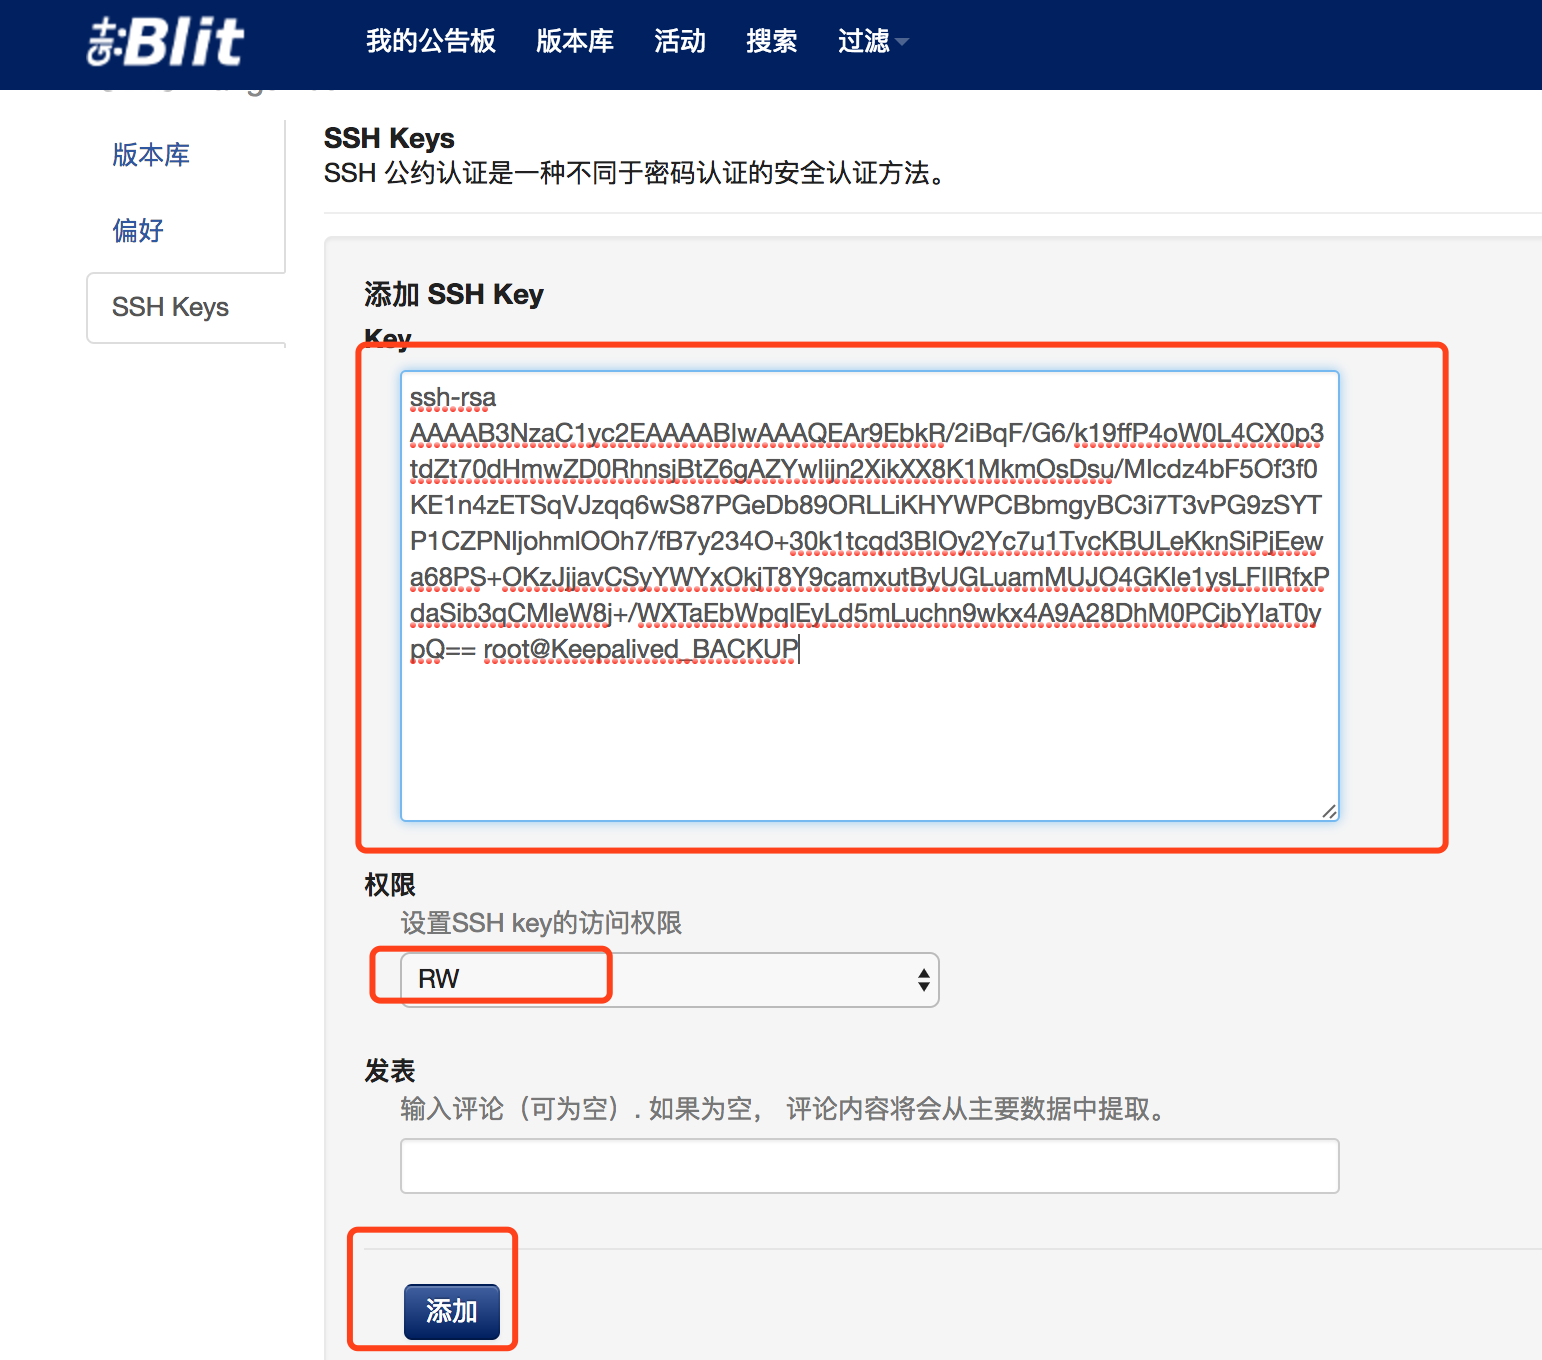
可以是用上面创建的wangshibo用户登陆,然后将客户机的ssh公钥添加到gitblit的wangshibo用户下,这样就能使用ssh方式进行操作了。

添加客户机公钥,可以设置操作权限(读写权限)
然后就可以在客户机上进行代码操作了
[root@Agent-node1 ~]# cd /opt
[root@Agent-node1 opt]# git clone ssh://wangshibo@182.48.115.233:29418/huanqiu/hqpc.git
Initialized empty Git repository in /opt/hqpc/.git/
warning: remote HEAD refers to nonexistent ref, unable to checkout.

[root@Agent-node1 opt]# ls
hqpc
[root@Agent-node1 opt]# cd hqpc/
[root@Agent-node1 hqpc]# echo "123123" > test.txt
[root@Agent-node1 hqpc]# git add test.txt
[root@Agent-node1 hqpc]# git commit -m "added by wangshibo"
[master (root-commit) fd709a4] added by wangshibo
 Committer: root <root@Agent-node1.(none)>
Your name and email address were configured automatically based
on your username and hostname. Please check that they are accurate.
You can suppress this message by setting them explicitly:

    git config --global user.name "Your Name"
    git config --global user.email you@example.com              //可以在操作下执行这两行,进行全局设置(不操作也行)

If the identity used for this commit is wrong, you can fix it with:

    git commit --amend --author='Your Name <you@example.com>'

 1 files changed, 1 insertions(+), 0 deletions(-)
 create mode 100644 test.txt

 [root@Agent-node1 hqpc]# git push -u origin master
Counting objects: 3, done.
Writing objects: 100% (3/3), 222 bytes, done.
Total 3 (delta 0), reused 0 (delta 0)
remote: Updating references: 100% (1/1)
To ssh://wangshibo@182.48.115.233:29418/huanqiu/hqpc.git
 * [new branch]      master -> master
Branch master set up to track remote branch master from origin.
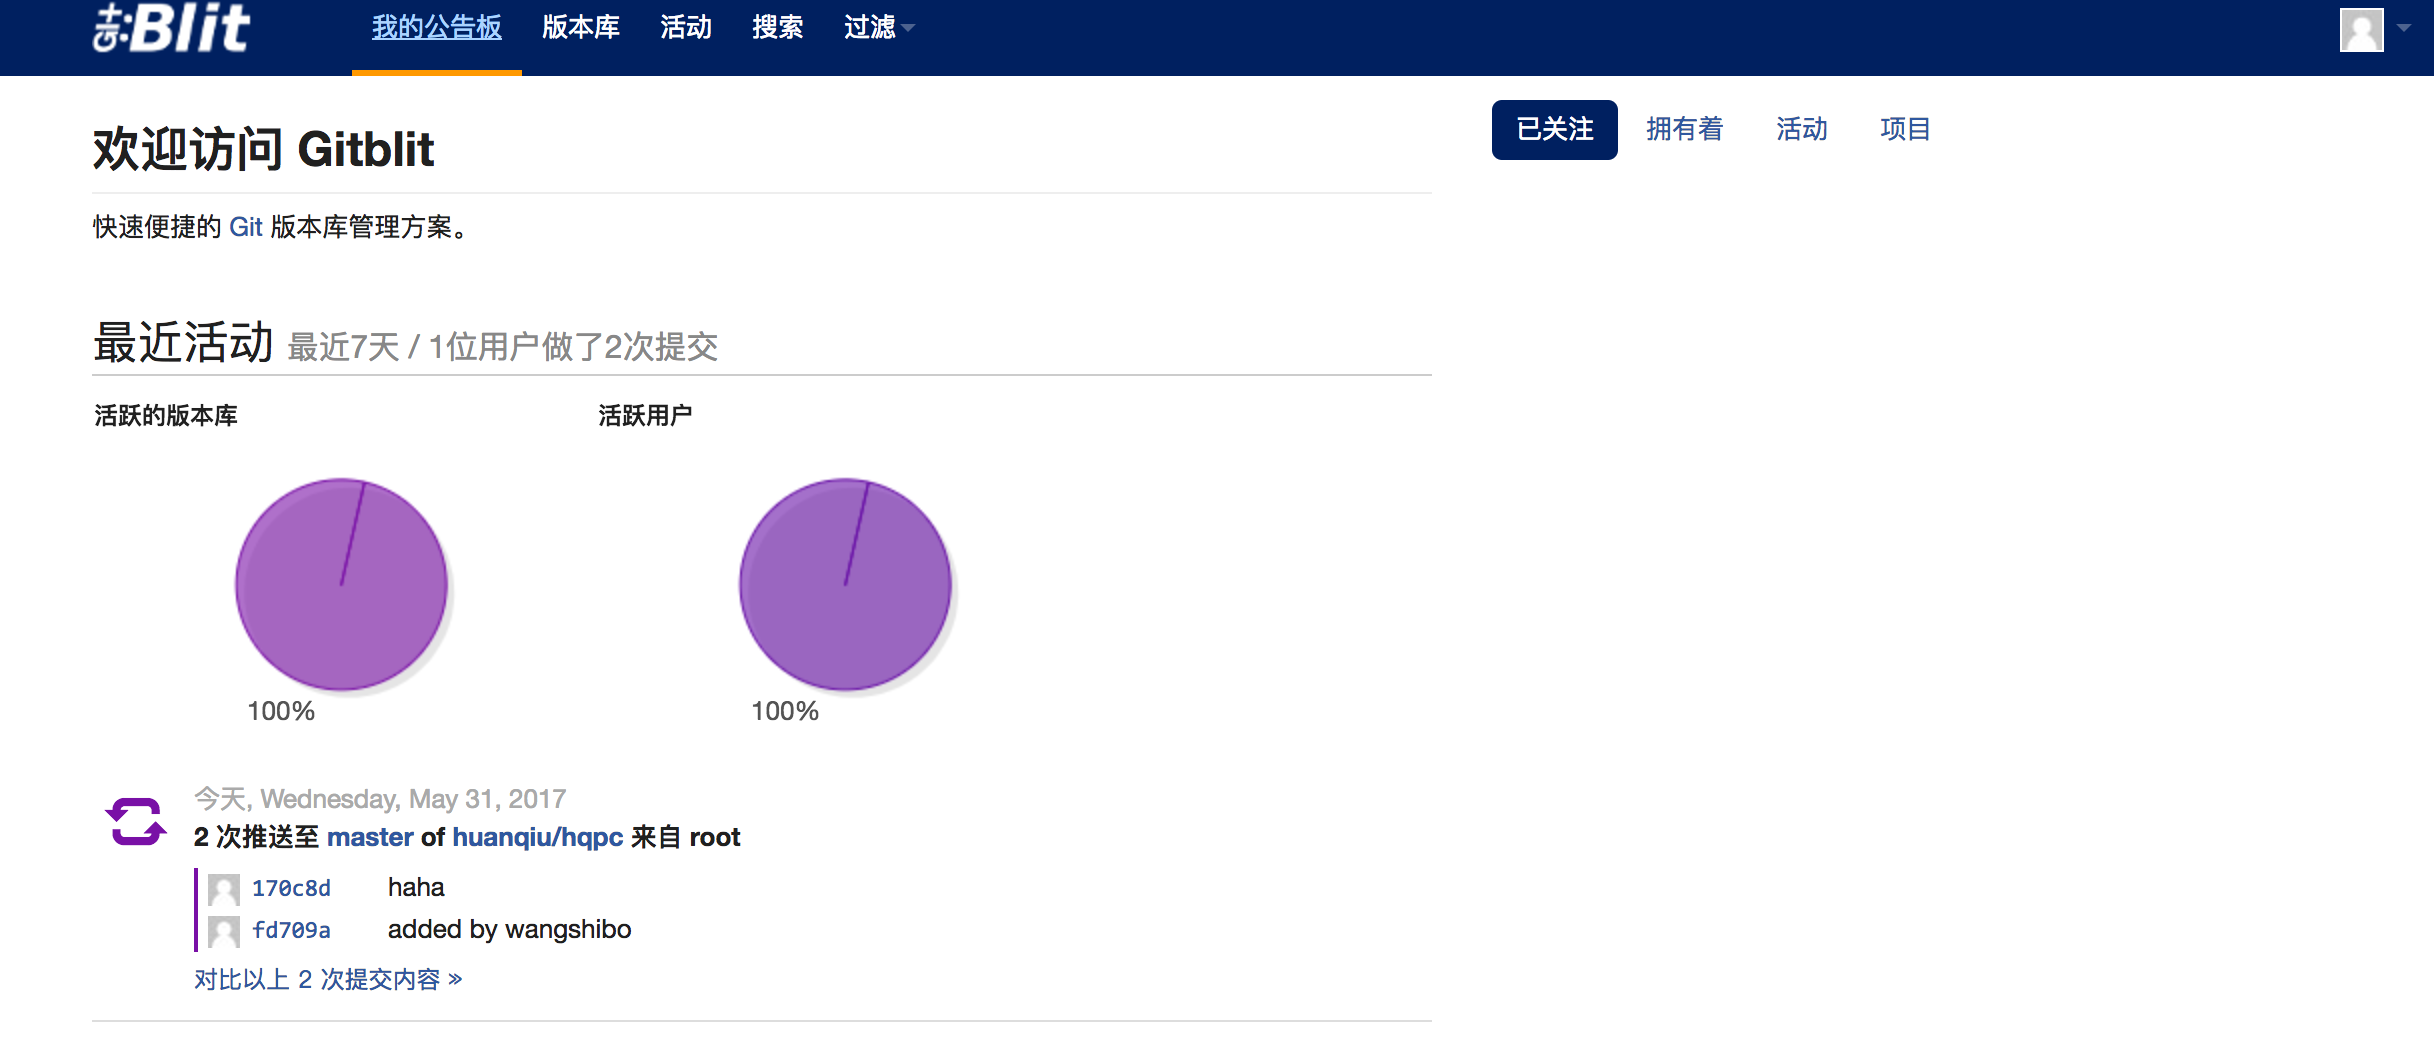
然后登陆到gitblit页面,查看test.txt文件是否已经成功推到了hqpc仓库里了


--------------------------------------------------------------------------
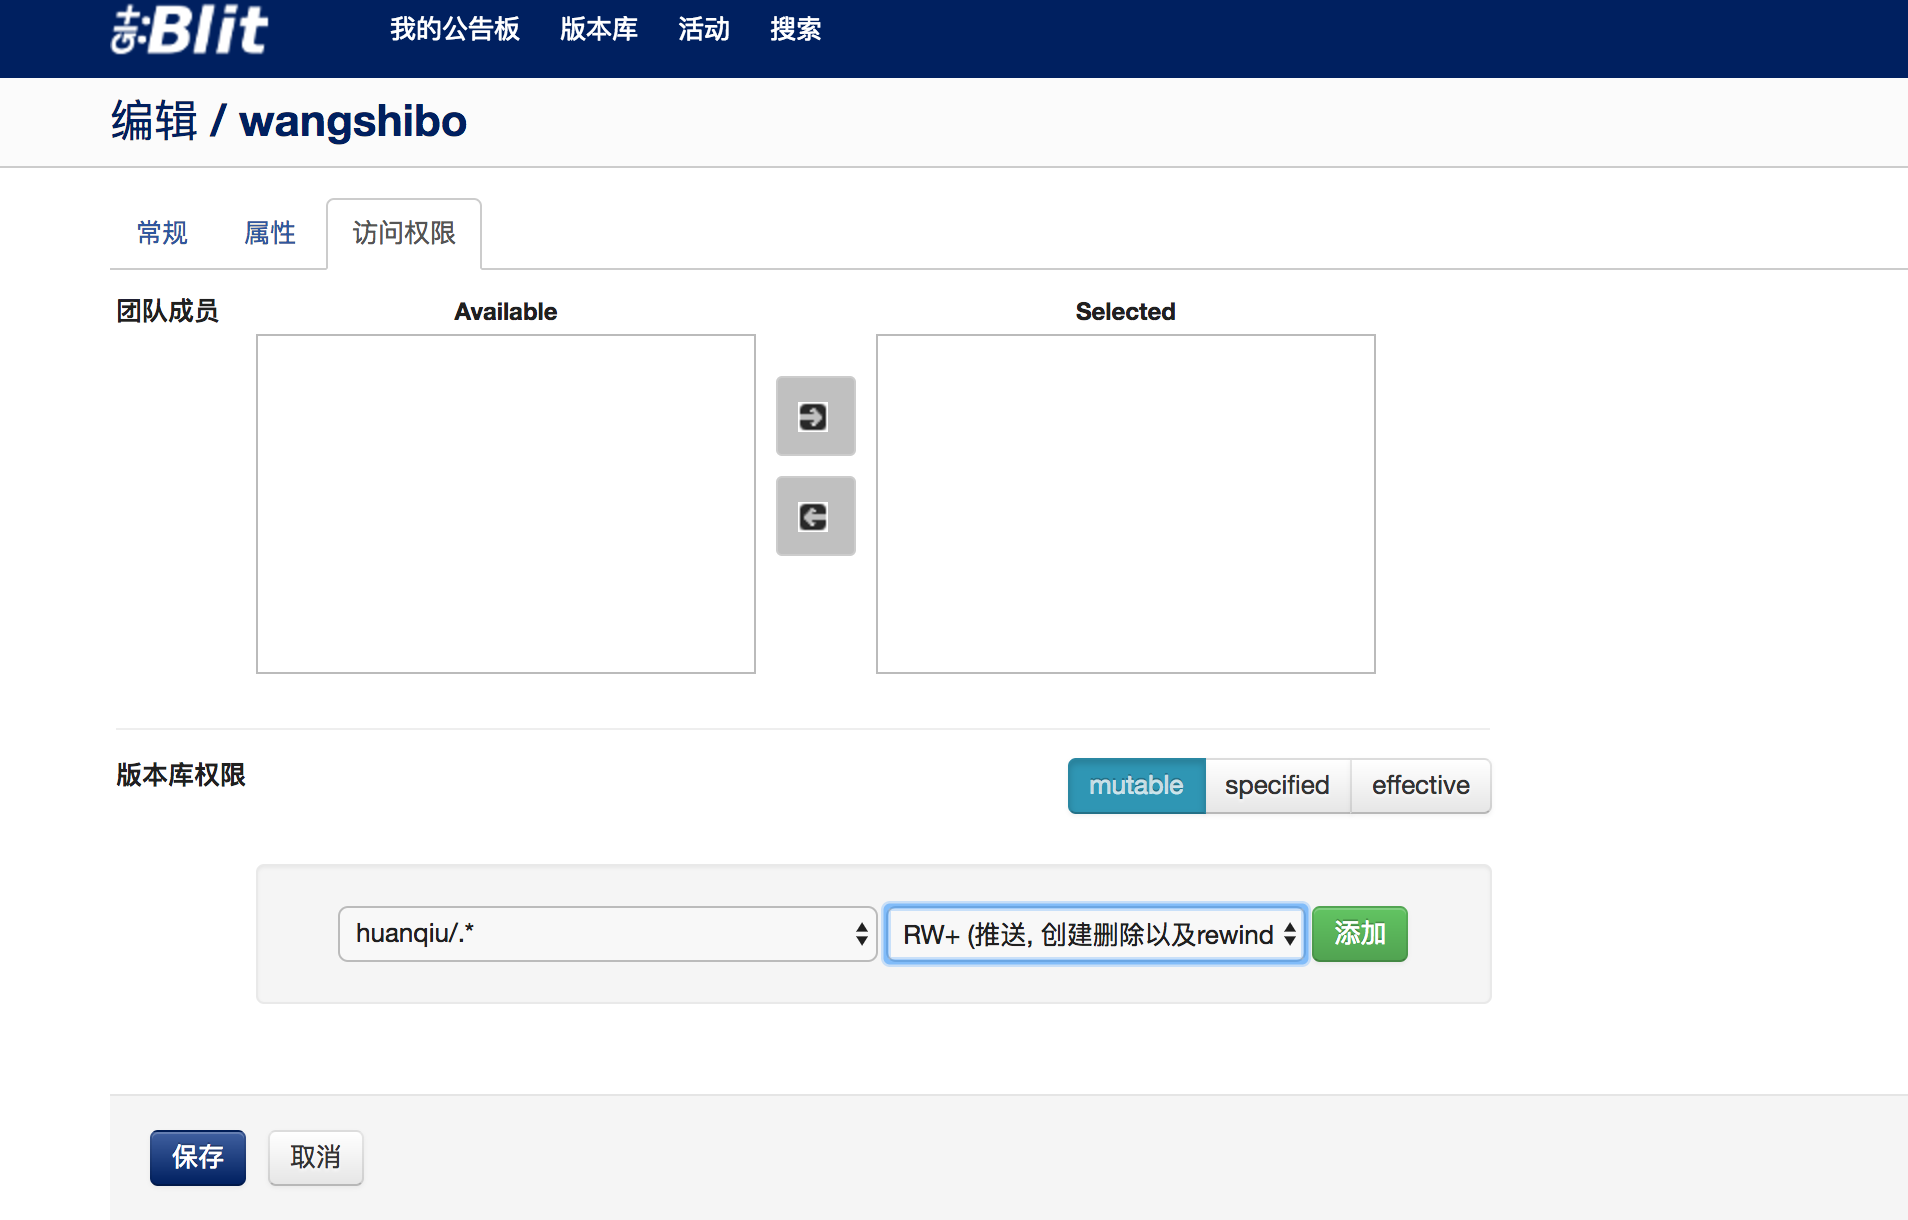
还可以设置用户的访问权限
中英文显示,可以在"用户中心"的"偏好设置"里选择中文或是英文显示

可以在"我的公告板"里查看最近的操作记录情况