超越昨天的自己系列(6)
使用ibatis开发中,耗在dao层的开发时间,调试时间,差错时间,以及适应修改需求的时间太长,导致项目看起来就添删改查,却特别费力。
在项目性能要求不高的情况下,开始寻找比较能快速点的开发框架,首先从dao层开始,考虑到hibernate的逆向工程,以及零sql的标语,项目开始尝试使用。
自己想打一个hibernate底层的项目,顺便熟悉下hibernate。
首先用maven 命令构建一个java项目
mvn archetype:create -DgroupId=work -DartifactId=HibernateFirst
最重要的pom.xml,profiles节点中的两个profile就是对不同环境的打包选择不同的properties文件进行了描述,可以看到
<activeByDefault>true</activeByDefault>默认触发的意思,其实就是说我用dev(默认)这个时,env这个参数等于dev,如果选择production的时候,env就等于production了。
单单这样还不能实现对不同环境打包时,使用不同的properties,注意下面build节点,这个节点描述了打包时的行为。
filters节点是类似全局替换的感觉,使用的${user.dir}/env/filter-${env}.properties就能明白上面提到的env的作用了,就是修改了下文件名嘛,靠~。
我们在pom同目录下的env文件夹里放了filter-dev.properties 和 filter-production.properties,就可以啦。
这样的配置就会把properties 文件里的内容自动的去替换了,还有个问题,这个替换的动作针对的文件夹是哪个?
下面的resource节点就是描述这事的。
<project xmlns="http://maven.apache.org/POM/4.0.0" xmlns:xsi="http://www.w3.org/2001/XMLSchema-instance"
  xsi:schemaLocation="http://maven.apache.org/POM/4.0.0 http://maven.apache.org/xsd/maven-4.0.0.xsd">
  <modelVersion>4.0.0</modelVersion>

  <groupId>work</groupId>
  <artifactId>HibernateFirst</artifactId>
  <version>1.0-SNAPSHOT</version>
  <packaging>jar</packaging>

  <name>HibernateFirst</name>
  <url>http://maven.apache.org</url>
<profiles>
          <!-- 开发环境,默认激活 -->
          <profile>
               <id>dev</id>
               <properties>
                    <env>dev</env>
                    <maven.test.skip>true</maven.test.skip>
               </properties>
               <activation>
                    <activeByDefault>true</activeByDefault>
               </activation>
          </profile>
          <!-- 生产环境,默认激活 -->
          <profile>
               <id>production</id>
               <properties>
                    <env>production</env>
               </properties>
          </profile>
     </profiles>
  <properties>
    <project.build.sourceEncoding>UTF-8</project.build.sourceEncoding>
  </properties>

  <dependencies>
    <dependency>
      <groupId>junit</groupId>
      <artifactId>junit</artifactId>
      <version>3.8.1</version>
      <scope>test</scope>
    </dependency>

     <dependency>
          <groupId>ch.qos.logback</groupId>
          <artifactId>logback-classic</artifactId>
          <version>0.9.24</version>
          <scope>runtime</scope>
     </dependency>
     <dependency>
       <groupId>org.hibernate</groupId>
       <artifactId>hibernate-core</artifactId>
       <version>3.3.2.GA</version>
    </dependency>

    <dependency>
       <groupId>org.hibernate</groupId>
       <artifactId>hibernate-entitymanager</artifactId>
       <version>3.4.0.GA</version>
    </dependency>
     <dependency>
      <groupId>mysql</groupId>
      <artifactId>mysql-connector-java</artifactId>
      <version>5.1.10</version>
    </dependency>
  </dependencies>

       <!-- Build Settings -->
    <build>
          <defaultGoal>install</defaultGoal>
          <filters>
               <filter>${user.dir}/env/filter-${env}.properties</filter>
          </filters>
          <resources>
               <resource>
                    <directory>src/main/resources</directory>
                    <filtering>true</filtering>
               </resource>
          </resources>
    </build>
</project>
filter-dev.properties文件,其中放数据库连接的信息,全局变量,图片服务器地址,公共目录,log打印文件地址啊什么的:
jdbc.driverClassName=com.mysql.jdbc.Driver
jdbc.url=jdbc:mysql://192.168.20.106:3306/adplugin?autoReconnect=true
jdbc.username=root
jdbc.password=root123
hibernate
接下来就是hibernate的使用了:
使用比较低端的xml方式,也比较简单。
目录结构:
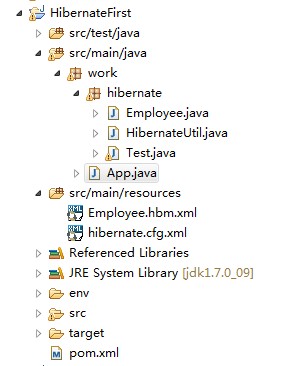
HibernateUtil:用于产生SessionFactory
public class HibernateUtil {

    private static final SessionFactory sessionFactory = buildSessionFactory();

    private static SessionFactory buildSessionFactory() {
        try {
            // Create the SessionFactory from hibernate.cfg.xml
            return new Configuration()
                    .configure()
                    .buildSessionFactory();
        } catch (Throwable ex) {
            System.err.println("Initial SessionFactory creation failed." + ex);
            throw new ExceptionInInitializerError(ex);
        }
    }

    public static SessionFactory getSessionFactory() {
        return sessionFactory;
    }
}
Employee:
public class Employee {
    private Long id;

    private String firstname;

    private String lastname;

    private Date birthDate;

    private String cellphone;

    public Employee() {

    }

    public Employee(String firstname, String lastname, Date birthdate, String phone) {
        this.firstname = firstname;
        this.lastname = lastname;
        this.birthDate = birthdate;
        this.cellphone = phone;

    }

....get set....
Test:
Employee.hbm.xmlpublic class Test {

    public static void main( String[] args )
    {
        list();
        System.out.println( "Hello World!" );
    }

    private static List list() {
        SessionFactory sf = HibernateUtil.getSessionFactory();
        Session session = sf.openSession();

        List employees = session.createQuery("from Employee").list();
        System.out.println(employees.size());
        session.close();
        return employees;
    }
}
Employee.hbm.xml
<?xml version="1.0" encoding="UTF-8"?>
<!DOCTYPE hibernate-mapping PUBLIC
        "-//Hibernate/Hibernate Mapping DTD 3.0//EN"
        "http://hibernate.sourceforge.net/hibernate-mapping-3.0.dtd">

<hibernate-mapping package="work.hibernate">

    <class name="Employee" table="EMPLOYEE">
        <id name="id" column="ID">
            <generator class="native"/>
        </id>
        <property name="firstname" />
        <property name="lastname" column="lastname"/>
        <property name="birthDate" type="date" column="birth_date"/>
        <property name="cellphone" column="cell_phone"/>
    </class>

</hibernate-mapping>
hibernate.cfg.xml 注意这里的数据库配置文件中的替换值,就是最前面提到的properties文件中的值,在install的时候自动替换。
<?xml version="1.0" encoding="UTF-8"?>
<!DOCTYPE hibernate-configuration PUBLIC
        "-//Hibernate/Hibernate Configuration DTD 3.0//EN"
        "http://hibernate.sourceforge.net/hibernate-configuration-3.0.dtd">
<hibernate-configuration>
    <session-factory name="mysql">
        <property name="hibernate.connection.driver_class">${jdbc.driverClassName}</property>
        <property name="hibernate.connection.url">${jdbc.url}</property>
        <property name="hibernate.connection.username">${jdbc.username}</property>
        <property name="hibernate.connection.password">${jdbc.password}</property>

        <!-- JDBC connection pool (use the built-in) -->
        <property name="connection.pool_size">1</property>

        <!-- SQL dialect -->
        <property name="dialect">org.hibernate.dialect.MySQLDialect</property>

        <!-- Enable Hibernate's automatic session context management -->
        <property name="current_session_context_class">thread</property>

        <!-- Disable the second-level cache  -->
        <property name="cache.provider_class">org.hibernate.cache.NoCacheProvider</property>

        <!-- Echo all executed SQL to stdout -->
        <property name="show_sql">false</property>

        <property name="hbm2ddl.auto">validate</property>
        <mapping resource="Employee.hbm.xml" />
    </session-factory>

</hibernate-configuration>
--------------------------------------------------
让我们继续前行!