一、SpringBoot
1.什么是SpringBoot
SpringBoot是Spring项目中的一个子工程,与我们所熟知的Spring-framework 同属于spring的产品:
我们可以看到下面的一段介绍:
Spring Boot makes it easy to create stand-alone, production-grade Spring based Applications that you can "just run".
We take an opinionated view of the Spring platform and third-party libraries so you can get started with minimum fuss.
Most Spring Boot applications need very little Spring configuration.
翻译一下:
Spring Boot你只需要“run”就可以非常轻易的构建独立的、生产级别的spring应用。
我们为spring平台和第三方依赖库提供了一种固定化的使用方式,使你能非常轻松的开始开发你的应用程序。大部分Spring Boot应用只需要很少的配置。
其实人们把Spring Boot称为搭建程序的脚手架。其最主要作用就是帮我们快速的构建庞大的spring项目,并且尽可能的减少一切xml配置,做到开箱即用,迅速上手,让我们关注于业务而非配置。
我们可以使用SpringBoot创建java应用,并使用java –jar 启动它,就能得到一个生产级别的web工程。
2.为什么要学习SpringBoot
java一直被人诟病的一点就是臃肿、麻烦。当我们还在辛苦的搭建项目时,可能Python程序员已经把功能写好了,究其原因主要是两点:
- 复杂的配置
项目各种配置其实是开发时的损耗, 因为在思考 Spring 特性配置和解决业务问题之间需要进行思维切换,所以写配置挤占了写应用程序逻辑的时间。
- 混乱的依赖管理
项目的依赖管理也是件吃力不讨好的事情。决定项目里要用哪些库就已经够让人头痛的了,你还要知道这些库的哪个版本和其他库不会有冲突,这也是件棘手的问题。并且,依赖管理也是一种损耗,添加依赖不是写应用程序代码。一旦选错了依赖的版本,随之而来的不兼容问题毫无疑问会是生产力杀手。
而SpringBoot让这一切成为过去!
3.SpringBoot的特点
- Spring Boot 主要特征是:
- 创建独立的spring应用程序
- 直接内嵌tomcat、jetty和undertow(不需要打包成war包部署)
- 提供了固定化的“starter”配置,以简化构建配置
- 尽可能的自动配置spring和第三方库
- 提供产品级的功能,如:安全指标、运行状况监测和外部化配置等
- 绝对不会生成代码,并且不需要XML配置
4.启动器
为了让SpringBoot帮我们完成各种自动配置,我们必须引入SpringBoot提供的自动配置依赖,我们称为启动器。spring-boot-starter-parent工程将依赖关系声明为一个或者多个启动器,我们可以根据项目需求引入相应的启动器,因为我们是web项目,这里我们引入web启动器:
<dependencies>
    <dependency>
        <groupId>org.springframework.boot</groupId>
        <artifactId>spring-boot-starter-web</artifactId>
    </dependency>
</dependencies>
5.
Enable auto-configuration of the Spring Application Context, attempting to guess and configure beans that you are likely to need.
Auto-configuration classes are usually applied based on your classpath and what beans you have defined.
简单翻译以下:
开启spring应用程序的自动配置,SpringBoot基于你所添加的依赖和你自己定义的bean,试图去猜测并配置你想要的配置。比如我们引入了spring-boot-starter-web,
而这个启动器中帮我们添加了tomcat、
SpringMVC的依赖。此时自动配置就知道你是要开发一个web应用,所以就帮你完成了web及SpringMVC的默认配置了!
所以,我们使用SpringBoot构建一个项目,只需要引入所需依赖,配置就可以交给SpringBoot处理了。
6.
- 配置组件扫描的指令。提供了类似与<context:component-scan>标签的作用
- 通过basePackageClasses或者basePackages属性来指定要扫描的包。如果没有指定这些属性,那么将从声明这个注解的类所在的包开始,扫描包及子包
- 而我们的@ComponentScan注解声明的类就是main函数所在的启动类,因此扫描的包是该类所在包及其子包。一般启动类会放在一个比较浅的包目录中。
7.
发现@SpringBootApplication其实是一个组合注解,这里重点的注解有3个:
- @SpringBootConfiguration
- @EnableAutoConfiguration:开启自动配置
- @ComponentScan:开启注解扫描
8.
<!-- 配置连接池 -->
<bean id="dataSource" class="com.alibaba.druid.pool.DruidDataSource"
      init-method="init" destroy-method="close">
    <property name="url" value="${jdbc.url}" />
    <property name="username" value="${jdbc.username}" />
    <property name="password" value="${jdbc.password}" />
</bean>
-
Spring1.0时代
在此时因为jdk1.5刚刚出来,注解开发并未盛行,因此一切Spring配置都是xml格式,想象一下所有的bean都用xml配置,细思极恐啊,心疼那个时候的程序员2秒
-
Spring2.0时代
Spring引入了注解开发,但是因为并不完善,因此并未完全替代xml,此时的程序员往往是把xml与注解进行结合,貌似我们之前都是这种方式。
-
Spring3.0及以后
3.0以后Spring的注解已经非常完善了,因此Spring推荐大家使用完全的java配置来代替以前的xml,不过似乎在国内并未推广盛行。然后当SpringBoot来临,人们才慢慢认识到java配置的优雅。
10.
-
@Configuration:声明一个类作为配置类,代替xml文件 -
@Bean:声明在方法上,将方法的返回值加入Bean容器,代替<bean>标签 -
@Value:属性注入 -
@PropertySource:指定外部属性文件。
jdbc.driverClassName=com.mysql.jdbc.Driver
jdbc.url=jdbc:mysql://127.0.0.1:3306/test
jdbc.username=root
jdbc.password=123
@Configuration
@PropertySource("classpath:jdbc.properties")
public class JdbcConfiguration {

    @Value("${jdbc.url}")
    String url;
    @Value("${jdbc.driverClassName}")
    String driverClassName;
    @Value("${jdbc.username}")
    String username;
    @Value("${jdbc.password}")
    String password;

    @Bean
    public DataSource dataSource() {
        DruidDataSource dataSource = new DruidDataSource();
        dataSource.setUrl(url);
        dataSource.setDriverClassName(driverClassName);
        dataSource.setUsername(username);
        dataSource.setPassword(password);
        return dataSource;
    }
}
-
@Configuration:声明JdbcConfiguration是一个配置类。 -
@PropertySource:指定属性文件的路径是:classpath:jdbc.properties -
通过
@Value为属性注入值。 -
通过@Bean将
dataSource()方法声明为一个注册Bean的方法,Spring会自动调用该方法,将方法的返回值加入Spring容器中。相当于以前的bean标签
然后就可以在任意位置通过@Autowired注入DataSource了!
11.
在SpringBoot中,提供了一种新的属性注入方式,支持各种java基本数据类型及复杂类型的注入。
1)配置类
@ConfigurationProperties(prefix = "jdbc")
public class JdbcProperties {
    private String url;
    private String driverClassName;
    private String username;
    private String password;
    // ... 略
    // getters 和 setters
}
-
-
prefix="jdbc"读取属性文件中,前缀为jdbc的值。 -
在类上定义各个属性,名称必须与属性文件中
jdbc.后面部分一致,并且必须具有getter和setter方法 -
需要注意的是,这里我们并没有指定属性文件的地址,SpringBoot默认会读取文件名为application.properties的资源文件,所以我们把jdbc.properties名称改为application.properties
2)在JdbcConfiguration中使用这个属性:
-
通过
@EnableConfigurationProperties(JdbcProperties.class)来声明要使用JdbcProperties这个类的对象 -
然后你可以通过以下方式在JdbcConfiguration类中注入JdbcProperties:
1.@Autowired注入
@Configuration
@EnableConfigurationProperties(JdbcProperties.class)
public class JdbcConfiguration {

    @Autowired
    private JdbcProperties jdbcProperties;

    @Bean
    public DataSource dataSource() {
        DruidDataSource dataSource = new DruidDataSource();
        dataSource.setUrl(jdbcProperties.getUrl());
        dataSource.setDriverClassName(jdbcProperties.getDriverClassName());
        dataSource.setUsername(jdbcProperties.getUsername());
        dataSource.setPassword(jdbcProperties.getPassword());
        return dataSource;
    }

}
2.构造函数注入
@Configuration
@EnableConfigurationProperties(JdbcProperties.class)
public class JdbcConfiguration {

    private JdbcProperties jdbcProperties;

    public JdbcConfiguration(JdbcProperties jdbcProperties){
        this.jdbcProperties = jdbcProperties;
    }

    @Bean
    public DataSource dataSource() {
        // 略
    }

}
3.@Bean方法的参数注入
@Configuration
@EnableConfigurationProperties(JdbcProperties.class)
public class JdbcConfiguration {

    @Bean
    public DataSource dataSource(JdbcProperties jdbcProperties) {
        // ...
    }
}
12.
@Configuration
public class JdbcConfiguration {

    @Bean
    // 声明要注入的属性前缀,SpringBoot会自动把相关属性通过set方法注入到DataSource中
    @ConfigurationProperties(prefix = "jdbc")
    public DataSource dataSource() {
        DruidDataSource dataSource = new DruidDataSource();
        return dataSource;
    }
}
13.静态资源
现在,我们的项目是一个jar工程,那么就没有webapp,我们的静态资源该放哪里呢?
源码中有一个叫做ResourceProperties的类,里面就定义了静态资源的默认查找路径:
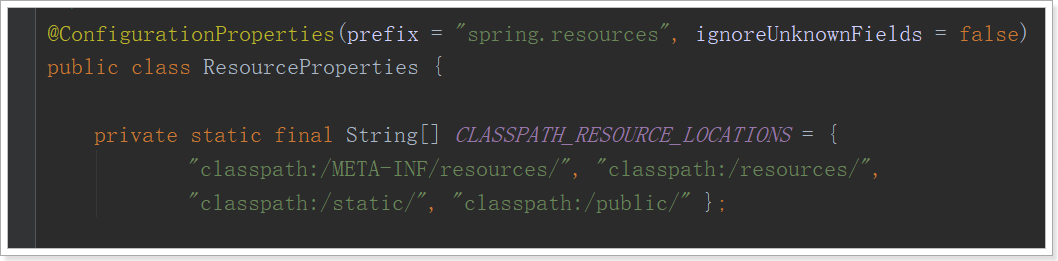
-
classpath:/META-INF/resources/
-
classpath:/resources/
-
classpath:/static/
-
classpath:/public/
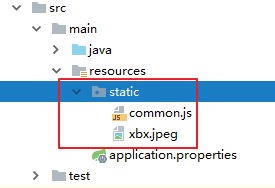
只要静态资源放在这些目录中任何一个,SpringMVC都会帮我们处理。
我们习惯会把静态资源放在classpath:/static/目录下。我们创建目录,并且添加一些静态资源:
14.
拦截器也是我们经常需要使用的,在SpringBoot中该如何配置呢?
拦截器不是一个普通属性,而是一个类,所以就要用到java配置方式了。在SpringBoot官方文档中有这么一段说明:
  If you want to keep Spring Boot MVC features and you want to add additional MVC configuration (interceptors, formatters,
view controllers, and other features), you can add your own @Configuration class of type WebMvcConfigurer but without @EnableWebMvc.
  If you wish to provide custom instances of RequestMappingHandlerMapping, RequestMappingHandlerAdapter, or
ExceptionHandlerExceptionResolver, you can declare a WebMvcRegistrationsAdapter instance to provide such components.

If you want to take complete control of Spring MVC, you can add your own @Configuration annotated with @EnableWebMvc.
翻译:
如果你想要保持Spring Boot 的一些默认MVC特征,同时又想自定义一些MVC配置(包括:拦截器,格式化器, 视图控制器、消息转换器 等等),
你应该让一个类实现WebMvcConfigurer,并且添加@Configuration注解,但是千万不要加@EnableWebMvc注解。如果你想要自定义HandlerMapping、
HandlerAdapter、ExceptionResolver等组件,你可以创建一个WebMvcRegistrationsAdapter实例 来提供以上组件。

如果你想要完全自定义SpringMVC,不保留SpringBoot提供的一切特征,你可以自己定义类并且添加@Configuration注解和@EnableWebMvc注解
实现如下:
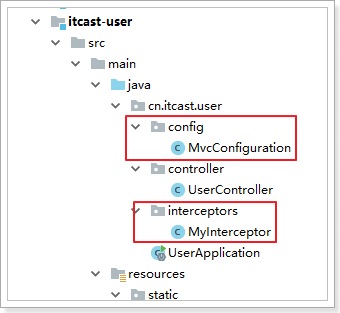
首先我们定义一个拦截器:
@Component
public class MyInterceptor implements HandlerInterceptor {
    @Override
    public boolean preHandle(HttpServletRequest request, HttpServletResponse response, Object handler) throws Exception {
        System.out.println("preHandle method is running!");
        return true;
    }

    @Override
    public void postHandle(HttpServletRequest request, HttpServletResponse response, Object handler, ModelAndView modelAndView) throws Exception {
        System.out.println("postHandle method is running!");
    }

    @Override
    public void afterCompletion(HttpServletRequest request, HttpServletResponse response, Object handler, Exception ex) throws Exception {
        System.out.println("afterCompletion method is running!");
    }
}
然后定义配置类,注册拦截器:
@Configuration
public class MvcConfiguration implements WebMvcConfigurer {

    @Autowired
    private HandlerInterceptor myInterceptor;

    /**
     * 重写接口中的addInterceptors方法,添加自定义拦截器
     * @param registry
     */
    @Override
    public void addInterceptors(InterceptorRegistry registry) {
        registry.addInterceptor(myInterceptor).addPathPatterns("/**");
    }
}