0113
进度条
<ProgressBar>
两种风格
水平进度条
style="?android:attr/progressBarStyleHorizontal"
android:max="200"进度条最大设置为200.不写这条语句默认下是100
或者在代码里面设置
firstBar.setMax(200);
圆圈
style="?android:attr/progressBarStyle"
android:visibility="gone"当前不可见,由程序让它改为可视的状态
------------------------------------------
对进度条的操作响应
public void onClick(View arg0) {
// TODO Auto-generated method stub
if(i==0)
{
firstBar.setVisibility(View.VISIBLE);
secondBar.setVisibility(View.VISIBLE);
}
if(i<firstBar.getMax())
{
firstBar.setProgress(i);
firstBar.setSecondaryProgress(i+10);
secondBar.setVisibility(View.VISIBLE);
}
else
{
firstBar.setVisibility(View.GONE);
secondBar.setVisibility(View.GONE);
}
i=i+10;
}
----------------------------------------------------------
Activity08
 1 package com.example.mars_activity08;
 2
 3
 4 import android.os.Bundle;
 5 import android.app.Activity;
 6 import android.view.Menu;
 7 import android.view.View;
 8 import android.view.View.OnClickListener;
 9 import android.widget.Button;
10 import android.widget.ProgressBar;
11
12 public class ProgressBarTest extends Activity {
13
14     private ProgressBar firstBar;
15     private ProgressBar secondBar;
16     private Button myButton;
17     private int i=0;
18     @Override
19     protected void onCreate(Bundle savedInstanceState) {
20         super.onCreate(savedInstanceState);
21         setContentView(R.layout.main);
22         //根据控件的ID开获取控件的对象
23         firstBar=(ProgressBar)findViewById(R.id.firstBar);
24         secondBar=(ProgressBar)findViewById(R.id.secondBar);
25         myButton=(Button)findViewById(R.id.myButton);
26         myButton.setOnClickListener(new ButtonListener());
27
28
29         }
30     class ButtonListener implements OnClickListener
31     {
32
33         @Override
34         public void onClick(View arg0) {
35             // TODO Auto-generated method stub
36
37             if(i==0)
38             {
39                 firstBar.setVisibility(View.VISIBLE);
40                 secondBar.setVisibility(View.VISIBLE);
41
42             }
43             if(i<firstBar.getMax())
44             {
45                 firstBar.setProgress(i);
46                 firstBar.setSecondaryProgress(i+10);
47                 secondBar.setVisibility(View.VISIBLE);
48
49
50             }
51             else
52             {
53                 firstBar.setVisibility(View.GONE);
54                 secondBar.setVisibility(View.GONE);
55             }
56             i=i+10;
57         }
58     }
59
60
61
62 }
 1 <?xml version="1.0" encoding="utf-8"?>
 2 <LinearLayout xmlns:android="http://schemas.android.com/apk/res/android"
 3     android:layout_width="match_parent"
 4     android:layout_height="match_parent"
 5     android:orientation="vertical" >
 6
 7     <ProgressBar
 8         android:id="@+id/firstBar"
 9         style="?android:attr/progressBarStyleHorizontal"
10         android:layout_width="wrap_content"
11         android:layout_height="wrap_content"
12         android:visibility="gone"
13         />
14     <ProgressBar
15         android:id="@+id/secondBar"
16         style="?android:attr/progressBarStyle"
17         android:layout_width="100dp"
18         android:layout_height="wrap_content"
19         android:visibility="gone"
20         />
21
22
23     <Button
24         android:id="@+id/myButton"
25         android:layout_width="wrap_content"
26         android:layout_height="wrap_content"
27         android:text="begin"
28
29         />
30
31
32 </LinearLayout>
------------------------------------------------------------
ListView 控件的用法
点击可以达到选中整个一横行的效果
这个Activity实现的是ListActivity 是Activity的子类
ArrayList的运用
Activity09.java
 1 package com.example.mars_activity09;
 2
 3 import java.util.ArrayList;
 4 import java.util.HashMap;
 5 import java.lang.Integer;
 6 import android.os.Bundle;
 7 import android.app.Activity;
 8 import android.app.ListActivity;
 9 import android.view.Menu;
10 import android.view.View;
11 import android.widget.ListView;
12 import android.widget.SimpleAdapter;
13
14 public class Activity09 extends ListActivity {
15
16     @Override
17     protected void onCreate(Bundle savedInstanceState) {
18         super.onCreate(savedInstanceState);
19         setContentView(R.layout.main);
20         //创建存储HashMap这样数据结构的ArrayList对象,其中HashMap是存储键值对的
21         ArrayList<HashMap<String,String>> list =new ArrayList<HashMap<String,String>>();
22         //对ArrayLsit中的HashMap创建对象,HashMap是存储键值对的
23         HashMap<String,String> map1=new HashMap<String,String>();
24         HashMap<String,String> map2=new HashMap<String,String>();
25         HashMap<String,String> map3=new HashMap<String,String>();
26         //在HashMap中存储键值对
27         map1.put("user_name"," kangyuxin");//第一个是键 第二个是值
28         map1.put("user_ip", "192.168.1.1");
29         map2.put("user_name", "zhangsan");
30         map2.put("user_ip","222.123.22.1" );
31         map3.put("user_name", "lisi");
32         map3.put("user_ip", "1.123.20.1");
33         //将HashMap放入ArrayList
34         list.add(map1);
35         list.add(map2);
36         list.add(map3);
37         //An easy adapter to map static data to views defined in an XML file.
38         SimpleAdapter listAdapter= new SimpleAdapter(this,
39                 list,R.layout.user,new String[]{"user_name","user_ip"},//如果两个就是两列,与map的键值一致
40                 //存string类型数据 username和userip是一个键
41                 new int[]{R.id.user_name,R.id.user_ip});//用此控件显示//此顺序决定显示顺序
42         //到map中找username所对应的键所对应的值,username的值就是在map中所对应的值
43
44         //注意String和 int数组 是{}
45         //在ListAdapter里面必须调用setListAdpater这个方法,此方法继承ListActivity
46         //ArrayList展现出来需要创建一个适配器
47         //Adapter是连接后端数据和前端显示的适配器接口,是数据和UI(View)之间一个重要的纽带。
48          setListAdapter(listAdapter);
49
50
51
52
53
54
55     }
user.xml
 1 <?xml version="1.0" encoding="utf-8"?>
 2 <LinearLayout xmlns:android="http://schemas.android.com/apk/res/android"
 3     android:layout_width="match_parent"
 4     android:layout_height="match_parent"
 5     android:orientation="horizontal" >
 6        <TextView
 7         android:id="@+id/user_name"
 8         android:layout_width="200dip"
 9         android:layout_height="30dip"
10         android:textSize="10pt"
11         android:singleLine="true"
12
13         />
14
15     <TextView
16         android:id="@+id/user_ip"
17         android:layout_width="wrap_content"
18         android:layout_height="wrap_content"
19         android:gravity="left"
20         android:textSize="10pt"
21         />
22
23
24 </LinearLayout>
main.xml
 1 <?xml version="1.0" encoding="utf-8"?>
 2 <LinearLayout xmlns:android="http://schemas.android.com/apk/res/android"
 3     android:layout_width="fill_parent"
 4     android:layout_height="fill_parent"
 5     android:orientation="vertical" >
 6   <LinearLayout
 7      android:layout_width="fill_parent"
 8     android:layout_height="wrap_content"
 9       >
10     <ListView
11         android:id="@id/android:list"
12         android:layout_width="fill_parent"
13         android:layout_height="wrap_content"
14         android:scrollbars="vertical"
15         />
16
17     </LinearLayout>
18
19 </LinearLayout>
20
21
22
23
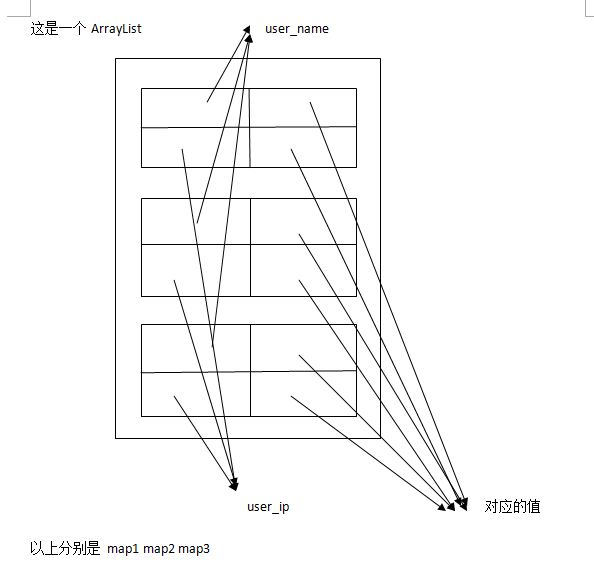
什么是ArrayList ArrayList就是传说中的动态数组,用MSDN中的说法,就是Array的复杂版本,它提供了如下一些好处:
- 动态的增加和减少元素
- 实现了ICollection和IList接口
- 灵活的设置数组的大小
- Add、AddRange、Remove、RemoveAt、RemoveRange、Insert、InsertRange
这几个方法比较类似
Add方法用于添加一个元素到当前列表的末尾
AddRange方法用于添加一批元素到当前列表的末尾
Remove方法用于删除一个元素,通过元素本身的引用来删除
RemoveAt方法用于删除一个元素,通过索引值来删除
RemoveRange用于删除一批元素,通过指定开始的索引和删除的数量来删除
Insert用于添加一个元素到指定位置,列表后面的元素依次往后移动
InsertRange用于从指定位置开始添加一批元素,列表后面的元素依次往后移动

listView是产生点击可以选中一行的效果,但具体那一行怎么显示由user.xml决定,
user.xml是规定每一行怎么显示
将数据存储在ArrayList里面
通过Adapter将数据与UI相互连接
Adapter是连接后端数据和前端显示的适配器接口,是数据和UI(View)之间一个重要的纽带。在常见的View(ListView,GridView)等地方都需要用到Adapter
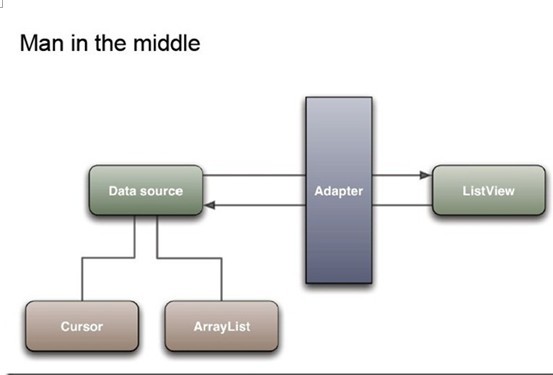
Adapter负责将整理好的ArrayList显示出来