历史上,Linux启动一直采用init进程。下面的命令用来启动服务:
# sudo /etc/init.d/apache2 start

//或者
# service apache2 start
上面的启动方法有两中缺点:
-
启动时间长: init进程是串行启动的,只有前一个进程启动完,才会启动下一个进程
-
启动脚本复杂: init进程只是执行启动脚本,不管其他事情。脚本需要自己处理各种情况,这往往使得脚本变的很长。
1. systemd概述
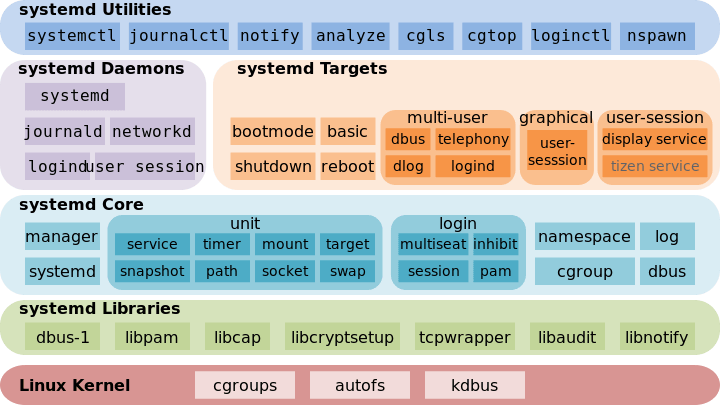
Systemd是Linux系统中最新的初始化系统(init), 它主要的设计目标是克服sysvinit固有的缺点,提高系统的启动速度,为系统的启动和管理提供一套完整的解决方案。 根据Linux惯例,字母d是守护进程(daemon)的缩写。Systemd这个名字的含义,就是它要守护整个系统。
使用了Systemd,就不需要再用init了。Systemd取代了initd,成为系统的第一个进程(pid等于1),其他进程都是它的子进程。我们可以通过如下的命令来查看Systemd的版本:
# systemctl --version
systemd 219
+PAM +AUDIT +SELINUX +IMA -APPARMOR +SMACK +SYSVINIT +UTMP +LIBCRYPTSETUP +GCRYPT +GNUTLS +ACL +XZ -LZ4 -SECCOMP +BLKID +ELFUTILS +KMOD +IDN
Systemd的优点是功能强大,使用方便,缺点是体系庞大,非常复杂。事实上,现在还有很多人反对使用systemd,理由就是它过于复杂,与操作系统的其他部分强耦合,违反keep simple,keep stupid的(unix哲学)[http://www.ruanyifeng.com/blog/2009/06/unix_philosophy.html]。
2. 系统管理
Systemd并不是一个命令,而是一组命令,涉及到系统管理的方方面面。
2.1 systemctl
systemctl是Systemd的主命令,用于管理系统。从功能上来说,systemctl是将service及chkconfig这两个命令组合到一起:
| 任务 | 旧指令 | 新指令 |
|---|---|---|
| 使某任务自动启动 | chkconfig --level 3 httpd on |
systemctl enable httpd.service |
| 使某服务不自动启动 | chkconfig --level 3 httpd off |
systemctl disable httpd.service |
| 检查服务状态 | service httpd status | systemctl status httpd.service(服务详细信息) systemctl is-active httpd.service(仅显示是否Active) |
| 显示所有已启动服务 | chkconfig --list |
systemctl list-units --type=service |
| 启动某服务 | service httpd start | systemctl start httpd.service |
| 停止某服务 | service httpd stop | systemctl stop httpd.service |
| 重启某服务 | service httpd restart | systemctl restart httpd.service |
下面我们列出一些常用的systemctl系统管理命令:
// 重启系统
# sudo systemctl reboot

//关闭系统,切断电源
# sudo systemctl poweroff

//cpu停止工作
# sudo systemctl halt

//暂停系统
# sudo systemctl suspend

//让系统进入冬眠状态
# sudo systemctl hibernate

//让系统进入交互式休眠状态
# sudo systemctl hybrid-sleep

//启动进入救援状态(单用户状态)
# sudo systemctl rescue
2.2 systemd-analyze
systemd-analyze命令用于查看系统启动耗时:
//查看系统启动耗时
# systemd-analyze

//查看每个服务的启动耗时
# systemd-analyze blame

//显示瀑布状的启动过程流
# systemd-analyze critical-chain

//显示指定服务的启动流
# systemd-analyze critical-chain atd.service
2.3 hostnamectl
hostnamectl命令用于查看当前主机的信息:
//显示当前主机的信息
# hostnamectl

//设置主机名
# sudo hostnamectl set-hostname rhel7
2.4 localectl
localectl命令用于查看本地化设置:
//查看本地化设置
# localectl

//设置本地化参数
# sudo localectl set-locale LANG=en_GB.utf8
# sudo localectl set-keymap en_GB
2.4 timedatectl
timedatectl命令用于查看当前时区设置:
//查看当前时区设置
# timedatectl

//显示所有可用时区
# timedatectl list-timezones

//设置当前时区
# sudo timedatectl set-timezone America/New_York
# sudo timedatectl set-date YYYY-MM-DD
# sudo timedatectl set-time HH:MM:SS
2.5 loginctl
loginctl命令用于查看当前登录的用户:
//列出当前session
# loginctl list-sessions

//列出当前登录用户
# loginctl list-users

//显示指定用户的信息
# loginctl show-user ruanyf
3. Unit
3.1 含义
Systemd可以管理所有系统资源。不同的资源统称为Unit。Unit一共分为12种:
-
Service unit: 系统服务
-
Target unit: 多个unit构成一个组
-
Device unit: 硬件设备
-
Mount unit: 文件系统的挂载点
-
Automount unit: 自动挂载点
-
Path unit: 文件或路径
-
Scope unit: 不是由Systemd启动的外部进程
-
Slice unit: 进程组
-
Snapshot unit: Systemd快照,可以切回某个快照
-
Socket unit: 进程间通信的socket
-
Swap unit: swap文件
-
Timer unit: 定时器
systemctl list-units命令可以查看当前系统的所有unit:
//列出正在运行的unit
# systemctl list-units

//列出所有unit,包括没有找到配置文件的或者启动失败的
# systemctl list-units --all

//列出所有没有运行的unit
# systemctl list-units --all --state=inactive

//列出所有加载失败的unit
# systemctl list-units --failed

//列出所有正在运行的类型为service 的unit
# systemctl list-units --type=service
3.2 Unit状态
systemctl status命令用于查看系统状态和单个Unit的状态:
//显示系统状态
# systemctl status

//显示单个unit的状态
# systemctl status bluetooth.service

//显示远程主机的某个unit的状态
# systemctl status -H root@rhel7.example.com status httpd.service
此外,除了status命令,systemctl还提供了三个查询状态的简单方法,主要供脚本内部的判断语句使用。
//显示某个unit服务是否正在运行
# systemctl is-active application.service

//显示某个unit服务是否处于启动失败状态
# systemctl is-failed application.service

//显示某个unit服务是否建立了启动链接
# systemctl is-enabled application.service
3.3 Unit管理
对于用户来说,最常用的是下面这些命令,用于启动和停止Unit(主要是Service):
//立即启动一个服务
# sudo systemctl start apache.service

//立即停止一个服务
# sudo systemctl stop apache.service

//重启一个服务
# sudo systemctl restart apache.service

//杀死一个服务的所有子进程
# suso systemctl kill apache.service

//重新加载一个服务的配置文件
# suso systemctl reload apache.service

//重载所有修改过的配置文件
# sudo systemctl daemon-reload

//显示某个unit的所有底层参数
# systemctl show httpd.service

//显示某个unit的指定属性的值
# systemctl show -p CPUShares httpd.service

//设置某个unit的指定属性
# systemctl set-property httpd.service CPUShares=500
3.4 依赖关系
Unit之间存在依赖关系: A依赖与B,就意味着Systemd在启动A的时候,同时会去启动B。
systemctl list-dependencies命令列出一个unit的所有依赖:
# systemctl list-dependencies nginx.service
上面命令的输出结果之中,有些依赖是Target类型,默认并不会展开显示。如果要展开Target,就需要使用--all选项:
# systemctl list-dependencies --all nginx.service
4. Unit配置文件
4.1 概述
每一个Unit都有一个配置文件,告诉Systemd怎么启动这个Unit。Systemd默认从/etc/systemd/system/目录读取配置文件。但是,里面存放的大部分文件都是符号链接,指向目录/usr/lib/systemd/system/目录下的文件,因此真正的文件存放在那个目录下。
systemctl enable命令用于在上面两个目录之间建立符号链接关系:
# sudo systemctl enable clamd@scan.service

//等价于
# sudo ln -s /usr/lib/systemd/system/clamd@scan.service /etc/systemd/system/clamd@scan.service
如果配置文件里面设置了开机启动,systemctl enable就相当于激活开机启动。与之对应的,systemctl disable命令用于在两个目录之间撤销符号链接关系,相当于撤销开机启动:
# sudo systemctl disable clamd@scan.service
配置文件名称的后缀,就是该Unit的种类,比如sshd.socket。如果省略,Systemd默认后缀名为.service。所以sshd会被理解成sshd.service。
4.2 配置文件的状态
systemctl list-unit-files命令用于列出所有配置文件:
//列出所有配置文件
# systemctl list-unit-files
UNIT FILE                                   STATE
proc-sys-fs-binfmt_misc.automount           static
dev-hugepages.mount                         static
dev-mqueue.mount                            static
proc-fs-nfsd.mount                          static
proc-sys-fs-binfmt_misc.mount               static
sys-fs-fuse-connections.mount               static
sys-kernel-config.mount                     static
sys-kernel-debug.mount                      static
tmp.mount                                   disabled
var-lib-nfs-rpc_pipefs.mount                static
brandbot.path                               disabled
cups.path                                   enabled

//列出指定类型的配置文件
# systemctl list-unit-files --type=service
配置文件的状态有4种:
enabled:  已建立启动链接
disabled: 没建立启动链接
static: 该配置文件没有[Install]部分(无法执行),只能作为其他配置文件的依赖
masked: 该配置文件被禁止建立启动链接
注意,从配置文件的状态无法看出,该Unit是否正在运行。这必须执行前面提到的systemctl status命令。
# systemctl status bluetooth.service
一旦修改配置文件,就要让Systemd重新加载配置文件,然后重新启动,否则修改不会生效。
# sudo systemctl daemon reload
# sudo systemctl restart httpd.service
4.3 配置文件的格式
配置文件就是普通的文本文件,可以用文本编辑器打开。systemctl cat命令可以查看配置文件的内容:
[root@bogon ~]# systemctl cat mysqld
# /usr/lib/systemd/system/mysqld.service
# Copyright (c) 2015, 2016, Oracle and/or its affiliates. All rights reserved.
#
# This program is free software; you can redistribute it and/or modify
# it under the terms of the GNU General Public License as published by
# the Free Software Foundation; version 2 of the License.
#
# This program is distributed in the hope that it will be useful,
# but WITHOUT ANY WARRANTY; without even the implied warranty of
# MERCHANTABILITY or FITNESS FOR A PARTICULAR PURPOSE.  See the
# GNU General Public License for more details.
#
# You should have received a copy of the GNU General Public License
# along with this program; if not, write to the Free Software
# Foundation, Inc., 51 Franklin St, Fifth Floor, Boston, MA  02110-1301 USA
#
# systemd service file for MySQL forking server
#

[Unit]
Description=MySQL Server
Documentation=man:mysqld(8)
Documentation=http://dev.mysql.com/doc/refman/en/using-systemd.html
After=network.target
After=syslog.target

[Install]
WantedBy=multi-user.target

[Service]
User=mysql
Group=mysql

Type=forking

PIDFile=/var/run/mysqld/mysqld.pid

# Disable service start and stop timeout logic of systemd for mysqld service.
TimeoutSec=0

# Execute pre and post scripts as root
PermissionsStartOnly=true

# Needed to create system tables
ExecStartPre=/usr/bin/mysqld_pre_systemd

# Start main service
ExecStart=/usr/sbin/mysqld --daemonize --pid-file=/var/run/mysqld/mysqld.pid $MYSQLD_OPTS

# Use this to switch malloc implementation
EnvironmentFile=-/etc/sysconfig/mysql

# Sets open_files_limit
LimitNOFILE = 5000

Restart=on-failure

RestartPreventExitStatus=1

PrivateTmp=false从上面的输出可以看到,配置文件分成几个区块。每个区块的第一行,使用方括号表示的区的名称,比如[Unit]。注意,配置文件的区块名和字段名都是大小写敏感的。
每个区块内部是一些符号连接的键值对:
[Section]
Directive1=value
Directive2=value
...
注意: 键值对的等号两侧不能有空格。
4.4 配置文件的区块
1) Unit区块
[Unit]区块通常是配置文件的第一个区块,用来定义Unit的元数据,以及配置与其他Unit的关系。它的主要字段如下:
Description: 简短描述

Documentation: 文档地址

Requires: 当前Unit依赖的其他Unit,如果它们没有运行,当前Unit会启动失败

Wants: 与当前Unit配合的其他Unit,如果它们没有运行, 当前Unit不会启动失败

BindsTo: 与Requires类似,它指定的Unit如果退出,会导致当前Unit停止运行

Before: 如果该字段指定的Unit也要启动,那么必须在当前Unit之后启动

After: 如果该字段指定的Unit也要启动,那么必须在当前Unit之前启动

Conflicts: 这里指定的Unit不能与当前Unit同时运行

Condition...: 当前Unit运行必须满足的条件,否则不会运行

Assert...: 当前Unit运行必须满足的条件,否则会报启动失败
2) Install区块
[Install]区块用来定义如何启动,以及是否开机启动。它的主要字段如下:
WantedBy: 它的值是一个或多个Target,当前Unit激活时(enable)符号链接会放入/etc/systemd/system目录下面以
          Target名 + .wants后缀构成的子目录中

RequiredBy: 它的值是一个或多个Target,当前Unit激活时(enable)符号链接会放入/etc/systemd/system目录下面以
          Target名 + .required后缀构成的子目录中

Alias: 当前Unit可用于启动的别名

Also: 当前Unit激活时(enable),会被同时激活的其他Unit
3) Service区块
[Service]区块用来Service的配置,只有service类型的unit才有本区块。它的主要字段如下:
Type: 定义启动时的进程行为。它有以下几种值:
      1) Type=simple  默认值,执行ExecStart指定的命令,启动主进程
      2) Type=forking  以fork方式从父进程创建子进程,创建后父进程会立即退出
      3) Type=oneshot 一次性进程,Systemd会等待当前服务退出,再继续往下执行
      4) Type=dbus  当前服务通过DBus启动
      5) Type=notify  当前服务启动完毕,会通知Systemd,再继续往下执行
      6) Type=idle 若有其他任务执行完毕,当前服务才会运行

ExecStart: 启动当前服务的命令

ExecStartPre: 启动当前服务之前执行的命令

ExecStartPost: 启动当前服务之后执行的命令

ExecReload: 重启当前服务执行时的命令

ExecStop: 停止当前服务时执行的命令

ExecStopPost: 停止当前服务之后执行的命令

RestartSec: 自动重启当前服务间隔的秒数

Restart: 定义何种情况下会自动重启当前服务,可能的值包括always(总是重启)、on-success、on-failure、on-abnormal、on-abort、on-watchdog

TimeoutSec: 定义Systemd停止当前服务之前等待的秒数

Environment: 指定环境变量
Unit配置文件的完整清单,请参看官方文档
5. Target
启动计算机的时候,需要启动大量的Unit。如果每一次启动,都要一一写明本次启动需要哪些Unit,显然非常不方便。Systemd的解决方案就是Target。简单说,Target就是一个Unit组,包含许多相关Unit。启动某个Target的时候,Systemd就会启动里面所有的Unit。从这个意义上说,Target这个概念类似于状态点,启动某个Target就好比启动到某种状态。
传统init启动模式里面,有RunLevel的概念,跟Target的作用很类似。不同的是,RunLevel是互斥的,不可能多个RunLevel同时启动,但是多个Target可以同时启动。
//查看当前系统的所有Target
# systemctl list-unit-files --type=target

//查看一个target所包含的所有Unit
# systemctl list-dependencies multi-user.target

//查看启动时的默认target
# systemctl get-default

//设置启动时的默认target
# systemctl set-default multi-user.target

//切换target时,默认不关闭前一个Target启动的进程。systemctl isolate命令改变这种行为,
//关闭前一个Target里面所有不属于后一个Target的进程
# sudo systemctl isolate multi-user.target
Target与传统RunLevel的对应关系如下:
Traditional runlevel      New target name     Symbolically linked to...

Runlevel 0           |    runlevel0.target -> poweroff.target
Runlevel 1           |    runlevel1.target -> rescue.target
Runlevel 2           |    runlevel2.target -> multi-user.target
Runlevel 3           |    runlevel3.target -> multi-user.target
Runlevel 4           |    runlevel4.target -> multi-user.target
Runlevel 5           |    runlevel5.target -> graphical.target
Runlevel 6 | runlevel6.target -> reboot.target它与init进程的主要差别如下:
-
默认的RunLevel(在/etc/inittab文件设置)现在被默认的Target取代,位置是/etc/systemd/system/default.target,通常符号链接到
graphical.target(图形界面)或者multi-user.target(多用户命令行) -
启动脚本的位置: 以前是
/etc/init.d目录,符号链接到不同的RunLevel目录(比如/etc/rc3.d、/etc/rc5.d等),现在则存放在/lib/systemd/system和/etc/systemd/system目录。 -
配置文件的位置: 以前init进程的配置文件是/etc/inittab,各种服务的配置文件存放在
/etc/sysconfig目录。现在的配置文件主要存放在/lib/systemd目录,在/etc/systemd目录里面的修改可以覆盖原始设置。
6. 日志管理
Systemd统一管理所有Unit的启动日志。带来的好处就是,可以只用journalctl一个命令,查看所有日志(内核日志和应用日志)。日志的配置文件是/etc/systemd/journald.conf。
journalctl功能强大,用法非常多:
//查看所有日志(默认情况下,只保存本次启动的日志)
# sudo journalctl

//查看内核日志(不显示应用日志)
# sudo journalctl -k

//查看系统本次启动日志
# sudo journalctl -b
# sudo journalctl -b -0

//查看上一次启动的日志(需要更改设置)
# sudo journalctl -b -1

//查看指定时间的日志
# sudo journalctl --since="2012-10-30 18:17:16"
# sudo journalctl --since "20 min ago"
# sudo journalctl --since yesterday
# sudo journalctl --since "2015-01-01" --until "2015-01-11 03:00"
# sudo journalctl --since 09:00 --until "1 hour ago"

//显示尾部的最新10行日志
# sudo journalctl -n

//显示尾部指定行数的日志
# sudo journalctl -n 20


//实时滚动显示最新日志
# sudo journalctl -f

//查看指定服务的日志
# sudo journalctl /usr/lib/systemd/systemd

//查看指定进程的日志
# sudo journalctl _PID=1

//查看某个路径的脚本的日志
# sudo journalctl /usr/bin/bash

//查看指定用户的日志
# sudo journalctl _UID=33 --since today


//查看某个Unit的日志
# sudo journalctl -u nginx.service
# sudo journalctl -u nginx.service --since today


//实时滚动显示某个Unit的最新日志信息
# sudo journalctl -u nginx.service -f


//合并显示多个unit的日志
# sudo journalctl -u nginx.service -u php-fpm.service --since today


//查看指定优先级(及其以上级别)的日志,共有8级
// 0: emerg
// 1: alert
// 2: crit
// 3: err
// 4: warning
// 5: notice
// 6: info
// 7: debug
# sudo journalctl -p err -b


//日志默认分页输出, --no-pager 改为正常标准输出
# sudo journalctl --no-pager

//以Json格式(当行)输出
# sudo journalctl -b -u nginx.service -o json


//以Json格式(多行)输出,可读性更好
# sudo journalctl -b -u nginx.service -o json-pretty


//显示日志占据的硬盘空间
# sudo journalctl --disk-usage

// 指定日志文件占据的最大空间
# sudo journalctl --vacuum-size=1G


//指定日志文件保存多久
# sudo journalctl --vacuum-time=1years
注: 默认情况下,Systemd将日志保存在/run/log/journal中,系统重启就会清除。通过新建/var/log/journal目录,日志会自动记录到这个目录中,并永久存储。
7. 设置开机启动示例
编写如下脚本start@.service:
[Unit]
Description=oss application server
After=network-online.target

[Service]
Type=forking
User=apps
ExecStart=/usr/bin/python /workspace/service.py %i start
ExecStop=/usr/bin/python /workspace/service.py %i stop
Restart=on-failure
#StartLimitInterval=5s
#StartLimitBurst=5

[Install]
WantedBy=multi-user.target将上述脚本复制到/etc/systemd/system目录下,然后通过如下方式将某个程序(例如mytest)设置为开机启动:
# systemctl enable start@mytest.service
# systemctl is-enabled start@mytest

参考:
https://ivanzz1001.github.io/records/post/linuxops/2018/03/09/linux-systemctl#32-unit%E7%8A%B6%E6%80%81
https://wiki.archlinux.org/title/Systemd_(%E7%AE%80%E4%BD%93%E4%B8%AD%E6%96%87)