zoukankan      html  css  js  c++  java
  • 在Android中实现阴影效果

    在Android L推出后,Google提出了全新的设计语言:材质设计。其中很重要的一点就是阴影效果的使用,你可以为每一个View设置一个elevation值,相当于除了x、y之外的z值,z值决定了阴影的大小,z值越大表示阴影越大。z值包含两个成分:elevationtranslation。elevation是一个静态的成分,translation使用了动画:Z = elevation + translationZ

    在layout中设置elevation,使用android:elevation属性。在代码中设置,使用View.setElevation()方法。设置一个View的translation,使用View.setTranslationZ()方法。ViewPropertyAnimator.z()ViewPropertyAnimator.translationZ()能使你更轻易的推动Views的elevation

    因此,想要在5.0(API 21)以及以后想要设置阴影非常简单我们只需要设置elevation属性就可以了。比如我们想让一张图片显示阴影:

    1
    2
    3
    4
    5
    6
    7
    <ImageView
    android:layout_width="100dp"
    android:layout_height="100dp"
    android:layout_marginTop="10dp"
    android:background="#fff"
    android:elevation="10dp"
    android:src="@drawable/ic_launcher" />

    需要注意的一点是:必须要设置background并且不能设置是透明背景,这样在真机上才能显示出来,没有设置的话预览能显示,但是真机并没有效果,在ViewGroup中也是一样。

    那我们想在5.0之前也实现阴影效果怎么办呢?有两个办法:第一种是自定义layer-list,第二种办法是使用nine-patch图片。

    先来看看nine-patch方案:大概原理就是使用一张边界是阴影效果的.9图片,然后设置为背景,可以让美工帮忙切一张,也可以使用系统自带的,有个叫android:background="@android:drawable/dialog_holo_light_frame”,设置后的效果就是带阴影的效果。

    再来看看layer-list方案,如果我们需要一张矩形的阴影效果,则大概应该这么定义:

    1
    2
    3
    4
    5
    6
    7
    8
    9
    10
    11
    12
    13
    14
    15
    16
    17
    18
    19
    20
    21
    22
    23
    24
    25
    26
    27
    28
    29
    30
    31
    32
    33
    34
    35
    36
    37
    38
    39
    40
    41
    42
    43
    44
    45
    46
    47
    48
    49
    50
    51
    52
    53
    54
    55
    56
    57
    58
    59
    60
    61
    <?xmlversion="1.0"encoding="utf-8"?>
    <layer-list xmlns:android="http://schemas.android.com/apk/res/android">
    <!-- Drop Shadow Stack -->
    <item>
    <shape>
    <padding
    android:bottom="2dp"
    android:left="2dp"
    android:right="2dp"
    android:top="2dp" />
    <solid android:color="#10CCCCCC" />
    </shape>
    </item>
    <item>
    <shape>
    <padding
    android:bottom="2dp"
    android:left="2dp"
    android:right="2dp"
    android:top="2dp" />
    <solid android:color="#20CCCCCC" />
    </shape>
    </item>
    <item>
    <shape>
    <padding
    android:bottom="2dp"
    android:left="2dp"
    android:right="2dp"
    android:top="2dp" />
    <solid android:color="#40CCCCCC" />
    </shape>
    </item>
    <item>
    <shape>
    <padding
    android:bottom="2dp"
    android:left="2dp"
    android:right="2dp"
    android:top="2dp" />
    <solid android:color="#50CCCCCC" />
    </shape>
    </item>
    <item>
    <shape>
    <padding
    android:bottom="2dp"
    android:left="2dp"
    android:right="2dp"
    android:top="2dp" />
    <solid android:color="#60CCCCCC" />
    </shape>
    </item>
    <!-- Background -->
    <item>
    <shape>
    <solid android:color="#FFFFFF" />
    <corners android:radius="3dp" />
    </shape>
    </item></layer-list>

    原理就是沿着边界一层一层的绘制,颜色由深到浅。

    同样,如果需要实现像FAB(Floating ActionBar)一样的阴影效果,也能这么定义,把矩形换做圆形即可:

    1
    2
    3
    4
    5
    6
    7
    8
    9
    10
    11
    12
    13
    14
    15
    16
    17
    18
    19
    20
    21
    22
    23
    24
    25
    26
    27
    28
    29
    30
    31
    32
    33
    34
    35
    36
    37
    38
    39
    40
    41
    42
    43
    44
    45
    46
    47
    48
    49
    50
    51
    52
    53
    54
    55
    56
    57
    58
    59
    60
    61
    62
    63
    64
    65
    66
    67
    68
    69
    70
    71
    72
    73
    74
    75
    76
    77
    78
    79
    80
    81
    82
    83
    84
    85
    86
    87
    88
    89
    90
    91
    92
    93
    94
    95
    96
    97
    98
    99
    100
    101
    102
    103
    104
    105
    106
    107
    108
    109
    110
    111
    112
    113
    114
    115
    116
    117
    118
    119
    120
    121
    122
    123
    124
    125
    126
    127
    128
    129
    130
    131
    132
    133
    134
    135
    136
    137
    138
    139
    140
    141
    142
    143
    144
    145
    146
    147
    148
    149
    150
    151
    152
    153
    154
    155
    156
    157
    158
    159
    160
    161
    162
    163
    164
    165
    166
    167
    168
    169
    170
    171
    172
    173
    174
    175
    176
    177
    178
    179
    180
    181
    182
    183
    184
    185
    186
    187
    188
    189
    190
    191
    192193194195196197198199200201202203204205206207208209210211212213214215216217218219220221222223224225226227228229230231
    <?xmlversion="1.0"encoding="utf-8"?>
    <selectorxmlns:android="http://schemas.android.com/apk/res/android">
    <itemandroid:state_pressed="true">
    <layer-list>
    <!-- Shadow -->
    <itemandroid:top="1dp"android:right="1dp">
    <layer-list>
    <item>
    <shape android:shape="oval">
    <solid android:color="#08000000"/>
    <padding
    android:bottom="3px"
    android:left="3px"
    android:right="3px"
    android:top="3px"
    />
    </shape>
    </item>
    <item>
    <shape android:shape="oval">
    <solid android:color="#09000000"/>
    <padding
    android:bottom="2px"
    android:left="2px"
    android:right="2px"
    android:top="2px"
    />
    </shape>
    </item>
    <item>
    <shape android:shape="oval">
    <solid android:color="#10000000"/>
    <padding
    android:bottom="2px"
    android:left="2px"
    android:right="2px"
    android:top="2px"
    />
    </shape>
    </item>
    <item>
    <shape android:shape="oval">
    <solid android:color="#11000000"/>
    <padding
    android:bottom="1px"
    android:left="1px"
    android:right="1px"
    android:top="1px"
    />
    </shape>
    </item>
    <item>
    <shape android:shape="oval">
    <solid android:color="#12000000"/>
    <padding
    android:bottom="1px"
    android:left="1px"
    android:right="1px"
    android:top="1px"
    /> </shape> </item> <item> <shape android:shape="oval"> <solid android:color="#13000000"/> <padding android:bottom="1px" android:left="1px" android:right="1px" android:top="1px" /> </shape> </item> <item> <shape android:shape="oval"> <solid android:color="#14000000"/> <padding android:bottom="1px" android:left="1px" android:right="1px" android:top="1px" /> </shape> </item> <item> <shape android:shape="oval"> <solid android:color="#15000000"/> <padding android:bottom="1px" android:left="1px" android:right="1px" android:top="1px" /> </shape> </item> <item> <shape android:shape="oval"> <solid android:color="#16000000"/> <padding android:bottom="1px" android:left="1px" android:right="1px" android:top="1px" /> </shape> </item> </layer-list> </item> <!-- Blue button pressed --> <item> <shape android:shape="oval"> <solid android:color="#90CAF9"/> </shape> </item> </layer-list> </item> <item android:state_enabled="true"> <layer-list> <!-- Shadow --> <item android:top="2dp"android:right="1dp"> <layer-list> <item> <shape android:shape="oval"> <solid android:color="#08000000"/> <padding android:bottom="4px" android:left="4px" android:right="4px" android:top="4px" /> </shape> </item> <item> <shape android:shape="oval"> <solid android:color="#09000000"/> <padding android:bottom="2px" android:left="2px" android:right="2px" android:top="2px" /> </shape> </item> <item> <shape android:shape="oval"> <solid android:color="#10000000"/> <padding android:bottom="2px" android:left="2px" android:right="2px" android:top="2px" /> </shape> </item> <item> <shape android:shape="oval"> <solid android:color="#11000000"/> <padding android:bottom="1px" android:left="1px" android:right="1px" android:top="1px" /> </shape> </item> <item> <shape android:shape="oval"> <solid android:color="#12000000"/> <padding android:bottom="1px" android:left="1px" android:right="1px" android:top="1px" /> </shape> </item> <item> <shape android:shape="oval"> <solid android:color="#13000000"/> <padding android:bottom="1px" android:left="1px" android:right="1px" android:top="1px" /> </shape> </item> <item> <shape android:shape="oval"> <solid android:color="#14000000"/> <padding android:bottom="1px" android:left="1px" android:right="1px" android:top="1px" /> </shape> </item> <item> <shape android:shape="oval"> <solid android:color="#15000000"/> <padding android:bottom="1px" android:left="1px" android:right="1px" android:top="1px" /> </shape> </item> <item> <shape android:shape="oval"> <solid android:color="#16000000"/> <padding android:bottom="1px" android:left="1px" android:right="1px" android:top="1px" /> </shape> </item> </layer-list> </item> <!-- Blue button --> <item> <shape android:shape="oval"> <solid android:color="#03A9F4"/> </shape> </item> </layer-list> </item></selector>

    这样就能实现通用平台的阴影效果了,还有一点不要被迷惑了,support-v4里面有个ViewCompat.setElevation(iv, 2.0f);方法,试验证明是没用的。

    更多的学习大家可以参考API DEMO的ShadowCardDragShadowCardStack两个Demo。

    最后来看看实现的效果图:

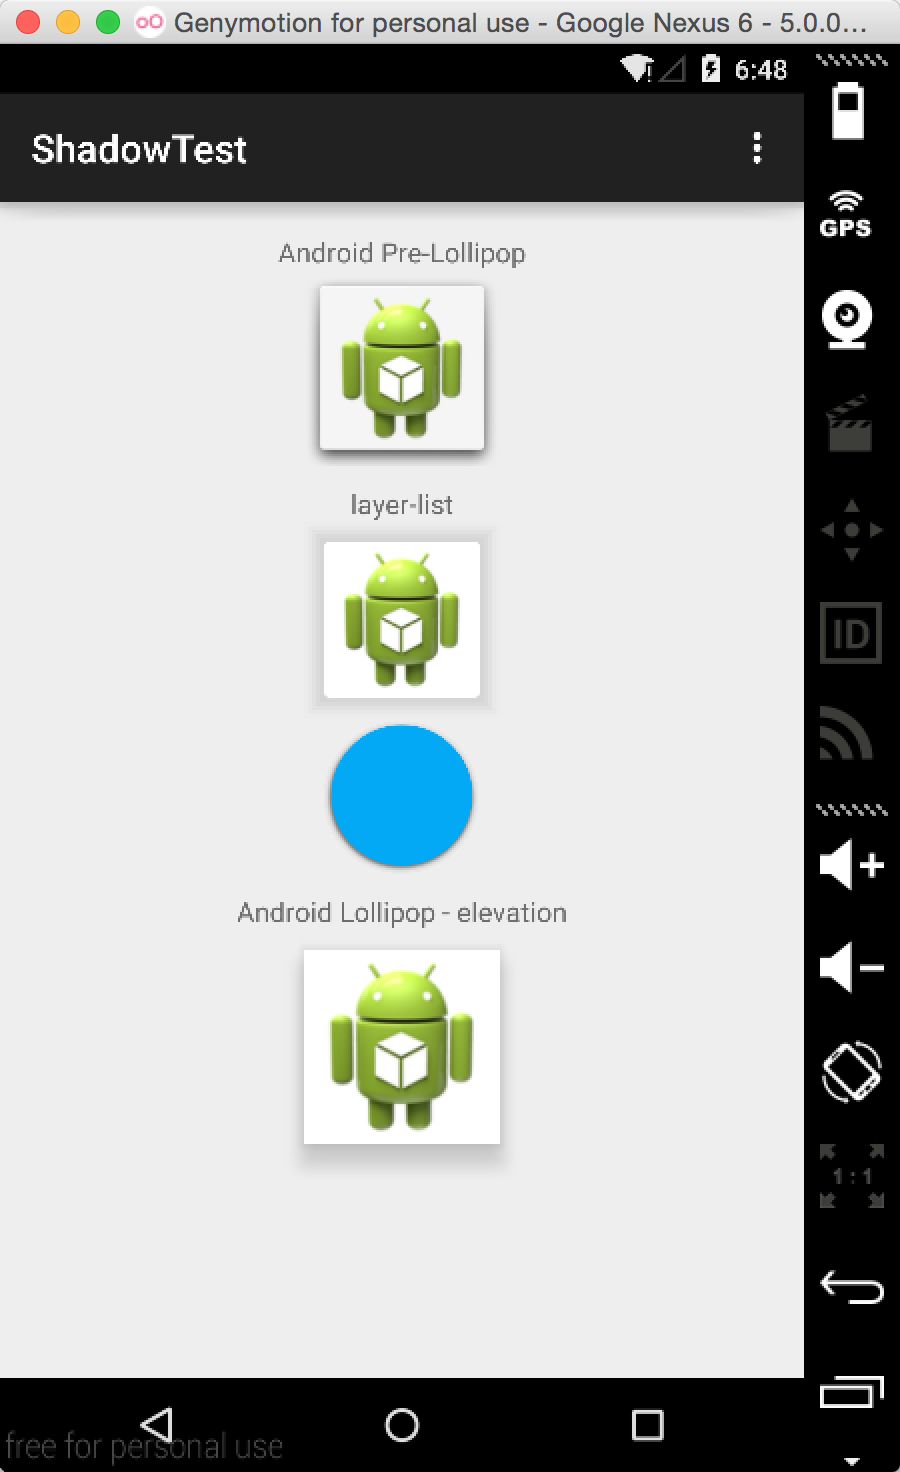
    第一个是使用的.9背景图片,也就是之前提到的属性,第二个和第三个是使用的layer-list,最后一个是使用的elevation属性。

  • 相关阅读:
    接口测试-自动化-Java实现-HttpUtil
    接口测试-自动化-Java实现-CommonClass
    接口测试-自动化-Java实现-InterfaceTest
    接口测试-自动化-Java实现-HtmlFile
    接口测试-自动化-Java实现-TestMain
    接口测试-自动化-Java-思路整理后
    接口测试-自动化-Java-思路
    接口测试-自动化-Java-写在前面的话
    HDU 2546 饭卡 (01背包)
    codeforces 615B. Longtail Hedgehog
  • 原文地址:https://www.cnblogs.com/ldq2016/p/6912278.html
Copyright © 2011-2022 走看看