接到的项目是:spring的项目做spring整合rabbitMQ的作生产者,而测试使用springboot整合RmQ做消费者,交换机模式---Topic,这里还涉及到队列和消息的持久化,这里稍作总结!
1:设置了队列和消息的持久化之后,当broker服务重启的之后,消息依旧存在
spring整合rabbitMQ的作生产者:
pom.xml:
<!-- 添加springboot对amqp的支持 -->
        <dependency>
            <groupId>org.springframework.amqp</groupId>
            <artifactId>spring-rabbit</artifactId>
            <version>1.3.5.RELEASE</version>
        </dependency>
         <!--无此类会报错,具体原因不详-->
        <dependency>
            <groupId>org.springframework</groupId>
            <artifactId>spring-aspects</artifactId>
            <version>3.2.8.RELEASE</version>
        </dependency>
rabbitMq.xml
<?xml version="1.0" encoding="UTF-8"?>
<beans xmlns="http://www.springframework.org/schema/beans"
       xmlns:xsi="http://www.w3.org/2001/XMLSchema-instance" xmlns:rabbit="http://www.springframework.org/schema/rabbit"
       xsi:schemaLocation="http://www.springframework.org/schema/beans
     http://www.springframework.org/schema/beans/spring-beans-3.0.xsd
     http://www.springframework.org/schema/rabbit
     http://www.springframework.org/schema/rabbit/spring-rabbit-1.2.xsd">

    <!-- RabbitMQ公共配置部分 start -->

    <!--配置connection-factory,指定连接rabbit server参数 -->
    <rabbit:connection-factory id="connectionFactory"
                               virtual-host="/" username="guest" password="guest" host="172.24.245.90"
                               port="5672" />

    <!--通过指定下面的admin信息,当前producer中的exchange和queue会在rabbitmq服务器上自动生成 -->
    <rabbit:admin id="connectAdmin" connection-factory="connectionFactory" />

    <!-- RabbitMQ公共配置部分 end -->


    <!-- ~~~~~~~~~~~~~~~~~~~~~华丽的分割线~~~~~~~~~~~~~~~~~~~~~~~~~~ -->

    <!-- 定义 topic方式的exchange、队列、消息收发 start -->

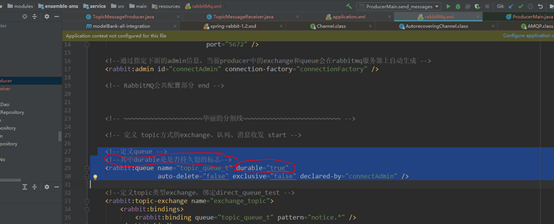
    <!--定义queue -->
    <!--其中durable是是否持久划的标志,默认是true-->
    <rabbit:queue name="topic_queue_t" durable="true"
                  auto-delete="false" exclusive="false" declared-by="connectAdmin" />

    <!--定义topic类型exchange,绑定direct_queue_test -->
    <rabbit:topic-exchange name="exchange_topic">
        <rabbit:bindings>
            <rabbit:binding queue="topic_queue_t" pattern="notice.*" />
        </rabbit:bindings>
    </rabbit:topic-exchange>

    <!--定义rabbit template用于数据的接收和发送 -->
    <rabbit:template id="topicAmqpTemplate"
                     connection-factory="connectionFactory" exchange="exchange_topic" />

    <!-- 消息接收者 -->

    <!--<bean id="topicMessageReceiver" class="com.dcits.ensemble.service.sms.rabbit.TopicMessageReceiver"></bean>-->

    <!-- queue litener 观察 监听模式 当有消息到达时会通知监听在对应的队列上的监听对象 -->

   <!-- <rabbit:listener-container
            connection-factory="connectionFactory">
        <rabbit:listener queues="topic_queue_t" ref="topicMessageReceiver" />
    </rabbit:listener-container>-->

    <!-- 定义 topic方式的exchange、队列、消息收发 end -->


    <!-- ~~~~~~~~~~~~~~~~~~~~~华丽的分割线~~~~~~~~~~~~~~~~~~~~~~~~~~ -->

</beans>
aapplication.xml:
<?xml version="1.0" encoding="UTF-8"?>
<beans xmlns="http://www.springframework.org/schema/beans"
       xmlns:xsi="http://www.w3.org/2001/XMLSchema-instance" xmlns:context="http://www.springframework.org/schema/context"
       xsi:schemaLocation="http://www.springframework.org/schema/beans http://www.springframework.org/schema/beans/spring-beans-3.1.xsd
    http://www.springframework.org/schema/context http://www.springframework.org/schema/context/spring-context-3.1.xsd">

    <import resource="classpath*:rabbitMq.xml" />

    <!-- 扫描指定package下所有带有如@controller,@services,@resource,@ods并把所注释的注册为Spring Beans -->
    <!--<context:component-scan base-package="com.dcits.ensemble.service.sms.rabbit, com.dcits.ensemble.service.sms.rabbit" />-->
    <context:component-scan base-package="com.dcits.ensemble.service.sms.rabbit" />

    <!-- 激活annotation功能 -->
    <context:annotation-config />
    <!-- 激活annotation功能 -->
    <context:spring-configured />

</beans>
生产者:
package com.dcits.ensemble.service.sms.rabbit;

import com.rabbitmq.client.Channel;
import com.rabbitmq.client.Connection;
import com.rabbitmq.client.ConnectionFactory;
import com.rabbitmq.client.MessageProperties;
import org.slf4j.Logger;
import org.slf4j.LoggerFactory;
import org.springframework.amqp.core.AmqpTemplate;
import org.springframework.scheduling.annotation.Async;
import org.springframework.stereotype.Service;


import javax.annotation.Resource;
import java.io.IOException;

@Service
public class TopicMessageProducer {
    private Logger logger = LoggerFactory.getLogger(TopicMessageProducer.class);

    @Resource(name = "topicAmqpTemplate")
    private AmqpTemplate topicAmqpTemplate;
    /**
     * @author:LiFangTao
     * @date: 2019/6/4
     * @description:
     * topicAmqpTemplate.convertAndSend(String routingKey, Object object),异步调用生产者
     */

    @Async
    public void sendMessage(Object message) throws IOException {
        logger.info("to send message:{}", message);
        //未持久化的消息
        topicAmqpTemplate.convertAndSend("notice.info", message);

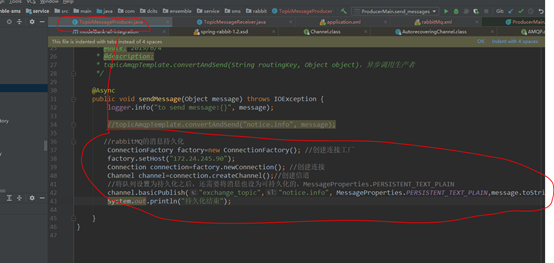
       //rabbitMQ的消息持久化
        /*ConnectionFactory factory=new ConnectionFactory(); //创建连接工厂
        factory.setHost("172.24.245.90");
        Connection connection=factory.newConnection(); //创建连接
        Channel channel=connection.createChannel();//创建信道
        //将队列设置为持久化之后,还需要将消息也设为可持久化的,MessageProperties.PERSISTENT_TEXT_PLAIN
        channel.basicPublish("exchange_topic","notice.info", MessageProperties.PERSISTENT_TEXT_PLAIN,message.toString().getBytes());
        System.out.println("持久化结束");*/

    }
}
springboot整合rabbitMQ的作消费者:
pom.xml:
<!-- 添加springboot对amqp的支持 -->
        <dependency>
            <groupId>org.springframework.boot</groupId>
            <artifactId>spring-boot-starter-amqp</artifactId>
        </dependency>
Mqconfig:
package com.example.test002.mq;

import org.springframework.amqp.core.Binding;
import org.springframework.amqp.core.BindingBuilder;
import org.springframework.amqp.core.Queue;
import org.springframework.amqp.core.TopicExchange;
import org.springframework.beans.factory.annotation.Qualifier;
import org.springframework.context.annotation.Bean;
import org.springframework.context.annotation.Configuration;

@Configuration
public class Conf {

        @Bean(name="message")
        public Queue queueMessage() {
            return new Queue("topic_queue_t");
        }

        @Bean
        public TopicExchange exchange() {
            return new TopicExchange("exchange_topic");
        }

        @Bean
        Binding bindingExchangeMessage(@Qualifier("message") Queue queueMessage, TopicExchange exchange) {
            return BindingBuilder.bind(queueMessage).to(exchange).with("notice.info");
        }


}
TopicReceiver:
package com.example.test002.mq;

import org.springframework.amqp.rabbit.annotation.RabbitListener;
import org.springframework.stereotype.Component;

/**
 * Created by Administrator on 2018/4/10.
 */
@Component
public class TopicReceiver {

    @RabbitListener(queues ="topic_queue_t" )
    public void receiveMessage1(String str){
        System.out.println("我是消费者----------- , "+str);
    }


}
测试持久化:
一:未持久化的MQ:
注意,RabbitMQ不允许对一个已经存在的队列用不同的参数重新声明,对于试图这么做的程序,会报错,所以,改动之前代码之前,要在控制台中把原来的队列删除
步骤:
1,启动rabbitmq server
2,运行以上java代码
3,使用rabbitmqctl查看消息
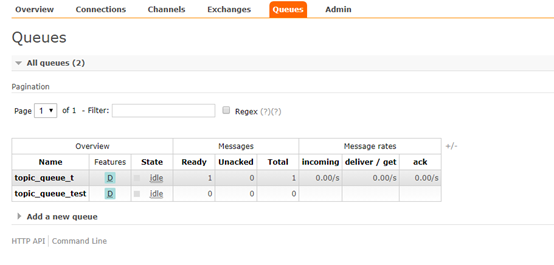
4,关闭rabbitmq server,再启动
5,使用rabbitmqctl查看消息
A:只队列持久化,未消息持久化
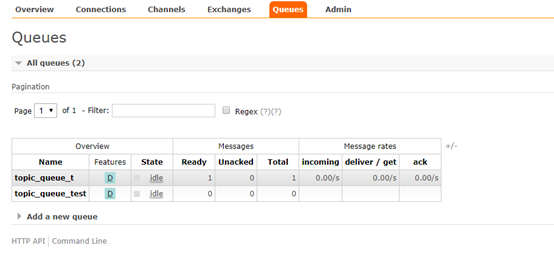
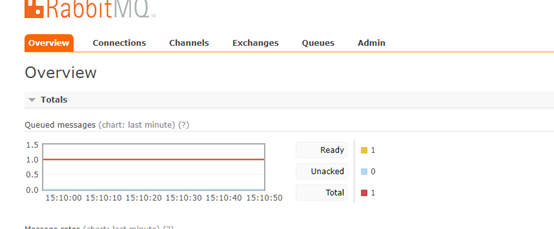
答:仍可别消费(已持久化)
B: 未队列持久化,只消息持久化(不存在)
C:都未持久化

重启前;
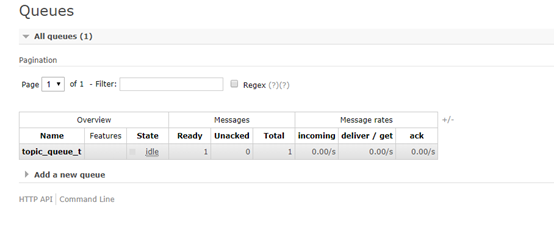
重启后:(无队列)

二:持久化后的MQ:
1队列持久化:
2消息持久化:
3测试:
步骤:
1,启动rabbitmq server
2,运行以上java代码
3,使用rabbitmqctl查看消息
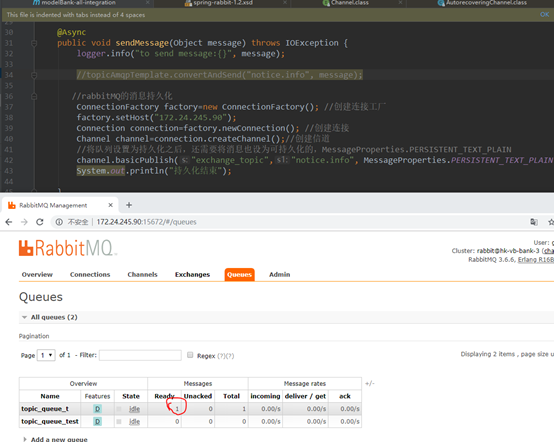
4,关闭rabbitmq server,再启动
5,使用rabbitmqctl查看消息
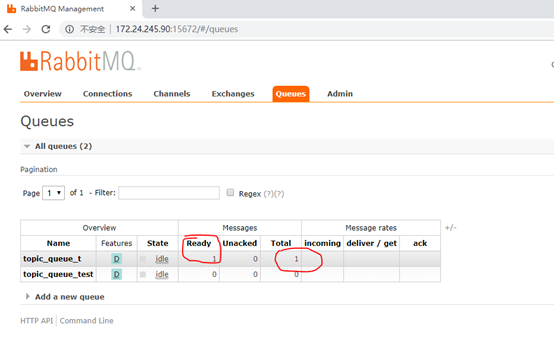
6:关闭生产者项目,启动消费者项目:
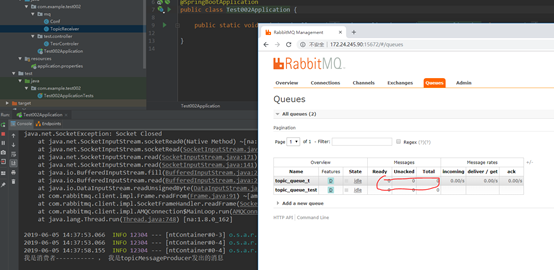
已消费(持久化成功)