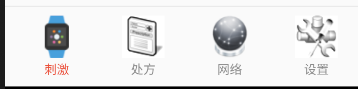
示例一:
效果如图所示
每一个Fragment显示一个字符串,比如 。
。
在所有的例子里面,都有四个简单Fragment,分别为FragmentA,FragmentB,FragmentC,FragmentD。。
类的内容
    @Override
    public View onCreateView(LayoutInflater inflater, ViewGroup container,
                             Bundle savedInstanceState) {
        // Inflate the layout for this fragment
        return inflater.inflate(R.layout.fragment_a, container, false);
    }
布局文件就是FrameLayout中有一个TextView。
MainActivity继承自FragmentActivity,其布局文件内容可以看出下面四个导航按钮是RadioButton
<?xml version="1.0" encoding="utf-8"?>
<LinearLayout xmlns:android="http://schemas.android.com/apk/res/android"
    xmlns:tools="http://schemas.android.com/tools"
    android:layout_width="match_parent"
    android:layout_height="match_parent"
    android:orientation="vertical">

    <FrameLayout
        android:id="@+id/content"
        android:layout_weight="1"
        android:layout_width="match_parent"
        android:layout_height="0dp">

    </FrameLayout>
    <View
        android:layout_width="match_parent"
        android:layout_height="1dp"
        android:background="@color/devider_line" >
    </View>

    <RadioGroup
        android:id="@+id/radioGroup"
        android:layout_width="match_parent"
        android:layout_height="wrap_content"
        android:orientation="horizontal"
        android:padding="10dp" >

        <RadioButton
            android:id="@+id/btn_stimulation"
            android:layout_width="0dp"
            android:layout_height="wrap_content"
            android:layout_weight="1"
            android:background="@null"
            android:button="@null"
            android:drawablePadding="3dp"
            android:drawableTop="@drawable/stimulation"
            android:gravity="center_horizontal"
            android:text="@string/tab_stimulation"
            android:textColor="@color/yellow" />
        <RadioButton
            android:id="@+id/btn_prescription"            ............. />

        <RadioButton
            android:id="@+id/btn_network"            .............. />

        <RadioButton
            android:id="@+id/btn_setting"             ........ />

    </RadioGroup>

</LinearLayout>
使用ButterKnife获取控件对象
    @BindView(R.id.content)
    FrameLayout content;
    @BindView(R.id.btn_stimulation)
    RadioButton btnStimulation;
    ............
    @BindView(R.id.radioGroup)
    RadioGroup radioGroup;
在初始化时添加radioGroup的点击响应事件
radioGroup.setOnCheckedChangeListener(new RadioGroup.OnCheckedChangeListener() {
            @Override
            public void onCheckedChanged(RadioGroup group, @IdRes int checkedId) {
                switch (checkedId) {
                    case R.id.btn_stimulation:
                        selectNavigation(0);
                        break;
                    case R.id.btn_prescription:
                        selectNavigation(1);
                     ........
                }
            }
        });
按钮选择函数selectNavigation就是先将四个变灰色,再把选择的变成彩色,设置选中,同时调用Fragment选择函数,在onCreate中调用selectNavigation(0)。
    private void selectNavigation(int page) {
        //四个导航按钮绘制成灰色
        for (int i = 0; i < radioGroup.getChildCount(); i++) {
            Drawable grey_image = getResources().getDrawable(greyed[i]);
            grey_image.setBounds(0, 0, grey_image.getMinimumWidth(),
                    grey_image.getMinimumHeight());
            RadioButton child = (RadioButton) radioGroup.getChildAt(i);
            child.setCompoundDrawables(null, grey_image, null, null);
            child.setTextColor(getResources().getColor(
                    R.color.dark_gray));

        }
        //将指定按钮绘制成彩色,并设置选中
        Drawable yellow = getResources().getDrawable(colored[page]);
        yellow.setBounds(0, 0, yellow.getMinimumWidth(),
                yellow.getMinimumHeight());
        RadioButton select = (RadioButton) radioGroup.getChildAt(page);
        select.setCompoundDrawables(null, yellow, null, null);
        select.setTextColor(getResources().getColor(
                R.color.yellow));
        select.setChecked(true);

        // 选择导航的时候,同时选择Fragment
        showFragment(page);
    }
其中greyed和colored就是底部四个灰色和彩色资源文件id数组。
Fragment的声明,创建和显示
    FragmentA fragmentA;
    FragmentB fragmentB;
    FragmentC fragmentC;
    FragmentD fragmentD;
    List<Fragment> fragments = new ArrayList<Fragment>();
在onCreate的时候创建Fragment,调用InitFragments
    private void InitFragments() {
        fragments.clear();

        if (fragmentA == null) {
            fragmentA = new FragmentA();
        }
        if (fragmentB == null) {
            fragmentB = new FragmentB();
        }
        if (fragmentC == null) {
            fragmentC = new FragmentC();
        }
        if (fragmentD == null) {
            fragmentD = new FragmentD();
        }
        fragments.add(fragmentA);
        fragments.add(fragmentB);
        fragments.add(fragmentC);
        fragments.add(fragmentD);
        for (Fragment frag : fragments) {
            if (!frag.isAdded()) {
                getSupportFragmentManager().beginTransaction().add(R.id.content, frag).commit();
            }
        }
    }
在切换导航的时候同时调用切换Fragment函数
    private void showFragment(int frag) {
        //首先隐藏所有Fragments
        for (Fragment f : fragments) {
            getSupportFragmentManager().beginTransaction().hide(f).commit();
        }
        //获取当前 序号的fragment
        Fragment current_frag = fragments.get(frag);
        if (current_frag != null) {
            getSupportFragmentManager().beginTransaction().show(current_frag).commit();

        }

    }
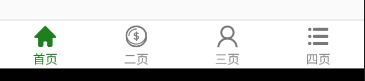
示例二:修改底部导航。
使用LinearLayout,效果如下
<?xml version="1.0" encoding="utf-8"?>
<LinearLayout xmlns:android="http://schemas.android.com/apk/res/android"
    xmlns:tools="http://schemas.android.com/tools"
    android:layout_width="match_parent"
    android:layout_height="match_parent"
    android:orientation="vertical">

    <FrameLayout
        android:id="@+id/content"
        android:layout_weight="1"
        android:layout_width="match_parent"
        android:layout_height="0dp">

    </FrameLayout>

    <LinearLayout
        android:orientation="vertical"
        android:layout_width="match_parent"
        android:layout_height="55dp">

        <View
            android:layout_width="wrap_content"
            android:layout_height="1dp"
            android:background="?android:listDivider"
            />
        <LinearLayout
            android:layout_width="match_parent"
            android:orientation="horizontal"
            android:background="@android:color/white"
            android:layout_height="54dp">

            <LinearLayout
                android:id="@+id/ll_home"
                android:layout_width="0dp"
                android:padding="4dp"
                android:layout_height="match_parent"
                android:layout_weight="1"
                android:gravity="center"
                android:orientation="vertical">

                <ImageView
                    android:id="@+id/iv_home"
                    android:layout_width="28dp"
                    android:layout_height="28dp"
                    android:src="@drawable/bid02"
                    tools:ignore="ContentDescription" />

                <TextView
                    android:id="@+id/tv_home"
                    android:textColor="@color/home_back_unselected"
                    android:layout_width="wrap_content"
                    android:layout_height="wrap_content"
                    android:text="首页"
                    android:layout_marginTop="2dp"
                    android:textSize="14sp"/>
            </LinearLayout>
            <LinearLayout
                android:id="@+id/ll_invest"
                android:layout_width="0dp"
                android:padding="4dp"
                android:layout_height="match_parent"
                android:layout_weight="1"
                android:gravity="center"
                android:orientation="vertical">

                <ImageView
                    android:id="@+id/iv_invest"
                    android:layout_width="28dp"
                    android:layout_height="28dp"
                    android:src="@drawable/bid04" />

                <TextView
                    android:id="@+id/tv_invest"
                    android:textColor="@color/home_back_unselected"
                    android:layout_width="wrap_content"
                    android:layout_height="wrap_content"
                    android:text="二页"
                    android:layout_marginTop="2dp"
                    android:textSize="14sp"/>
            </LinearLayout>
            <LinearLayout
                android:id="@+id/ll_me"
                android:layout_width="0dp"
                android:padding="4dp"
                android:layout_height="match_parent"
                android:layout_weight="1"
                android:gravity="center"
                android:orientation="vertical">

                <ImageView
                    android:id="@+id/iv_me"
                    android:layout_width="28dp"
                    android:layout_height="28dp"
                    android:src="@drawable/bid06" />

                <TextView
                    android:id="@+id/tv_me"
                    android:textColor="@color/home_back_unselected"
                    android:layout_width="wrap_content"
                    android:layout_height="wrap_content"
                    android:text="三页"
                    android:layout_marginTop="2dp"
                    android:textSize="14sp"/>
            </LinearLayout>-
            <LinearLayout
                android:id="@+id/ll_more"
                android:layout_width="0dp"
                android:padding="4dp"
                android:layout_height="match_parent"
                android:layout_weight="1"
                android:gravity="center"
                android:orientation="vertical">

                <ImageView
                    android:id="@+id/iv_more"
                    android:layout_width="28dp"
                    android:layout_height="28dp"
                    android:src="@drawable/bid08" />

                <TextView
                    android:id="@+id/tv_more"
                    android:textColor="@color/home_back_unselected"
                    android:layout_width="wrap_content"
                    android:layout_height="wrap_content"
                    android:text="四页"
                    android:layout_marginTop="2dp"
                    android:textSize="14sp"/>
            </LinearLayout>

        </LinearLayout>
        </LinearLayout>
</LinearLayout>
使用ButterKnife来响应四个LinearLayout按钮的点击操作
    @OnClick({R.id.ll_home,R.id.ll_invest,R.id.ll_me,R.id.ll_more})
    public void changeTab(View view){
        switch (view.getId()){
            case R.id.ll_home:
                selectNavigation(0);
                break;
            case R.id.ll_invest:
                selectNavigation(1);
                break;
            case R.id.ll_me:
                selectNavigation(2);
                break;
            case R.id.ll_more:
                selectNavigation(3);
                break;
        }
    }
    private void selectNavigation(int page) {
        //相关图片,字体变成灰色
        ivHome.setImageResource(R.drawable.bid02);
        ivInvest.setImageResource(R.drawable.bid04);
        ivMe.setImageResource(R.drawable.bid06);
        ivMore.setImageResource(R.drawable.bid08);
        tvHome.setTextColor(getResources().getColor(R.color.home_back_unselected));
        tvInvest.setTextColor(getResources().getColor(R.color.home_back_unselected));
        tvMe.setTextColor(getResources().getColor(R.color.home_back_unselected));
        tvMore.setTextColor(getResources().getColor(R.color.home_back_unselected));


        switch (page) {
            case 0:
                ivHome.setImageResource(R.drawable.bid01);
                tvHome.setTextColor(getResources().getColor(R.color.home_back_selected_green));
                break;
            case 1:
                ivInvest.setImageResource(R.drawable.bid03);
                tvInvest.setTextColor(getResources().getColor(R.color.home_back_selected_green));
                break;
            case 2:
                ivMe.setImageResource(R.drawable.bid05);
                tvMe.setTextColor(getResources().getColor(R.color.home_back_selected_green));
                break;
            case 3:
                ivMore.setImageResource(R.drawable.bid07);
                tvMore.setTextColor(getResources().getColor(R.color.home_back_selected_green));
                break;
        }

        // 选择导航的时候,同时选择Fragment
        showFragment(page);
    }