1.ipv4
ipv4一共32bit,每8个bit转换为一个十进制数,就形成了我们熟知的点分十进制IP地址。
# 192.168.1.1
11000000  10101000  00000001  00000001
2.ipv6
ipv6一共有128bit,每16bit使用冒号分割,以16进制来表示。
2001:0000:a000:0000:0000:0000:0000:0001
一共8个部分,每个部分16bit,以冒号分割开。
以前导零压缩,可以将上述IPv6地址简写为如下形式:
2001:0:a000:0:0:0:0:1
再使用 :: 来表示连续的0,变为如下形式:
2001:0:a000::1
一个ipv6地址中最多只能有一个 :: ,代表多个连续的0,补够8部分即可。
3.命令行模式配置ipv6
1)首先开启NetworkManager
[root@centos7-test etc]# systemctl restart NetworkManager
[root@centos7-test etc]# nmcli connection
NAME    UUID                                  TYPE      DEVICE
eth0    5fb06bd0-0bb0-7ffb-45f1-d6edd65f3e03  ethernet  eth0
virbr0  74ae6b0d-c915-41a3-8de4-2d94ae19f2ef  bridge    virbr0
2)查看eth0的ipv6信息
[root@centos7-test etc]# nmcli connection show eth0 | grep ipv6
ipv6.method:                            ignore
ipv6.dns:                               --
ipv6.dns-search:                        --
ipv6.dns-options:                       ""
ipv6.dns-priority:                      0
ipv6.addresses:                         --
ipv6.gateway:                           --
ipv6.routes:                            --
ipv6.route-metric:                      -1
ipv6.route-table:                       0 (unspec)
ipv6.routing-rules:                     --
ipv6.ignore-auto-routes:                no
ipv6.ignore-auto-dns:                   no
ipv6.never-default:                     no
ipv6.may-fail:                          yes
ipv6.ip6-privacy:                       -1 (unknown)
ipv6.addr-gen-mode:                     stable-privacy
ipv6.dhcp-duid:                         --
ipv6.dhcp-send-hostname:                yes
ipv6.dhcp-hostname:                     --
ipv6.token:                             --
可以看到,目前是没有ipv6信息的。
3)配置ipv6
[root@centos7-test etc]# nmcli connection modify eth0 ipv6.method auto
[root@centos7-test etc]# nmcli connection modify eth0 ipv6.addresses 2001::2/64 ipv7.method manual
[root@centos7-test etc]# nmcli connection show eth0 | grep ipv6
ipv6.method:                            manual
ipv6.dns:                               --
ipv6.dns-search:                        --
ipv6.dns-options:                       ""
ipv6.dns-priority:                      0
ipv6.addresses:                         2001::2/64
ipv6.gateway:                           --
ipv6.routes:                            --
ipv6.route-metric:                      -1
ipv6.route-table:                       0 (unspec)
ipv6.routing-rules:                     --
ipv6.ignore-auto-routes:                no
ipv6.ignore-auto-dns:                   no
ipv6.never-default:                     no
ipv6.may-fail:                          yes
ipv6.ip6-privacy:                       -1 (unknown)
ipv6.addr-gen-mode:                     stable-privacy
ipv6.dhcp-duid:                         --
ipv6.dhcp-send-hostname:                yes
ipv6.dhcp-hostname:                     --
ipv6.token:                             --
在配置ipv6之前,需要先将method配置为auto或manual。
4)重启网络
[root@centos7-test etc]# systemctl restart network
[root@centos7-test etc]# ifconfig
eth0: flags=4163<UP,BROADCAST,RUNNING,MULTICAST>  mtu 1500
        inet 192.168.4.211  netmask 255.255.255.0  broadcast 192.168.4.255
        inet6 fe80::7848:20c6:5a7e:9a07  prefixlen 64  scopeid 0x20<link>
        inet6 2001::2  prefixlen 64  scopeid 0x0<global>
        ether 00:0c:29:c8:38:de  txqueuelen 1000  (Ethernet)
        RX packets 750261  bytes 1087296866 (1.0 GiB)
        RX errors 0  dropped 0  overruns 0  frame 0
        TX packets 409155  bytes 31060072 (29.6 MiB)
        TX errors 0  dropped 0 overruns 0  carrier 0  collisions 0
4.图形界面配置ipv6
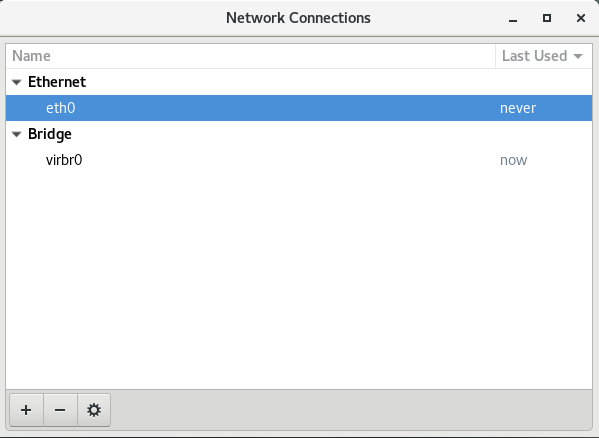
1)启动nm-connection-editor
[root@centos7-devel ~]# nm-connection-editor &
[1] 33226

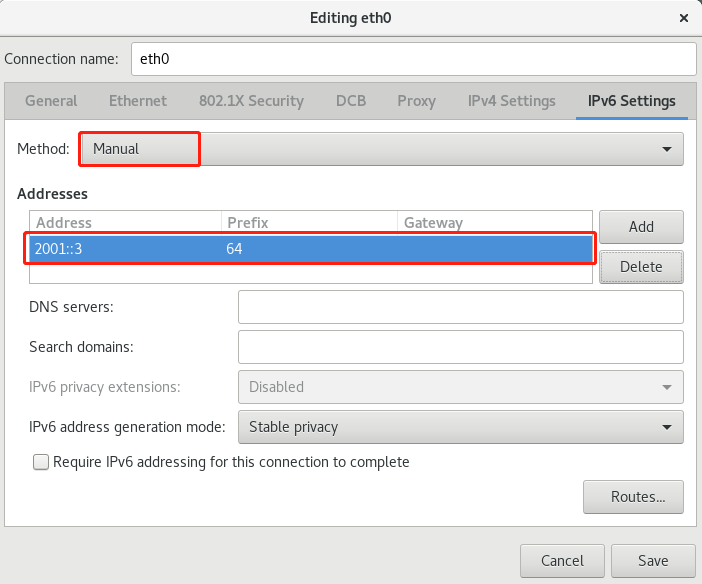
2)配置eth0的ipv6

3)重启网络
[root@centos7-devel ~]# ifconfig
eth0: flags=4163<UP,BROADCAST,RUNNING,MULTICAST>  mtu 1500
        inet 192.168.4.210  netmask 255.255.255.0  broadcast 192.168.4.255
        inet6 2001::3  prefixlen 64  scopeid 0x0<global>
        inet6 fe80::505a:a162:866b:74df  prefixlen 64  scopeid 0x20<link>
        ether 00:0c:29:7e:61:77  txqueuelen 1000  (Ethernet)
        RX packets 1127940  bytes 757489172 (722.3 MiB)
        RX errors 0  dropped 0  overruns 0  frame 0
        TX packets 8518578  bytes 533827717 (509.0 MiB)
        TX errors 0  dropped 0 overruns 0  carrier 0  collisions 0
5.修改配置文件配置ipv6
[root@centos7-test etc]# vi /etc/sysconfig/network-scripts/ifcfg-eth0
TYPE=Ethernet
BOOTPROTO=none
NAME=eth0
#UUID="a4305c7c-05ea-457d-b17f-177f04416117"
DEVICE=eth0
ONBOOT=yes
IPADDR=192.168.4.211
PREFIX=24
GATEWAY=192.168.4.1
DNS1=61.139.2.69
PROXY_METHOD=none
BROWSER_ONLY=no
DEFROUTE=yes
IPV4_FAILURE_FATAL=no
IPV6INIT=yes
IPV6_AUTOCONF=no
IPV6_DEFROUTE=yes
IPV6_FAILURE_FATAL=no
IPV6_ADDR_GEN_MODE=stable-privacy
UUID=5fb06bd0-0bb0-7ffb-45f1-d6edd65f3e03
IPV6ADDR=2001::2/64
6.ipv6互相ping
[root@centos7-test etc]# ping6 2001::3
PING 2001::3(2001::3) 56 data bytes
64 bytes from 2001::3: icmp_seq=1 ttl=64 time=0.613 ms
64 bytes from 2001::3: icmp_seq=2 ttl=64 time=1.23 ms
64 bytes from 2001::3: icmp_seq=3 ttl=64 time=0.325 ms
64 bytes from 2001::3: icmp_seq=4 ttl=64 time=0.348 ms
注意,ping只能用于ipv4,而ipv6要使用ping6。
===