通过gunicorn部署django项目,比使用uwsgi方式要简单,具体操作如下:
步骤:
1. 安装依赖
yum install python3
yum install nginx (或者下载nginx包部署)
yum install gunicorn
pip install gevent   # 这个是gunicorn运行的一种模式
easy_install -U greenlet
easy_install -U eventlet
pip install gevent
2. 检查python/nginx安装是否成功
a. 输入python3,是否出现交互命令页面

b. 启动nginx, 浏览器访问ip,出现weclome ngix
举例:

启动nginx: ./nginx
2种方式验证nginx是否启动/安装成功:
进程查看: ps -ef |grep nginx
页面访问:

3. gunicorn 简单使用
按照上面的例子,当前目录为 /home/myapp, myapp中有一个包 gunicorn_app,gunicorn_app.py代码如下:
def app(environ, start_response):
    data = b"Hello, World!
"
    start_response("200 OK", [("Content-Type", "text/plain"),("Content-Length", str(len(data)))])
    return iter([data])
我们将要运行 test.py文件中的 app(当然名字由你决定,可以是myapp,demo等等)
gunicorn -w 2 gunicorn_app:app

上图展示了两个很重要的信息:


user  root;
worker_processes  1;

#error_log  logs/error.log;
#error_log  logs/error.log  notice;
#error_log  logs/error.log  info;

#pid        logs/nginx.pid;


events {
    worker_connections  1024;
}


http {
    include       mime.types;
    default_type  application/octet-stream;

    #log_format  main  '$remote_addr - $remote_user [$time_local] "$request" '
    #                  '$status $body_bytes_sent "$http_referer" '
    #                  '"$http_user_agent" "$http_x_forwarded_for"';

    #access_log  logs/access.log  main;

    sendfile        on;
    #tcp_nopush     on;

    #keepalive_timeout  0;
    keepalive_timeout  65;

    #gzip  on;

    server {
        listen       80;
        server_name  192.168.252.79;
        charset utf-8;

        #access_log  logs/host.access.log  main;

        location / {
            proxy_pass http://0.0.0.0:8001; # 这里要配合启动文件使用
            proxy_redirect     off;
            proxy_set_header   Host                 $http_host;
            proxy_set_header   X-Real-IP            $remote_addr;
            proxy_set_header   X-Forwarded-For      $proxy_add_x_forwarded_for;
              proxy_set_header   X-Forwarded-Proto    $scheme;
         }

      location /static {
            alias   /data/service/Django_project/static/;
        }

        #error_page  404              /404.html;

        # redirect server error pages to the static page /50x.html
        #
        error_page   500 502 503 504  /50x.html;
        location = /50x.html {
            root   html;
        }
        # proxy the PHP scripts to Apache listening on 127.0.0.1:80
        #
        #location ~ .php$ {
        #    proxy_pass   http://127.0.0.1;
        #}

        # pass the PHP scripts to FastCGI server listening on 127.0.0.1:9000
        #
        #location ~ .php$ {
        #    root           html;
        #    fastcgi_pass   127.0.0.1:9000;
        #    fastcgi_index  index.php;
        #    fastcgi_param  SCRIPT_FILENAME  /scripts$fastcgi_script_name;
        #    include        fastcgi_params;
        #}

        # deny access to .htaccess files, if Apache's document root
        # concurs with nginx's one
        #
        #location ~ /.ht {
        #    deny  all;
        #}
    }


    # another virtual host using mix of IP-, name-, and port-based configuration
    #
    #server {
    #     listen       8000;
    #    listen       somename:8080;
    #    server_name  somename  alias  another.alias;

    #    location / {
    #        root   html;
    #        index  index.html index.htm;
    #    }
    #}


    # HTTPS server
    #
    #server {
    #    listen       443 ssl;
    #    server_name  localhost;

    #    ssl_certificate      cert.pem;
    #    ssl_certificate_key  cert.key;

    #    ssl_session_cache    shared:SSL:1m;
    #    ssl_session_timeout  5m;

    #    ssl_ciphers  HIGH:!aNULL:!MD5;
    #    ssl_prefer_server_ciphers  on;

    #    location / {
    #        root   html;
    #        index  index.html index.htm;
    #    }
    #}
}
3. 加载静态文件,具体步骤如下:
a. 修改settings.py中STATIC_ROOT为你的static静态文件的物理路径,比如说我静态文件存放在/data/service/Django_project/static中,首先创建Django目录下的static文件夹,最后修改settings.py中STATIC_ROOT指向/data/service/Django_project/static.
b. 运行python3 manage.py collectstatic命令,这将从Django资源包中复制必须的静态文件到STATIC_ROOT指示的static文件夹中,这其中包括admin界面所必须的样式表(style)、图片(image)及脚本(js)等。
c.修改nginx配置文件, nginx.conf中指向static目录。
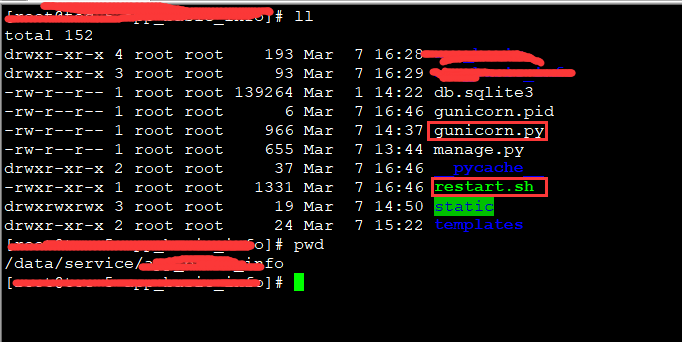
4. Django根目录创建 gunicorn.py文件,具体内容如下:
#gunicorn.py
# coding:utf-8
import multiprocessing
bind = '0.0.0.0:8001'      #绑定ip和端口号
backlog = 512                #监听队列
chdir = '/data/service/Django_project'  #gunicorn要切换到的目的工作目录
timeout = 30      #超时
worker_class = 'gevent' #使用gevent模式,还可以使用sync 模式,默认的是sync模式

workers = multiprocessing.cpu_count() * 2 + 1    #进程数
threads = 2 #指定每个进程开启的线程数
loglevel = 'info' #日志级别,这个日志级别指的是错误日志的级别,而访问日志的级别无法设置
access_log_format = '%(t)s %(p)s %(h)s "%(r)s" %(s)s %(L)s %(b)s %(f)s" "%(a)s"'    #设置gunicorn访问日志格式,错误日志无法设置

accesslog = "/home/gunicorn_log/gunicorn_access.log"      #访问日志文件
errorlog = "/home/gunicorn_log/gunicorn_error.log"        #错误日志文件
5. 可以通过命令启动服务,也可以指向脚本启动服务
命令: /data/service/Django_project目录下,执行 gunicorn Djanfo_project.wsgi -c gunicorn.py
脚本: 在/data/service/Django_project目录,创建 restrt.sh, 具体内容如下: ./restart.sh start

#!/bin/sh
## service name
#项目的目录
SERVICE_DIR=/data/service/Django_project
#gunicorn的名字
SERVICE_NAME=gunicorn
#gunicorn的配置文件名
SERVICE_CONF=gunicon.py
#pid存放的位置
PID=gunicorn.pid
export PATH=$PATH:$HOME/bin:/usr/local/python3/bin
cd $SERVICE_DIR

start(){
       nohup gunicorn app_basic_info.wsgi -c $SERVICE_DIR/gunicorn.py>/dev/null 2>&1 &
       echo $! > $SERVICE_DIR/$PID
       echo "*** start $SERVICE_NAME ***"
}
stop(){
       kill `cat $SERVICE_DIR/$PID`
       rm -rf $SERVICE_DIR/$PID
       echo "*** stop $SERVICE_NAME ***"

       sleep 2
       P_ID=`ps -ef | grep -w "$SERVICE_NAME" | grep -v "grep" | awk '{print $2}'`
       if [ "$P_ID" == "" ]; then
           echo "*** $SERVICE_NAME process not exists or stop success ***"
       else
           echo "*** $SERVICE_NAME process pid is:$P_ID ***"
           echo "*** begin kill $SERVICE_NAME process,kill is:$P_ID ***"
           kill -9 $P_ID
       fi
}
f_usage() {
   echo "USAGE: restart [options]"
   echo "OPTIONS:"
   echo "       start"
   echo "       stop "
   echo "       restart"
}
case "$1" in

   "start")
       start
       ;;
   "stop")
       stop
       ;;
   "restart")
       stop
       sleep 2
       start
       echo "*** restart $SERVICE_NAME ***"
       ;;
   *)
   f_usage
   ;;

esac
exit 0
6. 浏览器访问, http://localhost/admin/login
