概述
目标站点是http://www.example.com,官网提供了api使用文档,但是对其测试后没有发现漏洞,目录、端口扫描等都未发现可利用的点。后发现官网提供了客户端下载,遂对其进行一番测试。
信息收集
先抓了下客户端的包,使用Fiddler和BurpSuite都抓不到,怀疑走的不是HTTP协议,用WireShark查看其确实用的是HTTP协议,但是数据包不好重放,这里最后使用了WSExplorer抓指定进程的包,成功抓取到通信的数据,抓到的数据如下,绿色的是请求包,红色的是响应包。

数据包又分为两部分,一个是请求行和请求头。

一个是请求正文。
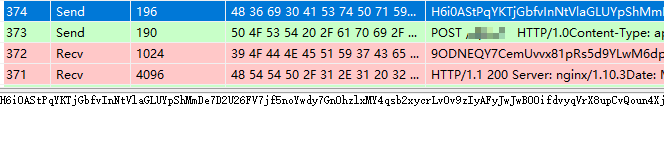
拼接起来即可放到BurpSuite中进行数据包的重放

测试过程
可看到请求包经过了加密再传输,返回的响应包也经过了加密。但是加解密总归是在客户端进行的,所以可从分析客户端入手。
使用Exeinfo PE查壳,可得知使用的是.NET框架 C#开发的程序。

可以使用dnspy,针对.NET程序的逆向工程工具,对客户端的加解密进行分析。打开后发现类及方法的命名都是无规律的数字字母,代码做了混淆。

混淆了的代码不利用阅读分析,可使用De4Dot尝试反混淆,支持很多种混淆加密工具混淆过的源码。
de4dot-x64.exe origin.exe
- 1
即可得到反混淆后的程序 origin-cleaned.exe

将反混淆后的程序拖入dnspy查看,可看到基本已还原,提高了可读性。

因为其通信采用的是HTTP协议,又发现有个类名为HttpHelper,跟进分析,代码不多看到一个Post函数,疑似为对数据加密并发起Post请求的方法,如图。
 调用了MM.Encrypt()对请求的参数进行加密,跟进方法,发现其中关键的加密函数应该就是MM类下的test05函数。

下断点,验证程序是否调用此函数进行加密并传输,我在明文及密文处下了断点。

F5启动程序,输入账号密码test123456,登录。
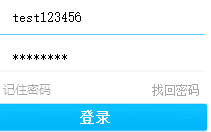
程序在断点处停了下来,明文中包含我输入的账号test123456和md5加密过的密码。
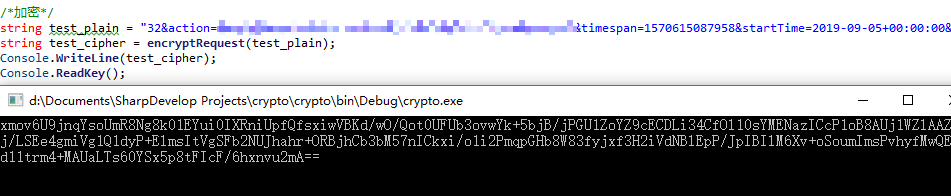
 放行,得到经过加密的内容,可确定就是调用了此处的加密函数。

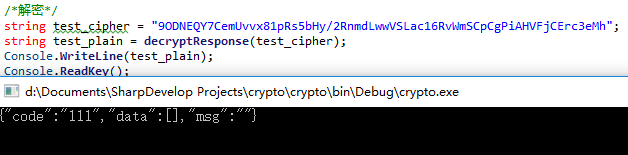
后又证实响应包解密调用的是MM类下的test06函数,请求包加密函数test05及响应包解密函数test06都是调用Dll中对应的函数。
 此处加解密调用的是两套方法,不能用解密函数去解密请求包加密后的数据。为了方便测试,以及快速加解密,将其加解密函数扣出来,同样调用Dll里的函数,编译成一个独立的程序,这样也不用分析算法。
这里我使用的是SharpDevelop编译的,使用Visual Studio总是会报错…
public static string decryptResponse(string cipher){
	byte[] bytes = Encoding.UTF8.GetBytes(cipher);
	byte[] array = new byte[bytes.Length + 128];
	int count = Program.test06(ref bytes[0], ref array[0]);
	string text = Encoding.UTF8.GetString(array, 0, count);
	return text;
}

public static string encryptRequest(string plain){
	byte[] bytes = Encoding.UTF8.GetBytes(plain);
	int num = bytes.Length * 2 + 128;
	if(num<32){
		num = 64;
	}
	byte[] array = new byte[num];
	int num2 = 0;
	num2 = test05(ref bytes[0], ref array[0]);
	string result = Encoding.UTF8.GetString(array, 0, num2);
	return result;
}
加密
 解密
解密
再用Python的Flask框架在本地写一个代理转发程序,方便在BurpSuite中进行重放测试。
流程如下:
- 本地发送明文数据包到代理
- 代理接收到请求包
- 调用程序对请求包进行加密
- 将加密后的数据包转发给服务器
- 调用程序对服务器返回的内容解密
- 返回给明文数据到本地
from flask import request, Flask
from urllib.parse import quote
import requests
import os

headers = {
	'User-Agent': 'Mozilla',
	'Content-Type': 'application/x-www-form-urlencoded',
	'Accept-Encoding': 'gzip, deflate',
}

app = Flask('example')
@app.route('/example', methods=['POST'])


def proxy():
	form = request.form
	request_plain = ''
	for key in form:
			request_plain += '&{}={}'.format(key, form[key])
	response_plain = test(request_plain)
	return response_plain

def encrypt(filename):
	encrypt_cmd = 'crypto.exe -encrypt {}'.format(filename) #要加密的内容 从文件读取
	result = os.popen(encrypt_cmd) # 执行exe
	request_cipher = quote(result.read()) #加密后的内容 经过一次url编码把 + 号 转成 %2B 服务端才能识别
	return request_cipher

def decrypt(filename):
	decrypt_cmd = 'crypto.exe -decrypt {}'.format(filename) #要解密的内容 从文件读取
	result = os.popen(decrypt_cmd) # 执行exe
	response_plain = result.read() # 读取解密后的内容
	return response_plain

def test(request_plain):
	url = 'http://example.com/api/'
	plain_txt = 'plain.txt'
	with open(plain_txt, 'w') as f1:
		f1.writelines(request_plain) # 存放明文到plain.txt
	request_cipher = encrypt(plain_txt) # 加密明文
	response = requests.post(url=url, data=request_cipher, headers=headers) #发送请求
	cipher_txt = 'cipher.txt'
	with open(cipher_txt, 'w') as f2:
		f2.writelines(response.text) #存放密文到cipher.txt
	response_plain = decrypt(cipher_txt) # 解密密文
	return response_plain

if __name__ == '__main__':
	app.run(host='0.0.0.0', port=9999, debug=True)
这里每次请求的接口都是一样的,改变的只是请求体中的参数。在CodeService中有所有接口的明文,全部提取出来。
 即可正常的在BurpSuite中进行测试~
 最后成功在一个接口中发现SQL注入。


原文转载至:https://blog.csdn.net/qq_32727277/article/details/102783316