1、添加普通用户
[1] 要在CentOS服务器上添加普通用户帐户,请按以下步骤设置。
[root@lianglab ~]# useradd centos
[root@lianglab ~]# passwd centos
Changing password for user centos.
New password:                               #输入您要设置的任何密码
Retype new password:
passwd: all authentication tokens updated successfully. #所有身份验证令牌已成功更新
[2] 如果您想从普通用户切换到root用户帐户,请使用[su]命令。
[root@lianglab ~]# su - centos   #切换centos账号
[centos@lianglab ~]$ su -        #切换root账号
Password:                        #输入root密码
[root@lianglab ~]#               #切换到root账号
[3] 如果您想限制用户运行[su]命令,请进行如下设置。
在以下示例中,只有[wheel]组中的用户可以运行[su]命令。
[root@lianglab ~]# usermod -G wheel centos
[root@lianglab ~]# vi /etc/pam.d/su
[root@lianglab ~]# cat  /etc/pam.d/su
#%PAM-1.0
auth            required        pam_env.so
auth            sufficient      pam_rootok.so
# Uncomment the following line to implicitly trust users in the "wheel" group.
#auth           sufficient      pam_wheel.so trust use_uid   #我们添加的配置项
# Uncomment the following line to require a user to be in the "wheel" group.
auth            required        pam_wheel.so use_uid
auth            substack        system-auth
auth            include         postlogin
account         sufficient      pam_succeed_if.so uid = 0 use_uid quiet
account         include         system-auth
password        include         system-auth
session         include         system-auth
session         include         postlogin
session         optional        pam_xauth.so
auth          sufficient      pam_rootok.so debug

[root@lianglab ~]# groups centos   #查看账号所在的组
centos : centos wheel

我们可以创建一个账号user01没有在wheel组,并尝试切换到root账号
[root@lianglab ~]# useradd user01
[root@lianglab ~]# passwd user01
Changing password for user user01.
New password:
Retype new password:
passwd: all authentication tokens updated successfully.
[root@lianglab ~]#
[root@lianglab ~]# su - user01
[user01@lianglab ~]$
[user01@lianglab ~]$ su -
Password:
su: Permission denied   #通常是被拒绝的
[user01@lianglab ~]$
[4] 如果您要删除用户帐户,请按以下步骤设置。
[root@lianglab ~]# userdel -r user01  #删除用户[user01](仅删除的用户帐户)
userdel: user 'user01' does not exist
[root@lianglab ~]# ll /home/
total 4
drwxr-xr-x.  3 admin    admin      78 Sep 28 10:09 admin
drwx------.  4 centos   centos    113 Dec  4 13:56 centos
drwx------. 15 lianglab lianglab 4096 Sep 27 16:42 lianglab
drwx------.  3 tddev    users      78 Sep 28 10:09 tddev
drwx------.  5 tdops    users     143 Oct 15 16:10 tdops
drwx------.  3 tdsec    users      78 Sep 28 10:09 tdsec
drwx------.  4     1006     1006  113 Dec  4 14:16 user01
#删除用户[user01](已删除的用户帐户和他的主目录)
[root@lianglab ~]# userdel -r user01
userdel: user 'user01' does not exist
[root@lianglab ~]# userdel -r lianglab
[5] 添加到wheel组用户免密切换root账号设置步骤。
 vi /etc/sudoers

## Same thing without a password
%wheel        ALL=(ALL)       NOPASSWD: ALL  #添加这段内容后,wheel组用户,切换到root不需要知道root密码。


[root@lianglab ~]# su - centos
[centos@lianglab ~]$ id
uid=1005(centos) gid=1005(centos) groups=1005(centos),10(wheel) context=unconfined_u:unconfined_r:unconfined_t:s0-s0:c0.c1023
[centos@lianglab ~]$
[centos@lianglab ~]$ sudo su -  ##免密切换到root账号。
[root@lianglab ~]#
2、防火墙和SELinux
[1] 可以如下所示显示FireWall服务状态。(默认启用)
[root@lianglab ~]#  systemctl status firewalld
● firewalld.service - firewalld - dynamic firewall daemon
   Loaded: loaded (/usr/lib/systemd/system/firewalld.service; disabled; vendor preset: enabled)
   Active: active (running) since Fri 2020-12-04 14:23:39 CST; 1h 10min ago
     Docs: man:firewalld(1)
 Main PID: 199682 (firewalld)
    Tasks: 2 (limit: 49642)
   Memory: 28.1M
   CGroup: /system.slice/firewalld.service
           └─199682 /usr/libexec/platform-python -s /usr/sbin/firewalld --nofork --nopid

Dec 04 14:23:38 lianglab systemd[1]: Starting firewalld - dynamic firewall daemon...
Dec 04 14:23:39 lianglab systemd[1]: Started firewalld - dynamic firewall daemon.
Dec 04 14:23:39 lianglab firewalld[199682]: WARNING: AllowZoneDrifting is enabled. This is considered an insecure configuration option.
[活动:活动(正在运行)***]表示firewalld正在运行
[2] 如果您使用FireWall服务,则它需要手动修改FireWall设置,因为默认情况下大多数情况下不允许传入服务请求。
有关防火墙的基本操作和设置,请参见此处。
[3] 如果由于某些原因(例如某些FireWall计算机在您的本地Netowrk中运行)而不需要FireWall服务,则可以像下面这样在CentOS服务器上停止和禁用FireWall服务。
#停止服务
停止防火墙、并禁用防火墙

[root@lianglab ~]# systemctl stop firewalld
[root@lianglab ~]# systemctl disable firewalld
[root@lianglab ~]# systemctl status  firewalld
● firewalld.service - firewalld - dynamic firewall daemon
   Loaded: loaded (/usr/lib/systemd/system/firewalld.service; disabled; vendor preset: enabled)
   Active: inactive (dead)
     Docs: man:firewalld(1)

Dec 04 14:23:38 lianglab systemd[1]: Starting firewalld - dynamic firewall daemon...
Dec 04 14:23:39 lianglab systemd[1]: Started firewalld - dynamic firewall daemon.
Dec 04 14:23:39 lianglab firewalld[199682]: WARNING: AllowZoneDrifting is enabled. This is considered an insecure configuration option. It will b>
Dec 04 15:36:01 lianglab systemd[1]: Stopping firewalld - dynamic firewall daemon...
Dec 04 15:36:01 lianglab systemd[1]: Stopped firewalld - dynamic firewall daemon.
[4] 可以如下显示当前的SELinux(增强安全性的Linux)状态。(默认启用)
[root@lianglab ~]# getenforce
Permissive #允许
[root@lianglab ~]#
[5] 如果启用SELinux,则有时会手动修改SELinux策略,因为SELinux有时会停止应用程序。
有关SELinux的基本操作和设置,请参见此处。
该站点上CentOS 8的配置示例基于SELinux始终在执行的环境。
[6] 如果由于某些原因(例如您的服务器仅在本地安全网络中运行)或某些其他原因而不需要SELinux功能,则可以如下禁用SELinux。
vi  /etc/selinux/config

SELINUX=disabled
#重新启动计算机以应用设置
[root@lianglab ~]# reboot
3、网络设置
[root@lianglab ~]# hostnamectl set-hostname www.lianglab.cn ##设置主机名
#显示设备
[root@lianglab ~]# nmcli device
DEVICE TYPE STATE CONNECTION
ens3 ethernet connected ens3
cni-podman0 bridge connected cni-podman0
lo loopback unmanaged --
#设置IPv4地址
[root@lianglab ~]# nmcli connection modify ens3 ipv4.addresses 10.0.0.30/24
#设置网关
[root@lianglab ~]# nmcli connection modify ens3 ipv4.gateway 10.0.0.1
#设置DNS
[root@lianglab ~]# nmcli connection modify ens3 ipv4.dns 10.0.0.1
#设置手动进行静态设置(对于DHCP为[auto])
[root@lianglab ~]# nmcli connection modify ens3 ipv4.method manual
#重新启动界面以重新加载设置
[root@lianglab ~]# nmcli connection down ens3; nmcli connection up ens3
#显示设置
[root@lianglab ~]# nmcli device show ens3
GENERAL.DEVICE: ens3
GENERAL.TYPE: ethernet
GENERAL.HWADDR: FA:57:3D:27:AB:00
GENERAL.MTU: 1500
GENERAL.STATE: 100 (connected)
GENERAL.CONNECTION: ens3
GENERAL.CON-PATH: /org/freedesktop/NetworkManager/ActiveConnection/1
WIRED-PROPERTIES.CARRIER: on
IP4.ADDRESS[1]: 192.168.6.58/24
IP4.GATEWAY: 192.168.6.1
IP4.ROUTE[1]: dst = 0.0.0.0/0, nh = 192.168.6.1, mt = 100
IP4.ROUTE[2]: dst = 169.254.169.254/32, nh = 192.168.6.194, mt = 100
IP4.ROUTE[3]: dst = 192.168.6.0/24, nh = 0.0.0.0, mt = 100
IP4.DNS[1]: 223.5.5.5
IP6.ADDRESS[1]: fe80::63b:d0b2:2d5b:e779/64
IP6.GATEWAY: --
IP6.ROUTE[1]: dst = fe80::/64, nh = ::, mt = 100
[root@lianglab ~]#
#显示状态
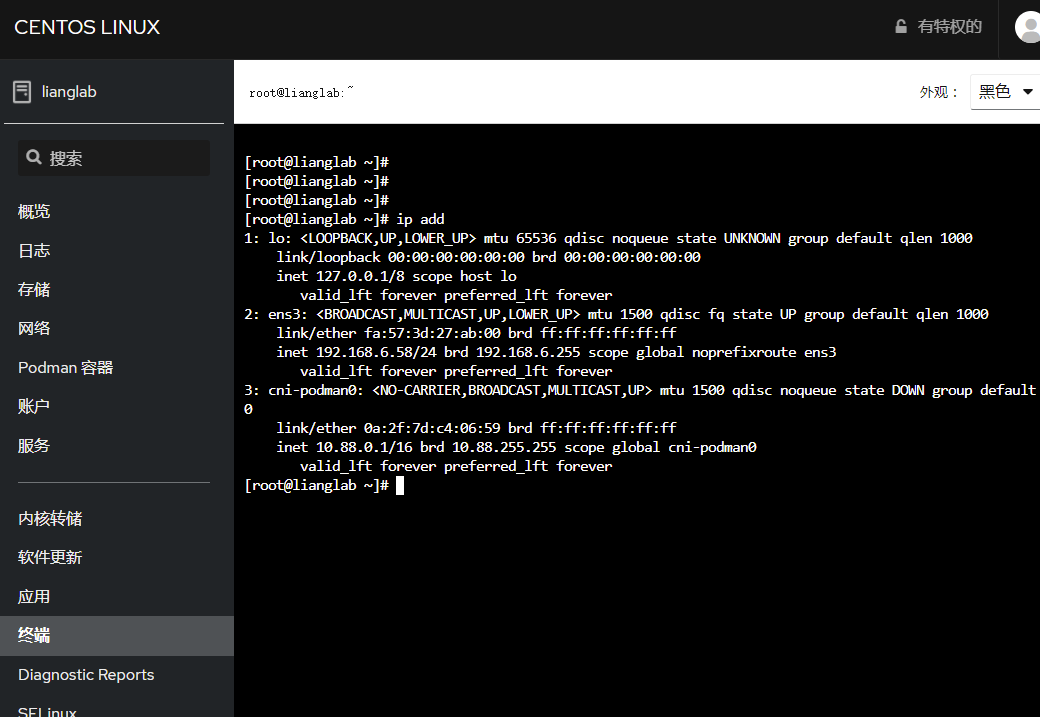
[root@lianglab ~]# ip addr show
1: lo: <LOOPBACK,UP,LOWER_UP> mtu 65536 qdisc noqueue state UNKNOWN group default qlen 1000
link/loopback 00:00:00:00:00:00 brd 00:00:00:00:00:00
inet 127.0.0.1/8 scope host lo
valid_lft forever preferred_lft forever
2: ens3: <BROADCAST,MULTICAST,UP,LOWER_UP> mtu 1500 qdisc fq state UP group default qlen 1000
link/ether fa:57:3d:27:ab:00 brd ff:ff:ff:ff:ff:ff
inet 192.168.6.58/24 brd 192.168.6.255 scope global noprefixroute ens3
valid_lft forever preferred_lft forever
3: cni-podman0: <NO-CARRIER,BROADCAST,MULTICAST,UP> mtu 1500 qdisc noqueue state DOWN group default qlen 1000
link/ether 0a:2f:7d:c4:06:59 brd ff:ff:ff:ff:ff:ff
inet 10.88.0.1/16 brd 10.88.255.255 scope global cni-podman0
valid_lft forever preferred_lft forever
[root@lianglab ~]#
[2] 如果您不需要IPv6,则可以如下禁用它。
[root@lianglab ~]# cat /etc/default/grub
GRUB_TIMEOUT=5
GRUB_DISTRIBUTOR="$(sed 's, release .*$,,g' /etc/system-release)"
GRUB_DEFAULT=saved
GRUB_DISABLE_SUBMENU=true
GRUB_TERMINAL_OUTPUT="console"
GRUB_CMDLINE_LINUX="crashkernel=auto rhgb quiet ipv6.disable=1"
GRUB_DISABLE_RECOVERY="true"
GRUB_ENABLE_BLSCFG=true
[root@lianglab ~]#  grub2-mkconfig -o /boot/grub2/grub.cfg
Generating grub configuration file
done

[root@lianglab ~]# reboot
4、启动或禁用服务
[1] 可以如下显示服务状态。
#现在活动的服务列表
[root@lianglab ~]#  systemctl -t service
UNIT                                                                                      LOAD   ACTIVE SUB     DESCRIPTION
atd.service                                                                               loaded active running Job spooling tools
auditd.service                                                                            loaded active running Security Auditing Service
avahi-daemon.service                                                                      loaded active running Avahi mDNS/DNS-SD Stack
crond.service                                                                             loaded active running Command Scheduler
cups.service                                                                              loaded active running CUPS Scheduler
dbus.service                                                                              loaded active running D-Bus System Message Bus
dracut-shutdown.service                                                                   loaded active exited  Restore /run/initramfs on shutdown
getty@tty1.service                                                                        loaded active running Getty on tty1
gssproxy.service                                                                          loaded active running GSSAPI Proxy Daemon
import-state.service                                                                      loaded active exited  Import network configuration from initramfs
irqbalance.service                                                                        loaded active running irqbalance daemon
iscsi-shutdown.service                                                                    loaded active exited  Logout off all iSCSI sessions on shutdown
#所有服务清单
[root@lianglab ~]# systemctl list-unit-files -t service
UNIT FILE                                  STATE
accounts-daemon.service                    enabled
alsa-restore.service                       static
alsa-state.service                         static
anaconda-direct.service                    static
anaconda-nm-config.service                 static
anaconda-noshell.service                   static
anaconda-pre.service                       static
anaconda-shell@.service                    static
anaconda-sshd.service                      static
anaconda-tmux@.service                     static
anaconda.service                           static
arp-ethers.service                         disabled
atd.service                                enabled
auditd.service                             enabled
auth-rpcgss-module.service                 static
autovt@.service                            enabled
avahi-daemon.service                       enabled
blivet.service                             static
blk-availability.service                   disabled
bluetooth.service                          enabled
bolt.service                               static
brltty.service                             disabled
btattach-bcm@.service                      static
canberra-system-bootup.service             disabled
canberra-system-shutdown-reboot.service    disabled
canberra-system-shutdown.service           disabled
chrony-dnssrv@.service                     static
chrony-wait.service                        disabled
chronyd.service                            disabled
clean-mount-point@.service                 static
cockpit-motd.service                       static
cockpit-wsinstance-http-redirect.service   static
cockpit-wsinstance-http.service            static
[2] 如果需要,请停止并关闭服务的自动启动设置。
[root@lianglab ~]# systemctl status  smartd
● smartd.service - Self Monitoring and Reporting Technology (SMART) Daemon
   Loaded: loaded (/usr/lib/systemd/system/smartd.service; enabled; vendor preset: enabled)
   Active: active (running) since Thu 2020-11-19 14:57:30 CST; 2 weeks 1 days ago
     Docs: man:smartd(8)
           man:smartd.conf(5)
 Main PID: 691 (smartd)
    Tasks: 1 (limit: 49642)
   Memory: 2.8M
   CGroup: /system.slice/smartd.service
           └─691 /usr/sbin/smartd -n -q never

Nov 19 14:57:30 centos8 systemd[1]: Started Self Monitoring and Reporting Technology (SMART) Daemon.
Nov 19 14:57:31 centos8 smartd[691]: smartd 6.6 2017-11-05 r4594 [x86_64-linux-4.18.0-193.el8.x86_64] (local build)
Nov 19 14:57:31 centos8 smartd[691]: Copyright (C) 2002-17, Bruce Allen, Christian Franke, www.smartmontools.org
Nov 19 14:57:31 centos8 smartd[691]: Opened configuration file /etc/smartmontools/smartd.conf
Nov 19 14:57:31 centos8 smartd[691]: Configuration file /etc/smartmontools/smartd.conf was parsed, found DEVICESCAN, scanning devices
Nov 19 14:57:31 centos8 smartd[691]: DEVICESCAN failed: glob(3) aborted matching pattern /dev/discs/disc*
Nov 19 14:57:31 centos8 smartd[691]: In the system's table of devices NO devices found to scan
Nov 19 14:57:31 centos8 smartd[691]: Monitoring 0 ATA/SATA, 0 SCSI/SAS and 0 NVMe devices
[root@lianglab ~]# systemctl stop   smartd
[root@lianglab ~]# systemctl disable  smartd
Removed /etc/systemd/system/multi-user.target.wants/smartd.service.
[root@lianglab ~]# systemctl status  smartd
● smartd.service - Self Monitoring and Reporting Technology (SMART) Daemon
   Loaded: loaded (/usr/lib/systemd/system/smartd.service; disabled; vendor preset: enabled)
   Active: inactive (dead)
     Docs: man:smartd(8)
           man:smartd.conf(5)

Nov 19 14:57:30 centos8 systemd[1]: Started Self Monitoring and Reporting Technology (SMART) Daemon.
Nov 19 14:57:31 centos8 smartd[691]: smartd 6.6 2017-11-05 r4594 [x86_64-linux-4.18.0-193.el8.x86_64] (local build)
Nov 19 14:57:31 centos8 smartd[691]: Copyright (C) 2002-17, Bruce Allen, Christian Franke, www.smartmontools.org
Nov 19 14:57:31 centos8 smartd[691]: Opened configuration file /etc/smartmontools/smartd.conf
Nov 19 14:57:31 centos8 smartd[691]: Configuration file /etc/smartmontools/smartd.conf was parsed, found DEVICESCAN, scanning devices
Nov 19 14:57:31 centos8 smartd[691]: DEVICESCAN failed: glob(3) aborted matching pattern /dev/discs/disc*
Nov 19 14:57:31 centos8 smartd[691]: In the system's table of devices NO devices found to scan
Nov 19 14:57:31 centos8 smartd[691]: Monitoring 0 ATA/SATA, 0 SCSI/SAS and 0 NVMe devices
Dec 04 16:37:19 lianglab systemd[1]: Stopping Self Monitoring and Reporting Technology (SMART) Daemon...
Dec 04 16:37:19 lianglab systemd[1]: Stopped Self Monitoring and Reporting Technology (SMART) Daemon.
[root@lianglab ~]#
5、更新CentOS系统
RHEL 8 / CentOS 8上的软件包管理工具DNF(Dandified YUM)已设置为默认值。
但是,[yum]命令也作为指向[dnf]的链接而存在,因此可以以相同的用法使用[yum]或[dnf]。
实际上,RedHat上的官方文档使用RHEL 8的[yum]命令给出了示例
(此站点上的文档使用[dnf]命令提供了示例)。
[1] [yum]和[dnf]链接到[dnf-3]命令。
[root@lianglab ~]# which yum
/usr/bin/yum
[root@lianglab ~]# ll /usr/bin/yum
lrwxrwxrwx. 1 root root 5 Apr 25  2020 /usr/bin/yum -> dnf-3
[root@lianglab ~]# which dnf
/usr/bin/dnf
[root@lianglab ~]# ll /usr/bin/dnf
lrwxrwxrwx. 1 root root 5 Apr 25  2020 /usr/bin/dnf -> dnf-3
[root@lianglab ~]# ll /usr/bin/dnf-3
-rwxr-xr-x. 1 root root 1954 Apr 25  2020 /usr/bin/dnf-3
[root@lianglab ~]#
[root@lianglab ~]#
[root@lianglab ~]#
[root@lianglab ~]# rpm -aq | grep yum
yum-utils-4.0.12-3.el8.noarch
yum-4.2.17-6.el8.noarch
[root@lianglab ~]# rpm -q yum
yum-4.2.17-6.el8.noarch
[root@lianglab ~]# rpm -ql yum
/etc/dnf/protected.d/yum.conf
/etc/yum.conf
/etc/yum/pluginconf.d
/etc/yum/protected.d
/etc/yum/vars
/usr/bin/yum
/usr/share/man/man1/yum-aliases.1.gz
/usr/share/man/man5/yum.conf.5.gz
/usr/share/man/man8/yum-shell.8.gz
/usr/share/man/man8/yum.8.gz
[root@lianglab ~]# ll  /etc/yum.conf
lrwxrwxrwx. 1 root root 12 Apr 25  2020 /etc/yum.conf -> dnf/dnf.conf
[root@lianglab ~]# ll /etc/yum/vars
lrwxrwxrwx. 1 root root 11 Apr 25  2020 /etc/yum/vars -> ../dnf/vars
[root@lianglab ~]# rpm -aq | grep dnf
python3-dnf-plugin-spacewalk-2.8.5-11.module_el8.1.0+211+ad6c0bc7.noarch
python3-dnf-plugins-core-4.0.12-3.el8.noarch
dnf-plugins-core-4.0.12-3.el8.noarch
dnf-data-4.2.17-6.el8.noarch
libdnf-0.39.1-5.el8.x86_64
python3-dnf-4.2.17-6.el8.noarch
dnf-plugin-spacewalk-2.8.5-11.module_el8.1.0+211+ad6c0bc7.noarch
dnf-4.2.17-6.el8.noarch
python3-libdnf-0.39.1-5.el8.x86_64
dnf-plugin-subscription-manager-1.26.16-1.el8.0.1.x86_64
[root@lianglab ~]# rpm -ql dnf
/usr/bin/dnf
/usr/lib/systemd/system/dnf-makecache.service
/usr/lib/systemd/system/dnf-makecache.timer
/usr/share/bash-completion
/usr/share/bash-completion/completions
/usr/share/bash-completion/completions/dnf
[2] 在CentOS服务器成为生产系统之后,可能很难更新系统,但是至少在安装后,将CentOS服务器更新为最新版本。
anaconda-ks.cfg  initial-setup-ks.cfg
[root@lianglab ~]# dnf -y upgrade
Last metadata expiration check: 0:47:05 ago on Fri 04 Dec 2020 03:57:36 PM CST.
Dependencies resolved.
==================================================================================================================================================
 Package                                          Architecture     Version                                              Repository           Size
==================================================================================================================================================
Installing:
 kernel                                           x86_64           4.18.0-193.28.1.el8_2                                base                2.8 M
 kernel-core                                      x86_64           4.18.0-193.28.1.el8_2                                base                 28 M
 kernel-modules                                   x86_64           4.18.0-193.28.1.el8_2                                base                 23 M
Upgrading:

Installing dependencies:
 lttng-ust                                        x86_64           2.8.1-11.el8                                         AppStream           259 k
--------------------------------------省略------------------------------------

Transaction Summary
==================================================================================================================================================
Install    4 Packages
Upgrade  106 Packages

Total download size: 256 M
Downloading Packages:
(1/110): kernel-4.18.0-193.28.1.el8_2.x86_64.rpm                                                                   26 MB/s | 2.8 MB     00:00
(2/110): lttng-ust-2.8.1-11.el8.x86_64.rpm                                                                         12 MB/s | 259 kB     00:00
(3/110): librados2-14.2.15-0.el8.x86_64.rpm                                                                        13 MB/s | 3.5 MB     00:
--------------------------------------省略------------------------------------
(110/110): firefox-78.4.0-1.el8_2.x86_64.rpm                                                                                                                                     49 MB/s | 105 MB     00:02
----------------------------------------------------------------------------------------------------------------------------------------------------------------------------------------------------------------
Total                                                                                                                                                                            67 MB/s | 256 MB     00:03
Running transaction check
Transaction check succeeded.
Running transaction test
Transaction test succeeded.
Running transaction
  Preparing        :                                                                                                                                                                                        1/1
  Running scriptlet: zlib-1.2.11-16.el8_2.x86_64                                                                                                                                                            1/1
  Upgrading        : zlib-1.2.11-16.el8_2.x86_64                                                                                                                                                          1/216
  Upgrading        : glusterfs-libs-6.0-37.el8.x86_64                                                                                                                                                     2/216
  Running scriptlet: glusterfs-libs-6.0-37.el8.x86_64                                                                                                                                                     2/216


--------------------------------------省略------------------------------------

  teamd-1.29-1.el8_2.2.x86_64                                                                             tzdata-2020d-1.el8.noarch
  unbound-libs-1.7.3-11.el8_2.x86_64                                                                      yum-4.2.17-7.el8_2.noarch
  yum-utils-4.0.12-4.el8_2.noarch                                                                         zlib-1.2.11-16.el8_2.x86_64

Installed:
  kernel-4.18.0-193.28.1.el8_2.x86_64               kernel-core-4.18.0-193.28.1.el8_2.x86_64               kernel-modules-4.18.0-193.28.1.el8_2.x86_64               lttng-ust-2.8.1-11.el8.x86_64

Complete!
6、使用Moduler存储库
可以在首次集成到Fedora 28中的RHEL 8 / CentOS 8上使用Moduler信息库。
[1] 显示可用的模块。
[root@lianglab ~]# dnf module list

CentOS-8 - AppStream
Name                   Stream        Profiles                                  Summary
389-ds                 1.4                                                     389 Directory Server (base)
ant                    1.10 [d]      common [d]                                Java build tool
container-tools        rhel8 [d][e]  common [d]                                Common tools and dependencies for container runtimes
container-tools        1.0           common [d]                                Common tools and dependencies for container runtimes
container-tools        2.0           common [d]                                Common tools and dependencies for container
rust-toolset           rhel8 [d]     common [d]                                Rust
satellite-5-client     1.0 [d][e]    common [d], gui                           Red Hat Satellite 5 client packages
scala                  2.10 [d]      common [d]                                A hybrid functional/object-oriented language for the JVM
squid                  4 [d]         common [d]                                Squid - Optimising Web Delivery
subversion             1.10 [d]      common [d], server                        Apache Subversion
swig                   3.0 [d]       common [d], complete                      Connects C/C++/Objective C to some high-level programming languages
varnish                6 [d]         common [d]                                Varnish HTTP cache
virt                   rhel [d][e]   common [d]                                Virtualization module

Hint: [d]efault, [e]nabled, [x]disabled, [i]nstalled
[2] 要安装可用模块,请按如下所示进行配置。
[root@lianglab ~]# dnf module list postgresql
CentOS-8 - AppStream
Name                            Stream                      Profiles                                Summary
postgresql                      9.6                         client, server [d]                      PostgreSQL server and client module
postgresql                      10 [d]                      client, server [d]                      PostgreSQL server and client module
postgresql                      12                          client, server [d]                      PostgreSQL server and client module

Hint: [d]efault, [e]nabled, [x]disabled, [i]nstalled
[root@lianglab ~]#

#安装 postgresql 10 这个版本
[root@lianglab ~]# dnf module install postgresql:10
Dependencies resolved.
============================================================================================================================================================
 Package                              Architecture              Version                                                  Repository                    Size
============================================================================================================================================================
Installing group/module packages:
 postgresql-server                    x86_64                    10.14-1.module_el8.2.0+487+53cc39ce                      AppStream                    5.0 M
Installing dependencies:
 libpq                                x86_64                    12.4-1.el8_2                                             AppStream                    195 k
 postgresql                           x86_64                    10.14-1.module_el8.2.0+487+53cc39ce                      AppStream                    1.5 M
Installing module profiles:
 postgresql/server
Enabling module streams:
 postgresql                                                     10

Transaction Summary
============================================================================================================================================================
Install  3 Packages

Total download size: 6.7 M
Installed size: 26 M
Is this ok [y/N]: y
Downloading Packages:
(1/3): libpq-12.4-1.el8_2.x86_64.rpm                                                                                        609 kB/s | 195 kB     00:00
(2/3): postgresql-10.14-1.module_el8.2.0+487+53cc39ce.x86_64.rpm                                                            3.5 MB/s | 1.5 MB     00:00
(3/3): postgresql-server-10.14-1.module_el8.2.0+487+53cc39ce.x86_64.rpm                                                     8.6 MB/s | 5.0 MB     00:00
------------------------------------------------------------------------------------------------------------------------------------------------------------
Total                                                                                                                       5.4 MB/s | 6.7 MB     00:01
Running transaction check
Transaction check succeeded.
Running transaction test
Transaction test succeeded.
Running transaction
  Preparing        :                                                                                                                                    1/1
  Installing       : libpq-12.4-1.el8_2.x86_64                                                                                                          1/3
  Installing       : postgresql-10.14-1.module_el8.2.0+487+53cc39ce.x86_64                                                                              2/3
  Running scriptlet: postgresql-server-10.14-1.module_el8.2.0+487+53cc39ce.x86_64                                                                       3/3
  Installing       : postgresql-server-10.14-1.module_el8.2.0+487+53cc39ce.x86_64                                                                       3/3
  Running scriptlet: postgresql-server-10.14-1.module_el8.2.0+487+53cc39ce.x86_64                                                                       3/3
  Verifying        : libpq-12.4-1.el8_2.x86_64                                                                                                          1/3
  Verifying        : postgresql-10.14-1.module_el8.2.0+487+53cc39ce.x86_64                                                                              2/3
  Verifying        : postgresql-server-10.14-1.module_el8.2.0+487+53cc39ce.x86_64                                                                       3/3
Installed products updated.

Installed:
  libpq-12.4-1.el8_2.x86_64     postgresql-10.14-1.module_el8.2.0+487+53cc39ce.x86_64     postgresql-server-10.14-1.module_el8.2.0+487+53cc39ce.x86_64

Complete!
[root@lianglab ~]#

[root@lianglab ~]# dnf module list postgresql

CentOS-8 - AppStream
Name                           Stream                       Profiles                                  Summary
postgresql                     9.6                          client, server [d]                        PostgreSQL server and client module
postgresql                     10 [d][e]                    client, server [d] [i]                    PostgreSQL server and client module
postgresql                     12                           client, server [d]                        PostgreSQL server and client module

Hint: [d]efault, [e]nabled, [x]disabled, [i]nstalled
[root@lianglab ~]#  dnf module provides postgresql

postgresql-10.14-1.module_el8.2.0+487+53cc39ce.x86_64
Module   : postgresql:10:8020020200917114337:6a468ee4:x86_64
Profiles : client
Repo     : AppStream
Summary  : PostgreSQL server and client module

postgresql-12.1-2.module_el8.1.0+273+979c16e6.x86_64
Module   : postgresql:12:8010020200205032101:cdc1202b:x86_64
Profiles : client
Repo     : AppStream
Summary  : PostgreSQL server and client module

postgresql-9.6.10-1.module_el8.0.0+16+7a9f6089.x86_64
Module   : postgresql:9.6:8000020190628020724:55190bc5:x86_64
Profiles : client
Repo     : AppStream
Summary  : PostgreSQL server and client module
[root@lianglab ~]# postgres -V
postgres (PostgreSQL) 10.14
[root@lianglab ~]#


#首先重设切换
[3] 如果您想更改为已安装模块的另一个版本,请按以下步骤进行配置。
例如,从上面[2]上安装的PostgreSQL 10切换到PostgreSQL 9.6。
[root@lianglab ~]#
[root@lianglab ~]# dnf module list postgresql   ###

Last metadata expiration check: 0:28:05 ago on Fri 04 Dec 2020 04:51:39 PM CST.
CentOS-8 - AppStream
Name                                          Stream                                       Profiles                                                  Summary
postgresql                                    9.6                                          client, server [d]                                        PostgreSQL server and client module
postgresql                                    10 [d][e]                                    client, server [d] [i]                                    PostgreSQL server and client module
postgresql                                    12                                           client, server [d]                                        PostgreSQL server and client module

Hint: [d]efault, [e]nabled, [x]disabled, [i]nstalled
[root@lianglab ~]# dnf module reset postgresql      ####首先重设切换
Last metadata expiration check: 0:28:46 ago on Fri 04 Dec 2020 04:51:39 PM CST.
Dependencies resolved.
==========================================================================================================================================================================================================================
 Package                                              Architecture                                        Version                                              Repository                                            Size
==========================================================================================================================================================================================================================
Disabling module profiles:
 postgresql/server
Resetting modules:
 postgresql

Transaction Summary
==========================================================================================================================================================================================================================

Is this ok [y/N]: y
Complete!
[root@lianglab ~]# postgres -V
postgres (PostgreSQL) 10.14
[root@lianglab ~]# dnf module list postgresql
Last metadata expiration check: 0:29:19 ago on Fri 04 Dec 2020 04:51:39 PM CST.
CentOS-8 - AppStream
Name                                            Stream                                      Profiles                                               Summary
postgresql                                      9.6                                         client, server [d]                                     PostgreSQL server and client module
postgresql                                      10 [d]                                      client, server [d]                                     PostgreSQL server and client module
postgresql                                      12                                          client, server [d]                                     PostgreSQL server and client module

Hint: [d]efault, [e]nabled, [x]disabled, [i]nstalled
[root@lianglab ~]# dnf module install postgresql:9.6        #安装PostgreSQL 9.6
Last metadata expiration check: 0:29:38 ago on Fri 04 Dec 2020 04:51:39 PM CST.
Dependencies resolved.
==========================================================================================================================================================================================================================
 Package                                              Architecture                              Version                                                                Repository                                    Size
==========================================================================================================================================================================================================================
Downgrading:
 postgresql                                           x86_64                                    9.6.10-1.module_el8.0.0+16+7a9f6089                                    AppStream                                    1.4 M
 postgresql-server                                    x86_64                                    9.6.10-1.module_el8.0.0+16+7a9f6089                                    AppStream                                    5.0 M
Installing module profiles:
 postgresql/server
Enabling module streams:
 postgresql                                                                                     9.6

Transaction Summary
==========================================================================================================================================================================================================================
Downgrade  2 Packages

Total download size: 6.4 M
Is this ok [y/N]: y
Downloading Packages:
(1/2): postgresql-9.6.10-1.module_el8.0.0+16+7a9f6089.x86_64.rpm                                                                                                                          4.0 MB/s | 1.4 MB     00:00
(2/2): postgresql-server-9.6.10-1.module_el8.0.0+16+7a9f6089.x86_64.rpm                                                                                                                   9.4 MB/s | 5.0 MB     00:00
--------------------------------------------------------------------------------------------------------------------------------------------------------------------------------------------------------------------------
Total                                                                                                                                                                                     6.5 MB/s | 6.4 MB     00:00
Running transaction check
Transaction check succeeded.
Running transaction test
Transaction test succeeded.
Running transaction
  Preparing        :                                                                                                                                                                                                  1/1
  Running scriptlet: postgresql-9.6.10-1.module_el8.0.0+16+7a9f6089.x86_64                                                                                                                                            1/1
  Downgrading      : postgresql-9.6.10-1.module_el8.0.0+16+7a9f6089.x86_64                                                                                                                                            1/4
  Running scriptlet: postgresql-server-9.6.10-1.module_el8.0.0+16+7a9f6089.x86_64                                                                                                                                     2/4
  Downgrading      : postgresql-server-9.6.10-1.module_el8.0.0+16+7a9f6089.x86_64                                                                                                                                     2/4
  Running scriptlet: postgresql-server-9.6.10-1.module_el8.0.0+16+7a9f6089.x86_64                                                                                                                                     2/4
  Running scriptlet: postgresql-server-10.14-1.module_el8.2.0+487+53cc39ce.x86_64                                                                                                                                     3/4
  Cleanup          : postgresql-server-10.14-1.module_el8.2.0+487+53cc39ce.x86_64                                                                                                                                     3/4
  Running scriptlet: postgresql-server-10.14-1.module_el8.2.0+487+53cc39ce.x86_64                                                                                                                                     3/4
  Cleanup          : postgresql-10.14-1.module_el8.2.0+487+53cc39ce.x86_64                                                                                                                                            4/4
  Running scriptlet: postgresql-10.14-1.module_el8.2.0+487+53cc39ce.x86_64                                                                                                                                            4/4
  Verifying        : postgresql-9.6.10-1.module_el8.0.0+16+7a9f6089.x86_64                                                                                                                                            1/4
  Verifying        : postgresql-10.14-1.module_el8.2.0+487+53cc39ce.x86_64                                                                                                                                            2/4
  Verifying        : postgresql-server-9.6.10-1.module_el8.0.0+16+7a9f6089.x86_64                                                                                                                                     3/4
  Verifying        : postgresql-server-10.14-1.module_el8.2.0+487+53cc39ce.x86_64                                                                                                                                     4/4
Installed products updated.

Downgraded:
  postgresql-9.6.10-1.module_el8.0.0+16+7a9f6089.x86_64                                                    postgresql-server-9.6.10-1.module_el8.0.0+16+7a9f6089.x86_64

Complete!
[root@lianglab ~]# dnf module list postgresql        #[PostgreSQL 9.6]的状态变为[e]启用
Last metadata expiration check: 0:29:58 ago on Fri 04 Dec 2020 04:51:39 PM CST.
CentOS-8 - AppStream
Name                                           Stream                                     Profiles                                                  Summary
postgresql                                     9.6 [e]                                    client, server [d] [i]                                    PostgreSQL server and client module
postgresql                                     10 [d]                                     client, server [d]                                        PostgreSQL server and client module
postgresql                                     12                                         client, server [d]                                        PostgreSQL server and client module

Hint: [d]efault, [e]nabled, [x]disabled, [i]nstalled
###提示:[d]故障,[e]启用,[x]禁用,[i]安装
[root@lianglab ~]# dnf module provides postgresql
Last metadata expiration check: 0:30:12 ago on Fri 04 Dec 2020 04:51:39 PM CST.
postgresql-10.14-1.module_el8.2.0+487+53cc39ce.x86_64
Module   : postgresql:10:8020020200917114337:6a468ee4:x86_64
Profiles : client
Repo     : AppStream
Summary  : PostgreSQL server and client module

postgresql-12.1-2.module_el8.1.0+273+979c16e6.x86_64
Module   : postgresql:12:8010020200205032101:cdc1202b:x86_64
Profiles : client
Repo     : AppStream
Summary  : PostgreSQL server and client module

postgresql-9.6.10-1.module_el8.0.0+16+7a9f6089.x86_64
Module   : postgresql:9.6:8000020190628020724:55190bc5:x86_64
Profiles : client
Repo     : AppStream
Summary  : PostgreSQL server and client module
[root@lianglab ~]# postgres -V
postgres (PostgreSQL) 9.6.10
7、使用web管理控制台
Cockpit管理控制台与CentOS 8基本环境[服务器]或其他一起安装。可以在Web浏览器上管理CentOS服务器以启用它。
[1] 在控制台登录提示上,如[激活Web控制台***]之类的消息所示,可以使用管理控制台启用它。
启动cockpit 服务并配置firwalld
[root@lianglab yum.repos.d]#  systemctl enable --now cockpit.socket
Created symlink /etc/systemd/system/sockets.target.wants/cockpit.socket → /usr/lib/systemd/system/cockpit.socket.
[root@lianglab yum.repos.d]#
[root@lianglab yum.repos.d]#
[root@lianglab yum.repos.d]#
[root@lianglab yum.repos.d]#
                                          users:(("systemd",pid=1,fd=27))
[root@lianglab yum.repos.d]# ss -napt
State     Recv-Q    Send-Q       Local Address:Port        Peer Address:Port
LISTEN    0         128                0.0.0.0:5355             0.0.0.0:*         users:(("systemd-resolve",pid=907,fd=13))
LISTEN    0         128                0.0.0.0:111              0.0.0.0:*         users:(("rpcbind",pid=653,fd=4),("systemd",pid=1,fd=100))
LISTEN    0         511                0.0.0.0:80               0.0.0.0:*         users:(("nginx",pid=1073,fd=10),("nginx",pid=1070,fd=10),("nginx",pid=1068,fd=10),("nginx",pid=1067,fd=10),("nginx",pid=1059,fd=10))
LISTEN    0         128                0.0.0.0:22               0.0.0.0:*         users:(("sshd",pid=739,fd=4))
LISTEN    0         5                127.0.0.1:631              0.0.0.0:*         users:(("cupsd",pid=733,fd=9))
ESTAB     0         0             192.168.6.58:22          10.57.237.13:53974     users:(("sshd",pid=196985,fd=5),("sshd",pid=196937,fd=5))
ESTAB     0         0             192.168.6.58:22          10.57.237.13:57232     users:(("sshd",pid=194458,fd=5),("sshd",pid=194373,fd=5))
ESTAB     0         48            192.168.6.58:22          10.57.237.13:53973     users:(("sshd",pid=196938,fd=5),("sshd",pid=196933,fd=5))
ESTAB     0         0             192.168.6.58:22          10.57.237.13:57231     users:(("sshd",pid=194390,fd=5),("sshd",pid=194369,fd=5))
LISTEN    0         128                   [::]:5355                [::]:*         users:(("systemd-resolve",pid=907,fd=15))
LISTEN    0         128                   [::]:111                 [::]:*         users:(("rpcbind",pid=653,fd=6),("systemd",pid=1,fd=102))
LISTEN    0         128                   [::]:22                  [::]:*         users:(("sshd",pid=739,fd=6))
LISTEN    0         5                    [::1]:631                 [::]:*         users:(("cupsd",pid=733,fd=8))
LISTEN    0         128                      *:9090                   *:*         users:(("systemd",pid=1,fd=27))
[root@lianglab yum.repos.d]# firewall-cmd --list-service
FirewallD is not running
[root@lianglab yum.repos.d]# systemctl start firewalld
[root@lianglab yum.repos.d]# firewall-cmd --list-service
cockpit dhcpv6-client ssh
[root@lianglab yum.repos.d]# systemctl stop firewalld
[root@lianglab yum.repos.d]# systemctl start firewalld
[root@lianglab yum.repos.d]# firewall-cmd --add-service=cockpit --permanent
Warning: ALREADY_ENABLED: cockpit
success
[root@lianglab yum.repos.d]# firewall-cmd --reload
success
[root@lianglab yum.repos.d]# firewall-cmd --add-service=cockpit --permanent
Warning: ALREADY_ENABLED: cockpit
success
[root@lianglab yum.repos.d]# systemctl enable --now cockpit.socket
[root@lianglab yum.repos.d]# firewall-cmd --add-service=cockpit --permanent
Warning: ALREADY_ENABLED: cockpit
success
[root@lianglab yum.repos.d]# systemctl status firewalld
● firewalld.service - firewalld - dynamic firewall daemon
   Loaded: loaded (/usr/lib/systemd/system/firewalld.service; disabled; vendor preset: enabled)
   Active: active (running) since Fri 2020-12-04 17:37:44 CST; 1min 1s ago
     Docs: man:firewalld(1)
 Main PID: 249340 (firewalld)
    Tasks: 3 (limit: 49642)
   Memory: 26.3M
   CGroup: /system.slice/firewalld.service
           └─249340 /usr/libexec/platform-python -s /usr/sbin/firewalld --nofork --nopid

Dec 04 17:37:43 lianglab systemd[1]: Starting firewalld - dynamic firewall daemon...
Dec 04 17:37:44 lianglab systemd[1]: Started firewalld - dynamic firewall daemon.
Dec 04 17:37:44 lianglab firewalld[249340]: WARNING: AllowZoneDrifting is enabled. This is considered an insecure configuration option. It will be removed in a future release. Please consider disabling it now.
Dec 04 17:37:50 lianglab firewalld[249340]: WARNING: ALREADY_ENABLED: cockpit
Dec 04 17:37:59 lianglab firewalld[249340]: WARNING: AllowZoneDrifting is enabled. This is considered an insecure configuration option. It will be removed in a future release. Please consider disabling it now.
Dec 04 17:38:02 lianglab firewalld[249340]: WARNING: ALREADY_ENABLED: cockpit
Dec 04 17:38:26 lianglab firewalld[249340]: WARNING: ALREADY_ENABLED: cockpit
[root@lianglab yum.repos.d]# systemctl status cockpit.socket
● cockpit.socket - Cockpit Web Service Socket
   Loaded: loaded (/usr/lib/systemd/system/cockpit.socket; enabled; vendor preset: disabled)
   Active: active (listening) since Fri 2020-12-04 17:36:29 CST; 2min 26s ago
     Docs: man:cockpit-ws(8)
   Listen: [::]:9090 (Stream)
    Tasks: 0 (limit: 49642)
   Memory: 992.0K
   CGroup: /system.slice/cockpit.socket
Dec 04 17:36:29 lianglab systemd[1]: Starting Cockpit Web Service Socket.
Dec 04 17:36:29 lianglab systemd[1]: Listening on Cockpit Web Service Socket.
[root@lianglab yum.repos.d]#
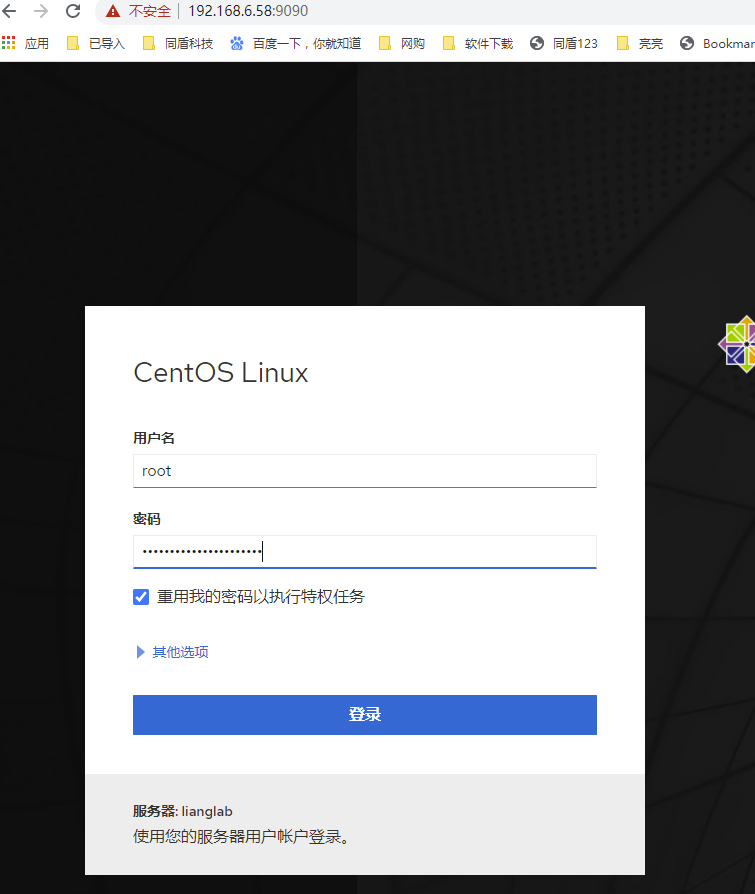
[2] 使用Web浏览器从本地主机或客户端计算机访问[https://(服务器的主机名或IP地址):9090 /],然后显示Cockpit登录表单,如下所示。使用服务器上的本地用户登录。在此示例中,显示了使用root用户登录。
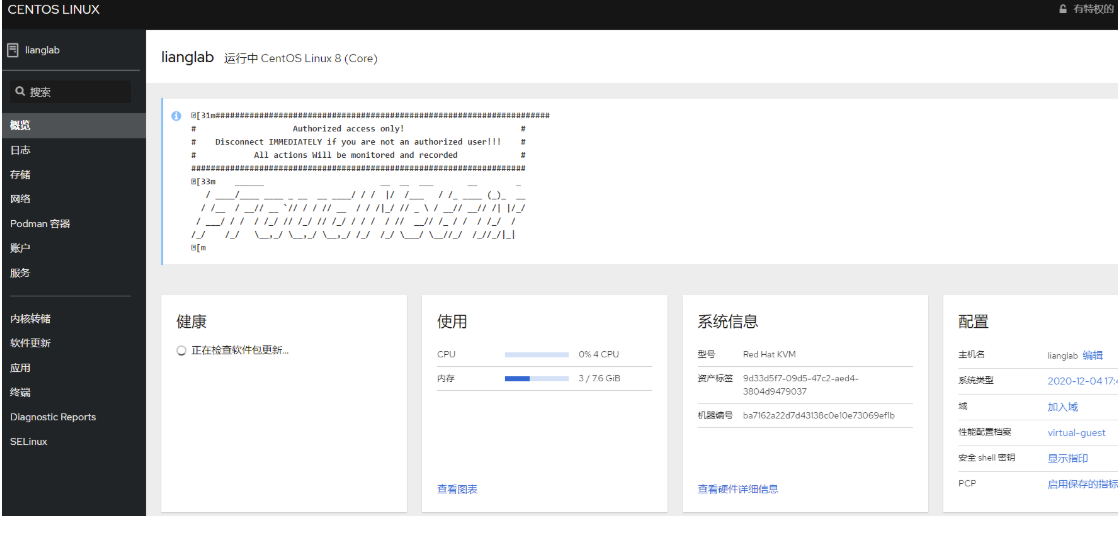
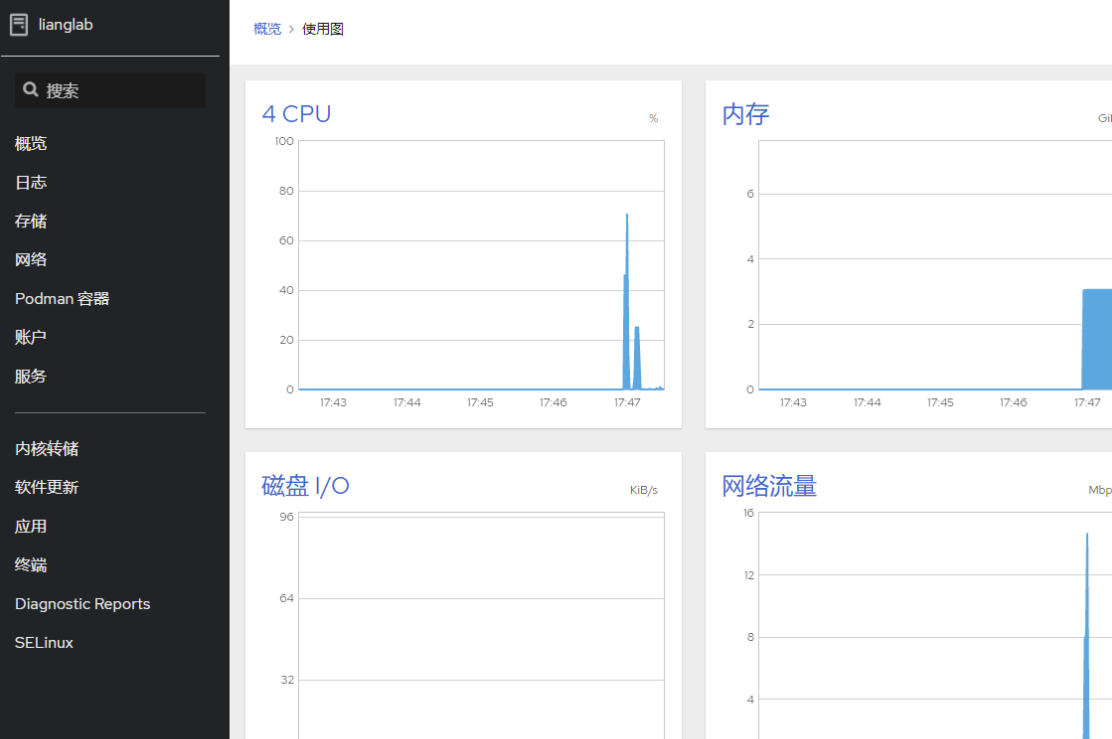
[3] 这是座舱索引页面。可以在此处管理各种系统设置。
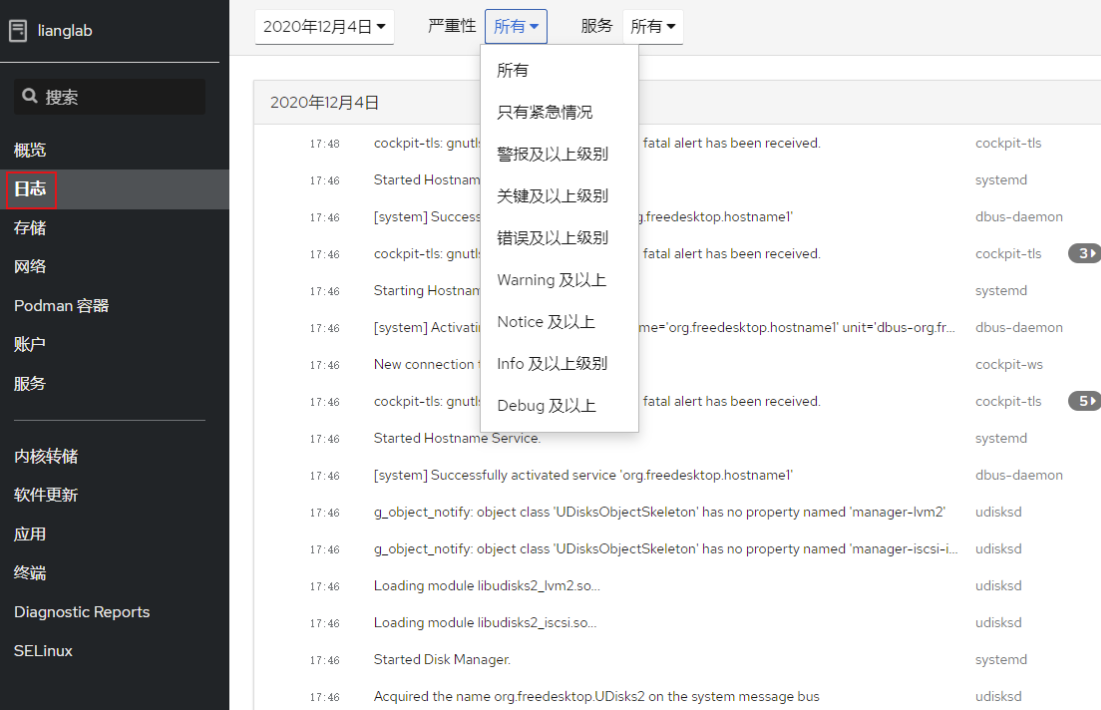
[4] 对于左窗格中的[日志],可以管理或操作作为日志管理工具的[日志]服务。
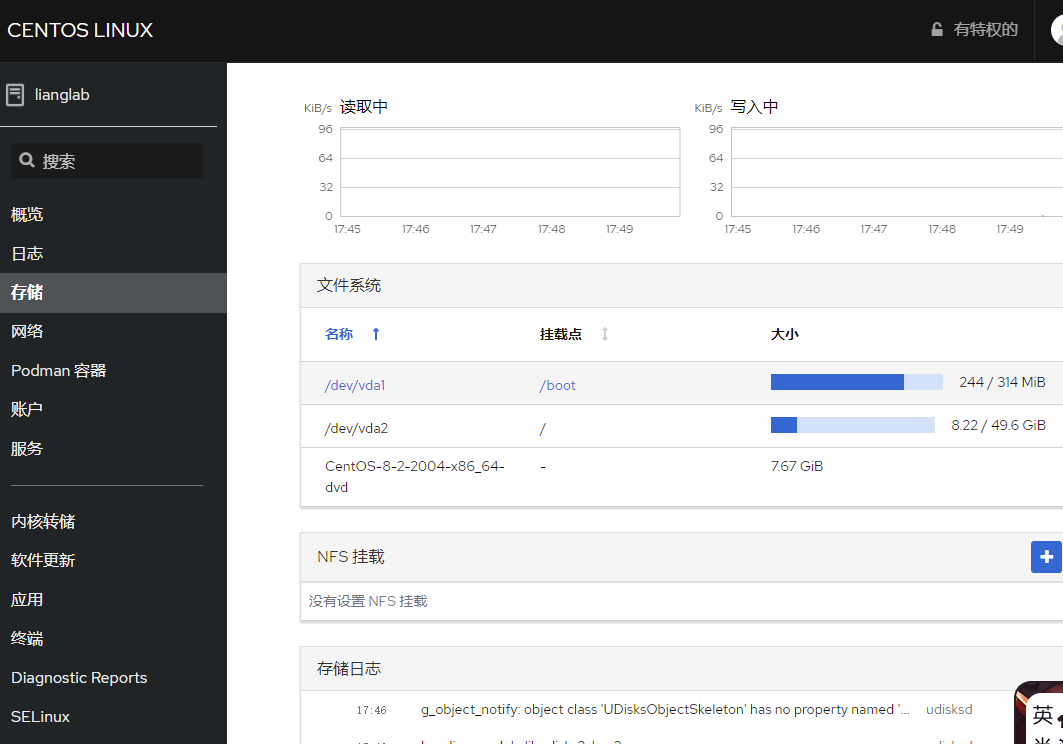
[5] 对于左窗格中的[存储],可以管理或操作存储。
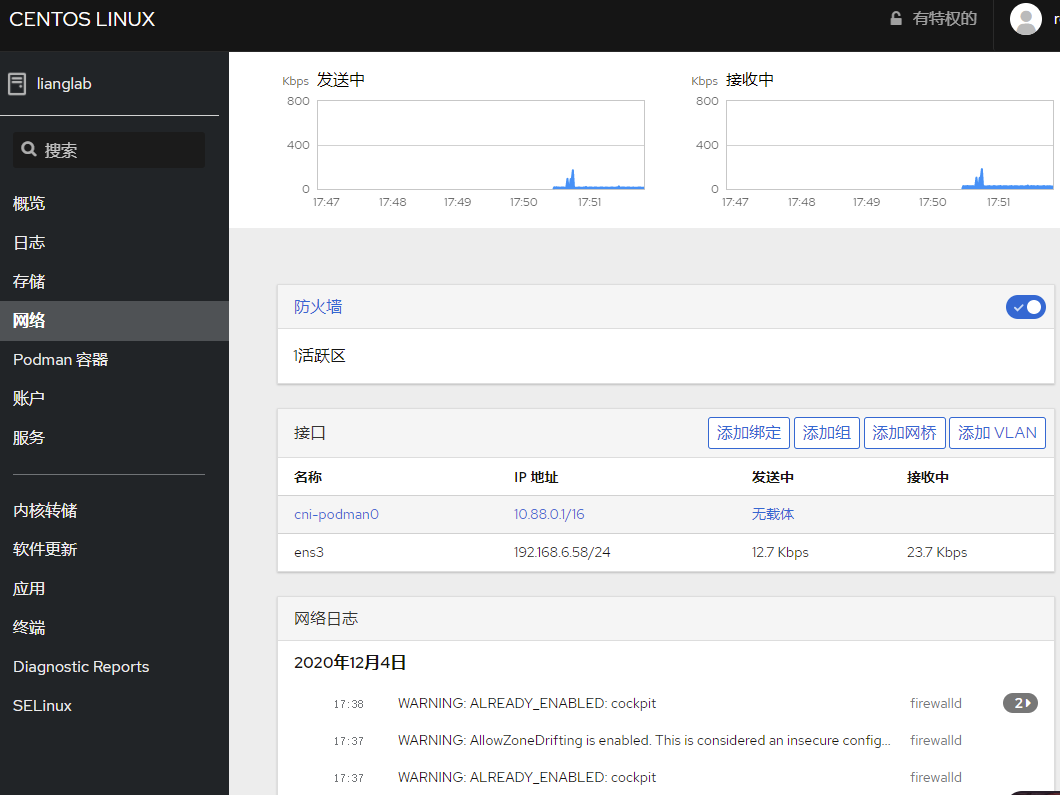
[6] 对于左窗格中的[网络],可以管理或操作网络设置。
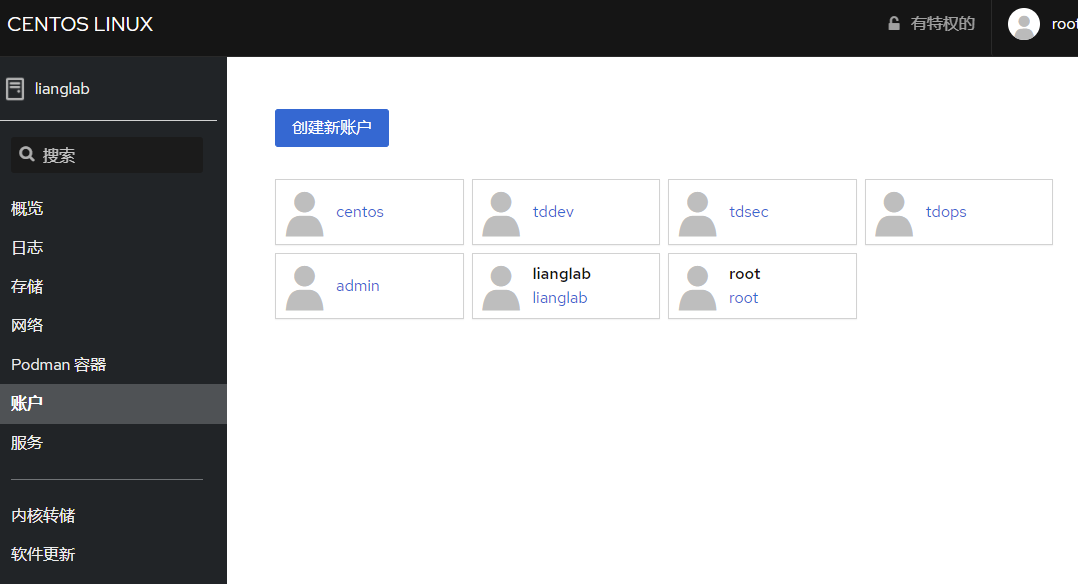
[7] 对于左窗格中的[帐户],可以管理或操作系统帐户。
[8] 对于左窗格中的[服务],可以管理或操作系统服务。

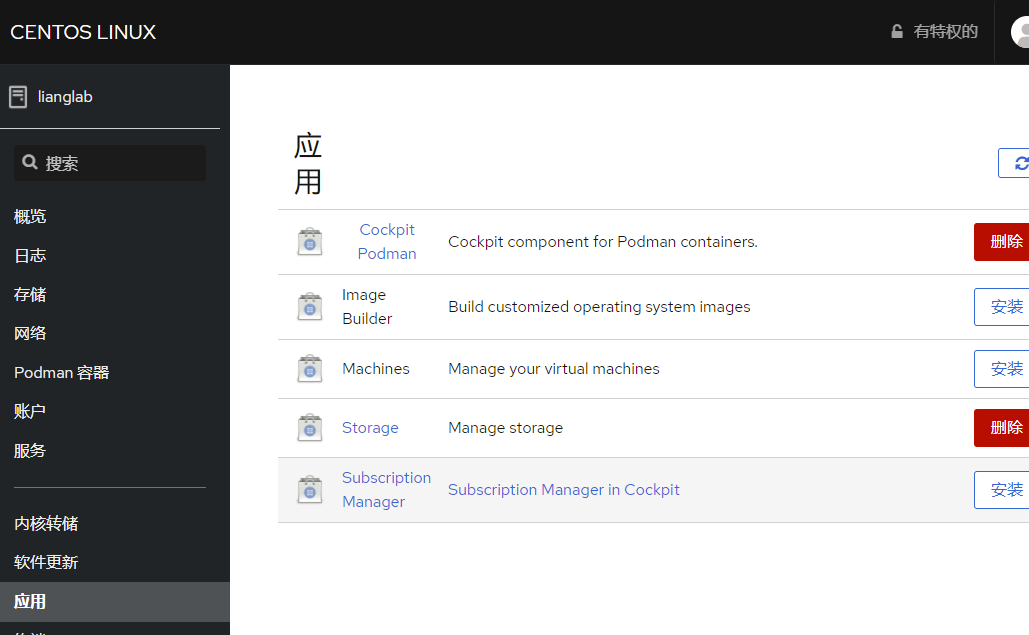
[9] 对于左窗格中的[Applications],可以安装或删除应用程序。
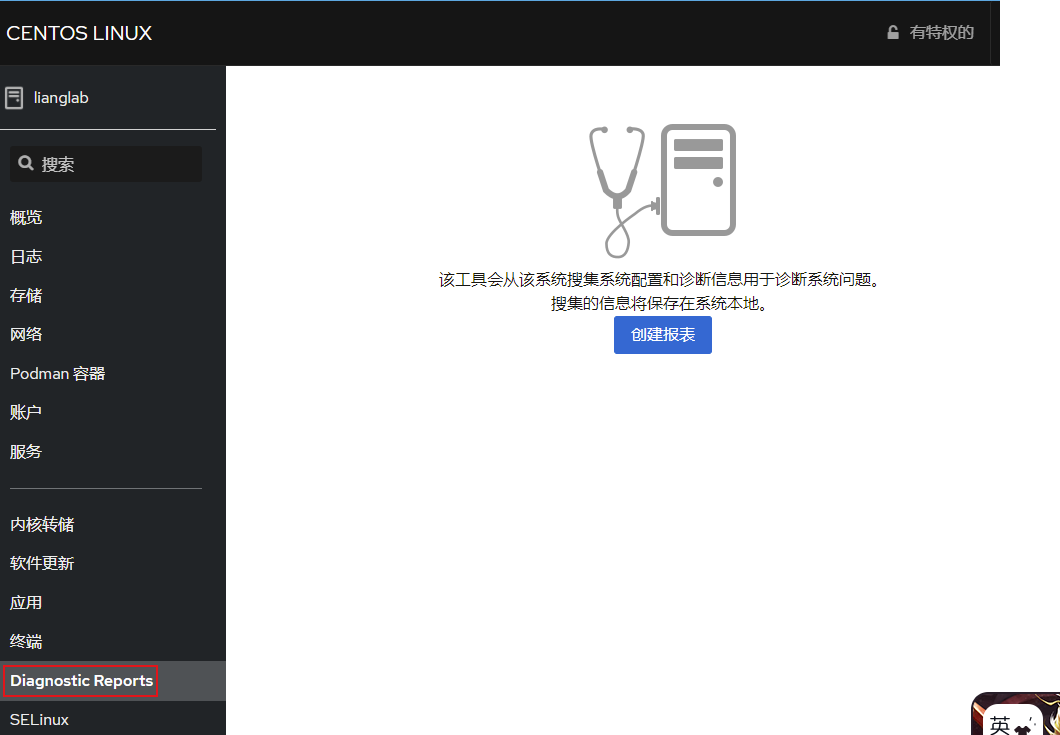
[10] 对于左窗格上的[诊断报告],可以创建或查看系统诊断报告。
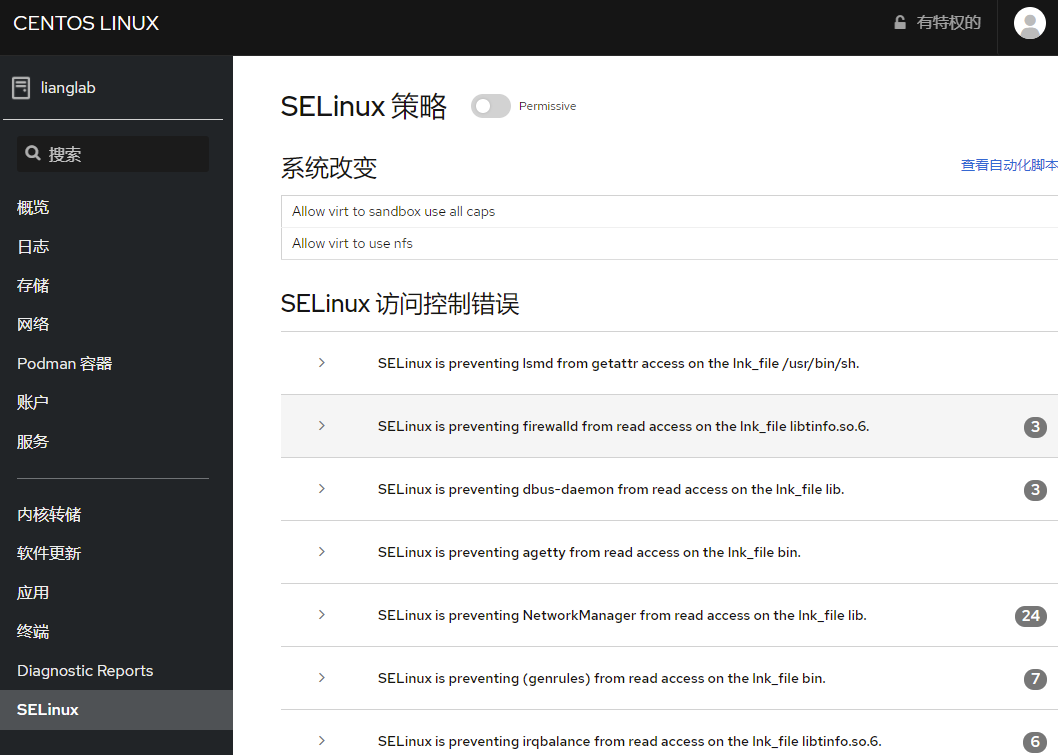
[11] 对于左窗格中的[SELinux],可能会看到SELinux警报日志。(基于SELinux启用状态)
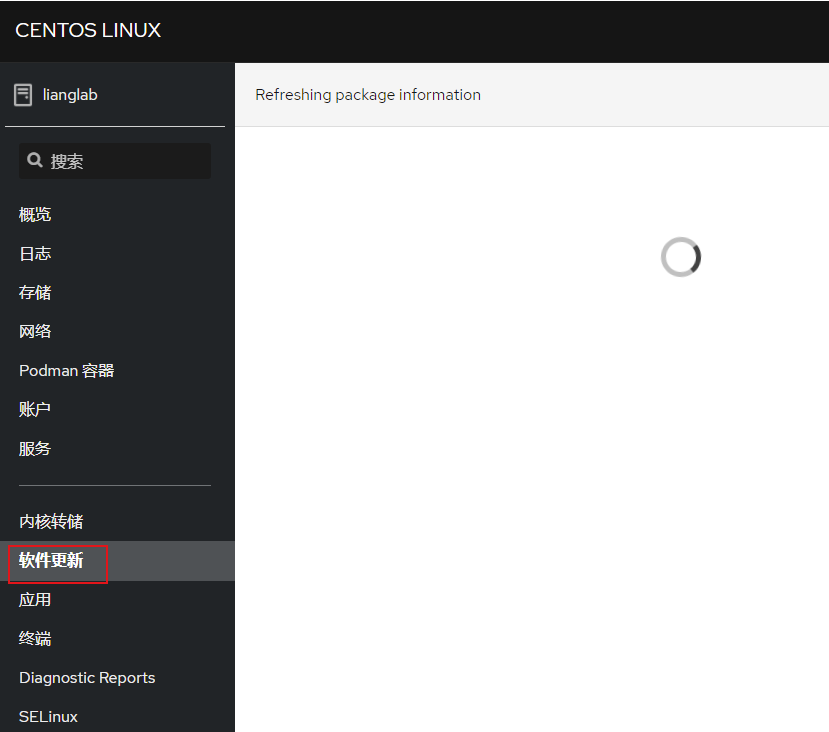
[12] 对于左窗格上的[软件更新],可以确认更新或运行更新程序包。
[13] 对于左窗格中的[Terminal],可以直接使用命令来操作系统。
8、vim设置
9、其他个性化设置
广告时间:
- 关于我 :全国7*24高效代维服务
- 微信:lianglab
- QQ:867266199
- 淘宝店:全国7*24高效代维服务
- 全国高效代维:为中小型企业,提供云计算咨询代维、架构设计、降低成本。