一、模块初识:
Python有大量的模块,从而使得开发Python程序非常简洁。类库有包括三中:
- Python内部提供的模块
- 业内开源的模块
- 程序员自己开发的模块
1、Python内部提供一个 sys 的模块,
① 其中的 sys.argv 用来捕获执行执行python脚本时传入的参数:
import sys

strings = sys.argv
print(strings)   # 所有参数 类型为列表
# ['start.py', 'hello', 'world']
print(strings[0])   # 脚本名本身
# start.py
print(strings[1])   # 第一个参数
# hello
print(strings[2])   # 第二个参数
# world
print(strings[-1])  # 倒数第一个参数
# world

$ python test.py helo world   执行脚本
② sys.stdin信息输入:
读取的文件:


我越无所适从
越会事与愿违
在交错的时空
灵魂加速下坠
Here we are, here we are, here we are
程序start.py:
import sys
li = []
file = sys.stdin
# <_io.TextIOWrapper name='<stdin>' mode='r' encoding='cp936'>  file
for line in file:
    li.append(line)
    print(li)
    print(line.strip())    # 这个很重要 strip去除末尾的换行符 本身print跟print直接回产生换行符
                           # 如果不进去去除末尾的换行符的话 会再多打印一行换行符
    li =[]
执行程序: < 输入的文件 > 脚本打印的输出
python start.py < lzl.txt >test.txt
生成的文件test.txt:
['我越无所适从
']
我越无所适从
['越会事与愿违
']
越会事与愿违
['在交错的时空
']
在交错的时空
['灵魂加�udc80�下�udca0
']
灵魂加速下坠
['Here we are, here we are, here we are']
Here we are, here we are, here we are
③ sys.stdout 重定向输出
import sys

sys.stdout.write("asdgf") # 当我们在 Python 中打印对象调用 print obj 时候,事实上是调用了 sys.stdout.write(obj+'
')
# asdgf
④ sys.stdout.flush 强制刷新标准输出缓存,举网上泛传的一个例子,python3中楼主没有看出其中的效果,单本楼主之前学多进程时看到过效果,那个例子找不到了;就暂且认为下面的例子看出效果了吧
import time
import sys
for i in range(5):
    print(i),
    sys.stdout.flush()
    time.sleep(1)
# 这样设计是为了打印一个数每秒五秒钟,但如果您运行它,因为它是现在(取决于您的默认系统缓冲),
# 你可能看不到任何输出 CodeGo.net,直到再一次全部,你会看到0 1 2 3 4打印到屏幕上。
#  这是输出被缓冲,除非你sys.stdout之后每print你不会看到从输出中取出sys.stdout.flush()网上看到的差别
2、os模块,os模块与系统进行交互
① os.dir、os.popen调用当前系统命令:
#!/usr/bin/env python
# -*- coding:utf-8 -*-
#-Author-Lian
import os                           #调用os模块
res = os.system("dir")              #只执行命令,不保存结果
#������ C �еľ�û�б�ǩ��               #打印dir命令的结果
#�������� 50FA-4D57
#
#C:UsersLPycharmProjectss14Day2 ��Ŀ¼
#2016/08/04  10:53    <DIR>          .
#2016/08/04  10:53    <DIR>          ..
#2016/08/04  10:53               147 module.py
#               1 ���ļ�            147 �ֽ�
#               2 ��Ŀ¼ 35,291,541,504 �����ֽ�
print(res)                          #res只返会执行命令的成功与否,成功为0 反之为1
#0


res = os.popen("dir")               #不打印输出,保存执行结果
print(res)                           #打印res内存地址信息
#<os._wrap_close object at 0x009BE570>
res = os.popen("dir").read()        #通过read去读取内存地址记录的信息
print(res)
#驱动器 C 中的卷没有标签。
#卷的序列号是 50FA-4D57
#
#C:UsersLPycharmProjectss14Day2 的目录
#
#2016/08/04  11:00    <DIR>          .
#2016/08/04  11:00    <DIR>          ..
#2016/08/04  11:00             1,002 module.py
#               1 个文件          1,002 字节
#               2 个目录 35,291,017,216 可用字节

os.mkdir("new_dir")                 #在当前目录下创建新的目录new_dir
②、两者结合使用:
import os,sys

os.system(''.join(sys.argv[1:])) #把用户的输入的参数当作一条命令交给os.system来执行
3、platform识别当前运行的系统
① 根据不同的系统创建文件的绝对路径(linux系统路径为/,windows系统路径为)
import os,sys
import platform

if platform.system() == 'Windows':      #windows系统
    BASE_DIR = '\'.join(os.path.abspath(os.path.dirname(__file__)).split('\')[:-1])   # 取当前文件目录的父目录
    #school_dbpaths = os.path.join(BASE_DIR,'school_db')                                 # 如果只要当前目录则不用split
    sys.path.insert(0, BASE_DIR)    #加入到系统路径

else:
    BASE_DIR = '/'.join(os.path.abspath(os.path.dirname(__file__)).split('/')[:-1])
    school_dbpaths =os.path.join(BASE_DIR, 'school_db')

print(school_dbpaths)
# C:UsersLPycharmProjectss14homeworkDay_11
pc_clientschool_db
二、运算符:
1、算数运算:

2、比较运算:

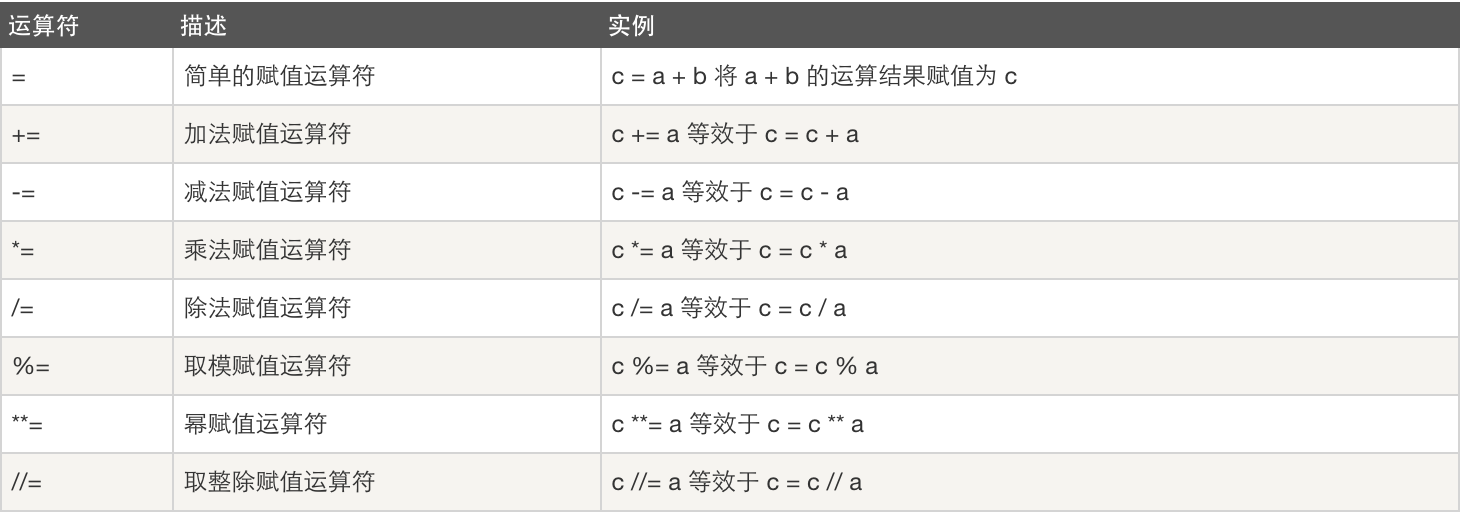
3、赋值运算:
4、逻辑运算:

5、成员运算:

6、身份运算:

7、位运算:
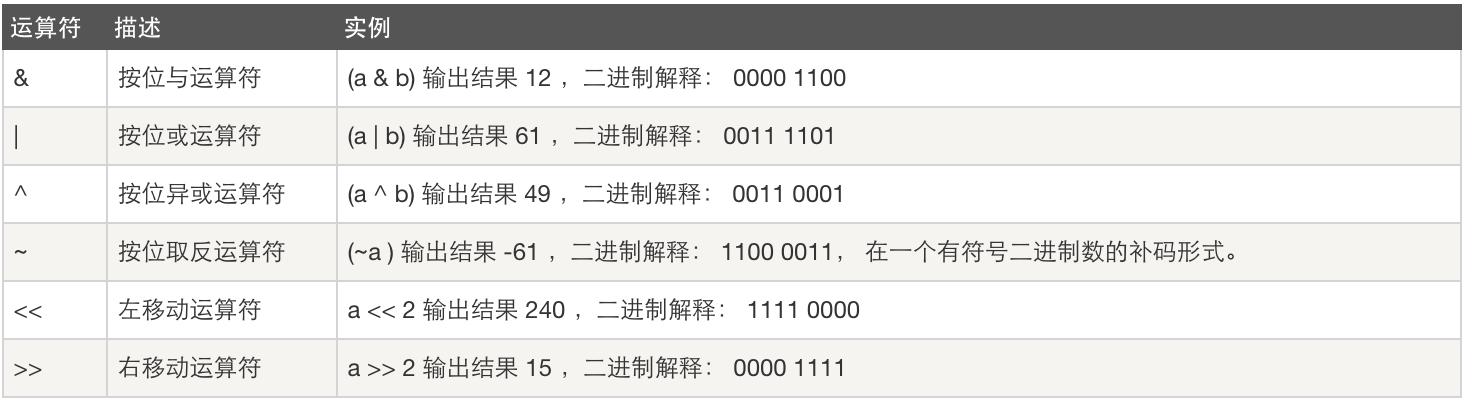
#!/usr/bin/python

a = 60            # 60 = 0011 1100
b = 13            # 13 = 0000 1101
c = 0

c = a & b;        # 12 = 0000 1100
print "Line 1 - Value of c is ", c

c = a | b;        # 61 = 0011 1101
print "Line 2 - Value of c is ", c

c = a ^ b;        # 49 = 0011 0001
print "Line 3 - Value of c is ", c

c = ~a;           # -61 = 1100 0011
print "Line 4 - Value of c is ", c

c = a << 2;       # 240 = 1111 0000
print "Line 5 - Value of c is ", c

c = a >> 2;       # 15 = 0000 1111
print "Line 6 - Value of c is ", c
8、运算符优先级:

点击查看更多内容:Python运算符