1、静态方法
通过@staticmethod装饰器即可把其装饰的方法变为一个静态方法,什么是静态方法呢?其实不难理解,普通的方法,可以在实例化后直接调用,并且在方法里可以通过self.调用实例变量或类变量,但静态方法是不可以访问实例变量或类变量的,一个不能访问实例变量和类变量的方法,其实相当于跟类本身已经没什么关系了,它与类唯一的关联就是需要通过类名来调用这个方法;不可访问实例变量跟类变量,内部其他函数可通过self.静态方法执行,需要实例化
#静态方法
class Schoolmate(object):
    def __init__(self, name):
        self.name = name

    @staticmethod    # 把eat方法变为静态方法
    def eat(self):
        print("%s is eating" % self.name)


p= Schoolmate("LianZhiLei")
p.eat()

# Traceback (most recent call last):
#   File "C:/Users/L/PycharmProjects/s14/class/Day7/staticmothod.py", line 16, in <module>
#     p.eat()
#TypeError: eat() missing 1 required positional argument: 'self'
上面的调用会出以下错误,说是eat需要一个self参数,但调用时却没有传递,没错,当eat变成静态方法后,再通过实例调用时就不会自动把实例本身当作一个参数传给self了。
想让上面的代码可以正常工作有两种办法
- 调用时主动传递实例本身给eat方法,即p.eat(p)
- 在eat方法中去掉self参数,但这也意味着,在eat中不能通过self.调用实例中的其它变量了
#静态方法
class Schoolmate(object):
    def __init__(self, name):
        self.name = name

    @staticmethod    # 把eat方法变为静态方法
    def eat(self):
        print("%s is eating" % self.name)

p= Schoolmate("LianZhiLei")
p.eat(p)

#LianZhiLei is eating

#静态方法
class Schoolmate(object):
    def __init__(self, name):
        self.name = name

    @staticmethod    # 把eat方法变为静态方法
    def eat():
        print("is eating")

p= Schoolmate("LianZhiLei")
p.eat()

#is eating
2、类方法
类方法顾名思义跟类有关,类方法通过@classmethod装饰器实现,类方法和普通方法的区别是, 类方法只能访问类变量,不能访问实例变量,不用实例化,通过类名直接执行;
#类方法
class Schoolmate(object):
    def __init__(self, name):
        self.name = name

    @classmethod   # 把eat方法变为类方法
    def eat(self):
        print("%s is eating" % self.name)

p= Schoolmate("LianZhiLei")
p.eat()

# Traceback (most recent call last):
#   File "C:/Users/L/PycharmProjects/s14/class/Day7/classmothod.py", line 15, in <module>
#     p.eat()
#   File "C:/Users/L/PycharmProjects/s14/class/Day7/classmothod.py", line 12, in eat
#     print("%s is eating" % self.name)
# AttributeError: type object 'Schoolmate' has no attribute 'name'
执行报错如下,说schoolmat没有name属性,这是因为name是个实例变量,类方法是不能访问实例变量的,只能访问类变量
#类方法
class Schoolmate(object):
    name = ("Schoolmat的类变量")
    def __init__(self, name):
        self.name = name

    @classmethod   # 把eat方法变为类方法
    def eat(cls):
        print("%s is eating" % cls.name)

Schoolmate.eat()
此时可以定义一个类变量,变量名为name即可解决
3、属性方法
属性方法的作用就是通过@property把一个方法变成一个静态属性,这个蛮有用的,后面课程会涉及到,先看代码
#属性方法

class Schoolmate(object):
    name = ("Schoolmat的类变量")
    def __init__(self, name):
        self.name = name

    @property       # 把eat方法变为属性方法
    def eat(self):
        print("%s is eating" % self.name)

p= Schoolmate("LianZhiLei")
p.eat()

# Traceback (most recent call last):
#   File "C:/Users/L/PycharmProjects/s14/class/Day7/property.py", line 17, in <module>
#     p.eat()
# TypeError: 'NoneType' object is not callable
调用会出以下错误, 说NoneType is not callable, 因为eat此时已经变成一个静态属性了, 不是方法了, 想调用已经不需要加()号了,直接d.eat就可以了
#属性方法

class Schoolmate(object):
    name = ("Schoolmat的类变量")
    def __init__(self, name):
        self.name = name

    @property       # 把eat方法变为属性方法
    def eat(self):
        print("%s is eating" % self.name)

p= Schoolmate("LianZhiLei")
p.eat

#LianZhiLei is eating
好吧,把一个方法变成静态属性有什么卵用呢?既然想要静态变量,那直接定义成一个静态变量不就得了么?well, 以后我们会遇到静态变量不固定的情况,不能简单通过定义静态属性来实现的, 比如 ,你想知道一个航班当前的状态,是到达了、延迟了、取消了、还是已经飞走了, 想知道这种状态你必须经历以下几步:连接航空公司API查询、对查询结果进行解析 、返回结果给你的用户;因此这个status属性的值是一系列动作后才得到的结果,所以你每次调用时,其实它都要经过一系列的动作才返回你结果,但这些动作过程不需要用户关心, 用户只需要调用这个属性就可以,明白了么?
#属性方法实例

class Flight(object):
    def __init__(self,name):
        self.flight_name = name


    def checking_status(self):
        print("checking flight %s status " % self.flight_name)
        return  1

    @property
    def flight_status(self):
        status = self.checking_status()
        if status == 0 :
            print("flight got canceled...")
        elif status == 1 :
            print("flight is arrived...")
        elif status == 2:
            print("flight has departured already...")
        else:
            print("cannot confirm the flight status...,please check later")


f = Flight("CA980")
f.flight_status
cool , 那现在我只能查询航班状态, 既然这个flight_status已经是个属性了, 那我能否给它赋值呢?试试吧
f = Flight("CA980")
f.flight_status
f.flight_status = 2

# checking flight CA980 status
# Traceback (most recent call last):
# flight is arrived...
#   File "C:/Users/L/PycharmProjects/s14/class/Day7/flight_status.py", line 31, in <module>
#     f.flight_status = 2
# AttributeError: can't set attribute
输出, 说不能更改这个属性,我擦。。。。,怎么办怎么办。。。当然可以改, 不过需要通过@proerty.setter装饰器再装饰一下,此时 你需要写一个新方法, 对这个flight_status进行更改。
#属性方法
class Flight(object):
def __init__(self, name):
self.flight_name = name
def checking_status(self):
print("checking flight %s status " % self.flight_name)
return 1
@property
def flight_status(self):
status = self.checking_status()
if status == 0:
print("flight got canceled...")
elif status == 1:
print("flight is arrived...")
elif status == 2:
print("flight has departured already...")
else:
print("cannot confirm the flight status...,please check later")
@flight_status.setter # 修改 执行修改操作时触发
def flight_status(self, status):
status_dic = {
0: "canceled",
1:"arrived",
2: "departured"
}
print("�33[31;1mHas changed the flight status to �33[0m", status_dic.get(status))
@flight_status.deleter # 删除
def flight_status(self):
print("status got removed...")
f = Flight("CA980")
f.flight_status = 0 # 触发@flight_status.setter 只执行setter装饰的代码
del f.flight_status # 触发@flight_status.deleter 只执行deleter装饰的代码
执行相应的操作,触发相应的装饰器,此时不会再触发原来的属性,只执行装饰器下面的代码,需要做相应的操作可在代码块里添加(修改,删除);只是触发了而已,装饰器并没有做什么操作
4、类的特殊成员方法
① __doc__ 表示类的描述信息
#__doc__

class Foo:
    """ 描述类信息,这是用于看片的神奇 """

    def func(self):
        pass


print(Foo.__doc__)

# 描述类信息,这是用于看片的神奇
② __module__ 和 __class__
- __module__ 表示当前操作的对象在那个模块
- __class__ 表示当前操作的对象的类是什么
# __module__ 和  __class__

class Foo:
    """ 描述类信息,这是用于看片的神奇 """

    def func(self):
        pass


A = Foo()
print(A.__module__)
print(A.__class__)

# __main__
# <class '__main__.Foo'>
③ __init__ 构造方法,通过类创建对象时,自动触发执行
④ __del__析构方法,当对象在内存中被释放时,自动触发执行
⑤ __call__ 对象后面加括号,触发执行
注:__init__的执行是由创建对象触发的,即:对象 = 类名() ;而对于 __call__ 方法的执行是由对象后加括号触发的,即:对象() 或者 类()()
# __call__

class Foo:
    def __init__(self):
        pass

    def __call__(self, *args, **kwargs):
        print('__call__')


obj = Foo()  # 执行 __init__
obj()  # 执行 __call__

#__call__
⑥ __dict__ 查看类或对象中的所有成员
class Province:
    country = 'China'

    def __init__(self, name, count):
        self.name = name
        self.count = count

    def func(self, *args, **kwargs):
        print('func')


# 获取类的成员,即:静态字段、方法、
print(Province.__dict__)
# 输出:{'__init__': <function Province.__init__ at 0x0054D588>, '__dict__': <attribute '__dict__' of 'Province' objects>,
#  '__doc__': None, 'func': <function Province.func at 0x0054D4B0>, '__weakref__': <attribute '__weakref__' of 'Province' objects>,
#  'country': 'China', '__module__': '__main__'}

obj1 = Province('HeBei', 10000)
print(obj1.__dict__)
# 获取 对象obj1 的成员
# 输出:{'count': 10000, 'name': 'HeBei'}
⑦ __str__ 如果一个类中定义了__str__方法,那么在打印 对象 时,默认输出该方法的返回值
#__str__

class Foo:
    def __str__(self):
        return 'lianzhilei'


obj = Foo()
print(obj)              #输出__str__返回值 而不是内存地址

# 输出:lianzhilei
⑧ __getitem__、__setitem__、__delitem__
用于索引操作,如字典。以上分别表示获取、设置、删除数据
#__getitem__、__setitem__、__delitem__

class Foo(object):
    def __getitem__(self, key):
        print('__getitem__', key)

    def __setitem__(self, key, value):
        print('__setitem__', key, value)

    def __delitem__(self, key):
        print('__delitem__', key)


obj = Foo()

result = obj['k1']  # 自动触发执行 __getitem__
obj['k2'] = 'lzl'  # 自动触发执行 __setitem__
del obj['k1']

# __getitem__ k1
# __setitem__ k2 lzl
# __delitem__ k1
⑨ __new__ __metaclass__
上述代码中,obj 是通过 Foo 类实例化的对象,其实,不仅 obj 是一个对象,Foo类本身也是一个对象,因为在Python中一切事物都是对象;如果按照一切事物都是对象的理论:obj对象是通过执行Foo类的构造方法创建,那么Foo类对象应该也是通过执行某个类的 构造方法创建
print type(f) # 输出:<class '__main__.Foo'>     表示,obj 对象由Foo类创建
print type(Foo) # 输出:<type 'type'>              表示,Foo类对象由 type 类创建
所以,f对象是Foo类的一个实例,Foo类对象是 type 类的一个实例,即:Foo类对象 是通过type类的构造方法创建,那么类还有一种创建方式
def func(self):
    print("hello %s"%self.name)

def __init__(self,name,age):
    self.name = name
    self.age = age
Foo = type('Foo',(object,),{'func':func,'__init__':__init__})

f = Foo("jack",22)
f.func()

加上构造方法
类 是由 type 类实例化产生那么问题来了,类默认是由 type 类实例化产生,type类中如何实现的创建类?类又是如何创建对象?
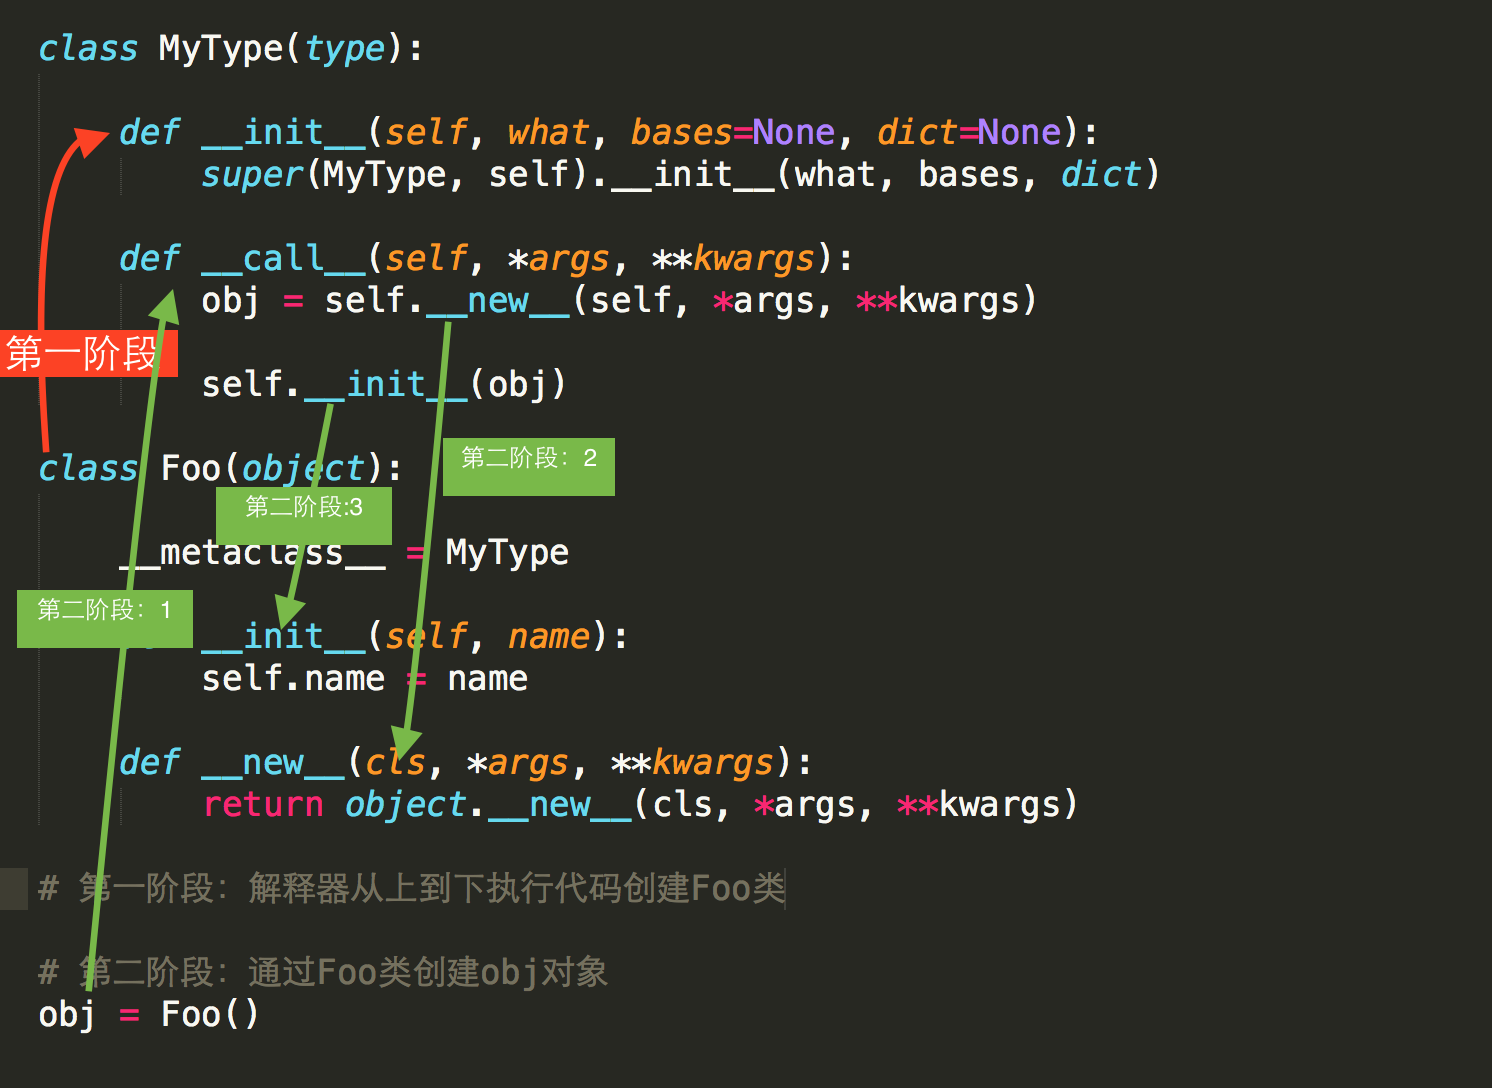
答:类中有一个属性 __metaclass__,其用来表示该类由 谁 来实例化创建,所以,我们可以为 __metaclass__ 设置一个type类的派生类,从而查看 类 创建的过程。
class MyType(type):

    def __init__(self, what, bases=None, dict=None):
        print("--MyType init---")
        super(MyType, self).__init__(what, bases, dict)

    def __call__(self, *args, **kwargs):
        print("--MyType call---")
        obj = self.__new__(self, *args, **kwargs)

        self.__init__(obj, *args, **kwargs)


class Foo(object):

    __metaclass__ = MyType

    def __init__(self, name):
        self.name = name
        print("Foo ---init__")

    def __new__(cls, *args, **kwargs):
        print("Foo --new--")
        return object.__new__(cls)


# 第一阶段:解释器从上到下执行代码创建Foo类
# 第二阶段:通过Foo类创建obj对象
obj = Foo("lzl")
5、反射
通过字符串映射或修改程序运行时的状态、属性、方法, 有以下4个方法
① hasattr(obj,str) 判断一个对象obj里是否有对应的str字符串的方法
② getattr(obj,str) 根据字符串去获取obj对象里的对应的方法的内存地址
#hasattr、getattr

class Foo(object):
    def __init__(self,name):
        self.name = name

    def func(self):
        print("func",self.name)

obj = Foo("alex")
str = "func"

print(hasattr(obj,str))   # 检查是否含有成员 有没有obj.str属性

if hasattr(obj,str):
   getattr(obj,str)()      #getattr(obj,str) = obj.str

# True
# func alex
③ setattr(obj,'y','z') obj.y = z
#setattr

def bulk(self):
    print("%s is yelling"%self.name)

class Foo(object):
    def __init__(self,name):
        self.name = name

    def func(self):
        print("func",self.name)

obj = Foo("alex")
str = "talk"

print(hasattr(obj,str))   # 检查是否含有成员 有没有obj.str属性

if hasattr(obj,str):
   getattr(obj,str)()      # getattr(obj,str) = obj.str

else:
    setattr(obj,str,bulk)   # setattr(obj,str,bulk 相当于 obj.str = bulk
    getattr(obj,str)()

# False
# alex is yelling
④ delattr(obj,str) 删除obj.str
#delattr

class Foo(object):
    def __init__(self,name):
        self.name = name

    def func(self):
        print("func",self.name)

obj = Foo("alex")
str = "name"

if hasattr(obj,str):
   delattr(obj,str)      # 删除属性obj.str

print(obj.name)

# Traceback (most recent call last):
#   File "C:/Users/L/PycharmProjects/s14/preview/Day7/main.py", line 40, in <module>
#     print(obj.name)
# AttributeError: 'Foo' object has no attribute 'name'
6、单例模式(非常重要)
①、屌丝版单例模式
class Foo(object):
    instance = None

    def __init__(self):
        self.name = 'alex'

    @classmethod
    def get_instance(cls):
        if cls.instance:
            return cls.instance
        else:
            cls.instance = Foo()
            return cls.instance

obj1 = Foo.get_instance()
obj2 = Foo.get_instance()

print(id(obj1),id(obj2))
#5235856 5235856
生成的实例都是一个内存地址,大大节省内存开销,缺点是使用不方便
②、高富帅版单例模式
class Foo(object):
    instance = None
    def __init__(self):
        self.name = 'alex'

    def __new__(cls, *args, **kwargs):
        if Foo.instance:
            return Foo.instance
        else:
            Foo.instance = object.__new__(cls, *args, **kwargs)
            return Foo.instance

obj1 = Foo()
obj2 = Foo()
print(id(obj1),id(obj2))
# 5695856 5695856
③ 补充一种单例模式,高富帅版单例,在生产中遇到了问题,还会执行init里面的方法
def decorator(cls):
    instance = {}
    def inner(*args,**kwargs):
        if cls not in instance:
            instance[cls] = cls(*args,**kwargs)
        return instance[cls]
    return inner

@decorator
class Foo(object):
    def __init__(self):
        self.name = 'Jefrey'

obj1 = Foo()
obj2 = Foo()
print(id(obj1),id(obj2))
# (58624208L, 58624208L)