前言
很久之前就想研究React Native了,但是一直没有落地的机会,我一直认为一个技术要有落地的场景才有研究的意义,刚好最近迎来了新的APP,在可控的范围内,我们可以在上面做任何想做的事情。
PS:任何新技术的尝鲜都一定要控制在自己能控制的范围内,失败了会有可替换方案,不要引起不可逆的问题,这样会给团队造成灾难性的后果。
事实上,RN经过一段时间发展,已经有充分数量的人尝试过了,就我身边就有几批,褒贬也不一:
① 做UI快
② 还是有很多限制,不如原生Native
③ 入门简单,能让前端快速开发App
④ iOS&Android大部分代码通用
⑤ code-push能做热更新,但是用不好依旧坑
......
在得到一些信息后,可以看出,要用RN高效率的做出比较不错的App是有可能的,单看投入度与最初设计是否合理,而且现在关于React Native的各种文档是相当丰富的,所以这个阶段想切入RN可能是一个不错的选择。
带着试试不吃亏的想法,我们开始今天的学习。
准备阶段
搭建开发环境
http://reactnative.cn/docs/0.36/getting-started.html
官方的例子其实写的很好了,我照着官方的例子能很好的跑起来,大家自己去看看吧
这里在运行时候要注意一下,我因为开启了FQ工具,一运行就crash,这里猜测是翻(科学上网法)墙工具对localhost造成了影响,导致不能读取文件,这个可能涉及到RN底层实现,我们后面深入了再去做研究,这里关闭FQ工具即可。
然后第二个问题,是http的图片展示不出来,这里折腾了很久,却发现后面的章节有了说明,app默认只支持https的链接,这里大家改下配置即可:
https://segmentfault.com/a/1190000002933776
RN中的js使用的是比较新的语法,这里也需要大家进行学习,我学习的感受是ES6提供了很多语法糖,但是有几个东西也要注意。
Class
JavaScript之前的继承全部是复写原型链模拟实现的,作为大型应用框架,继承是必不可少的,所以ES6直接将这块API化了,我这里写一个简单的demo:

 1 class Animal {
 2     constructor(name) {
 3         this.name = name;
 4     }
 5     say() {
 6         console.log('我是' + this.name);
 7     }
 8 }
 9
10 class Person extends Animal {
11     say() {
12         console.log('我是人类');
13         super.say();
14     }
15 }
16
17 var p = new Person('叶小钗')
18 p.say();
1 /*
2  我是人类
3  我是叶小钗
4  */
Module
我们一般使用requireJS解决模块化的问题,在ES6里面提出了Module功能在官方解决了模块化的问题,这里优缺点不是我们考虑的重点,简单了解下语法,两个核心为:
① export
② import
ES6以一个文件为单位,一个文件可以多个输出,这里以RN的一个引用为例:
1 import React, { Component } from 'react';
2 import {
3   AppRegistry,
4   StyleSheet,
5   Text,
6   View
7 } from 'react-native';
8 import styles from './static/style/styles.js';
可以假想,这里一定会有一个react文件,并且里面可能是这个样式的:
export default class React......

expoet class Component ......
PS:一个文件只能有一个default
输出的default一定会出现,不使用大括号包裹,其余部分随意输出,这里与我们使用require或有不同,需要注意。
应该说ES6提供了很多语法糖,有人喜欢,有人不喜欢,这个看爱好使用吧,比如=>箭头函数。了解了以上关系,再配合ES6的一些文档,基本可以写RN的代码了。
城市列表
拆分目录
这里,我们做一个城市列表,真实的访问接口获取数据,然后渲染页面,看看做出来效果如何。
首先,我们初始化一个RN项目:
react-native init Citylist
然后使用Xcode打开iOS中的项目,编译运行:


 1 import React, { Component } from 'react';
 2 import {
 3   AppRegistry,
 4   StyleSheet,
 5   Text,
 6   View
 7 } from 'react-native';
 8
 9 export default class Citylist extends Component {
10   render() {
11     return (
12       <View style={styles.container}>
13         <Text style={styles.welcome}>
14           Welcome to React Native!
15         </Text>
16         <Text style={styles.instructions}>
17           To get started, edit index.ios.js
18         </Text>
19         <Text style={styles.instructions}>
20           Press Cmd+R to reload,{'
'}
21           Cmd+D or shake for dev menu
22         </Text>
23       </View>
24     );
25   }
26 }
27
28 const styles = StyleSheet.create({
29   container: {
30     flex: 1,
31     justifyContent: 'center',
32     alignItems: 'center',
33     backgroundColor: '#F5FCFF',
34   },
35   welcome: {
36     fontSize: 20,
37     textAlign: 'center',
38     margin: 10,
39   },
40   instructions: {
41     textAlign: 'center',
42     color: '#333333',
43     marginBottom: 5,
44   },
45 });
46
47 AppRegistry.registerComponent('Citylist', () => Citylist);

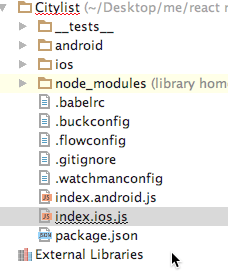
这里除了index.io.js,其他文件我们不必理睬,我们做的第一件事情是,将样式文件剥离出去,新建static文件夹,加入images和style,将样式文件移入style文件,新建style.js:
 1 import {
 2     StyleSheet
 3 } from 'react-native';
 4
 5 export let styles = StyleSheet.create({
 6     container: {
 7         flex: 1,
 8         justifyContent: 'center',
 9         alignItems: 'center',
10         backgroundColor: '#F5FCFF',
11     },
12     welcome: {
13         fontSize: 20,
14         textAlign: 'center',
15         margin: 10,
16     },
17     instructions: {
18         textAlign: 'center',
19         color: '#333333',
20         marginBottom: 5,
21     },
22 });
然后首页代码再做一些改动:
 1 import React, { Component } from 'react';
 2 import {
 3   AppRegistry,
 4   Text,
 5   View
 6 } from 'react-native';
 7
 8 import {styles} from './static/style/style';
 9
10
11 export default class Citylist extends Component {
12   render() {
13     return (
14       <View style={styles.container}>
15         <Text style={styles.welcome}>
16           Welcome to React Native!
17         </Text>
18         <Text style={styles.instructions}>
19           To get started, edit index.ios.js
20         </Text>
21         <Text style={styles.instructions}>
22           Press Cmd+R to reload,{'
'}
23           Cmd+D or shake for dev menu
24         </Text>
25       </View>
26     );
27   }
28 }
29
30 AppRegistry.registerComponent('Citylist', () => Citylist);
PS:这里有一个箭头函数
1 () => Citylist
2 //===>
3 function () {
4   return Citylist;
5 }
静态资源剥离后,我们先不处理其它的,我们来做数据请求。
数据请求
RN虽然内置了ajax库,但是一般推荐使用RN自带的Fetch,最简单的使用是:
fetch('https://mywebsite.com/mydata.json')
PS:我们在学习RN的时候,也是在学习神马方式是适合的,或者说熟悉使用合适的组件
请求一个接口是这样写的(使用promise):
1 fetch('https://apikuai.baidu.com/city/getstartcitys')
2 .then((response) => response.json())
3 .then((jsonData) => {
4   console.log(jsonData);
5 })
6 .catch((e) => {
7   console.log(e)
8 })
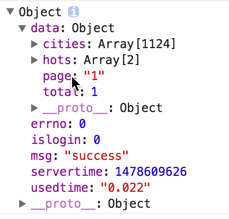
这里打开调试环境一看,输出了我们要的数据:
一般来说,我们需要对数据请求应该封装为一个底层库,这里只做一些简单改造,真实项目不会这样做:
 1 export default class Citylist extends Component {
 2   getdata(url, suc, err) {
 3     return fetch(url)
 4       .then((response) => response.json())
 5       .then((data) => {
 6         if(data.errno == 0) {
 7           suc && suc(data.data)
 8         }
 9       })
10       .catch((e) => {
11           console.log(e)
12       });
13   }
14   render() {
15
16     this.getdata('https://apikuai.baidu.com/city/getstartcitys', function(data) {
17       s = ''
18     });
19
20     return (
21       <View style={styles.container}>
22         <Text style={styles.welcome}>
23           Welcome to React Native!
24         </Text>
25         <Text style={styles.instructions}>
26           To get started, edit index.ios.js
27         </Text>
28         <Text style={styles.instructions}>
29           Press Cmd+R to reload,{'
'}
30           Cmd+D or shake for dev menu
31         </Text>
32       </View>
33     );
34   }
35 }
PS:这里的使用不一定正确,先完成功能再改进吧
我们取所有的城市cities,这个数据量很大,有1000多条记录,也可以测试下拖动效率了,这里为类加入构造函数,因为列表是可变的,暂时把列表数据归为state(react也不是太熟,如果有问题后续优化,先完成功能):
1 constructor(props) {
2   super(props);
3   this.state = {
4     cities: []
5   };
6 }
1 var scope = this;
2 //本来想使用箭头函数的,但是了解不太清楚,demo时候暂时这样吧
3 this.getdata('https://apikuai.baidu.com/city/getstartcitys', function(data) {
4   scope.state.citys = data.cities;
5 });
列表渲染
处理了数据问题后,我们开始做列表渲染,这里使用ListView组件,这个组件用以显示一个垂直滚动列表,适合长列表,两个必须的属性是datasource和renderRow:
dataSource:列表数据源
renderRow:逐个解析数据源中的数据,然后返回一个设定好的格式来渲染
简单书写代码:
  1 export default class Citylist extends Component {
  2   constructor(props) {
  3     super(props);
  4
  5     this.ds = new ListView.DataSource({rowHasChanged: (r1, r2) => r1 !== r2});
  6     this.state = {
  7       cities: this.ds.cloneWithRows([
  8           {cnname
  9               :
 10               "文山壮族苗族自治州",
 11               enname
 12                   :
 13                   "wszzmzzzz",
 14               extflag
 15                   :
 16                   "1",
 17               flag
 18                   :
 19                   "0",
 20               name
 21                   :
 22                   "wenshanzhuangzumiaozuzizhizhou",
 23               parentid
 24                   :
 25                   "28",
 26               regionid
 27                   :
 28                   "177",
 29               shortname
 30                   :
 31                   "文山",
 32               shownname
 33                   :
 34                   "文山",
 35               type
 36                   :
 37                   "2"},{cnname
 38               :
 39               "文山壮族苗族自治州",
 40               enname
 41                   :
 42                   "wszzmzzzz",
 43               extflag
 44                   :
 45                   "1",
 46               flag
 47                   :
 48                   "0",
 49               name
 50                   :
 51                   "wenshanzhuangzumiaozuzizhizhou",
 52               parentid
 53                   :
 54                   "28",
 55               regionid
 56                   :
 57                   "177",
 58               shortname
 59                   :
 60                   "文山",
 61               shownname
 62                   :
 63                   "文山",
 64               type
 65                   :
 66                   "2"},{cnname
 67               :
 68               "文山壮族苗族自治州",
 69               enname
 70                   :
 71                   "wszzmzzzz",
 72               extflag
 73                   :
 74                   "1",
 75               flag
 76                   :
 77                   "0",
 78               name
 79                   :
 80                   "wenshanzhuangzumiaozuzizhizhou",
 81               parentid
 82                   :
 83                   "28",
 84               regionid
 85                   :
 86                   "177",
 87               shortname
 88                   :
 89                   "文山",
 90               shownname
 91                   :
 92                   "文山",
 93               type
 94                   :
 95                   "2"}
 96       ])
 97     };
 98   }
 99   getdata(url, suc, err) {
100     return fetch(url)
101     .then((response) => response.json())
102     .then((data) => {
103       if(data.errno == 0) {
104         suc && suc(data.data)
105       }
106     })
107     .catch((e) => {
108         console.log(e)
109     });
110   }
111   componentDidMount(){
112     var scope = this;
113     this.getdata('https://apikuai.baidu.com/city/getstartcitys', function(data) {
114         console.log(data)
115
116         scope.setState({
117             cities: scope.ds.cloneWithRows(data.cities)
118         });
119         //scope.state.citys = data.cities;
120         //this.getdata('https://apikuai.baidu.com/city/getstartcitys', (data) => {
121         //  this.state.citys = data.cities;
122         //});
123     });
124   }
125   render() {
126     return (
127       <View style={styles.container}>
128           <ListView
129               dataSource={this.state.cities}
130               renderRow={(rowData) => <Text>{rowData.cnname}</Text>}
131           />
132       </View>
133     );
134   }
135 }
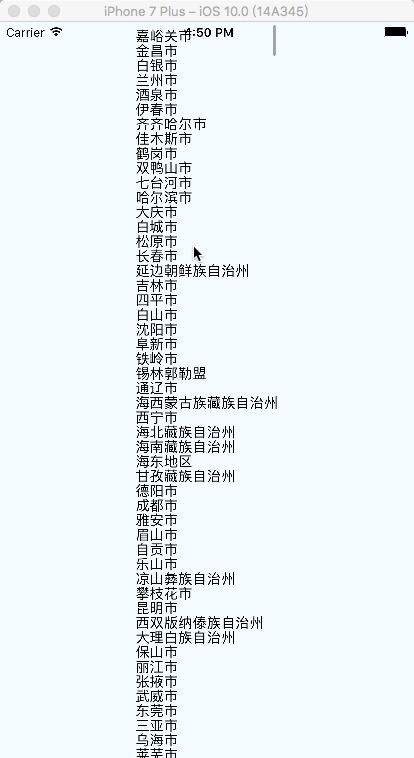
然后就这样了,虽然丑是丑点,但是还能看嘛,这里我们先不去理睬城市的排序,也不做搜索功能,我们先把布局处理下,他的丑陋我已经受不了了
样式处理
现在我们开始处理这段样式:
 1 import React, { Component } from 'react';
 2 import {
 3   AppRegistry,
 4   ListView,
 5   Text,
 6   View
 7 } from 'react-native';
 8
 9 import {styles} from './static/style/style';
10
11 export default class Citylist extends Component {
12   constructor(props) {
13     super(props);
14
15     this.ds = new ListView.DataSource({rowHasChanged: (r1, r2) => r1 !== r2});
16     this.state = {
17       cities: this.ds.cloneWithRows([])
18     };
19   }
20   getdata(url, suc, err) {
21     return fetch(url)
22     .then((response) => response.json())
23     .then((data) => {
24       if(data.errno == 0) {
25         suc && suc(data.data)
26       }
27     })
28     .catch((e) => {
29         console.log(e)
30     });
31   }
32   componentDidMount(){
33     var scope = this;
34     this.getdata('https://apikuai.baidu.com/city/getstartcitys', function(data) {
35         console.log(data)
36
37         scope.setState({
38             cities: scope.ds.cloneWithRows(data.cities)
39         });
40         //scope.state.citys = data.cities;
41         //this.getdata('https://apikuai.baidu.com/city/getstartcitys', (data) => {
42         //  this.state.citys = data.cities;
43         //});
44     });
45   }
46   render() {
47     return (
48       <View style={styles.container}>
49           <ListView style={styles.listView} enableEmptySections={true}
50               dataSource={this.state.cities}
51               renderRow={(rowData) =>
52               <View style={styles.listItem} >
53                   <Text>{rowData.cnname}</Text>
54               </View>
55               }
56           />
57       </View>
58     );
59   }
60 }
61
62 AppRegistry.registerComponent('Citylist', () => Citylist);
 1 import {
 2     StyleSheet
 3 } from 'react-native';
 4
 5 export let styles = StyleSheet.create({
 6     container: {
 7         flex: 1,
 8         backgroundColor: '#F5FCFF',
 9     },
10     listView: {
11         marginTop: 30,
12         flex: 1,
13         borderBottomColor:'#CCCCCC',//cell的分割线
14         borderBottomWidth:1
15     },
16     listItem: {
17         paddingTop: 15,
18         paddingBottom: 15,
19         paddingLeft: 10,
20         flexDirection:'row',
21         borderBottomColor:'#CCCCCC',//cell的分割线
22         borderBottomWidth:1
23     }
24 });
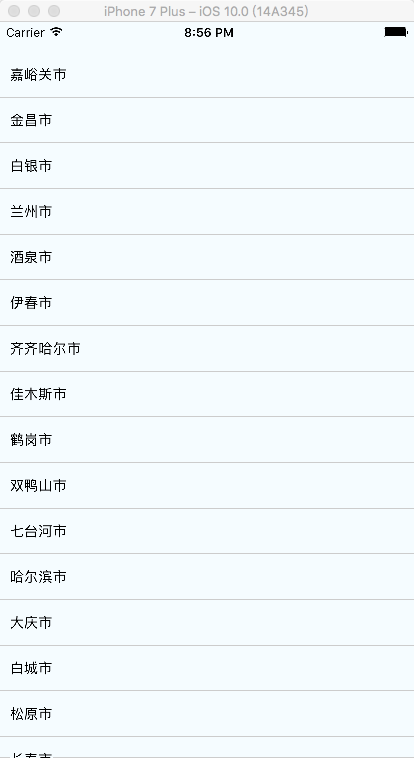
事件绑定
然后,我们再为每行数据加上点击事件,这里也做简单一点,打印出当前行的值即可:
 1   onPressAction(data){
 2     alert(data.cnname)
 3   }
 4   render() {
 5     return (
 6       <View style={styles.container}>
 7           <ListView style={styles.listView} enableEmptySections={true}
 8               dataSource={this.state.cities}
 9               renderRow={(rowData) =>
10               <View style={styles.listItem}  >
11                   <Text onPress={() => this.onPressAction(rowData)}>{rowData.cnname}</Text>
12               </View>
13               }
14           />
15       </View>
16     );
17   }
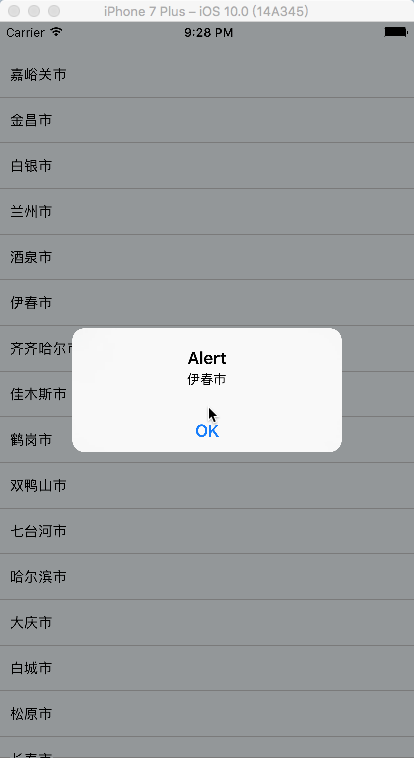
PS:我尼玛,这个RN的学习,很大程度就是一个个API或者组件的熟悉,这块不熟悉的话,做起来恼火的很
我这里开始想给Text设置边框,怎么都不能成功,后面就加了一层View就好了,这种小细节需要多摸索,这个是最终的结构:
结语
作为一个demo的话,这个例子基本可以说明一些问题的,虽然我本意是想做成这个样子的:)
通过这个例子,我们简单的学习了下RN的开发模式,做出来的感受是Facebook很强大,做了一个体系性的东西,举个例子来说(个人感受)
之前我们做Hybrid的时候Header是Native提供的,大概做法是这样的:
 1 //Native以及前端框架会对特殊tagname的标识做默认回调,如果未注册callback,或者点击回调callback无返回则执行默认方法
 2 //back前端默认执行History.back,如果不可后退则回到指定URL,Native如果检测到不可后退则返回Naive大首页
 3 //home前端默认返回指定URL,Native默认返回大首页
 4 this.header.set({
 5     left: [
 6         {
 7             //如果出现value字段,则默认不使用icon
 8             tagname: 'back',
 9             value: '回退',
10             //如果设置了lefticon或者righticon,则显示icon
11             //native会提供常用图标icon映射,如果找不到,便会去当前业务频道专用目录获取图标
12             lefticon: 'back',
13             callback: function () { }
14         }
15     ],
16     right: [
17         {
18             //默认icon为tagname,这里为icon
19             tagname: 'search',
20             callback: function () { }
21         },
22     //自定义图标
23         {
24             tagname: 'me',
25             //会去hotel频道存储静态header图标资源目录搜寻该图标,没有便使用默认图标
26             icon: 'hotel/me.png',
27             callback: function () { }
28         }
29     ],
30     title: 'title',
31     //显示主标题,子标题的场景
32     title: ['title', 'subtitle'],
33
34     //定制化title
35     title: {
36         value: 'title',
37         //标题右边图标
38         righticon: 'down', //也可以设置lefticon
39         //标题类型,默认为空,设置的话需要特殊处理
40         //type: 'tabs',
41         //点击标题时的回调,默认为空
42         callback: function () { }
43     }
44 });
通过这个约定,我们的Native就会生成一系列headerUI:
而RN做了什么呢,他可能是实现了一个这样的标签(或者说是语法糖):
<Header title="" right="[]" ></Header>
然后RN会自己去解析这个标签,生成上述的对象,然后生成Native的UI,这个我们其实也能做到,但是我们一个能做到,10个就不一定做得到了,RN牛的地方就牛在他提供了这么大一坨东西:
然后还有他一整套的样式体系,非常之大手笔,而通过RN的完善约定,生成了一套NativeUI,应该说来体验是非常高的,开发效率因为可以做到大部分iOS Android通用,虽然整体开发效率无法与Hybrid比肩,但绝对有其应用场景。
我们也有一些同事说了一些RN的问题,但是框架在发展,容器在优化,这些问题在某个时间点应该能解决的,总的说来,RN还是很有学习的价值,后面我可能会花很多功夫去进行落地!!!
