目录
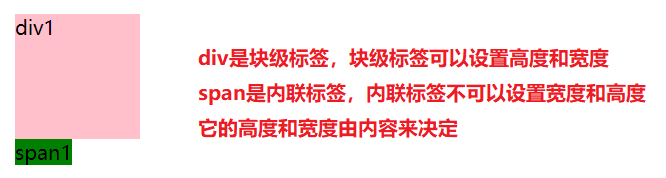
1.高度和宽度
<!DOCTYPE html>
<html lang="en">
<head>
    <meta charset="UTF-8">
    <title>Title</title>
    <style>
        div{
            height: 100px;
            width: 100px;
            background-color: pink;
        }
        span{
            height: 100px;
            width: 100px;
            background-color: green;
        }
    </style>
</head>
<body>
<div>
    div1
</div>
<span>span1</span>

</body>
</html>
效果如下图所示
宽度和高度除了可以用像素px单位,也可以使用百分比%
<!DOCTYPE html>
<html lang="en">
<head>
    <meta charset="UTF-8">
    <title>Title</title>
    <style>
        div{
            height: 100px;
            width: 50%; /* 可以给宽度和高度设置百分比 */
            background-color: pink;
        }
    </style>
</head>
<body>
<div>
    div1
</div>
</body>
</html>
但是在设置百分比时,有些问题需要注意:
1.宽度和高度可以设置百分比,会按照父级标签的宽度和高度进行计算
2.但是如果想给高度设置百分比,必须要求父级标签有固定高度才行
2.字体相关
<!DOCTYPE html>
<html lang="en">
<head>
    <meta charset="UTF-8">
    <title>Title</title>
    <style>
        div{
            font-size: 20px; /* 字体大小 */
            color: red; /* 字体颜色 */
            font-family: '楷体','宋体'; /* 字体 */
            font-weight: 100; /* 字体粗细 */
        }
    </style>
</head>
<body>
    <div>窗前明月光</div>
</body>
</html>
效果如下图所示
![]()
要注意:
1.如果不写font-size,默认是16px
2.font-size:‘字体1’,'字体2'
如果系统找的到字体1,则优先选用字体1的字体
如果系统找不到字体1,则使用字体2的字体
3.font-weight的范围是100-900,默认是400
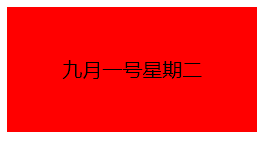
3.字体对齐
<!DOCTYPE html>
<html lang="en">
<head>
    <meta charset="UTF-8">
    <title>Title</title>
    <style>
        div{
            height: 100px;
            width: 200px;
            background-color: red;
            text-align: center; /* 水平居中 */
            line-height: 100px; /* 和height高度相同,标签文本垂直居中 */
        }
    </style>
</head>
<body>
    <div>
        九月一号星期二
    </div>
</body>
</html>
效果如下图所示
要注意:
1.text-align的值有left,center,right
2.想垂直居中,必须要把line-height的值和height的值设置成一样的
4.颜色设置
<!DOCTYPE html>
<html lang="en">
<head>
    <meta charset="UTF-8">
    <title>Title</title>
    <style>
        div{
            height: 100px;
            width: 200px;
            background-color: red; /* 英文单词 */
            background-color: #7969d2; /* 16进制数表示 */
            background-color: rgb(92,187,138); /* rgb颜色表示方法 */
            background-color: rgba(92,187,138,0.5); /* rgba加上透明度,透明度范围是0-1 */
            height: 100px;
            width: 100px;
            color: purple;
            opacity: 0.2; /* 整个标签设置透明度 */

        }
    </style>
</head>
<body>
    <div>
        九月一号星期二
    </div>
</body>
</html>
效果如下图所示

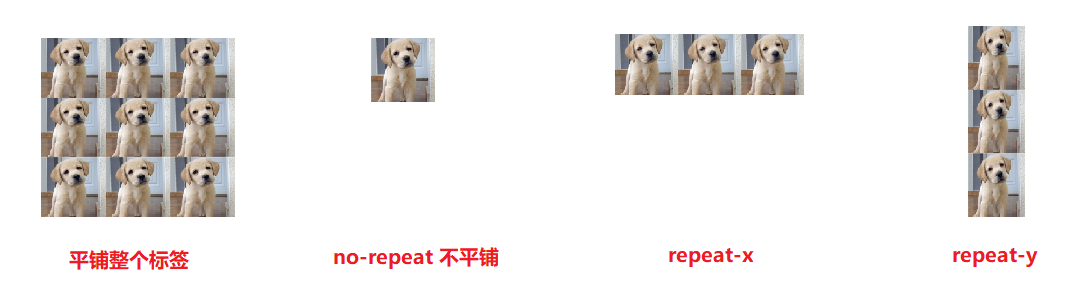
5.背景
<!DOCTYPE html>
<html lang="en">
<head>
    <meta charset="UTF-8">
    <title>Title</title>
    <style>
        .c1{
            height: 600px;
            width: 600px;

            background-image: url("1.jpg"); /* 设置背景图片 */
            background-repeat: no-repeat;/* 是否平铺整个标签 */
            background-position: center center; /* 当前图所在整个标签的位置 */
            background-position: 50px 100px; /* 当前图距离左上的位置 */
            border: 1px solid red; /* 画一个边框 */
        }
    </style>
</head>
<body>
    <div class="c1"></div>
</body>
</html>
效果如下所示

background也可以简写成一行
    <style>
        .c1{
            height: 600px;
            width: 600px;
            background: green url("1.jpg") no-repeat center center;
        }
    </style>
6.边框
<!DOCTYPE html>
<html lang="en">
<head>
    <meta charset="UTF-8">
    <title>Title</title>
    <style>
        .c1{
            width: 100px;
            height: 100px;
            border: 1px dashed red; /* 边框线为虚线 */
            border: 1px solid red; /* 边框线是实线 */

            /* 也可以将一句话拆成三句话写 */
            border-width: 10px; /* 线宽 */
            border-style: solid; /* 线样式 */
            border-color: yellow; /* 线颜色 */

            /* 也可以四个方向单独设置 */
            border-left: 10px solid yellow;

            /* 也可以单方向单参数设置 */
            border-right-width: 10px;
        }
    </style>
</head>
<body>
    <div class="c1"></div>
</body>
</html>
7.盒子模型
<!DOCTYPE html>
<html lang="en">
<head>
    <meta charset="UTF-8">
    <title>Title</title>
    <style>
        .c1{
            width: 200px;
            height: 100px;
            border:4px solid red; /* 边框 */
            padding: 7px 8px 9px 10px; /* 内容到边框之间的距离 上右下左 */
            margin:11px 12px 13px 14px; /* 距离其他标签或者自己父级标签的距离 上右下左 */
        }
    </style>
</head>
<body>
    <div class="c1">我是最帅的!</div>
    <div class="c2"></div>
</body>
</html>
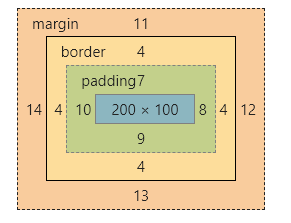
盒子模型包含四部分:
1.content:内容部分,设置的width和height
2.padding:内边距,内容和边框之间的距离
3.border:边框
4.margin:外边距,距离其他标签或者自己父级标签的距离
盒子模型如下图所示:
还有几个需要知道的:
    <style>
        .c1{
            /* margin可以设置上 右 下 左格式 */
            margin: 1px 2px 3px 4px;
            /* margin也可以设置上下 左右格式 */
            margin:15px 10px;
            /* 也可以单独设置各个方向 */
            margin-top: 10px;

            /* padding可以设置上 右 下 左格式 */
            padding: 1px 2px 3px 4px;
            /* padding也可以设置上下 左右格式 */
            padding: 15px 10px;
            /* 也可以单独设置各个方向 */
            padding-top: 10px;
        }

    </style>
要注意的是:如果两个相邻标签都设置了margin两者之间的距离,那么不会累加,而是选最大值为两者的距离
8.display属性
<!DOCTYPE html>
<html lang="en">
<head>
    <meta charset="UTF-8">
    <title>Title</title>
    <style>
        .c1{
            width: 100px;
            height: 100px;
            background-color: red;
            display: inline; /* 将块级标签改为内联标签 */
            display: inline-block; /* 将标签改为具有内联标签和块级标签属性效果的标签 可以设置高度,而且不独占一行 */
            display: none; /* 隐藏标签 */
        }
        .c2{
            width: 100px;
            height: 100px;
            background-color: blue;
            display: block; /* 将内联标签改为块级标签 */
        }
    </style>
</head>
<body>
    <div class="c1">
        悟空
    </div>

    <span class="c2">
        八戒
    </span>
</body>
</html>
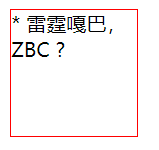
9.伪元素选择器
<!DOCTYPE html>
<html lang="en">
<head>
    <meta charset="UTF-8">
    <title>Title</title>
    <style>
        div{
            width: 100px;
            height: 100px;
            border: 1px solid red;
        }
        div:after{ /* 在文字前加一个问号 ? */
            content: '?';
        }
        div:before{ /* 在文字后加一个星号 * */
            content: '*';
        }
    </style>
</head>
<body>
    <div>
        雷霆嘎巴,ZBC
    </div>
</body>
</html>
效果如下图所示
10.伪类选择器
<!DOCTYPE html>
<html lang="en">
<head>
    <meta charset="UTF-8">
    <title>Title</title>
    <style>
        .c1{
            width: 200px;
            height: 200px;
            background-color: red;
            text-align: center;
            line-height: 200px;
        }

        .c1:hover{
            background-color: orange; /* 触碰时变成橙色 */
            cursor: pointer; /* 鼠标的小手效果 */
        }


        /* a标签未访问时设置样式 */
        a:link{
            color: gold;
        }

        /* 点击按下去之后,抬起之前显示样式 */
        a:active{
            color: red;
        }

        /* 网址被访问之后,显示样式 */
        a:visited{
            color: green;
        }

        /* 鼠标悬浮时,设置样式 */
        a:hover{
            color: purple;
        }
    </style>
</head>
<body>
    <div class="c1">小鸟伏特加</div>
    <a href="http://www.4399.com">点击进入花园宝宝乐园</a>
</body>
</html>
11.浮动
<!DOCTYPE html>
<html lang="en">
<head>
    <meta charset="UTF-8">
    <title>Title</title>
    <style>
        .main-left{
            height: 100px;
            width: 100px;
            background-color: red;
            float: left;
        }

        .main-right{
            height: 100px;
            width: 100px;
            background-color: green;
            float: right;
            /* 浮动起来的元素,可以设置高度和宽度,并且不会独占一行 */
        }

        .content{
            width: 100%;
            height: 200px;
            background-color: yellow;
        }

    </style>
</head>
<body>
    <div class="main">
        <div class="main-left"></div>
        <div class="main-right"></div>
    </div>

    <div class="content"></div>
</body>
</html>
这样做,会造成父级标签塌陷问题
什么是父级标签塌陷?
如果父元素只包含浮动元素,且父元素未设置高度和宽度的时候。那么它的高度就会塌缩为零,也就是所谓的“高度塌陷”
在上面代码中,父元素为main,在main中只包含浮动元素main-left和main-right,并且没有给父元素main设置高度和宽度,所以会有父级塌陷
父级塌陷如图所示

正常非塌陷如图所示
如果想解决父级标签塌陷,有如下几种方法
1.给父级标签加高度(不常用)
         /* 1.给父级标签加高度 */
        .main{
            height: 100px;
        }
2.清除浮动
我content标签上面不能有浮动的元素盖着我
        .content{
             100%;
            height: 200px;
            background-color: yellow;
            clear: both; /* 2.清除浮动 */
3.最常用的方法
       /* 3.最常用的方法 */
        .clearfix:after{
            content: '';
            display: block;
            clear: both;
        }
    </style>
</head>
<body>
    <div class="main clearfix"> <!-- class类值可以写多个 -->
        <div class="main-left"></div>
        <div class="main-right"></div>
    </div>

    <div class="content"></div>
4.常用方法
        /* 4.常用方法 */
        .main{
            overflow: hidden;
        }
12.文字装饰
<!DOCTYPE html>
<html lang="en">
<head>
    <meta charset="UTF-8">
    <title>Title</title>
    <style>
        .c1{
            text-decoration: line-through; /* 文字被横线贯穿 */
        }
        .c2{
            text-decoration: overline; /* 横线在文字上方 */
        }
        .c3{
            text-decoration: underline; /* 横线在文字下方 */
        }
        a{
            text-decoration: none; /* 去除a标签的下划线效果 */
        }
    </style>
</head>
<body>
    <span class="c1">床前明月光</span>
    <span class="c2">疑是地上霜</span>
    <span class="c3">举头望明月</span>
    <a href="">博伦</a>
</body>
</html>
实现效果如下图所示
![]()
13.相对定位和绝对定位
相对定位
<!DOCTYPE html>
<html lang="en">
<head>
    <meta charset="UTF-8">
    <title>Title</title>
    <style>
        body{ /* 让body标签紧贴左上,没有任何空隙 */
            margin: 0;
            padding: 0;
        }
        .c1{
            height: 100px;
            width: 100px;
            background-color: red;
        }
        .c2 {
            height: 100px;
            width: 100px;
            background-color: green;
            position: relative;
            left: 30px; /* 距离自己原来位置的左边有30px距离 */
        }
        .c3{
            height: 100px;
            width: 100px;
            background-color: pink;
        }
        .c4{
            height: 100px;
            width: 100px;
            background-color: blue;
        }
        .cc{
            position: relative;
            margin-left: 100px; /* 带有cc类的整体偏移100px */
        }
    </style>
</head>
<body>
    <div class="c4"></div>
    <div class="cc">
        <div class="c1"></div>
        <div class="c2"></div>
    </div>
    <div class="c3"></div>
</body>
</html>
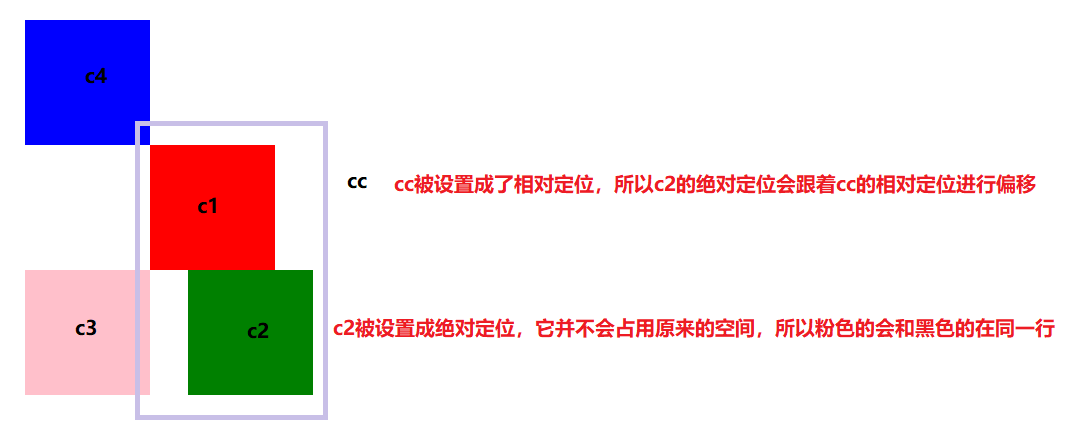
实现效果如图所示
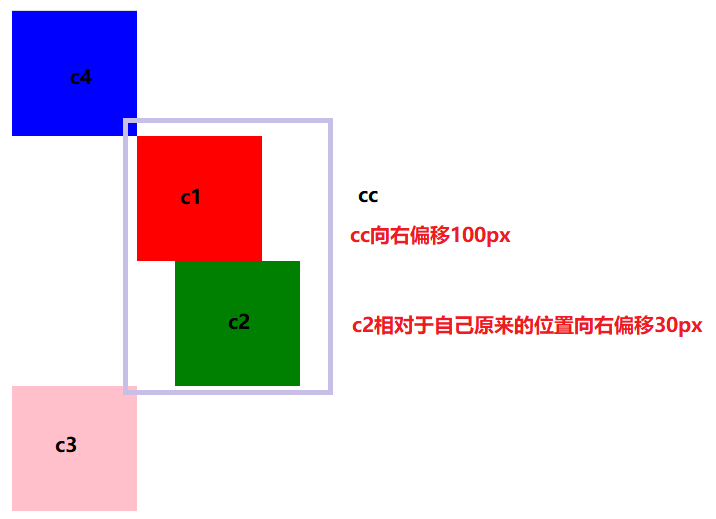
绝对定位
<!DOCTYPE html>
<html lang="en">
<head>
    <meta charset="UTF-8">
    <title>Title</title>
    <style>
        body{ /* 让body标签紧贴左上,没有任何空隙 */
            margin: 0;
            padding: 0;
        }
        .c1{
            height: 100px;
            width: 100px;
            background-color: red;
        }
        .c2 {
            height: 100px;
            width: 100px;
            background-color: green;
            position: absolute; /* 绝对定位 */
            left: 30px; /* 距离自己原来位置的左边有30px距离 */
        }
        .c3{
            height: 100px;
            width: 100px;
            background-color: pink;
        }
        .c4{
            height: 100px;
            width: 100px;
            background-color: blue;
        }
        .cc{
            position: relative;
            margin-left: 100px; /* 带有cc类的整体偏移100px */
        }
    </style>
</head>
<body>
    <div class="c4"></div>
    <div class="cc">
        <div class="c1"></div>
        <div class="c2"></div>
    </div>
    <div class="c3"></div>
</body>
</html>
实现效果如图所示
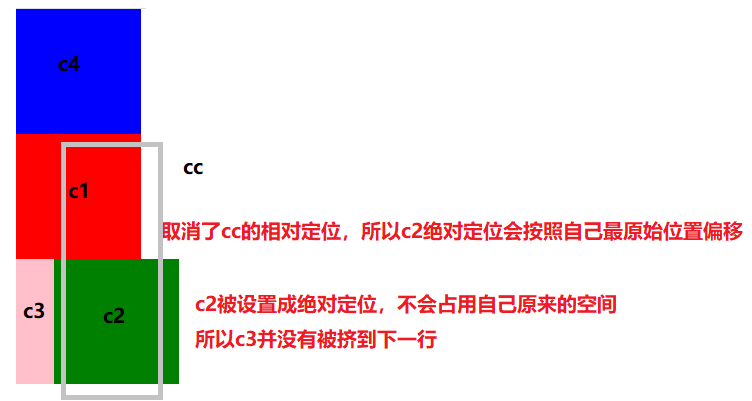
如果不对cc进行相对定位设置,效果如下图所示
关于相对定位和绝对定位,你需要注意的点:
相对定位:
1.相对定位可以使用top/bottom/left/right控制标签位置
2.是按照自己原来的位置进行移动的
3.标签还占据自己原来的位置
4.脱离正常文档流,所以可以覆盖别的标签
绝对定位:
1.并不占用自己原来的空间
2.如果父级标签或者祖先辈标签没有设置相对定位,那么绝对定位的元素会按照整个html文档的位置进行移动
3.如果父级标签或者祖先辈标签设置了相对定位,那么按照父级标签或者祖先辈标签的位置进行移动
14.固定定位
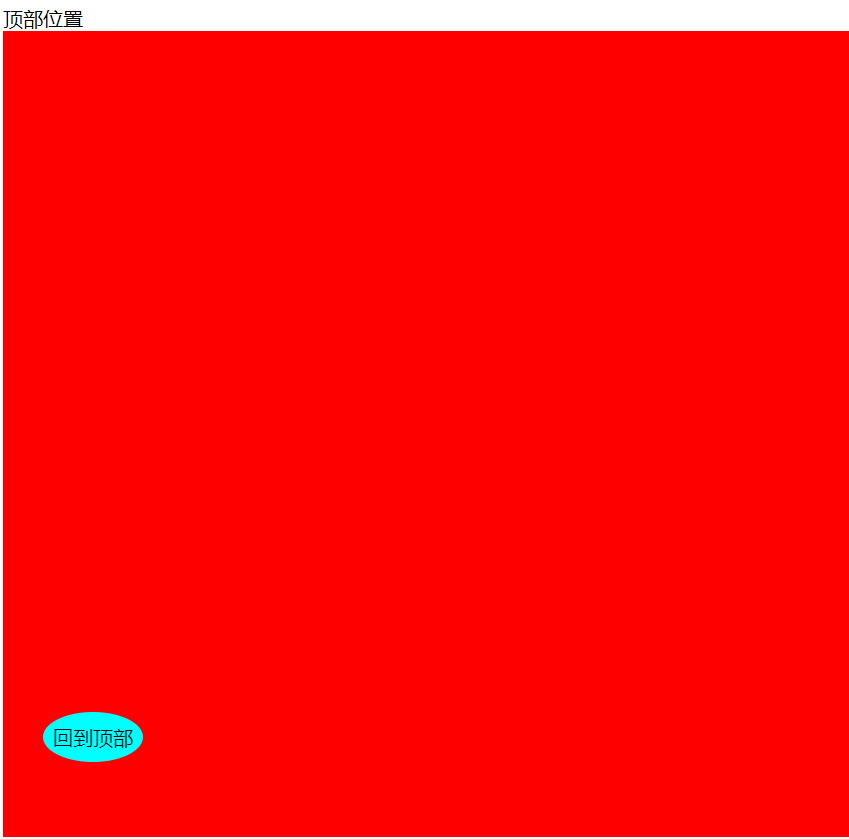
<!DOCTYPE html>
<html lang="en">
<head>
    <meta charset="UTF-8">
    <title>Title</title>
    <style>
        .c1{
            background-color: red;
            height: 800px;
        }
        .c2{
            background-color: blue;
            height: 800px;
        }
        .c3{ /* 相对于浏览器窗口来设置位置 */
            position: fixed;
            left: 40px;
            bottom: 60px;
            height: 40px;
            width: 80px;
            background-color: aqua;
            text-align: center;
            line-height: 40px;
            border-radius: 50%; /* 正方形的园度 */
        }
        .c3 a{
            text-decoration: none;
            color: black;
        }
    </style>
</head>
<body>
    <div id="top">顶部位置</div>
    <div class="c1"></div>
    <div class="c2"></div>
    <span class="c3">
        <a href="#top">回到顶部</a>
    </span>
</body>
</html>
实现效果如下图所示