JWT基本概念
JWT,即 JSON Web Tokens(RFC 7519),是一个广泛用于验证 REST APIs 的标准。虽说是一个新兴技术,但它却得以迅速流行。
-
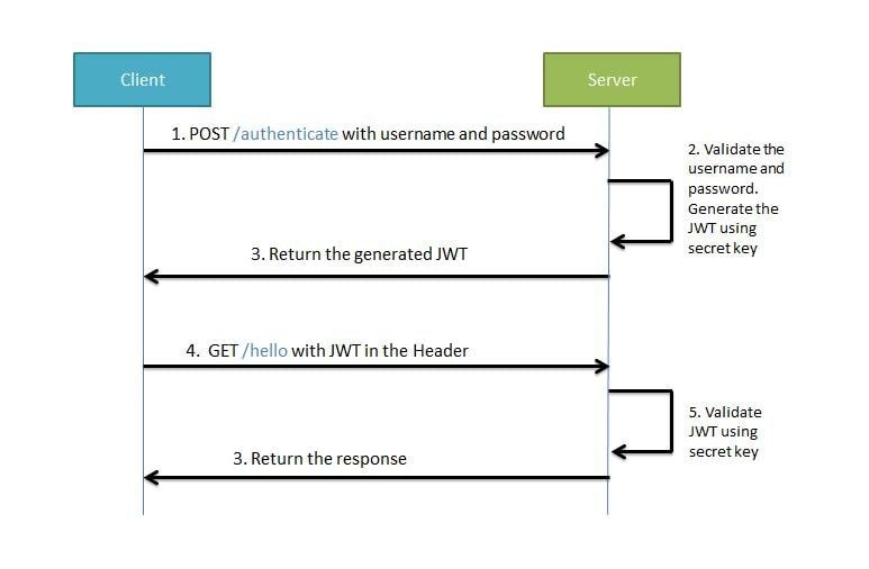
JWT的验证过程是:
-
前端(客户端)首先发送一些凭证来登录(我们编写的是 web 应用,所以这里使用用户名和密码来做验证)。
-
后端(服务端)这里指Spring应用校验这些凭证,如果校验通过则生成并返回一个 JWT。
-
客户端需要在请求头的Authorization字段中以 “Bearer TOKEN” 的形式携带获取到的token,服务端会检查这个token是否可用并决定授权访问或拒绝请求。
- token中可能保存了用户的角色信息,服务端可以根据用户角色来确定访问权限。
- token中可能保存了用户的角色信息,服务端可以根据用户角色来确定访问权限。
-
实现
我们来看一下在实际的 Spring 项目中是如何实现JWT登录和保存机制的。
依赖
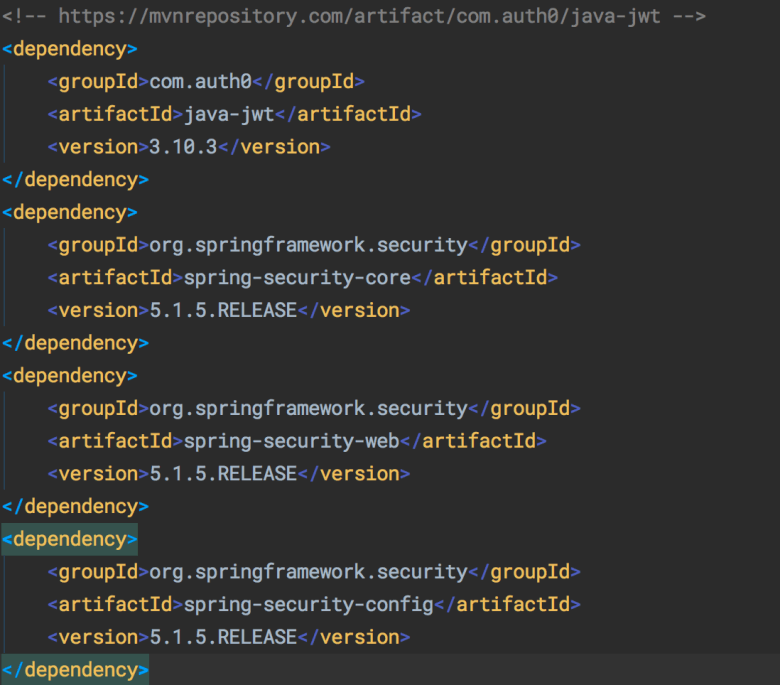
下面是我们示例代码的 Maven 依赖列表,注意,截图中并未包含Spring Boot、Hibernate等核心依赖(你需要自行添加)。
用户模型
- 创建一个包含保存用户信息、基于用户名和密码验证用户权限功能的 controller。
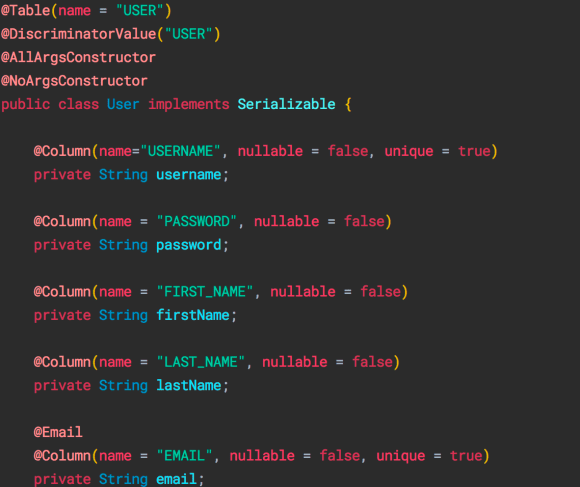
- 创建一个名为 User 的实体类,它是数据库中 USER 表的映射。需要的话,可以在其中添加其他属性。
- 还需要定义一个 UserRepository 类来保存用户信息,重写其 findByUsername 方法,在验证过程中会用到。
public interface UserRepository extends JpaRepository<User, String>{
    User findByUsername(String username);
}
-
千万不能在数据库中保存明文密码,因为很多用户喜欢在各种网站上使用相同的密码。
-
哈希算法有很多,BCrypt是最常用的之一,它也是推荐用于安全加密的算法。关于这个话题的更多内容,可以查看 这篇文章。
为了加密密码,我们在 @bean 注解标记的主类中定义一个 BCrypt Bean,如下所示:
@Bean
public BCryptPasswordEncoder bCryptPasswordEncoder() {
    return new BCryptPasswordEncoder();
}
加密密码的时候将会调用这个Bean里面的方法。
-
创建一个名为 UserController 的类,为其添加 @RestController 注解并定义路由映射。
-
在这个应用中,我们接收前端传入的 UserDto 对象来保存用户信息。你也可以选择在 @RequestBody 参数中接收 User 对象。
@RestController
@RequestMapping("/api/services/controller/user")
@AllArgsConstructor
public class UserController {
    private UserService userService;
	@PostMapping()
	public ResponseEntity<String> saveUser(@RequestBody UserDto userDto) {
		return new ResponseEntity<>(userService.saveDto(userDto), HttpStatus.OK);
	}
}
我们使用之前定义的 BCrypt Bean 来加密传入的 UserDto 对象的 password 字段。这个操作也可以在 controller 之中执行,但是把逻辑操作集中到 service 类中是更好的做法。
@Transactional(rollbackFor = Exception.class)
public String saveDto(UserDto userDto) {
	userDto.setPassword(bCryptPasswordEncoder.encode(userDto.getPassword()));
    return save(new User(userDto)).getId();
}
验证过滤器
需要通过权限验证来确定用户的真实身份。这里我们使用经典的【用户名-密码对】的形式来完成。
验证步骤:
- 创建继承 UsernamePasswordAuthenticationFilter 的验证过滤器
- 创建继承 WebSecurityConfigurerAdapter 的安全配置类并应用过滤器
- 验证过滤器的代码如下——也许你已经知道了,过滤器是 Spring Security 的核心。
public class JWTAuthenticationFilter extends UsernamePasswordAuthenticationFilter {
    private AuthenticationManager authenticationManager;
    public JWTAuthenticationFilter(AuthenticationManager authenticationManager) {
        this.authenticationManager = authenticationManager;
        setFilterProcessesUrl("/api/services/controller/user/login");
    }
    @Override
    public Authentication attemptAuthentication(HttpServletRequest req,
                                                HttpServletResponse res) throws AuthenticationException {
        try {
            User creds = new ObjectMapper().readValue(req.getInputStream(), User.class);
            return authenticationManager.authenticate(
                    new UsernamePasswordAuthenticationToken(
                            creds.getUsername(),
                            creds.getPassword(),
                            new ArrayList<>())
            );
        } catch (IOException e) {
            throw new RuntimeException(e);
        }
    }
    @Override
    protected void successfulAuthentication(HttpServletRequest req,
                                            HttpServletResponse res,
                                            FilterChain chain,
                                            Authentication auth) throws IOException {
        String token = JWT.create()
                .withSubject(((User) auth.getPrincipal()).getUsername())
                .withExpiresAt(new Date(System.currentTimeMillis() + EXPIRATION_TIME))
                .sign(Algorithm.HMAC512(SECRET.getBytes()));
        String body = ((User) auth.getPrincipal()).getUsername() + " " + token;
        res.getWriter().write(body);
        res.getWriter().flush();
    }
}
-
Spring Security 默认使用继承了 UsernamePasswordAuthenticationFilter 的子类进行密码验证 ,我们可以在其中编写自定义的验证逻辑。
-
我们在构造函数中调用setFilterProcessesUrl 方法,设置默认登录地址。
-
如果删除这行代码,Spring Security 会生成一个默认的 “/login” 端点,我们可以不用在 controller 中显式地定义登录端点。
-
这行代码执行之后,我们的登录端点将被设置为 /api/services/controller/user/login,你可以根据自己的实际代码来设置。
-
-
我们重写了 UsernameAuthenticationFilter 类的 attemptAuthentication 和 successfulAuthentication 方法。
-
用户登录时会执行 attemptAuthentication方法,它会读取凭证信息、创建用户 POJO、校验凭证并授权。
- 我们传入用户名、密码以及一个空列表。我们还没有定义用户角色,所以把这个表示用户权限(角色)的列表留空就行。
-
-
如果验证成功,就会执行 successfulAuthentication 方法,它的参数由Spring Security自动注入。
-
attemptAuthentication返回Authentication对象,这个对象包含了我们传入的权限信息。
-
我们想在验证成功之后返回一个使用用户名、密钥和过期时间创建的 token。先定义SECRET和 EXPIRATION_DATE。
-
public class SecurityConstants {
  public static final String SECRET = "SECRET_KEY";
  public static final long EXPIRATION_TIME = 900_000; // 15 mins
  public static final String TOKEN_PREFIX = "Bearer ";
  public static final String HEADER_STRING = "Authorization";
  public static final String SIGN_UP_URL = "/api/services/controller/user";
}
-
创建一个类作为常量的容器,SECRET 的值可以任意设置,最佳的做法是在 hash 算法支持的范围内使用尽可能长的字符串。例如我们使用的是 HS256 算法,SECRET 字符串的最佳长度即为 256 bits/32 个字符。
-
超时时间设置为 15 分钟,这是防御暴力破解密码的最佳实践。此处使用的时间单位为毫秒。
-
验证过滤器准备好了,但还不可用,我们还要创建一个授权过滤器,再通过一个配置类来应用它们。
-
授权过滤器会校验 Authorization 请求头中的 token 是否存在及其可用性。在配置类中指明哪些端点需要使用这个过滤器。
授权过滤器
-
doFilterInternal 方法拦截请求并校验 Authorization 请求头,如果不存在或者它的值不是以 “BEARER” 开头,则直接转到下一个过滤器。
-
如果这个请求头携带了合法的值,会调用 getAuthentication 方法,校验这个 JWT,如果这个 token 是可用的,它会返回一个Spring内部使用的 token。
-
这个新生成的 token 会被保存在 SecurityContext 中,如果需要基于用户角色进行授权的话,可以向这个 token 传入用户权限。
过滤器都准备好了,现在要通过配置类把它们投入使用。
public class JWTAuthorizationFilter extends BasicAuthenticationFilter {

    public JWTAuthorizationFilter(AuthenticationManager authManager) {
        super(authManager);
    }

    @Override
    protected void doFilterInternal(HttpServletRequest req,
                                    HttpServletResponse res,
                                    FilterChain chain) throws IOException, ServletException {
        String header = req.getHeader(HEADER_STRING);
        if (header == null || !header.startsWith(TOKEN_PREFIX)) {
            chain.doFilter(req, res);
            return;
        }
        UsernamePasswordAuthenticationToken authentication = getAuthentication(req);
        SecurityContextHolder.getContext().setAuthentication(authentication);
        chain.doFilter(req, res);
    }
    // Reads the JWT from the Authorization header, and then uses JWT to validate the token
    private UsernamePasswordAuthenticationToken getAuthentication(HttpServletRequest request) {
        String token = request.getHeader(HEADER_STRING);
        if (token != null) {
            // parse the token.
            String user = JWT.require(Algorithm.HMAC512(SECRET.getBytes()))
                    .build()
                    .verify(token.replace(TOKEN_PREFIX, ""))
                    .getSubject();
            if (user != null) {
                // new arraylist means authorities
                return new UsernamePasswordAuthenticationToken(user, null, new ArrayList<>());
            }
            return null;
        }
        return null;
    }
配置处理
-
给这个类添加 @EnableWebSecurity 注解,同时让它继承 WebSecurityConfigureAdapter 并实现自定义的安全逻辑。
-
自动注入之前定义的 BCrypt Bean,同时自动注入 UserDetailsService 用来获取用户账户信息。
-
最重要的是那个接收一个 HttpSecurity 对象作为参数的方法,其中声明了如何在各个端点中应用过滤器、配置了 CORS、放行了所有对注册接口的 POST 请求。
-
可以添加其他匹配器来基于 URL 模式和角色进行过滤,你也可以 查看 StackOverflow 上这个问题的相关示例。另一个方法配置了 AuthenticationManager 在登录校验时使用我们指定的编码器。
@EnableWebSecurity
public class WebSecurity extends WebSecurityConfigurerAdapter {

    private UserDetailsServiceImpl userDetailsService;
    private BCryptPasswordEncoder bCryptPasswordEncoder;

    public WebSecurity(UserDetailsServiceImpl userService, BCryptPasswordEncoder bCryptPasswordEncoder) {
        this.userDetailsService = userService;
        this.bCryptPasswordEncoder = bCryptPasswordEncoder;
    }

    @Override
    protected void configure(HttpSecurity http) throws Exception {
        http.cors().and().authorizeRequests()
                .antMatchers(HttpMethod.POST, SIGN_UP_URL).permitAll()
                .anyRequest().authenticated()
                .and()
                .addFilter(new JWTAuthenticationFilter(authenticationManager()))
                .addFilter(new JWTAuthorizationFilter(authenticationManager()))
                // this disables session creation on Spring Security
                .sessionManagement().sessionCreationPolicy(SessionCreationPolicy.STATELESS);
    }

    @Override
    public void configure(AuthenticationManagerBuilder auth) throws Exception {
        auth.userDetailsService(userDetailsService).passwordEncoder(bCryptPasswordEncoder);
    }

    @Bean
    CorsConfigurationSource corsConfigurationSource() {
        final UrlBasedCorsConfigurationSource source = new UrlBasedCorsConfigurationSource();
        CorsConfiguration corsConfiguration = new CorsConfiguration().applyPermitDefaultValues();
        source.registerCorsConfiguration("/**", corsConfiguration);
        return source;
    }
}
测试实现
发送一些请求来测试应用是否正常工作。
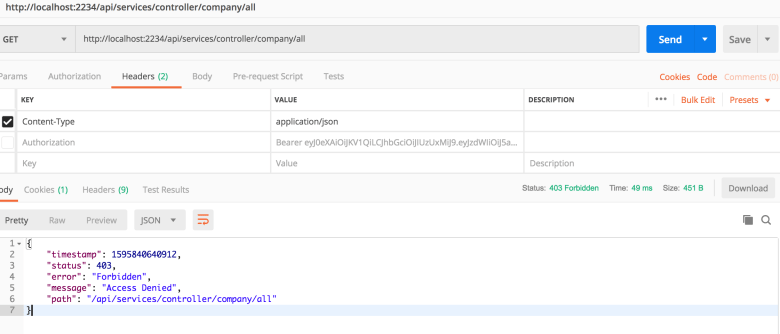
-
使用 GET 请求访问受保护的资源,服务端返回了 403 状态码。
-
这是程序设计预期的行为,因为我们没有在请求头中携带 token 信息。
现在创建一个用户:
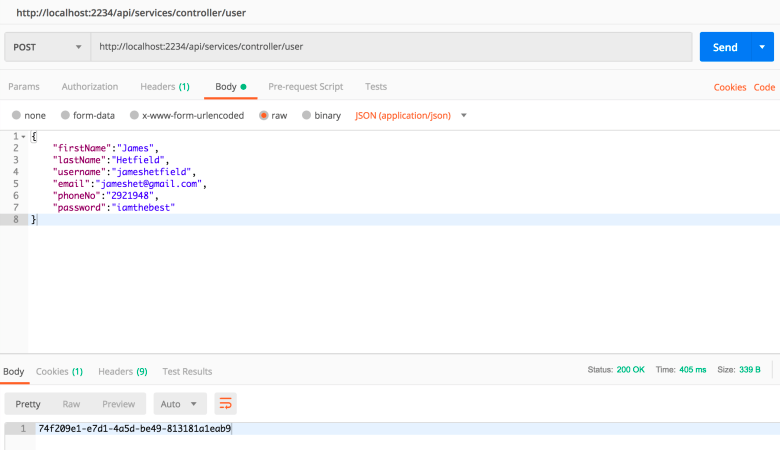
发送一个携带了用户信息数据的 POST 请求,以创建用户。稍后将登陆这个账户来获取 token。
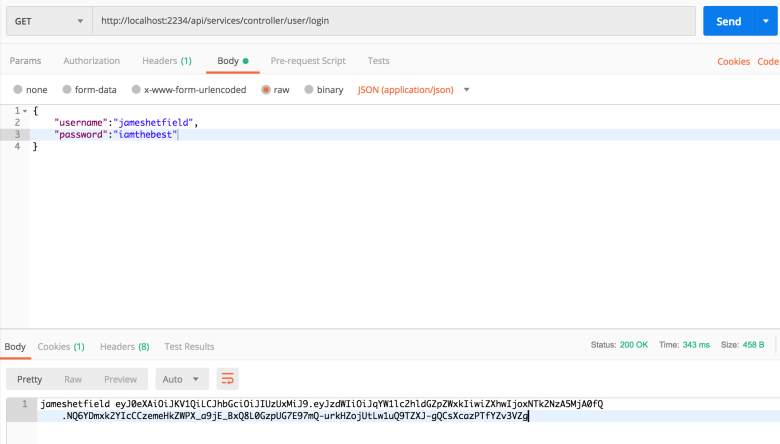
获取到 token 了,现在可以用这个 token 来访问受保护的资源。
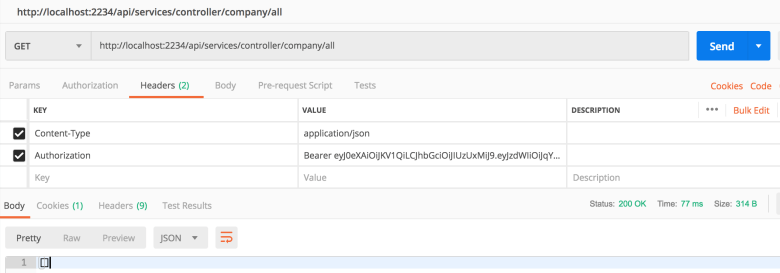
在 Authorization 请求头中携带 token,就可以访问受保护的端点了。
总结
Spring 中实现 JWT 授权和密码认证的步骤,同时学习了如何安全地保存用户信息。