9.1 迭代器
创建迭代器的3种方法:
方法一:
容器对象添加 __iter__() 和 __next__() 方法(Python 2.7 中是 next());__iter__() 返回迭代器对象本身 self,__next__() 则返回每次调用 next() 或迭代时的元素;
自定义一个迭代器:
1.    class Contain:
2.        def __init__(self,start,end):
3.            self.start = start          #self.start既是开始位置,也是记录位置的状态
4.            self.end = end
5.        def __iter__(self):
6.            print('调用iter方法!')
7.            return self     #/__iter()__返回自身self
8.        def __next__(self):
9.            if self.start < self.end:
10.                i = self.start
11.                self.start += 1
12.                return i
13.            else:
14.                raise StopIteration
15.    Con = Contain(0,5)
16.    for i in Con:
17.        print(i)
方法二:
使用内建函数iter()可以从可迭代对象中获得迭代器。示例:
1.    li = [2,5,3,7,9,10]
2.    it = iter(li)
3.    print(next(it), end=' ')    #2
4.    print(next(it), end=' ')    #5以此类推
方法三:
利用生成器(generator),生成器通过yield语句快速生成迭代器,省略了复杂的__iter()__和__next()__方式
参考原文:https://blog.csdn.net/qq_42068900/article/details/80369029
9.2 生成器
创建生成器:
1:generator 第一种创建方式(推导式):
输入:
1.    nums = (x for x in range(10))
2.    print(nums)              #<generator object <genexpr> at 0x0000004590AB9938>  生成器类型
3.    for i in nums:
4.        print(i, end=' ')    #0 1 2 3 4 5 6 7 8 9
输出:
runfile('C:/Users/lf/Desktop/Python/Python练习/迭代器和生成器.py', wdir='C:/Users/lf/Desktop/Python/Python练习')
<generator object <genexpr> at 0x000002899B831360>
0 1 2 3 4 5 6 7 8 9
2:第二种创建方式(斐波那契数列):
输入:
1.    fibs = []
2.    def Fib():
3.        for i in range(100):
4.            if i > 1:
5.                fibs.append(fibs[i-2]+fibs[i-1])
6.            else:
7.                fibs.append(1)
8.            yield fibs[i]     #print换成yield ,每次生成一个值
9.    fibnaqi = Fib()
10.    print(fibnaqi.__next__())   #1
11.    print(next(fibnaqi))        #1
12.    print(next(fibnaqi))        #2
13.    print(next(fibnaqi))        #3
14.    print(next(fibnaqi))        #5
15.    print(next(fibnaqi))        #8
16.    print(next(fibnaqi))        #13
输出:
runfile('C:/Users/lf/Desktop/Python/Python练习/迭代器和生成器.py', wdir='C:/Users/lf/Desktop/Python/Python练习')
1 1 2 3 5 8 13
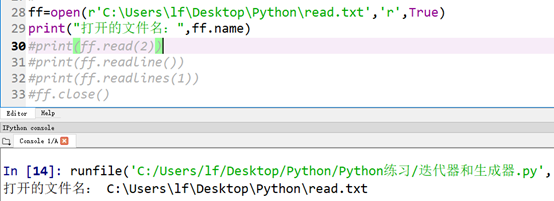
9.3 打开文件
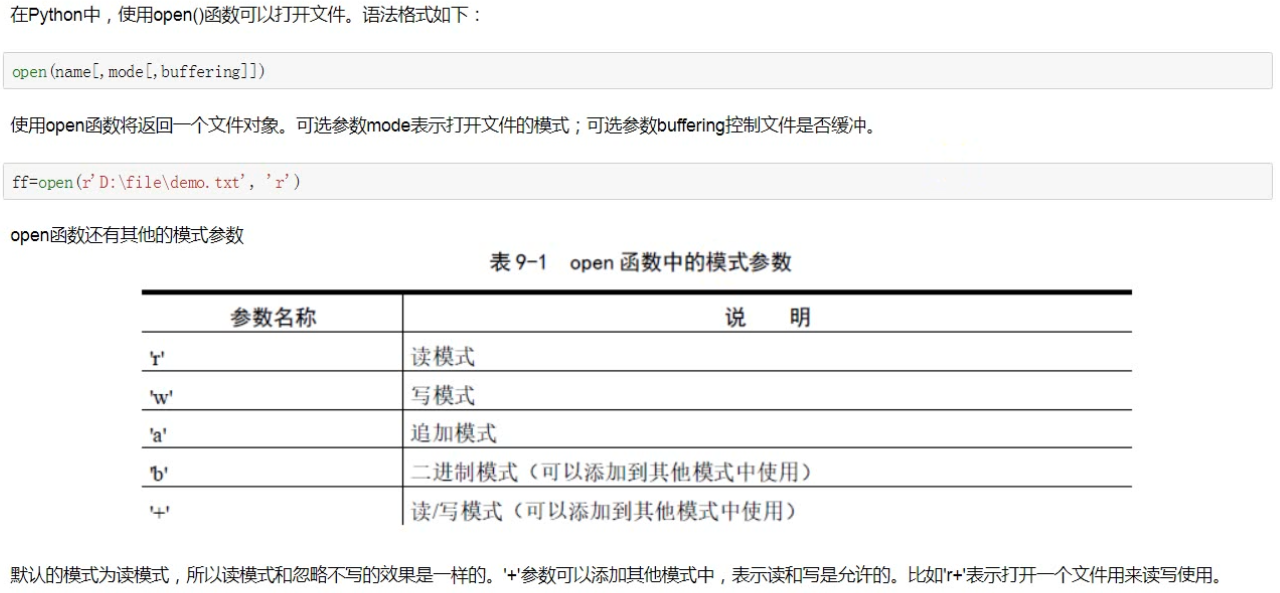

标准函数是:
open(filename,mode=’r’,buffering=-1,encoding=None, errors=None, newline=None, closefd=True, opener=None)
常见问题:
Python中遇到"UnicodeDecodeError: ‘gbk’ codec can’t decode bytes in position 2-3: illegal multibyte sequence"之类的编码或解码的错误时如何处理。
如何解决,参考原文:https://www.crifan.com/summary_python_unicodedecode_error_possible_reasons_and_solutions/
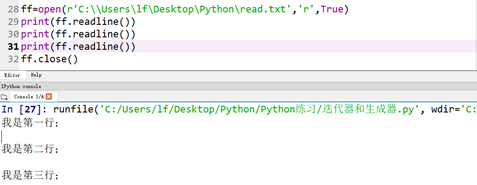
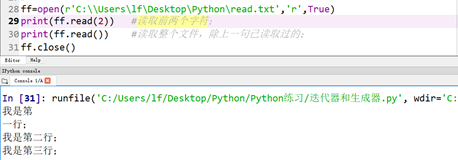
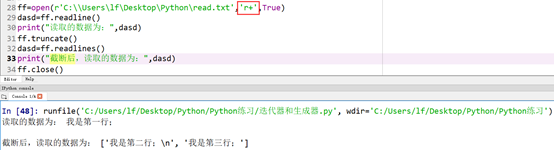
9.4 读取文件
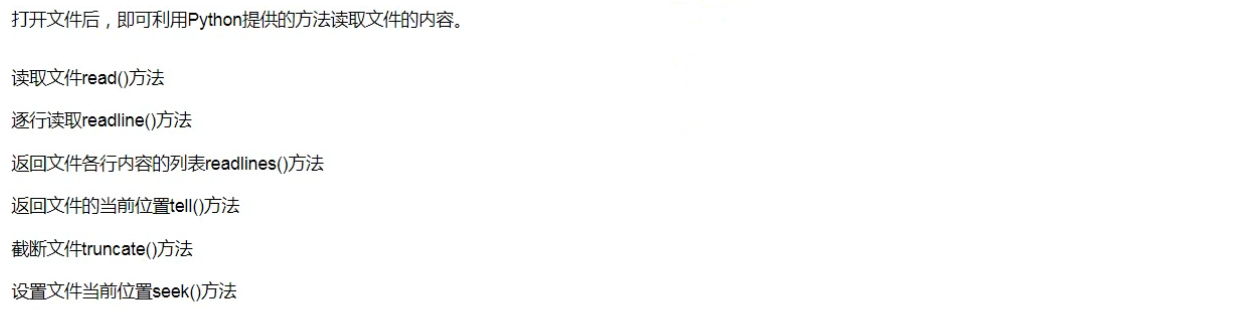
1:readlines()

2:readline()
3:read()
4:tell()

5:truncate()
6:seek()

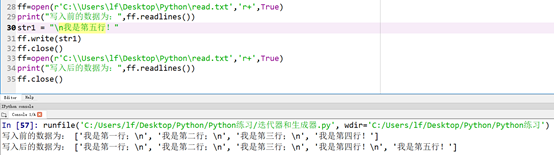
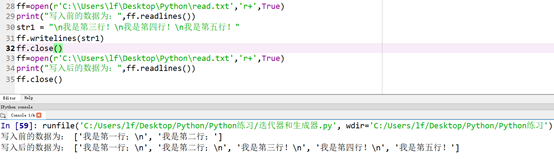
9.5 写入文件
1:write() 将字符串写入文件
2:writelines() 写入多行数据
9.6 关闭和刷新文件
1:close() 关闭文件函数
2:flush() 刷新文件

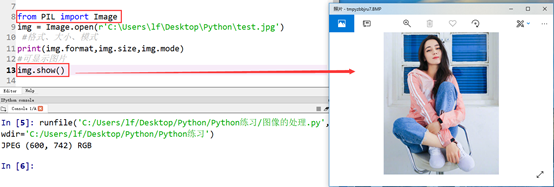
12.1 图像的处理
1、下载和安装Pillow
方法一:

方法二:

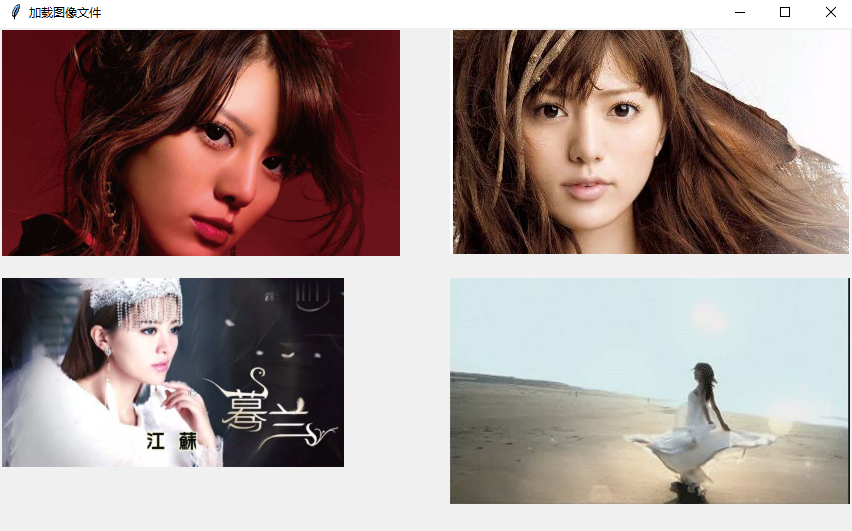
2、加载图像文件
示例一:
示例二:
from tkinter import * from PIL import Image, ImageTk #创建主窗口 win = Tk() win.title(string="加载图像文件") imgFile1 = Image.open(r'C:UserslfDesktopPython�1.bmp') imgFile2 = Image.open(r'C:UserslfDesktopPython�2.jpg') imgFile3 = Image.open(r'C:UserslfDesktopPython�3.tif') imgFile4 = Image.open(r'C:UserslfDesktopPython�4.gif') img1 = ImageTk.PhotoImage(imgFile1) img2 = ImageTk.PhotoImage(imgFile2) img3 = ImageTk.PhotoImage(imgFile3) img4 = ImageTk.PhotoImage(imgFile4) canvas = Canvas(win, width=850,height=500) canvas.create_image(0, 0, image=img1, anchor=NW) canvas.create_image(450, 0, image=img2, anchor=NW) canvas.create_image(0, 250, image=img3, anchor=NW) canvas.create_image(450, 250, image=img4, anchor=NW) canvas.pack(fill = BOTH) #开始程序循环 win.mainloop()
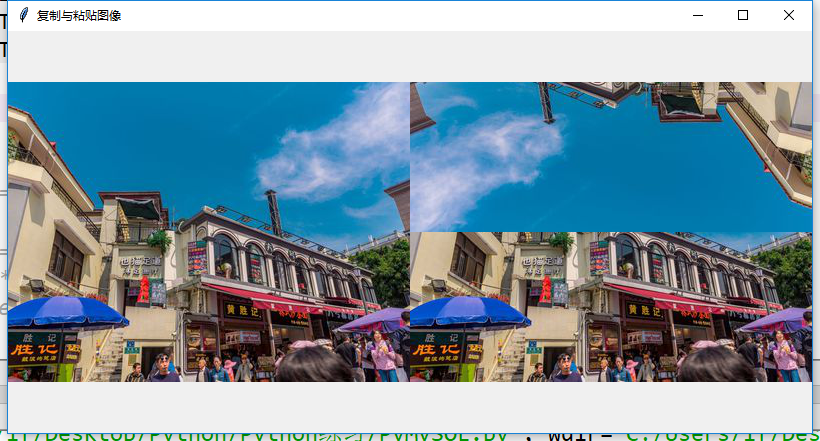
3、复制与粘贴图像
image模块的copy()方法,来复制该图像,copy();
image模块的paste()方法,来粘贴该图像,paste(image, box);
image模块的crop()方法,剪切该图像中的一个矩形方块,crop(box)。
示例:
from tkinter import *
from PIL import Image, ImageTk
#创建主窗口
win = Tk()
win.title(string="复制与粘贴图像")
#打开图像文件
imgFile = Image.open(r'C:UserslfDesktopPython	est02.jpg')
#创建第一个图像实例变量
img1 = ImageTk.PhotoImage(imgFile)
#读取图像文件的宽和高
width, height = imgFile.size
#设置剪切下的区块范围
box1 = (0, 0, width, int(height/2))
#将图像的上半部分剪切下来
part = imgFile.crop(box1)
#将剪切下的部分旋转
part = part.transpose(Image.ROTATE_180)
#将剪切下,处理后的部分,粘贴
imgFile.paste(part, box1)
#创建第二个图像实例变量
img2 = ImageTk.PhotoImage(imgFile)
#创建Label控件,来显示图像
label1 = Label(win, width=400, height=400, image=img1, borderwidth=1)
label2 = Label(win, width=400, height=400, image=img2, borderwidth=1)
label1.pack(side= LEFT)
label2.pack(side= LEFT)
#开始循环程序
win.mainloop()
4、图像的几何转换
(1)改变图像的大小:使用resize()方法,语法格式为resize((width, height));
(2)旋转图像:使用rotate()方法,语法格式为rotate(angle);
(3)颠倒图像:使用transpose()方法,语法格式为transpose(method)。
示例:
from tkinter import *
from PIL import Image, ImageTk
#创建主窗口
win = Tk()
win.title(string="图像的几何转换")
#打开图像文件
imgFile1 = Image.open(r'C:UserslfDesktopPython	est1.jpg')
#创建第一个图像实例变量
img1 = ImageTk.PhotoImage(imgFile1)
#创建Label1控件,来显示原始图像
label1 = Label(win, width=300, height=400, image=img1)
label1.pack(side = LEFT)
#旋转图像成45°角
imgFile2 = imgFile1.rotate(45)
img2 = ImageTk.PhotoImage(imgFile2)
#创建Label2控件,来显示图像
label2 = Label(win, width=300, height=400, image=img2)
label2.pack(side = LEFT)
#旋转图像成90°角
imgFile3 = imgFile1.transpose(Image.ROTATE_90)
img3 = ImageTk.PhotoImage(imgFile3)
#创建Label3控件,来显示图像
label3 = Label(win, width=300, height=400, image=img3)
label3.pack(side = LEFT)
#改变图像为四分之一大小
width, height = imgFile1.size
imgFile4 = imgFile1.resize((int(width/2),int(height/2)))
img4 = ImageTk.PhotoImage(imgFile4)
#创建Label3控件,来显示图像
label4 = Label(win, width=300, height=400, image=img4)
label4.pack(side = LEFT)
#开始循环程序
win.mainloop()

13.3 操作MYSQL数据库
Python中操作MySQL的模块是PyMySQL,在导入MySQL数据之前,需要安装PyMySQL模块。目前Python3.x仅支持PyMySQL,不支持MySQLdb。安装PyMySQL,如下:

1、连接数据库
代码:
import pymysql
#打开数据库连接
db = pymysql.connect('localhost','lifeng','123456','shopping')
#使用cursor()方法,创建一个游标对象cursor
cursor = db.cursor()
#使用execute()方法执行SQL查询
cursor.execute("SELECT VERSION()")
#使用fetchone()方法获取单条数据
data = cursor.fetchone()
#打印数据库版本号
print("Database version:%s" % data)
#关闭数据库
db.close()
2、在数据库创建表
代码:
import pymysql
#打开数据库连接
db = pymysql.connect('localhost','lifeng','123456','pymysql')
#使用cursor()方法,创建一个游标对象cursor
cursor = db.cursor()
#定义SQL语句
sql = """CREATE TABLE student4(id INT(10) NOT NULL UNIQUE,
 name CHAR(20) NOT NULL, age INT, sex CHAR(1))"""
#使用execute()方法执行SQL查询
cursor.execute(sql)
#关闭数据库
db.close()
3、在数据库插入数据
代码:
import pymysql
import sys
#打开数据库连接
db = pymysql.connect('localhost','lifeng','123456','pymysql')
#使用cursor()方法,创建一个游标对象cursor
cursor = db.cursor()
#定义SQL语句
sql = "INSERT INTO student (id, name, age, sex) VALUES ('%d', '%s', '%d', '%s')" % (4 , '迪丽热巴', 25, 'F')
try:
    #执行插入数据语句
    cursor.execute(sql)
    #提交到数据库执行
    db.commit()
except:
    #如果发生错误,则回滚到插入操作之前
    info = sys.exc_info()
    exc_type = info[0]
    exc_value = info[1]
    exc_traceback = info[2]
    print (exc_type, ":", exc_value)
    db.rollback() #回滚函数,回到错误操作之前,防止错误数据被插入。
#关闭数据库
db.close()
插入后的结果:

4、查询数据库
代码:
import pymysql
#打开数据库连接
db = pymysql.connect('localhost','lifeng','123456','pymysql')
#使用cursor()方法,创建一个游标对象cursor
cursor = db.cursor()
#定义SQL语句
sql = "SELECT * FROM student WHERE age > '%d'" % (23)
try:
    #执行插入数据语句
    cursor.execute(sql)
    results = cursor.fetchall()
    for row in results:
        id = row[0]
        name = row[1]
        age = row[2]
        sex = row[3]
        #打印查询结果
        print ("id=%d, name=%s, age=%d, sex=%s " % (id, name, age, sex))
except:
    #如果发生错误,则回滚到插入操作之前
    print("错误:无法查询到数据!!!")
#关闭数据库
db.close()
查询结果:

5、修改数据库数据
代码:
import pymysql
#打开数据库连接
db = pymysql.connect('localhost','lifeng','123456','pymysql')
#使用cursor()方法,创建一个游标对象cursor
cursor = db.cursor()
#定义SQL语句
sql = "UPDATE student SET age=age -1"
try:
    #执行插入数据语句
    cursor.execute(sql)
    #提交到数据库执行
    db.commit()
except:
    db.rollback() #回滚函数,回到错误操作之前,防止错误数据被插入。
#关闭数据库
db.close()
修改结果:

6、删除数据库数据
代码:
import pymysql
import sys
#打开数据库连接
db = pymysql.connect('localhost','lifeng','123456','pymysql')
#使用cursor()方法,创建一个游标对象cursor
cursor = db.cursor()
#定义SQL语句
sql = "DELETE FROM student WHERE sex = '%s'" % ('F')
try:
    #执行插入数据语句
    cursor.execute(sql)
    #提交到数据库执行
    db.commit()
except:
    #如果发生错误,则回滚到插入操作之前
    info = sys.exc_info()
    exc_type = info[0]
    exc_value = info[1]
    exc_traceback = info[2]
    print (exc_type, ":", exc_value)
    db.rollback() #回滚函数,回到错误操作之前,防止错误数据被插入。
#关闭数据库
db.close()
删除后结果:

7、遇到的问题
期间遇到一个问题:<class 'pymysql.err.OperationalError'> : (1142, "DELETE command denied to user 'lifeng'@'localhost' for table 'student'");
是因为“lifeng”这个数据库没有DELETE权限,需要设置权限,参考:https://blog.csdn.net/u014183172/article/details/78509017
——————————————————————————————————————————————————————————————————
初步了解numpy、pandas等内容,以及数据处理部分内容。下周准备学习数据处理、数据分析两章内容,进行简单的数据分析。