1、Uboot2017编译配置流程
/Uboot-2017.03$ make distclean
/Uboot-2017.03$ make mx6ull_14x14_evk_defconfig
/Uboot-2017.03$ make
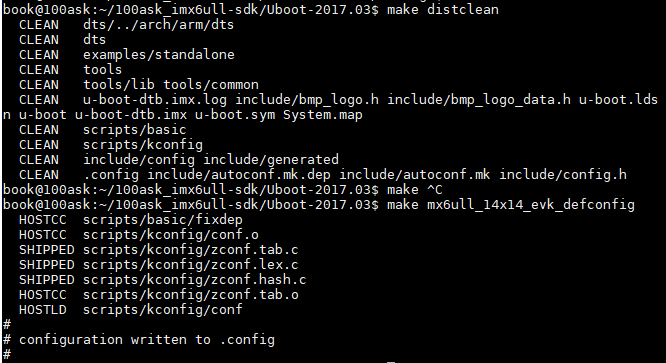
最后会编译出u-boot-dtb.imx文件,可以烧入板子中启动了。
2、Uboot2017的启动流程分析
1)内核启动的第一阶段
首先,经过上面的编译后,会在顶层目录下发现 自动生成了u-boot.lds链接文件,有了这个文件后,我们就会很容易找到我们需要分析的第一个文件是什么:
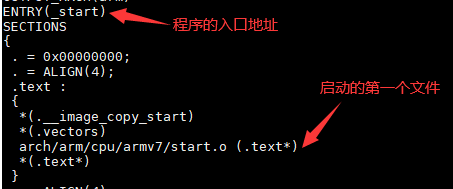
因此,我们就可以从arch/arm/cpu/armv7/start.S这个文件出发,去分析;但是当打开start.S这个文件时,并不会发现有程序的入口,也就是上图的_start这个标志,这个标志定义在arch/arm/lib/vectors.S文件中:
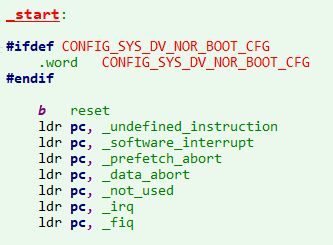
从上面也可以看到,主要定义了异常与中断的跳转函数,而第一个跳转到的是reset标志,可以发现,reset标志是定义在start.S中的,然后顺着程序向下执行:

1)将CPU从用户模式切换到管理员模式
2)禁止中断
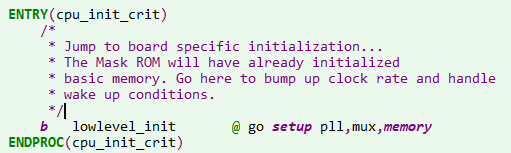
 这个函数是对CPU进行初始化
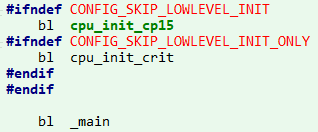
搜索_main,该函数定义在crt0.S中,这个函数是第一阶段的关键,第一阶段中最主要的函数是为了调用board_init_f:
由于此时RAM还并没有初始化,不能使用,因此使用gd结构体进行数据的传输
1)设置c代码的运行环境,为调用board_init_f作准备
a) 设置堆栈
b) 调用board_init_f_alloc_reserve接口,从堆栈开始的地方,为uboot的gd结构分配空间
c) 调用board_init_f_init_reserve接口,对gd进行初始化
2)调用board_init_f函数,完成一些前期的初始化工作
a)点亮一个Debug用的LED灯,表示u-boot已经活了
b)初始化DRAM,DDR等system范围的RAM等
c)计算后续代码需要使用的一些参数,包括relocation destination,the future stack,the future GD location等.
3).如果当前是SPL(由CONFIG_SPL_BUILD控制),则_main函数结束,直接返回.如果是正常的u-boot,则继续执行后续的动作
4).根据board_init_f指定的参数,执行u-boot的relocation操作
5).清除BSS段
6).调用board_init_r函数,执行后续的初始化操作
#if defined(CONFIG_SPL_BUILD) && defined(CONFIG_SPL_STACK)
	ldr	sp, =(CONFIG_SPL_STACK)
#else
	ldr	sp, =(CONFIG_SYS_INIT_SP_ADDR)
#endif
#if defined(CONFIG_CPU_V7M)	/* v7M forbids using SP as BIC destination */
	mov	r3, sp
	bic	r3, r3, #7
	mov	sp, r3
#else
	bic	sp, sp, #7	/* 8-byte alignment for ABI compliance */
#endif
	mov	r0, sp
	bl	board_init_f_alloc_reserve
	mov	sp, r0
	/* set up gd here, outside any C code */
	mov	r9, r0
	bl	board_init_f_init_reserve

	mov	r0, #0
	bl	board_init_f
在board_init_f中

会顺序的执行init_sequence_f中定义的函数指针,函数指针中,比较关键的是初始化时钟、初始化内核启动的环境参数、设置串口波特率、初始化串口、初始化i2c、初始化SPI、初始化ram、设置重定位地址、重定位
get_clocks
env_init
init_baud_rate
serial_init
init_func_i2c
init_func_spi
dram_init
jump_to_copy
.
.
.
.
jump_to_copy函数调用crt0.S文件中的重定位函数,之后便进行清除bss段,之后便调用board_init_r函数,进入内核启动的第二阶段。
2)内核启动的第二阶段
在第一阶段中,为第二阶段的函数调用提供了基础,比如gb结构、堆栈等
在board_init_r函数中,同样也有

顺序执行init_sequence_r函数指针的函数。
调用一系统函数之后,会调用到
run_main_loop
  main_loop()
    s = bootdelay_process()  /* 获得uboot传入的bootcmd      bootdelay参数,并将bootcmd参数保存在s中 */
    autoboot_command();     /* run_command s中的命令 */
      if (stored_bootdelay != -1 && s && !abortboot(stored_bootdelay))  /* 如果在bootdelay时间内,没有按下其他按键,便进入if判断 */
        run_command_list(s, -1, 0)  /* 执行uboot环境中bootcmd所指向的代码 */
    /* 如果在启动过程中,按下了空格,就会从autoboot_command()函数中返回 */
    cli_loop();
      parse_file_outer();
        /* 对uboot传入的命令进行必要的初始化 */
        rcode = parse_stream_outer(&input, FLAG_PARSE_SEMICOLON);  /* 执行uboot中的命令行参数 死循环 */
          do{
          run_list();
           }while();
如果在uboot命令行中输入了boot或bootm (地址),uboot便会再次启动内核。
3、bootm命令
对于uboot中,每一个命令行参数都会有一个相应的函数对应,对于bootm命令,会执行do_bootm函数(为什么调用略)

do_bootm
do_bootm_subcommand
do_bootm_states
bootm_os_get_boot_func
for (i = 0; i < ARRAY_SIZE(boot_os); i++)
static boot_os_fn *boot_os[] = {
...
#ifdef CONFIG_BOOTM_LINUX
[IH_OS_LINUX] = do_bootm_linux,
....
}
do_bootm_linux
boot_prep_linux
setup_start_tag(gd->bd);
if (BOOTM_ENABLE_SERIAL_TAG)
setup_serial_tag(¶ms);
if (BOOTM_ENABLE_CMDLINE_TAG)
setup_commandline_tag(gd->bd, commandline);
if (BOOTM_ENABLE_REVISION_TAG)
setup_revision_tag(¶ms);
if (BOOTM_ENABLE_MEMORY_TAGS)
setup_memory_tags(gd->bd);
setup_board_tags(¶ms);
setup_end_tag(gd->bd);
boot_jump_linux
void (*kernel_entry)(int zero, int arch, uint params);
unsigned long machid = gd->bd->bi_arch_number;
kernel_entry = (void (*)(int, int, uint))images->ep;
r2 = gd->bd->bi_boot_params;
kernel_entry(0, machid, r2); /* 启动内核 */