| 导读 | Hadoop是一个能够让用户轻松架构和使用的分布式计算平台,用户可以轻松地在Hadoop上开发和运行处理海量数据的应用程序,本节讲安装并且优化centos 6.7 系统下的Supper Hadoop。 |

1、系统安装类型选择及自定义额外包组
进入如图 1-1 所示界面。 上半部分是系统定制的不同的系统安装类型选择项,默认是“ Desktop”,这里我们选择“ Minimal”,即最小化安装,下半部分是在上面系统安装类型确定后, 额外想添加的软件包组选择项,我们选择“ Customize now”即立即自定义。
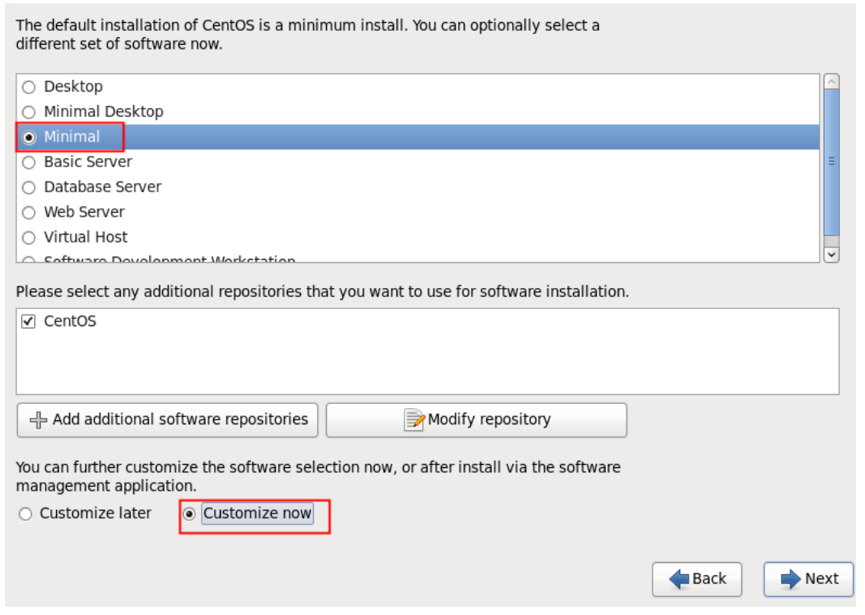
图 1-1 系统安装包类型选择及自定义额外包组。
在下图 1-2 的自定义额外的包组界面,我们首先需要选择左边的大的分类,然后在勾选右边对应的小的包组。注意:右边小包组里的内容默认即可,选择结果如图(1)、图(2)所示。
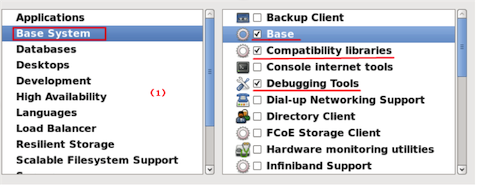
图 1-2 自定义安装包组选择界面I

1.1 根据经验,选择安装包时应该按最小化原则,即不需要的或者不确定是否需要的就不安装,这样可以最大程度上确保系统安全。
1.2 如果安装过程落了部分包组或者其他伙伴安装时没选
安装后可以按如下方式补上安装时未安装的包组:
yum groupinstall "Compatibility libraries" "Base" "Development tools"
yum groupinstall "debugging Tools" "Dial-up Networking Support"
可以通过 yum groupinfo 包组查看具体安装的组件。
1.3 下面安装 6.7 后登陆系统的时候查看选包的情况
yum grouplist:
Installed Groups:
Base
Compatibility libraries
Debugging Tools
Development tools
E-mail server
Graphical Administration Tools
Hardware monitoring utilities
Legacy UNIX compatibility
Networking Tools
Performance Tools
Perl Support
Scientific support
Security Tools
可以看到除了我们选择的外,系统还是默认安装了一些必须的软件包组。
2、网络设置
[root@centos ~]# cat /etc/sysconfig/network-scripts/ifcfg-eth0
DEVICE=eth0
HWADDR=00:0C:29:6D:58:E4
TYPE=Ethernet
UUID=5236fdbb-76ee-4f98-90cf-6bed4fb62661
ONBOOT=yes
NM_CONTROLLED=yes
BOOTPROTO=static
IPADDR=192.168.2.200
GATEWAY=192.168.2.1
NETMASK=255.255.255.0
3、Linux系统优化 Supper Hadoop
3.1 环境检查
3.1.1 操作系统
# cat /etc/redhat-release
CentOS release 6.6 (Final)
3.1.2 所有主机能够相互ping通
3.1.3 linux内核版本
# uname -r
2.6.32-504.el6.x86_64
3.2 添加安装集群用户&&关闭selinux&&修改Linux启动级别为3
useradd hadoop
echo "hadoop123"|passwd --stdin hadoop
yum grouplist
sed -i 's#SELINUX=enforcing#SELINUX=disabled#g' /etc/selinux/config
setenforce 0
grep SELINUX=disabled /etc/selinux/config
grep id:3:initdefault: /etc/inittab
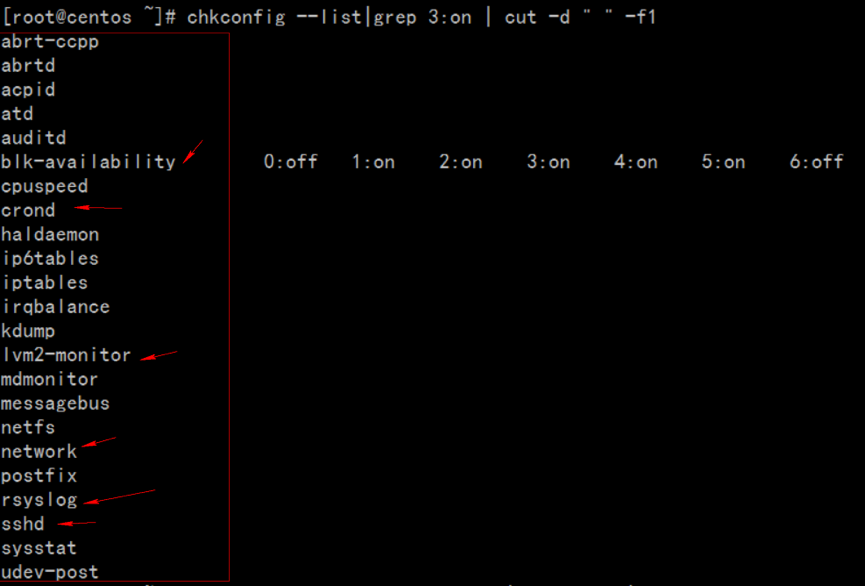
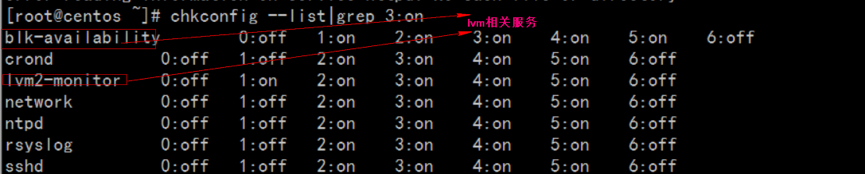
3.3 优化开机自动启动服务&&增大文件描述符(Hadoop并行读取数据文件)&&sudo权限管理
chkconfig --list|grep 3:on |wc –l
chkconfig --list|grep 3:on | cut -d " " -f1
for name in `chkconfig --list|grep 3:on | cut -d " " -f1` ;do chkconfig $name off;done
chkconfig --list|grep 3:on

#如果系统基于lvm逻辑卷管理需要开启lvm2-monitor blk-availability两个服务
for name in crond ntpd lvm2-monitor blk-availability network rsyslog sshd;do chkconfig $name on;done

iptables -L -n
/etc/init.d/iptables stop
iptables -L -n
chkconfig --list|grep iptables
echo 'hadoop  ALL=(ALL)       NOPASSWD: ALL' >> /etc/sudoers

echo '* - nofile 65535' >>  /etc/security/limits.conf
tail -1  /etc/security/limits.conf
3.4 配置ntp服务器,让所有服务器时间保持一致,如果是非内网服务器可以直接安装启动ntp
yum install htpd -y
/etc/init.d/ntpd start
chkconfig ntpd on

$ ntpq –p  #公网自动时间同步
如果是内网服务器,需要配置一台ntp服务器,所有服务器到ntp服务器定期同步时间,内网ntp服务器配置:
vim /etc/ntp.conf
restrict default ignore   //默认不允许修改或者查询ntp,并且不接收特殊封包
restrict 127.0.0.1        //给于本机所有权限
restrict 192.168.2.0 mask 255.255.255.0 notrap nomodify  //给于局域网机的机器有同步时间的权限
server  192.168.2.124   # local clock
driftfile /var/lib/ntp/drift
fudge   127.127.1.0 stratum 10
ntpq -p 查询网络中的NTP服务器:
$ ntpq –p
所有机器服务器需要和ntp服务时间保持一致:
$ ntpdate 192.168.1.124 #刚刚配置好ntp服务器,大概需要5min后才能正常提供服务;报错"no server suitable for synchronization found"
所有大数据服务器设置cron同步ntp服务器时间:
$ crontab -l
00 1 * * * root /usr/sbin/ntpdate 192.168.1.124 >> /root/ntpdate.log 2>&1
3.5 关闭防火墙
/etc/init.d/iptables status
/etc/init.d/iptables stop
chkconfig iptables off
3.6 关闭Swap
swapoff -a
3.7 Linux overcommit-memory
echo 0 > /proc/sys/vm/overcommit_memory
3.8 所有主机做好hosts ip映射&&repo文件
# tail -6 /etc/hosts
192.168.1.124 apache-server archive.cloudera.com archive-primary.cloudera.com

192.168.1.201   server1
192.168.1.202   server2
192.168.1.203   server3
192.168.1.204   server4
所有主机同步hosts文件一致
# scp -r /etc/hosts hostname:/etc/
所有主机repo文件同步
# scp -r CentOS-httpd.repo cloudera-cdh5.repo hostname:/etc/yum.repos.d/
3.9 swappiness && transparent_hugepage
#sudo echo '0' > /proc/sys/vm/swappiness
#sudo sysctl vm.swappiness=0

#sudo echo '#by whoami 2015-10-30'>> /etc/sysctl.conf
#sudo echo 'vm.swappiness=0'>> /etc/sysctl.conf

# cat /sys/kernel/mm/redhat_transparent_hugepage/defrag
[always] never
# echo never > /sys/kernel/mm/redhat_transparent_hugepage/defrag
# cat /sys/kernel/mm/redhat_transparent_hugepage/defrag
always [never]

# echo '#by whoami 2015-10-30'>> /etc/rc.local
# echo 'echo never > /sys/kernel/mm/redhat_transparent_hugepage/defrag ' >> /etc/rc.local
4、克隆虚拟机
虚拟机eth0无法启动解决,其实是因为克隆后Mac地址一致,导致冲突,而无法启动,报错信息如下:
Bring up interface eth0: Device eth0 does not seem to be present,delaying initialization.
删除两项ifcfg-eth0的配置,重启系统即可:
rm -f /etc/udev/rules.d/70-persistent-net.rules
删除/etc/sysconfig/network-scripts/ifcfg-eth0中,HWADDR、UUID两项内容,重启网卡即可解决。
/etc/init.d/network restart