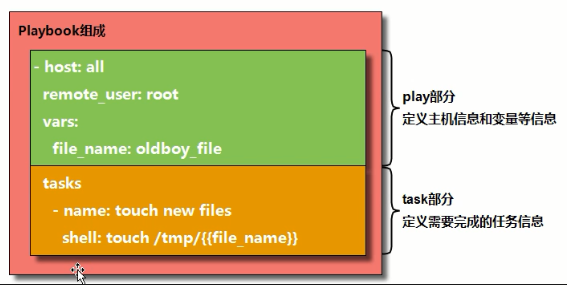
1、ansible剧本作用和组成
作用:
01.可以实现批量管理
02.可以实现批量部署
03.ad-hoc(批量执行命令)---针对临时性的操作
ansible xxx主机 -m command -a "hostname" <-批量执行命令举例
04.编写剧本-脚本(playbook)---针对重复性的操作
组成:
01.pyYAML <-用于ansible编写剧本所使用的语言格式(saltstack---python)
02.paramiko <-远程连接与数据传输
03.Jinja2 <-用于编写ansible的模板信息
2、 ansible剧本编写规则说明
①规则一:缩进/空格
yaml使用一个固定的缩进风格表示数据层结构关系,需要每个缩进级别由两个空格组成,一定不能使用tab键
注意:编写ansible-playbook文件,一定不能使用tab键
②规则二:冒号
- host: 172.16.1.41
tasks:
注意:每个冒号后一定要有空格(以冒号结尾不需要空格,表示文件路径的模板不需要空格)
③规则三:短横线
想要表示列表项,使用一个短横杠加一个空格。多个项使用同样的缩进级别作为同一个列表的一部分
核心规则:有效的利用空格进行剧本的编写,剧本编写是不支持tab的
3、 剧本书写格式
 剧本的开头,可以不写
 - hosts: all   #处理所有服务器,找到所有服务器;  -(空)hosts:(空)all
   tasks:    #剧本所要干的事情;                   (空)(空)task:
     - command: echo hello banana linux.      (空)(空)(空)(空)-(空)模块名称:(空)模块中对应的功能
等价于 ansible all -m command -a "echo hello banana linux"
剧本编写内容扩展:剧本任务定义名称
 - hosts: 172.16.1.7   #处理指定服务器                   -(空)hosts:(空)all
   task:    #剧本所要干的事情;                          -(空)(空)task:
     - name:
     command: echo hello banana linux.   (空)(空)(空)(空)-(空)模块名称:(空)模块中对应的功能
剧本格式示例
[root@ansible-server ansible]# vim host.yaml
- hosts: 10.192.27.115
  tasks:
    - name: 01-push conf file
      copy: src=/home/ansible/host.yaml dest=/etc/
    - name: 02-creste user  #密文生成方式  见模块user
      user: name=user06 password=$6$haha$3APjmPSwU.G/F8lE2n68TelpABeSX2S9KgMrMpqOsSbdqdC1tOvDaSB6FREobIxIPVKGvzF/imgHPusOJkWI.1
4、剧本编写后检查方法
[root@ansible-server ansible]# ansible-playbook --syntax-check host.yaml   #进行剧本配置信息语法检查

playbook: host.yaml
[root@ansible-server ansible]# ansible-playbook -C host.yaml   #模拟剧本执行(彩排)

PLAY [10.192.27.115] ********************************************

TASK [Gathering Facts] ******************************************
ok: [10.192.27.115]

TASK [01-push conf file] ****************************************
changed: [10.192.27.115]

TASK [02-creste user] *******************************************
changed: [10.192.27.115]

PLAY RECAP ******************************************************
10.192.27.115     : ok=3    changed=2    unreachable=0    failed=0    skipped=0    rescued=0    ignored=0

[root@ansible-server ansible]#


[root@ansible-server ansible]# ansible-playbook  host.yaml #正式执行

PLAY [10.192.27.115] *********************************************

TASK [Gathering Facts] *******************************************
ok: [10.192.27.115]

TASK [01-push conf file] *****************************************
changed: [10.192.27.115]

TASK [02-creste user] ********************************************
changed: [10.192.27.115]

PLAY RECAP *******************************************************
10.192.27.115     : ok=3    changed=2    unreachable=0    failed=0    skipped=0    rescued=0    ignored=0

[root@ansible-server ansible]#
剧本示例
4.1 剧本编写内容扩展:剧本任务编写多个任务
1 - hosts: all
2   tasks:
3     - name: restart-network
4       cron: name='restart network' minute=00 hour=00 job='/usr/sbin/ntpdate time.nist.gov >/dev/null 2>&1'
5     - name: sync time
6       cron: name='sync time' minute=*/5 job="/usr/sbin/ntpdate pool.ntp.com >/dev/null 2>&1"
4.2 剧本编写内容扩展:剧本任务编写多个主机
 1 - hosts: 172.16.1.7
 2   tasks:
 3     - name: restart-network
 4       cron: name='restart network' minute=00 hour=00 job='/usr/sbin/ntpdate time.nist.gov >/dev/null 2>&1'
 5     - name: sync time
 6       cron: name='sync time' minute=*/5 job="/usr/sbin/ntpdate pool.ntp.com >/dev/null 2>&1"
 7 - hosts: 172.16.1.31
 8   tasks:
 9     - name: show ip addr to file
10       shell: echo $(hostname -i) >> /tmp/ip.txt


    [root@m01 ansible-playbook]# cat rsync_server.yaml
- hosts: rsync_server
  tasks:
    - name: 01-install rsync
      yum: name=rsync state=installed
    - name: 02-push conf file
      copy: src=/etc/ansible/server_file/rsync_server/rsyncd.conf dest=/etc/
    - name: 03-create user
      user: name=rsync create_home=no shell=/sbin/nologin
      #shell: useradd rsync -M -s /sbin/nologin
    - name: 04-create backup dir
      file: path=/backup state=directory owner=rsync group=rsync
    - name: 05-create password file
      copy: content=rsync_backup:oldboy123 dest=/etc/rsync.password mode=600
    - name: 06-start rsync server
      service: name=rsyncd state=started enabled=yes

- hosts: rsync_clients
  tasks:
    - name: 01-install rsync
      yum: name=rsync state=installed
    - name: 02-create password file
      copy: content=oldboy123 dest=/etc/rsync.password mode=600
    - name: 03-create test file
      file: dest=/tmp/test.txt  state=touch
    - name: 04-check test
      shell: rsync -avz /tmp/test.txt rsync_backup@172.16.1.41::backup --password-file=/etc/rsync.password
5、如何配置主机清单(/etc/ansible/hosts)
主机清单的配置方法:
https://docs.ansible.com/ansible/latest/user_guide/intro_inventory.html
第一种方式: 分组配置主机信息
[web]
172.16.1.7
172.16.1.8
172.16.1.9

[data]
172.16.1.31
172.16.1.41
操作过程
[root@m01 ansible-playbook]# ansible data -a "hostname"
172.16.1.31 | CHANGED | rc=0 >>
nfs01
172.16.1.41 | CHANGED | rc=0 >>
backup
[root@m01 ansible-playbook]# ansible web -a "hostname"
172.16.1.7 | CHANGED | rc=0 >>
web01
第二种方式: 主机名符号匹配配置
[web]
172.16.1.[7:9]
[web]
web[01:03]  #需要在host文件中指定web01 web02 web03对应的IP
第三种方式: 跟上非标准远程端口
[web]
web01:52113 #需要在host文件中指定web01对应的IP
172.16.1.7:52113
第四种方式: 主机使用特殊的变量
[web]
172.16.1.7 ansible_ssh_port=52113 ansible_ssh_user=root ansible_ssh_pass=123456
[web]
web01 ansible_ssh_host=172.16.1.7 ansible_ssh_port=52113 ansible_ssh_user=root ansible_ssh_pass=123456
第五种方式: 主机组名嵌入配置
[rsync:children] --- 嵌入子组信息
rsync_server
rsync_client

[rsync_server]
172.16.1.41

[rsync_client]
172.16.1.31
172.16.1.7

[web:vars] --- 嵌入式变量信息
ansible_ssh_host=172.16.1.7
ansible_ssh_port=52113
ansible_ssh_user=root
ansible_ssh_pass=123456
[web]
web01
[root@ansible-server ansible]# vim /etc/ansible/hosts

[rsync:children]
rsync_server
rsync_client

[rsync_server]
10.192.27.114 ansible_ssh_user=root ansible_ssh_pass=123123

[rsync_client]
10.192.27.[115:116] ansible_ssh_user=root ansible_ssh_pass=123123


[root@ansible-server ansible]# ansible rsync -a 'hostname'
10.192.27.115 | CHANGED | rc=0 >>
node01

10.192.27.114 | CHANGED | rc=0 >>
master02

10.192.27.116 | CHANGED | rc=0 >>
node02


[root@ansible-server ansible]# ansible rsync_client -a 'hostname'
10.192.27.116 | CHANGED | rc=0 >>
node02

10.192.27.115 | CHANGED | rc=0 >>
node01

[root@ansible-server ansible]#
6、ansible编写剧本排错思路
6.1 剧本排错方法
1. ansible-playbook编写完,检査语法和模拟测试运行
2.打开剧本,定位异常问題原因,将剧本中的内容转换命令执行一次
3. 将参数中的脚本文件推送到远程服务器,在远程服务器本地执行脚本 sh -x test.sh
说明:ansible执行时,加上-vvvv显示ansible详细执行过程,也可以定位异常原因
### -v   查看执行的详细过程(-vv、-vvvv更详细)

--syntax-check或-C ansible语法检查和模拟执行(彩排)
6.2 ansible常见问题
常见问题一:在被控端上 root@notty进程一直存在
1 [root@backup ~]# ps -ef|grep sshd
2
3 root      35274      1  0 15:25 ?        00:00:00 /usr/sbin/sshd
4 root      37004  35274  0 16:23 ?        00:00:00 sshd: root@pts/2
5 root      37062  35274  0 16:55 ?        00:00:00 sshd: root@notty
6 root      37154  37006  0 16:55 pts/2    00:00:00 grep --color=auto sshd
解决思路:kill pid将该进程杀死,然后使用ansible的 -vvvv 参数查看执行的错误信息
Loading callback plugin minimal of type stdout, v2.0 from /usr/lib/python2.6/site-packages/ansible/plugins/callback/__init__.pyc

META: ran handlers
Using module file /usr/lib/python2.6/site-packages/ansible/modules/system/ping.py
<172.16.1.8> ESTABLISH SSH CONNECTION FOR USER: None
<172.16.1.8> SSH: EXEC ssh -vvv -C -o ControlMaster=auto -o ControlPersist=60s -o KbdInteractiveAuthentication=no -o PreferredAuthentications=gssapi-with-mic,gssapi-keyex,hostbased,publickey -o PasswordAuthentication=no -o ConnectTimeout=10 -o ControlPath=/root/.ansible/cp/923ebeb605 172.16.1.8 '/bin/sh -c '"'"'echo ~ && sleep 0'"'"''
可能为:在/etc/ssh/sshd_config 文件中的第132行为空,导致sftp 无法连接出错
133 Subsystem sftp /usr/libexec/openssh/sftp-server
常见问题二:
[root@m01 ~]# ansible -k 172.16.1.51 -m ping
SSH password:
[WARNING]: No hosts matched, nothing to do
解决思路:在ansible的hosts文件中,没有配置相应主机地址信息
常见问题三:
1 # ansible -k 172.16.1.51 -m ping
2
3 SSH password:
4 172.16.1.51|FAILED! => {
5 "failed": true,
6 "msg": "Using a SSH password instead of a key is not possible because Host Key checking is enabled and sshpass does not support this.  Please add this host's fingerprint to your known_hosts file to manage this host."
7 }
解决思路:在known_hosts文件中没有受控端指纹信息
6.3 [附录]pssh命令使用扩展
pssh命令使用场景说明
背景:若同时给上千台服务器执行一个命令,拷贝一个文件,杀一个进程等,有什么简化运维管理的工具呢?
在小型企业中通常使用for循环,但是数量巨大时:一方面不确定操作是否成功;另一方面for循环语句性能不好估计且是否是同步并行执行,故此时会用到批量并行执行的命令如 pdsh,mussh,cssh,dsh等,及下面说明提到的pssh
pssh软件安装部署方式
①通过yum安装pssh软件
1 yum install -y pssh <-pssh软件下载需要依靠epel源
说明:pssh是一个软件大礼包,里面有很多软件命令
②通过编译方式安装pssh软件
1 wget http://peak.telecommunity.com/dist/ez_setup.py
2 python ez_setup.py
3 wget http://parallel-ssh.googlecode.com/files/pssh-2.2.2.tar.gz
4 tar zxvf pssh-2.2.2.tar.gz
5 cd pssh-2.2.2
6 python setup.py install
③pssh软件使用操作说明(ssh key认证密钥配置完毕)
01.pssh 多主机并行运行命令
1 [root@server pssh-2.2.2]# vim hosts_info.txt
2
3 172.16.1.31:22
4 172.16.1.41:22
5 172.16.1.7:22  //注意我的端口号不仅是默认的22
说明:如果想将执行命令的批量输出信息重定向到一个文件 加-o 目录 选项
参数说明:
-h HOST_FILE,  --hosts=HOST_FILE       hosts file (each line "[user@]host[:port]")
-o OUTDIR,     --outdir=OUTDIR         output directory for stdout files (OPTIONAL)
-P,             --print                   print output as we get it
02.pscp 把文件并行地复制到多个主机上(从服务器端给客户端传送文件)
1 [root@server pssh-2.2.2]# pscp -h test.txt /etc/sysconfig/network /tmp/network
03.prsync 使用rsync协议从本地计算机同步到远程主机
1 [root@server ~]# pssh -h test.txt -P mkdir /tmp/etc
2 [root@server ~]# prsync -h test.txt -l dongwm -a -r /etc/sysconfig /tmp/etc
04.pslurp 将文件从远程主机复制到本地,和pscp方向相反

 1 [root@server ~]# pslurp -h test.txt   -L /tmp/test -l root /tmp/network test
 2
 3 [1] 14:53:54 [SUCCESS] 192.168.9.102 9922
 4 [2] 14:53:54 [SUCCESS] 192.168.9.104 9922
 5
 6 [root@server ~]# ll /tmp/test/192.168.9.10
 7 192.168.9.102/ 192.168.9.104/
 8
 9 [root@server ~]# ll /tmp/test/192.168.9.102/
10 总计 4.0K
11 -rw-r--r-- 1 root root 60 2011-04-22 14:53 test
12
13 [root@server ~]# ll /tmp/test/192.168.9.104/
14 总计 4.0K
15 -rw-r--r-- 1 root root 60 2011-04-22 14:53 test
此笔记是本人学习摘记整理而成,此为初稿(尚有诸多不完善之处),原创作品允许转载,转载时请务必以超链接形式标明文章原始出处,作者信息和本声明,否则将追究法律责任。http://www.cnblogs.com/bananaaa/