mongo术语:
https://docs.mongodb.com/manual/reference/glossary/
构建mongo集群可参考:
https://docs.mongodb.com/manual/tutorial/deploy-shard-cluster/
mongo的shard机制:
https://docs.mongodb.com/manual/sharding/
mongo集群的状态:
 1 mongos> sh.status();
 2 --- Sharding Status ---
 3   sharding version: {
 4         "_id" : 1,
 5         "minCompatibleVersion" : 5,
 6         "currentVersion" : 6,
 7         "clusterId" : ObjectId("5b150d3329f5ae8c563a9e80")
 8   }
 9   shards:
10         {  "_id" : "shard0000",  "host" : "x.x.x.x1:9202",  "state" : 1 }
11         {  "_id" : "shard0001",  "host" : "x.x.x.x2:9203",  "state" : 1 }
12   active mongoses:
13         "3.6.5" : 1
14   autosplit:
15         Currently enabled: yes
16   balancer:
17         Currently enabled:  yes
18         Currently running:  no
19         Failed balancer rounds in last 5 attempts:  5
20         Last reported error:  Connection refused
21         Time of Reported error:  Tue Sep 11 2018 17:16:25 GMT+0800 (CST)
22         Migration Results for the last 24 hours:
23                 No recent migrations
24   databases:
25         {  "_id" : "config",  "primary" : "config",  "partitioned" : true }
26                 config.system.sessions
27                         shard key: { "_id" : 1 }
28                         unique: false
29                         balancing: true
30                         chunks:
31                                 shard0000       1
32                         { "_id" : { "$minKey" : 1 } } -->> { "_id" : { "$maxKey" : 1 } } on : shard0000 Timestamp(1, 0)
33         {  "_id" : "test",  "primary" : "shard0000",  "partitioned" : false }
34         {  "_id" : "test2",  "primary" : "shard0000",  "partitioned" : true }
35         {  "_id" : "test3",  "primary" : "shard0001",  "partitioned" : false }
36         {  "_id" : "test4",  "primary" : "shard0000",  "partitioned" : false }
这里就可以看到有几个shards了。
要看replica set,在mongos里是看不了的,要到config server或者shardsvr上看。
 1 replica-set-name:PRIMARY> rs.status();
 2 {
 3         "set" : "replica-set-name",
 4         "date" : ISODate("2018-09-19T13:04:05.505Z"),
 5         "myState" : 1,
 6         "term" : NumberLong(4),
 7         "configsvr" : true,
 8         "heartbeatIntervalMillis" : NumberLong(2000),
 9         "optimes" : {
10                 "lastCommittedOpTime" : {
11                         "ts" : Timestamp(1537362245, 1),
12                         "t" : NumberLong(4)
13                 },
14                 "readConcernMajorityOpTime" : {
15                         "ts" : Timestamp(1537362245, 1),
16                         "t" : NumberLong(4)
17                 },
18                 "appliedOpTime" : {
19                         "ts" : Timestamp(1537362245, 1),
20                         "t" : NumberLong(4)
21                 },
22                 "durableOpTime" : {
23                         "ts" : Timestamp(1537362245, 1),
24                         "t" : NumberLong(4)
25                 }
26         },
27         "members" : [
28                 {
29                         "_id" : 0,
30                         "name" : "x.x.x.x:9204",
31                         "health" : 1,
32                         "state" : 1,
33                         "stateStr" : "PRIMARY",
34                         "uptime" : 4180052,
35                         "optime" : {
36                                 "ts" : Timestamp(1537362245, 1),
37                                 "t" : NumberLong(4)
38                         },
39                         "optimeDate" : ISODate("2018-09-19T13:04:05Z"),
40                         "electionTime" : Timestamp(1533182194, 1),
41                         "electionDate" : ISODate("2018-08-02T03:56:34Z"),
42                         "configVersion" : 12604,
43                         "self" : true
44                 }
45         ],
46         "ok" : 1,
47         "operationTime" : Timestamp(1537362245, 1),
48         "$gleStats" : {
49                 "lastOpTime" : Timestamp(0, 0),
50                 "electionId" : ObjectId("7fffffff0000000000000004")
51         },
52         "$clusterTime" : {
53                 "clusterTime" : Timestamp(1537362245, 1),
54                 "signature" : {
55                         "hash" : BinData(0,"fsfsfsdfsdfsdfsdfsdfsfsfs"),
56                         "keyId" : NumberLong(0)
57                 }
58         }
59 }
默认db和collection都没有分shard的,需要手动操作下。
MongoSpark的配置选项可以在这里找到:
https://docs.mongodb.com/spark-connector/master/configuration/
写的话就看WriteConfig好了。每个参数应该传什么值还是看代码好些:
查看是否sharding也可以用:
1 mongos> db.collection.getShardDistribution()
2 Collection db.collection is not sharded.
查看当前操作:
1 db.currentOp()
提高写的性能:
1. batch write。
Strategies for Bulk Inserts to a Sharded Collection
- Pre-Split the Collection 这里其实就是因为如果是空集合,那么每次还要 take time to receive data, create splits, and distribute the split chunks to the available shards. 这一步就是为了减少这个开销,当然如果集合已经存在了就可以省略这一步了。
- Unordered Writes to mongos 无序的batch write可以并行,提升插入性能
- Avoid Monotonic Throttling 递增地插入,会导致永远只在一个chunk上操作,导致了其实最后的性能都会和单个shard的差不多,因此最好是能保证随机,这样就会均衡地放在多个shard上。
https://docs.mongodb.com/manual/core/bulk-write-operations/
2. unordered。
Bulk write operations can be either ordered or unordered.
With an ordered list of operations, MongoDB executes the operations serially. If an error occurs during the processing of one of the write operations, MongoDB will return without processing any remaining write operations in the list. See ordered Bulk Write
With an unordered list of operations, MongoDB can execute the operations in parallel, but this behavior is not guaranteed. If an error occurs during the processing of one of the write operations, MongoDB will continue to process remaining write operations in the list. See Unordered Bulk Write.
Executing an ordered list of operations on a sharded collection will generally be slower than executing an unordered list since with an ordered list, each operation must wait for the previous operation to finish.
By default, bulkWrite() performs ordered operations. To specify unordered write operations, set ordered : false in the options document.
默认是有序的,比较坑爹。
https://docs.mongodb.com/manual/core/bulk-write-operations/
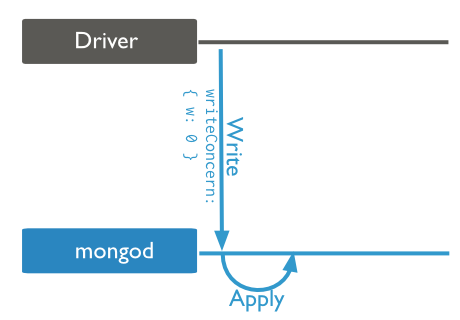
3. Write Concern
主要是这几个参数:
1 { w: <value>, j: <boolean>, wtimeout: <number> }
- the w option to request acknowledgement that the write operation has propagated to a specified number of mongod instances or to mongod instances with specified tags.
- the j option to request acknowledgement that the write operation has been written to the journal, and
- the wtimeout option to specify a time limit to prevent write operations from blocking indefinitely.
也就是说,写操作是否需要确认,可想而知,不需要确认当然就快很多啦。但是网络的错误这里还是可以捕获到的。

https://docs.mongodb.com/manual/reference/write-concern/
Journaling日志机制
如果开启了journal日志功能,MongoDB会在数据目录下创建一个journal文件夹,用来存放预写重放日志。同时这个目录也会有一个last-sequence-number文件。如果MongoDB安全关闭的话,会自动删除此目录下的所有文件,如果是崩溃导致的关闭,不会删除日志文件。在MongoDB进程重启的过程中,journal日志文件用于自动修复数据到一个一致性的状态。
MongoDB先在内存保存写操作,并记录journaling日志到磁盘,然后才会把数据改变刷入到磁盘上的数据文件。
https://jockchou.gitbooks.io/getting-started-with-mongodb/content/book/journal.html
每隔60秒, 或当Journal文件超过2GB, 会有一个叫Checkpoints的事件, WT会把WT Cache中的数据存入FS Cache, 然后一次性将所有改变应用到磁盘上。换言之, 如果你既没有用Replica Set, 也没有用Journal。那么在你宕机的时候仍然能从最后一个Checkpoints恢复数据。
https://learn-mongodb.readthedocs.io/storage-engine/wiredtiger-vs-mmapv1/
导入数据
1 bin/mongoimport --host [IP] --port [PORT] --drop --file [FILE] --db [DB] --collection [COLLECTION]
文件就按行隔开,每行是一条json。类似这样:
1 { "item": "journal", "qty": 25, "size": { "h": 14, "w": 21, "uom": "cm" }, "status": "A" }
2 { "item": "notebook", "qty": 50, "size": { "h": 8.5, "w": 11, "uom": "in" }, "status": "A" }
3 { "item": "paper", "qty": 100, "size": { "h": 8.5, "w": 11, "uom": "in" }, "status": "D" }
4 { "item": "planner", "qty": 75, "size": { "h": 22.85, "w": 30, "uom": "cm" }, "status": "D" }
5 { "item": "postcard", "qty": 45, "size": { "h": 10, "w": 15.25, "uom": "cm" }, "status": "A" }
导出数据
https://docs.mongodb.com/manual/reference/program/mongodump/
mongodump是导成二进制的。要导出json或csv,用mongoexport.
https://docs.mongodb.com/manual/reference/program/mongoexport/
1 bin/mongoexport --host [IP] --port [PORT] --db [DB] --collection [COLLECTION] --fields [FIELDS] --type csv --out [FILE_NAME] --query '{"FIELD_NAME" : {$exists : true}}'
性能监控
用mongostat。
1 bin/mongostat -h 【HOST:PORT】
结果如下:
1 insert query update delete getmore command flushes mapped vsize  res faults qrw arw net_in net_out conn                time
2    936    *0 255482     *0       0  1436|0       0     0B 1.76G 149M      0 0|0 0|0  55.6m   8.91m  365 Oct 11 21:24:47.771
3    785    *0 272450     *0       0  1321|0       0     0B 1.76G 150M      0 0|0 0|0  57.4m   9.47m  365 Oct 11 21:24:48.771
4    965    *0 262622     *0       0  1490|0       0     0B 1.76G 149M      0 0|0 0|0  56.7m   9.16m  365 Oct 11 21:24:49.771
5    929    *0 224718     *0       0  1372|0       0     0B 1.76G 149M      0 0|0 0|0  48.7m   7.84m  365 Oct 11 21:24:50.772
6    824    *0 271654     *0       0  1363|0       0     0B 1.76G 149M      0 0|0 0|0  57.9m   9.47m  365 Oct 11 21:24:51.772
7    925    *0 272144     *0       0  1464|0       0     0B 1.76G 149M      0 0|0 0|0  58.0m   9.48m  365 Oct 11 21:24:52.771
删除shard
http://www.mongoing.com/docs/tutorial/remove-shards-from-cluster.html
通过以下命令不断地查看shard的状态。
1 use admin
2 db.runCommand( { removeShard: "mongodb0" } )
或者:
1 db.adminCommand({removeShard:'shard0002'})
一旦 state 的值变为 “completed”,就可以安全地停止 mongodb0` 分片上的monod进程.
 1 mongos> db.runCommand({removeShard:'shard0002'})
 2 {
 3         "ok" : 0,
 4         "errmsg" : "removeShard may only be run against the admin database.",
 5         "code" : 13,
 6         "codeName" : "Unauthorized",
 7         "$clusterTime" : {
 8                 "clusterTime" : Timestamp(1539325098, 1),
 9                 "signature" : {
10                         "hash" : BinData(0,"AAAAAAAAAAAAAAAAAAAAAAAAAAA="),
11                         "keyId" : NumberLong(0)
12                 }
13         },
14         "operationTime" : Timestamp(1539325098, 1)
15 }
16 mongos> use admin
17 switched to db admin
18 mongos> db.runCommand({removeShard:'shard0002'})
19 {
20         "msg" : "draining started successfully",
21         "state" : "started",
22         "shard" : "shard0002",
23         "note" : "you need to drop or movePrimary these databases",
24         "dbsToMove" : [ ],
25         "ok" : 1,
26         "$clusterTime" : {
27                 "clusterTime" : Timestamp(1539325149, 2),
28                 "signature" : {
29                         "hash" : BinData(0,"AAAAAAAAAAAAAAAAAAAAAAAAAAA="),
30                         "keyId" : NumberLong(0)
31                 }
32         },
33         "operationTime" : Timestamp(1539325149, 2)
34 }
35 mongos> db.runCommand({removeShard:'shard0002'})
36 {
37         "msg" : "draining ongoing",
38         "state" : "ongoing",
39         "remaining" : {
40                 "chunks" : NumberLong(3495),
41                 "dbs" : NumberLong(0)
42         },
43         "note" : "you need to drop or movePrimary these databases",
44         "dbsToMove" : [ ],
45         "ok" : 1,
46         "$clusterTime" : {
47                 "clusterTime" : Timestamp(1539325150, 1),
48                 "signature" : {
49                         "hash" : BinData(0,"AAAAAAAAAAAAAAAAAAAAAAAAAAA="),
50                         "keyId" : NumberLong(0)
51                 }
52         },
53         "operationTime" : Timestamp(1539325150, 1)
54 }
如果想更改draining的状态,直接改数据库就行:
1 //connect to a mongos server with the mongo javascript shell
2 use config
3 //unset draining from all shards
4 db.shards.update({},{$unset:{draining:true}}, false, true)
https://stackoverflow.com/questions/11813664/stop-draining-shard-in-mongodb
但是如果删除了切片,又想把它加回来,必须将data数据目录清理干净才可以再加入集群,否则即使能加入成功也不会存储数据,集合都不会被创建。
https://blog.csdn.net/liqi_q/article/details/79047361
Adding a shard to a cluster creates an imbalance, since the new shard has no chunks. While MongoDB begins migrating data to the new shard immediately, it can take some time before the cluster balances. See the Add Shards to a Cluster tutorial for instructions on adding a shard to a cluster.
Removing a shard from a cluster creates a similar imbalance, since chunks residing on that shard must be redistributed throughout the cluster. While MongoDB begins draining a removed shard immediately, it can take some time before the cluster balances. Do not shutdown the servers associated to the removed shard during this process.
When you remove a shard in a cluster with an uneven chunk distribution, the balancer first removes the chunks from the draining shard and then balances the remaining uneven chunk distribution.
可以看到,整个balancing都是立刻生效的。
https://docs.mongodb.com/manual/core/sharding-balancer-administration/#sharding-balancing
实际上整个迁移过程如下:
- The balancer process sends the moveChunk command to the source shard.
- The source starts the move with an internal moveChunk command. During the migration process, operations to the chunk route to the source shard. The source shard is responsible for incoming write operations for the chunk.
- The destination shard builds any indexes required by the source that do not exist on the destination.
- The destination shard begins requesting documents in the chunk and starts receiving copies of the data. See also Chunk Migration and Replication.
- After receiving the final document in the chunk, the destination shard starts a synchronization process to ensure that it has the changes to the migrated documents that occurred during the migration.
- When fully synchronized, the source shard connects to the config database and updates the cluster metadata with the new location for the chunk.
- After the source shard completes the update of the metadata, and once there are no open cursors on the chunk, the source shard deletes its copy of the documents.
可以看到,整个过程中,由source shard来接管请求,由destination shard来同步最新的修改,最终是有两份拷贝,等到数据同步完成了,再把source shard的拷贝删了。也就是说,在迁移的过程中,写是往旧的shard写的。