1、OceLot中间件介绍
在传统的BS应用中,随着业务需求的快速发展变化,需求不断增长,迫切需要一种更加快速高效的软件交付方式。微服务可以弥补单体应用不足,是一种更加快速高效软件架构风格。单体应用被分解成多个更小的服务,每个服务有自己的独立模块,单独部署,然后共同组成一个应用程序。把范围限定到单个独立业务模块功能。分布式部署在各台服务器上。
而Ocelot开发的目标就是使用.NET运行面向微服务/服务的架构,要达到这个目标需要一个统的系统入口点(我们统称为API网关),同时需要与IdentityServer或相关的验证服务进行集成。
Ocelot同时是一系列按特定顺序排列的中间件。
包括(IdentityServer,Consul,Butterfly)等等。
Ocelot将HttpRequest对象操作到其配置指定的状态,直到它到达请求构建器中间件,在该中间件中它创建HttpRequestMessage对象,该对象用于向下游服务发出请求。发出请求的中间件是Ocelot管道中的最后一件事。它不会调用下一个中间件。下游服务的响应存储在每个请求范围的存储库中,并在请求返回Ocelot管道时进行检索。有一个中间件将HttpResponseMessage映射到HttpResponse对象并返回给客户端。
以下是部署Ocelot时使用的结构图:

与IdentityServer4的集成:

与Consul的集成:

从上面基本的介绍可以得出一个结论,OceLot微服务网关类似于经典设计模式的Façade模式,它将底层的复杂细节进行屏蔽,对外提供简单而统一的调用方式,通常使用HTTP的RESTful API服务。此时,对于客户端而言,可以是PC端网页,也可以是移动设备,客户端通过HTTP方式调用OceLot网关。
2、整体设计
看了前面的基于OceLot微服务的基础介绍,发现OceLot已提供了足够强大的功能及扩展能力,而我们只需要进行集成,对就是集成(我们不生产水,我们只是大自然的搬运工),如下图:

如图,我们采用了Nginx作为入口的高可用及负载均衡,通过API网关作为具体二次转发接入的统一入口,先向IdentityService进行Login以进行验证并获取Token,在IdentityService的验证过程中会访问数据库以验证。接着再通过Consul服务器获取服务的所在服务器,最后再带上Token通过API网关去访问具体的服务A、B、C。这里我们的IdentityService基于IdentityServer4开发,它具有统一登录验证和授权的功能。
而API网关的模块组件图大致如下图:

3、Nginx负载均衡
点击进入:https://www.cnblogs.com/littlewrong/p/9491901.html。
4、OceLot网关服务
4.1、路由
Ocelot的主要功能是接管进入的http请求并把它们转发给下游服务。目前是以另一个http请求的形式(将来可能是任何传输机制)。
捕获所有
Ocelot的路由还支持捕获所有样式的路由,用户可以指定他们想要匹配所有流量。如果你像下面那样设置你的配置,请求将被直接代理(它不一定叫url,任何占位符名称都可以)。
{
"DownstreamPathTemplate": "/{url}",
"DownstreamScheme": "https",
"DownstreamHostAndPorts": [
{
"Host": "localhost",
"Port": 80,
}
],
"UpstreamPathTemplate": "/{url}",
"UpstreamHttpMethod": [ "Get" ]
}
该捕获所有的优先级低于其他任何ReRoute。 如果你的配置中还有下面的ReRoute,那么Ocelot会在捕获所有配置之前先匹配它。
{"DownstreamPathTemplate":"/",
"DownstreamScheme":"https",
"DownstreamHostAndPorts": [
{"Host":"10.0.10.1",
"Port":80,
} ],"UpstreamPathTemplate":"/",
"UpstreamHttpMethod": ["Get"]
}上游主机
此功能允许您基于上游主机进行ReRoutes。 这是通过查看客户端使用的主机头来工作,然后将其用作识别ReRoute的信息的一部分。
为了使用这个功能,在你的配置中加上如下配置。
{"DownstreamPathTemplate":"/",
"DownstreamScheme":"https",
"DownstreamHostAndPorts": [
{"Host":"10.0.10.1",
"Port":80,
} ],"UpstreamPathTemplate":"/",
"UpstreamHttpMethod": ["Get"],
"UpstreamHost":"somedomain.com"
}上面的ReRoute只会匹配主机头是somedomain.com的请求。
如果您没有在ReRoue上设置UpstreamHost,则任何主机头都可以匹配它。 这基本上是一个捕获所有功能并保留构建功能时的现有功能。这意味着如果您有两个相同的ReRoute,其中一个与UpstreamHost是null,另一个有值。 Ocelot会倾向于设定值的那个。
这个功能在问题 216提出要求。
优先级
{"Priority":0
}0是最低优先级,Ocelot将始终使用0作为/{catchAll}路由条目,并且可以硬编码。之后,你可以自由设置你想要的任何优先级。
例如你可以这样:
{"UpstreamPathTemplate":"/goods/{catchAll}",
"Priority":0
}还可以:
{"UpstreamPathTemplate":"/goods/delete",
"Priority":1
}在上面的例子中,如果您向Ocelot请求/goods/delete,Ocelot将匹配/goods/delete这个ReRoute。不过在不设置优先级以前它会匹配/goods/{catchAll}(因为这是列表中的第一个ReRoute!)。
以上摘自官方的介绍,地址为:https://ocelot.readthedocs.io/en/latest/features/routing.html
最终实现代码如下:

调试时,确认启动多个项目。
启动多个项目:


进行路由测试:


通过PostMan测试发现,BookingAPI,及PassengerAPI已通过网关API成功访问。
配置文件解析
{
"ReRoutes": [ //路由是API网关最基本也是最核心的功能、ReRoutes下就是由多个路由节点组成。
{
"DownstreamPathTemplate": "", //下游服务模板
"UpstreamPathTemplate": "", //上游服务模板
"UpstreamHttpMethod": [ "Get" ],//上游方法类型Get,Post,Put
"AddHeadersToRequest": {},//需要在转发过程中添加到Header的内容
"FileCacheOptions": { //可以对下游请求结果进行缓存,主要依赖于CacheManager实现
"TtlSeconds": 10,
"Region": ""
},
"ReRouteIsCaseSensitive": false,//重写路由是否区分大小写
"ServiceName": "",//服务名称
"DownstreamScheme": "http",//下游服务schema:http, https
"DownstreamHostAndPorts": [ //下游服务端口号和地址
{
"Host": "localhost",
"Port": 8001
}
],
"RateLimitOptions": { //限流设置
"ClientWhitelist": [], //客户端白名单
"EnableRateLimiting": true,//是否启用限流设置
"Period": "1s", //每次请求时间间隔
"PeriodTimespan": 15,//恢复的时间间隔
"Limit": 1 //请求数量
},
"QoSOptions": { //服务质量与熔断,熔断的意思是停止将请求转发到下游服务。当下游服务已经出现故障的时候再请求也是无功而返,
并且增加下游服务器和API网关的负担,这个功能是用的Polly来实现的,我们只需要为路由做一些简单配置即可
"ExceptionsAllowedBeforeBreaking": 0, //允许多少个异常请求
"DurationOfBreak": 0, //熔断的时间,单位为秒
"TimeoutValue": 0 //如果下游请求的处理时间超过多少则自如将请求设置为超时
}
}
],
"UseServiceDiscovery": false,//是否启用服务发现
"Aggregates": [ //请求聚合
{
"ReRouteKeys": [ //设置需要聚合的路由key
"booking",
"passenger"
],
"UpstreamPathTemplate": "/api/getbookingpassengerinfo" //暴露给外部的聚合请求路径
},
"GlobalConfiguration": { //全局配置节点
"BaseUrl": "https://localhost:5000" //网关基地址
}
}
{
"DownstreamPathTemplate": "/api/posts/{postId}",
"DownstreamScheme": "https",
"DownstreamHostAndPorts": [
{
"Host": "10.0.1.10",
"Port": 5000,
},
{
"Host": "10.0.1.11",
"Port": 5000,
}
],
"UpstreamPathTemplate": "/posts/{postId}",
"LoadBalancer": "LeastConnection",
"UpstreamHttpMethod": [ "Put", "Delete" ]
}
万能模板
如果不希望对请求做任何的处理,则可以使用下面的万能模板:(万能模板的优先级最低,只要有其它的路由模板,其它的路由模板则会优先生效)
{
"DownstreamPathTemplate": "/{url}",
"DownstreamScheme": "https",
"DownstreamHostAndPorts": [
{
"Host": "localhost",
"Port": 80,
}
],
"UpstreamPathTemplate": "/{url}",
"UpstreamHttpMethod": [ "Get" ]
}
Prioirty优先级
对多个产生冲突的路由设置优化级
{
"UpstreamPathTemplate": "/goods/{catchAll}"
"Priority": 0
}
{
"UpstreamPathTemplate": "/goods/delete"
"Priority": 1
}
请求聚合
可以通过gateway将客户端的多个请求聚合然后将结果一次返回到客户端去,此时我们需要给每个模板指定一个key
{
"ReRoutes": [
{
"DownstreamPathTemplate": "/api/booking",
"UpstreamPathTemplate": "/api/getbooking",
"UpstreamHttpMethod": [ "Get" ],
"DownstreamScheme": "http",
"DownstreamHostAndPorts": [
{
"Host": "localhost",
"Port": 8001
}
],
"Key": "booking"
},
{
"DownstreamPathTemplate": "/api/passenger",
"UpstreamPathTemplate": "/api/getpassenger",
"UpstreamHttpMethod": [ "Get" ],
"ReRouteIsCaseSensitive": false,
"DownstreamScheme": "http",
"DownstreamHostAndPorts": [
{
"Host": "localhost",
"Port": 8002
}
],
"Key": "passenger"
}
],
"GlobalConfiguration": {
"BaseUrl": "https://localhost:5000"
},
"Aggregates": [
{
"ReRouteKeys": [
"booking",
"passenger"
],
"UpstreamPathTemplate": "/api/getbookingpassengerinfo"
}
]
}
需要注意的是:
- 聚合服务目前只支持返回json
- 目前只支持Get方式请求下游服务
- 任何下游的response header并会被丢弃
- 如果下游服务返回404,聚合服务只是这个key的value为空,它不会返回404
有没有觉得这里的聚合很类似于GraphQL的功能,但实际上在Ocelot中并不打算实现GraphQL的功能,因为毕竟Ocelot的主要职责是实现网关的功能,聚合只是其中的一个feature,GraphQL提供了一个库 graphql-dotnet ,我们可以用它来完成需要的功能,而在Ocelot中实现类似认证,授权等这样它擅长的事情:
{
"ReRoutes": [
{
"DownstreamPathTemplate": "/graphql",
"DownstreamScheme": "http",
"DownstreamHostAndPorts": [
{
"Host": "yourgraphqlhost.com",
"Port": 80
}
],
"UpstreamPathTemplate": "/graphql",
"DelegatingHandlers": [
"GraphQlDelegatingHandler"
]
}
]
}
在此感谢KenWang007 https://github.com/KenWang007/OcelotDemo 示例,查了很久的资料,最终通过上面的示例调试成功。
最后,github 有个 https://github.com/dbarkwell/Ocelot.ConfigEditor,这个项目实现了asp.net core mvc 的在线编辑路由。
4.2、API安全认证(OceLot+IdentityServer4)
IdentityServer4的介绍博客园上已经有非常多了,
点击打开:https://www.cnblogs.com/jaycewu/p/7791102.html 可以看一下。
这里主要介强OceLot集成需要进行改动的地方。
新增加IdentityService服务API
参照https://www.cnblogs.com/jaycewu/p/7791102.html
实现后IdentityService代码如下:

Startup.cs调整

configuration.json网关配置文件增加Token的获取地址
{
"DownstreamPathTemplate": "/connect/token",
"UpstreamPathTemplate": "/api/connect/token",
"UpstreamHttpMethod": [ "Post" ],
"ReRouteIsCaseSensitive": false,
"DownstreamScheme": "http",
"DownstreamHostAndPorts": [
{
"Host": "localhost",
"Port": 5001
}
],
"Key": "IdentityService",
"RateLimitOptions": {
"ClientWhitelist": [],
"EnableRateLimiting": true,
"Period": "1s",
"PeriodTimespan": 15,
"Limit": 1
}
},
{
"DownstreamPathTemplate": "/api/passenger",
"UpstreamPathTemplate": "/api/passenger",
"UpstreamHttpMethod": [ "Get" ],
"ReRouteIsCaseSensitive": false,
"DownstreamScheme": "http",
"ServiceName": "API002",
"LoadBalancer": "NoLoadBalancer",
"UseServiceDiscovery": true,
"Key": "passenger",
"AuthenticationOptions": {
"AuthenticationProviderKey": "Bearer",
"AllowScopes": [ "TWAPI" ]
}
},
测试
启动程序

未获取Token的情况下:

获取Token:

带上Token进行访问:

通过调用发现,返回的结果和预期一样,调用成功。
4.3、服务注册及发现(OceLot+Consul)
安装Consul就不介绍,可以参考:https://www.cnblogs.com/axzxs2001/p/8487521.html 自行调试,按照上面的写法需要非常注意的一点是OceLot9.X版本以下是OK的,最新版本的需要进行调整几个地方:
安装OceLot.Provider.Consul包
Install-Package Ocelot.Provider.Consul
Startup.cs修改

configuration.json调整

官方参考:https://ocelot.readthedocs.io/en/latest/features/servicediscovery.html,按照官方的调整后,调试通过
测试
启动程序及Consul


调用:

我们发现,OceLot已通过Consul调用成功。
4.4、服务质量与熔断
熔断的意思是停止将请求转发到下游服务。当下游服务已经出现故障的时候再请求也是功而返,并且增加下游服务器和API网关的负担。这个功能是用的Pollly来实现的,我们只需要为路由做一些简单配置即可
"QoSOptions": {
"ExceptionsAllowedBeforeBreaking":3,
"DurationOfBreak":5,
"TimeoutValue":5000
}
ExceptionsAllowedBeforeBreaking 允许多少个异常请求
DurationOfBreak 熔断的时间,单位为秒
TimeoutValue 如果下游请求的处理时间超过多少则自如将请求设置为超时。
4.5、分流控制
对请求进行限流可以防止下游服务器因为访问过载而崩溃,这个功能就是我们的张善友添加进去的。非常优雅的实现,我们只需要在路由下加一些简单的配置即可以完成。
"RateLimitOptions": {
"ClientWhitelist": [],
"EnableRateLimiting": true,
"Period": "1s",
"PeriodTimespan": 1,
"Limit": 1
}
ClientWihteList 白名单
EnableRateLimiting 是否启用限流
Period 统计时间段:1s, 5m, 1h, 1d
PeroidTimeSpan 多少秒之后客户端可以重试
Limit 在统计时间段内允许的最大请求数量
在 GlobalConfiguration下我们还可以进行以下配置
"RateLimitOptions": {
"DisableRateLimitHeaders": false,
"QuotaExceededMessage": "Customize Tips!",
"HttpStatusCode": 999,
"ClientIdHeader" : "Test"
}
Http头 X-Rate-Limit 和 Retry-After 是否禁用
QuotaExceedMessage 当请求过载被截断时返回的消息
HttpStatusCode 当请求过载被截断时返回的http status
ClientIdHeader 用来识别客户端的请求头,默认是 ClientId
如图:

连续点击几下后,返回:429 Too Many Requests.
4.6、负载均衡
当下游服务有多个结点的时候,我们可以在DownstreamHostAndPorts中进行配置。
{
"DownstreamPathTemplate": "/api/posts/{postId}",
"DownstreamScheme": "https",
"DownstreamHostAndPorts": [
{
"Host": "10.0.1.10",
"Port": 5000,
},
{
"Host": "10.0.1.11",
"Port": 5000,
}
],
"UpstreamPathTemplate": "/posts/{postId}",
"LoadBalancer": "LeastConnection",
"UpstreamHttpMethod": [ "Put", "Delete" ]
}
LoadBalancer将决定负载均衡的算法
- LeastConnection – 将请求发往最空闲的那个服务器
- RoundRobin – 轮流发送
- NoLoadBalance – 总是发往第一个请求或者是服务发现
在负载均衡这里,我们还可以和Consul结合来使用服务发现,同一个服务和Name配置成相同,则在请求时,会根据LoadBalancer请求的算法进行访问,如下:
{
"service": {
"id": "count1",
"name": "Count",
"tags": ["dev"],
"address": "localhost",
"port": 5001
}
}
{
"service": {
"id": "count2",
"name": "Count",
"tags": ["dev"],
"address": "localhost",
"port": 5002
}
}
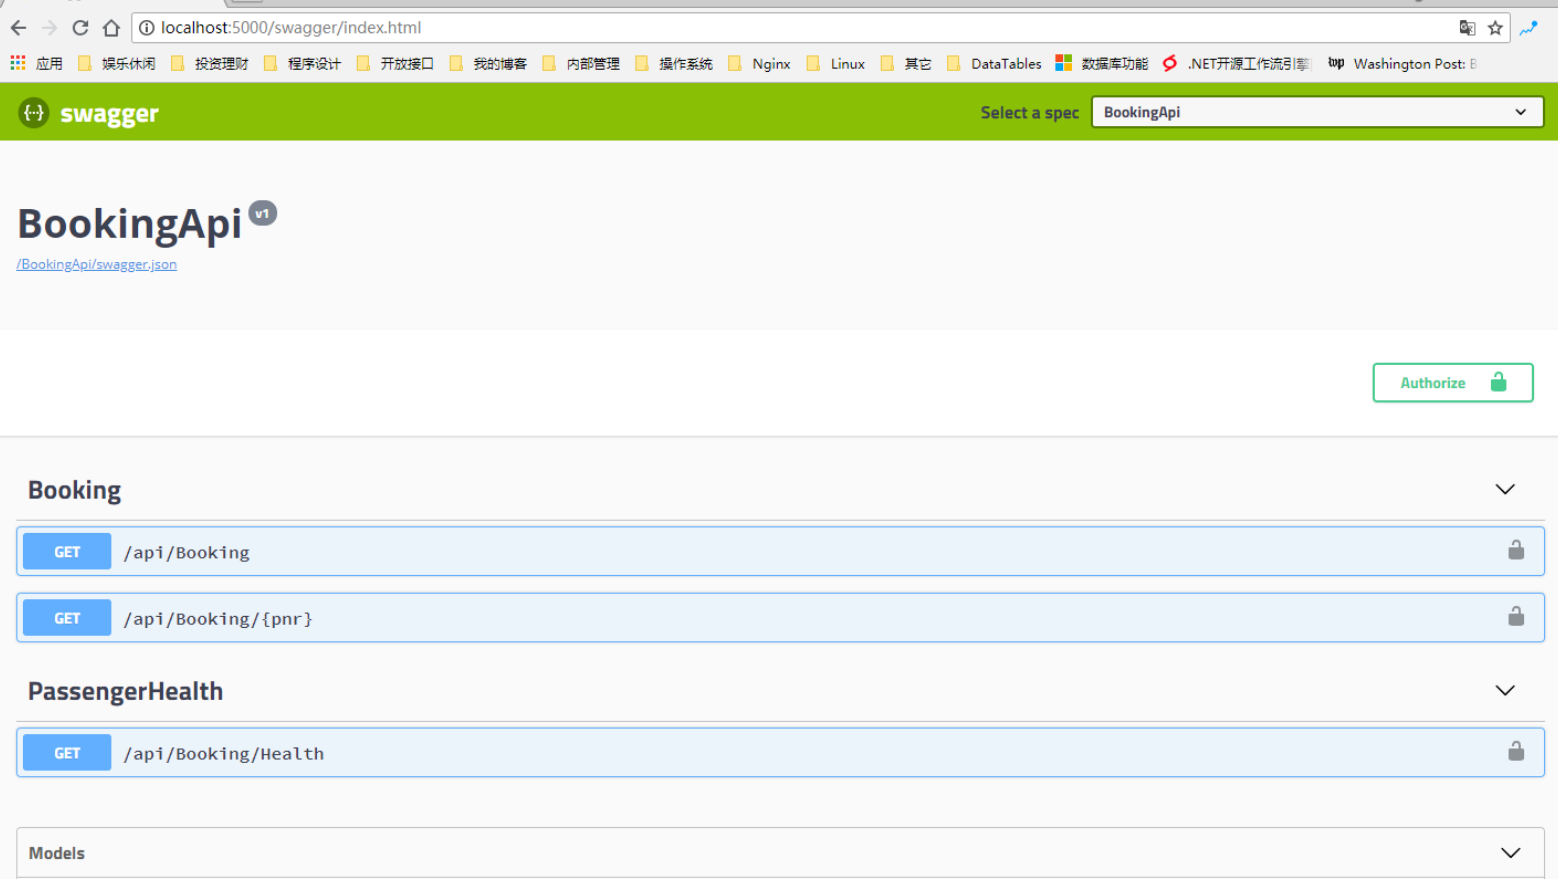
4.7、Swagger文档生成
Swagger 是一个规范和完整的框架,用于生成、描述、调用和可视化 RESTful 风格的 Web 服务。总体目标是使客户端和文件系统作为服务器以同样的速度来更新。文件的方法,参数和模型紧密集成到服务器端的代码,允许API来始终保持同步你可以通过一个文本编辑器来编辑 Swagger 文件,或者你也可以从你的代码注释中自动生成。各种工具都可以使用 Swagger 文件来生成互动的 API 文档。
在集成Swagger的时候,我们同时需要考虑到与IdentityServer的集成,在调试的时候让Swagger充许进行验证。
BookingApi Startup.cs修改
public void ConfigureServices(IServiceCollection services)
{
services.AddSwaggerGen(c =>
{
c.SwaggerDoc("v1", new Info { Title = "BookingApi", Version = "v1" });
c.AddSecurityDefinition("Bearer", new ApiKeyScheme
{
Description = "请输入带有Bearer的Token",
Name = "Authorization",
In = "header",
Type = "apiKey"
});
//Json Token认证方式,此方式为全局添加
c.AddSecurityRequirement(new Dictionary<string, IEnumerable<string>>
{
{ "Bearer", Enumerable.Empty<string>() }
});
});
services.AddMvc();
}
// This method gets called by the runtime. Use this method to configure the HTTP request pipeline.
public void Configure(IApplicationBuilder app, IHostingEnvironment env)
{
app.UseSwagger();
// Enable middleware to serve swagger-ui (HTML, JS, CSS, etc.),
// specifying the Swagger JSON endpoint.
app.UseSwaggerUI(c =>
{
c.SwaggerEndpoint("/swagger/v1/swagger.json", "BookingApi");
});
app.UseMvc();
}
PassengerApi Startup.cs修改
public void ConfigureServices(IServiceCollection services)
{
services.AddMvc();
services.AddSwaggerGen(c =>
{
c.SwaggerDoc("v1", new Info { Title = "PassengerApi", Version = "v1" });
c.AddSecurityDefinition("Bearer", new ApiKeyScheme
{
Description = "请输入带有Bearer的Token",
Name = "Authorization",
In = "header",
Type = "apiKey"
});
//Json Token认证方式,此方式为全局添加
c.AddSecurityRequirement(new Dictionary<string, IEnumerable<string>>
{
{ "Bearer", Enumerable.Empty<string>() }
});
});
}
// This method gets called by the runtime. Use this method to configure the HTTP request pipeline.
public void Configure(IApplicationBuilder app, IHostingEnvironment env)
{
app.UseSwagger();
// Enable middleware to serve swagger-ui (HTML, JS, CSS, etc.),
// specifying the Swagger JSON endpoint.
app.UseSwaggerUI(c =>
{
c.SwaggerEndpoint("/swagger/v1/swagger.json", "PassengerApi");
});
app.UseMvc();
}
Tw.ApiGateway Startup.cs修改
public void ConfigureServices(IServiceCollection services)
{
services.AddOcelot().AddConsul();
services.AddMvcCore(option =>
{
}).AddAuthorization().AddJsonFormatters();
services.AddAuthentication("Bearer")
.AddIdentityServerAuthentication(options =>
{
options.Authority = "http://localhost:5001";
options.RequireHttpsMetadata = false;
options.ApiName = "TWAPI";
});
services.AddMvc();
services.AddSwaggerGen(options =>
{
options.SwaggerDoc("ApiGateway", new Info { Title = "网关服务", Version = "v1" });
});
}
// This method gets called by the runtime. Use this method to configure the HTTP request pipeline.
public void Configure(IApplicationBuilder app, IHostingEnvironment env)
{
var apis = new List<string> { "BookingApi", "PassengerApi" };
app.UseMvc()
.UseSwagger()
.UseSwaggerUI(options =>
{
apis.ForEach(m =>
{
options.SwaggerEndpoint($"/{m}/swagger.json", m);
});
});
app.UseAuthentication();
app.UseOcelot().Wait();
}
测试
启动程序:
查看生成的API:
调用:
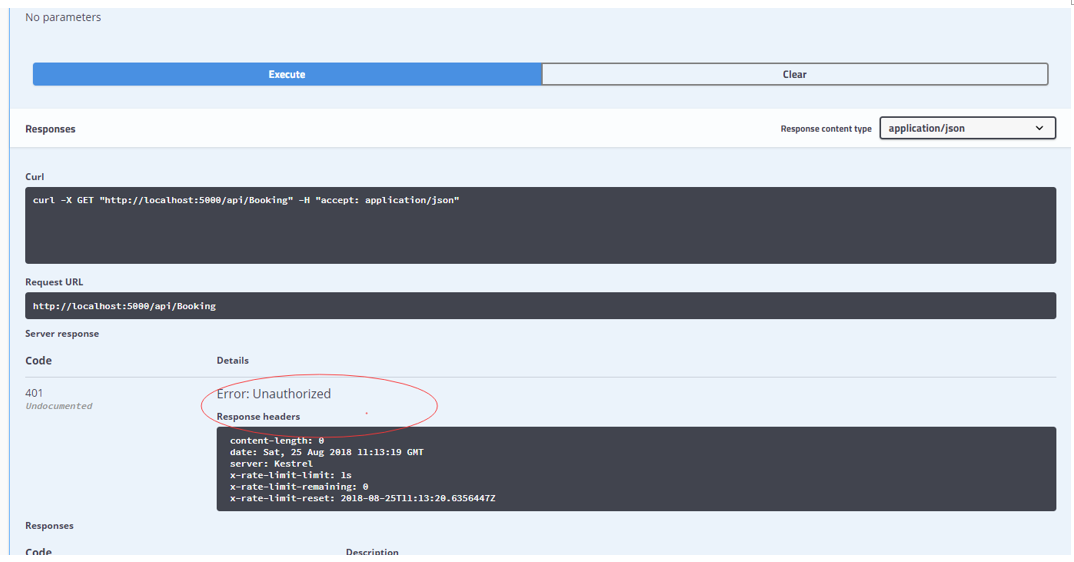
失败,加上验证:
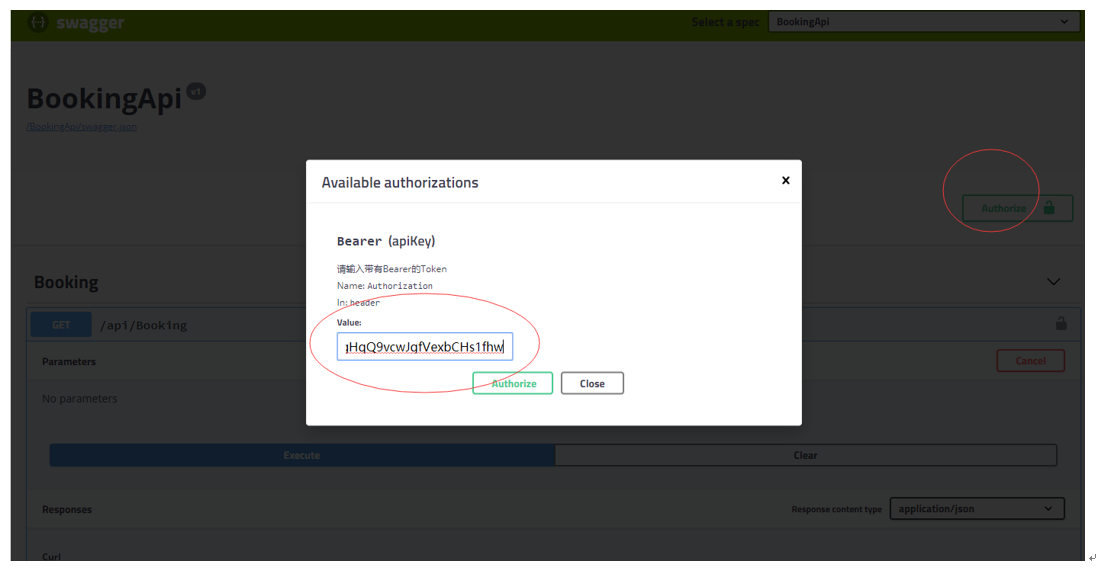
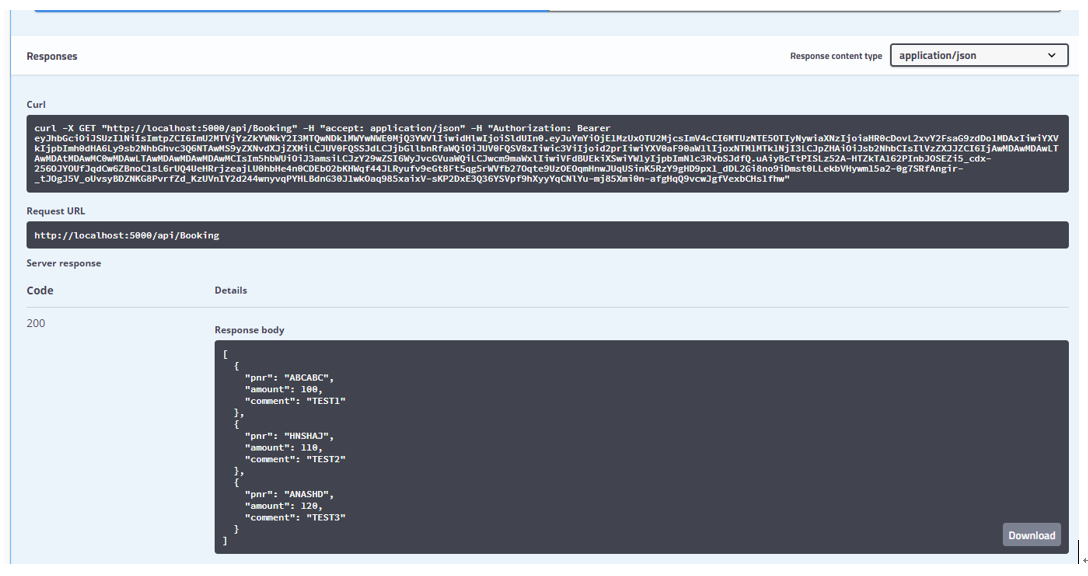
最后调用成功。
4.8、数据监控 NLOG+Grafana+InfluxDB
数据监控分为2个部分,一是基于Grafana+InfluxDB的计数。二是基于NLOG的日志记录。
如图:
NLOG的配置:
<?xml version="1.0" encoding="utf-8" ?>
<nlog xmlns="http://www.nlog-project.org/schemas/NLog.xsd"
xmlns:xsi="http://www.w3.org/2001/XMLSchema-instance"
autoReload="true"
throwConfigExceptions="true"
internalLogLevel="info"
internalLogFile="c:ApiGatewayLogNLog-AspNetCore2.txt">
<!-- the targets to write to -->
<targets>
<target xsi:type="File" name="Trace" fileName="c:ApiGatewayLogTrace-${shortdate}.log"
layout="${longdate}|${event-properties:item=EventId_Id:whenEmpty=0}|${uppercase:${level}}|${logger}|${message} ${exception:format=tostring}|url: ${aspnet-request-url}|action: ${aspnet-mvc-action}|${callsite}" />
<target xsi:type="File" name="Debug" fileName="c:ApiGatewayLogDebug-${shortdate}.log"
layout="${longdate}|${event-properties:item=EventId_Id:whenEmpty=0}|${uppercase:${level}}|${logger}|${message} ${exception:format=tostring}|url: ${aspnet-request-url}|action: ${aspnet-mvc-action}|${callsite}" />
<target xsi:type="File" name="Info" fileName="c:ApiGatewayLogInfo-${shortdate}.log"
layout="${longdate}|${event-properties:item=EventId_Id:whenEmpty=0}|${uppercase:${level}}|${logger}|${message} ${exception:format=tostring}|url: ${aspnet-request-url}|action: ${aspnet-mvc-action}|${callsite}" />
<target xsi:type="File" name="Warn" fileName="c:ApiGatewayLogWarn-${shortdate}.log"
layout="${longdate}|${event-properties:item=EventId_Id:whenEmpty=0}|${uppercase:${level}}|${logger}|${message} ${exception:format=tostring}|url: ${aspnet-request-url}|action: ${aspnet-mvc-action}|${callsite}" />
<target xsi:type="File" name="Error" fileName="c:ApiGatewayLogError-${shortdate}.log"
layout="${longdate}|${event-properties:item=EventId_Id:whenEmpty=0}|${uppercase:${level}}|${logger}|${message} ${exception:format=tostring}|url: ${aspnet-request-url}|action: ${aspnet-mvc-action}|${callsite}" />
<target xsi:type="File" name="Fatal" fileName="c:ApiGatewayLogFatal-${shortdate}.log"
layout="${longdate}|${event-properties:item=EventId_Id:whenEmpty=0}|${uppercase:${level}}|${logger}|${message} ${exception:format=tostring}|url: ${aspnet-request-url}|action: ${aspnet-mvc-action}|${callsite}" />
</targets>
<rules>
<logger name="*" minlevel="Trace" writeTo="Trace"/>
<logger name="*" minlevel="Debug" writeTo="Debug"/>
<logger name="*" minlevel="Info" writeTo="Info"/>
<logger name="*" minlevel="Warn" writeTo="Warn" />
<logger name="*" minlevel="Error" writeTo="Error"/>
<logger name="*" minlevel="Fatal" writeTo="Fatal"/>
</rules>
</nlog>
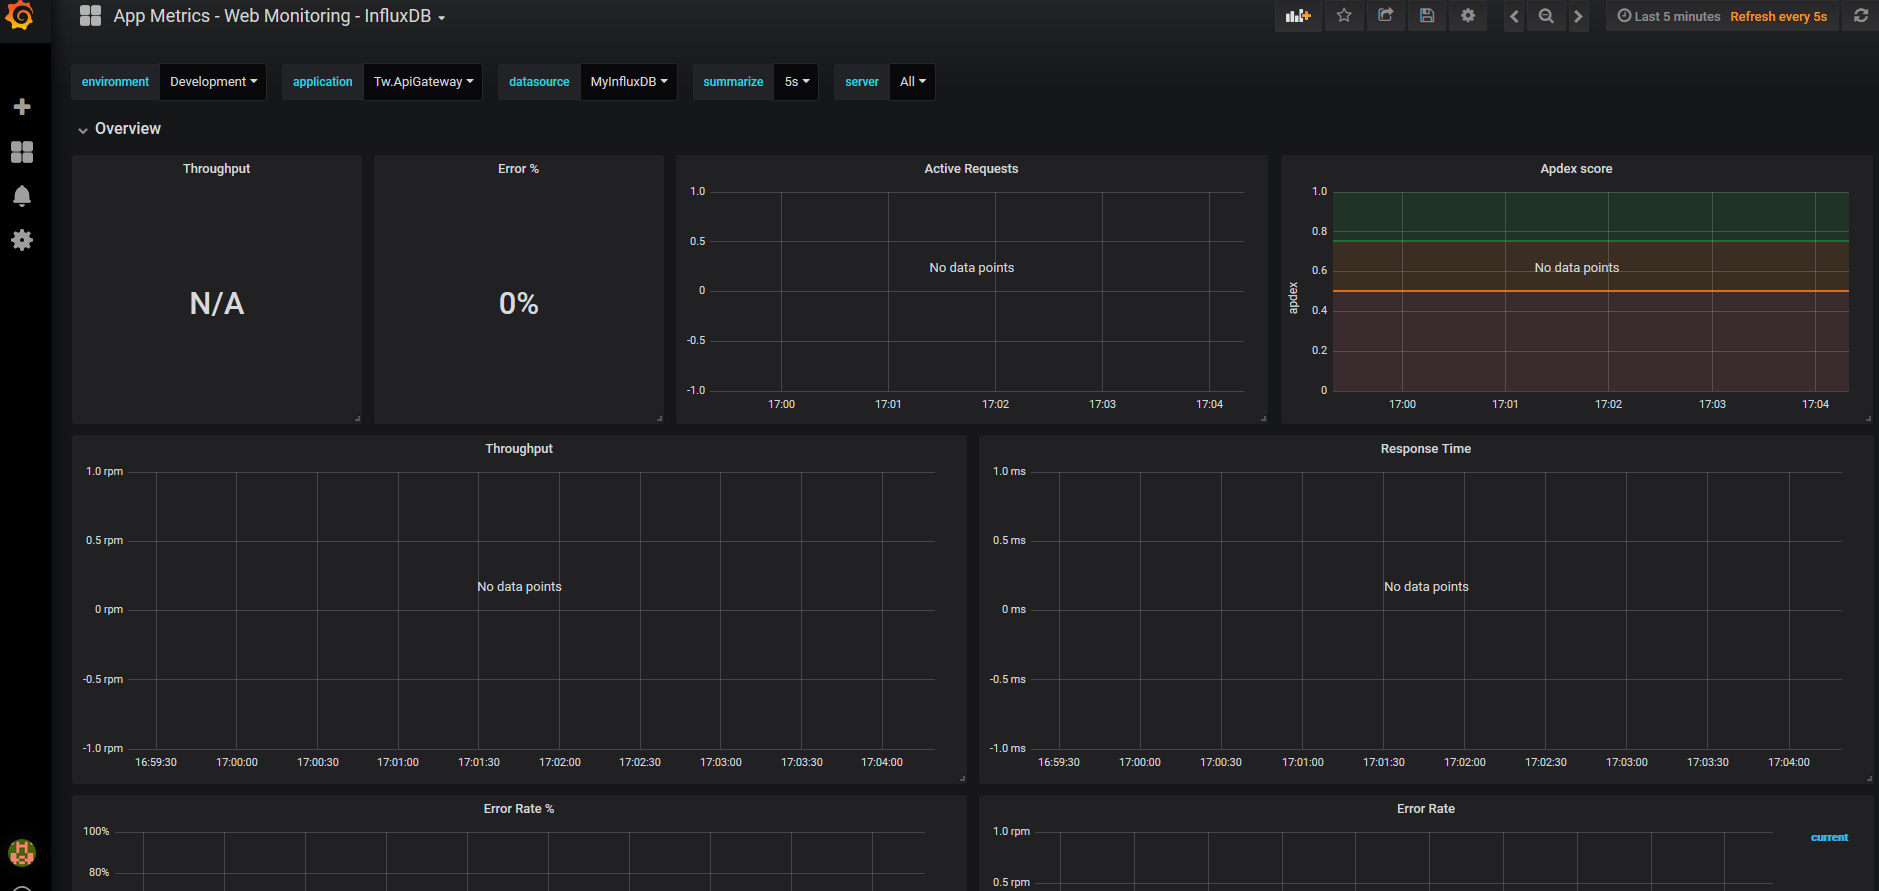
Grafana+InfluxDB的安装教程可在园子里搜一下,比较多,Grafana+InfluxDB安装完成后,最终效果图如下:
5、源码介绍
5.1、源码结构
API
Booking Api 测试用API
PassengerApi 测试用API
ApiGateWay
Tw.ApiGateway OceLot网关
Tw.IdentityService IdentityServer4服务
Libraies
Tw.Core 功能类库
Tw.Redis 功能类库
Tw.Repository 类库
Tw.Service 业务操作库
MiddleWare
Tw.IdentityServer IdentityServer4中间件源码
Tw.IdentityServer4.AccessTokenValidation 中间件源码
Tw.Ocelot OceLot源码
Tw.Ocelot.Provider.Consul 源码
5.2、下载地址
下载地址:https://github.com/littlewrong/ApiGateway
6、相关资料
1、https://ocelot.readthedocs.io/en/latest/introduction/bigpicture.html 官网介绍
2、http://www.sohu.com/a/132033560_468635 微服务网关Ocelot
3、https://blog.csdn.net/ai52011/article/details/77645009 Surgin API网关
4、https://github.com/KenWang007/OcelotDemo KenWang007/OcelotDemo
5、https://www.cnblogs.com/jaycewu/p/7791102.html IdentityServer4实现Token认证登录以及权限控制
6、http://www.cnblogs.com/edisonchou/archive/2018/07/08/9278775.html .NET Core微服务之基于Ocelot+IdentityServer实现统一验证与授权
7、https://www.cnblogs.com/axzxs2001/p/8487521.html Ocelot + Consul实践
8、https://www.jianshu.com/p/05a1bf2545a0 .Netcore 2.0 Ocelot Api网关教程
9、https://www.cnblogs.com/jesse2013/p/net-core-apigateway-ocelot-docs.html .NET Core开源API网关 – Ocelot中文文档
10、https://www.cnblogs.com/shanyou/p/8413506.html Ocelot 集成Butterfly 实现分布式跟踪
后话:最后把程序搬到了Linux安装部署,实验成功。