关于spring的几种注入方式
理解类之间的关联关系
一,set注入
在这之前我们得spring的jar包,可以去官网下,添加到WebContent下 WEB-INF 下 lib里
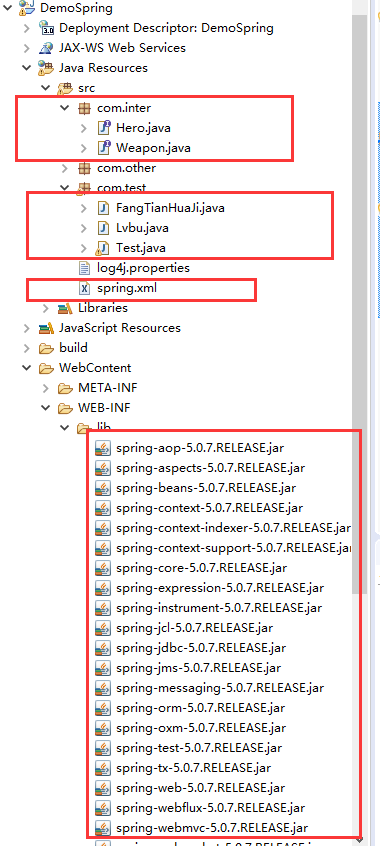
这种方式就得首先实现set方法,现在以英雄(Hero接口)和武器(weapon)为例讲解
第一步,首先我们创建两个接口
英雄接口
package com.inter;

public interface Hero {
   void fight();
}
武器接口
package com.inter;

public interface Weapon {
   void attack();
}
第二步,然后我们建立两个实现类吕布(Lvbu)实现Hero接口,方天画戟(FangTianHuaJi)实现Weapon
package com.test;

import com.inter.Hero;
import com.inter.Weapon;

public class Lvbu implements Hero{

	Weapon weapon;

	public Weapon getWeapon() {
		return weapon;
	}

	//shi
	public void setWeapon(Weapon weapon) {
		this.weapon = weapon;
	}

	@Override
	public void fight() {
		System.out.println("吕布拿起武器");
		weapon.attack();
	}

}
package com.test;

import com.inter.Weapon;

public class FangTianHuaJi implements Weapon {

	@Override
	public void attack() {
		// TODO Auto-generated method stub
       System.out.println("方天画戟卡卡砍");
	}

}
再来一个武器青龙偃月刀
package com.test;

import com.inter.Weapon;

public class Qing implements Weapon{

	@Override
	public void attack() {
		// TODO Auto-generated method stub
		System.out.println("青龙偃月杀杀");
	}


}
第三步,我们得创建一个配置文件spring.xml
<?xml version="1.0" encoding="UTF-8"?>
<beans xmlns="http://www.springframework.org/schema/beans"
    xmlns:xsi="http://www.w3.org/2001/XMLSchema-instance"
    xmlns:context="http://www.springframework.org/schema/context"
    xsi:schemaLocation="http://www.springframework.org/schema/beans
    http://www.springframework.org/schema/beans/spring-beans-3.0.xsd
    http://www.springframework.org/schema/context
    http://www.springframework.org/schema/context/spring-context.xsd">

   <bean id="lvbu" class="com.test.Lvbu">
   <!-- set注入 -->
    <property name="weapn" ref="fang"></property>
  </bean>
  <bean id="fang" class="com.test.FangTianHuaJi">
  </bean>

</beans>
第四步,建立一个测试main
package com.test;
import org.springframework.context.ApplicationContext;
import org.springframework.context.support.ClassPathXmlApplicationContext;
import com.inter.Hero;
import com.inter.Performer;
public class Test {
public static void main(String[] args) {
// TODO Auto-generated method stub
//获取配置文件
ApplicationContext context=new ClassPathXmlApplicationContext("spring.xml");
//得到英雄类
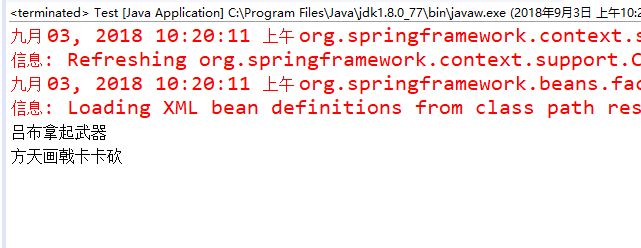
Hero per=(Hero)context.getBean("lvbu");
per.fight();
}
}
结果
二,自动装配autowire
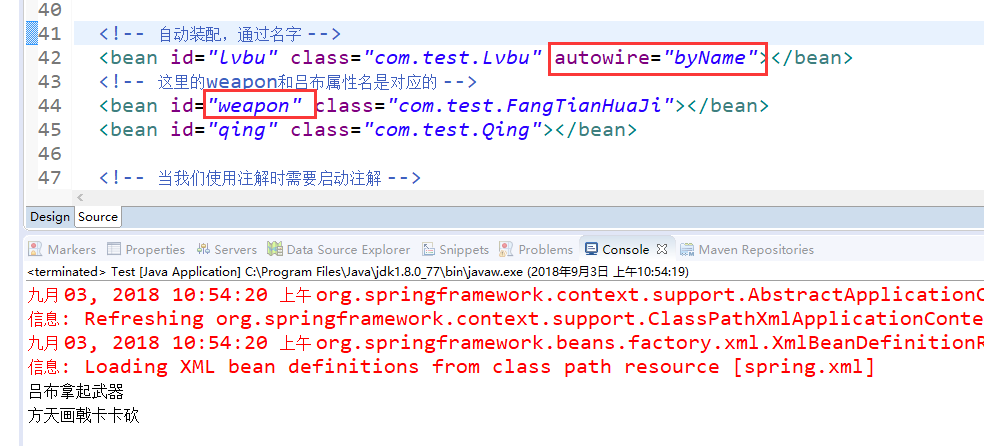
byName,当我们的吕布有两个属性的时候,也就是说他有两把武器的时候,我们还是这样写,就会报错。将FangTianHuaJi类的id去了一个和lvbu类的属性weapon一样的名字,并且在lvbu bean中添加了autowire="byName"用于指明装配类型是byName自动装配。这个时候lvbu bean就是在上下文中找名为weapon的bean装配到他自己的weapon属性中。
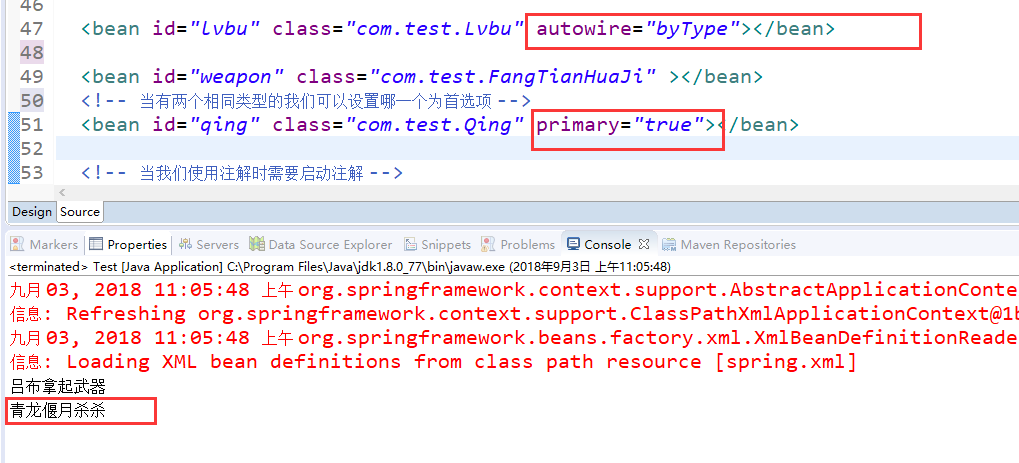
byType,这里已经不用关注FangTianHuaJi类对应的bean的id是什么了,因为已经定义lvbu bean的autowire属性为"byType"。这个时候lvbu bean会在上下文中寻找和weapon具有相同类型的类对应的bean。这里两把刀是相同的属性,所以还这样写就会报错
一种方法是将其中一个bean的primary属性设为false,比如:将青龙偃月Qing bean的primary属性设为true,那么吕布的武器就变成青龙偃月刀了
三,使用注解 @Autowired 自动装配
通过基于注解的方式,可以不用在xml文件中为guanyu bean添加autowire属性了,但是注意加启动注解标签
spring.xml
<!-- 当我们使用注解时需要启动注解 -->
  <context:annotation-config />

  <bean id="lvbu" class="com.test.Lvbu" ></bean>

  <bean id="weapon" class="com.test.FangTianHuaJi" ></bean>
还有要在吕布的武器属性上加@Autowired,表明注解自动注入
package com.test;

import org.springframework.beans.factory.annotation.Autowired;

import com.inter.Hero;
import com.inter.Weapon;

public class Lvbu implements Hero{

	//需要在属性头上添加注解
	@Autowired
	Weapon weapon;

	public Weapon getWeapon() {
		return weapon;
	}

	//set注入,时必须写
	public void setWeapon(Weapon weapon) {
		this.weapon = weapon;
	}

	@Override
	public void fight() {
		System.out.println("吕布拿起武器");
		weapon.attack();
	}
}
注意这里我们和上面一样,我们有两个同类型的武器时,我们还是要做区分,添加@Qualifier注解
xml添加
 <!-- 当我们使用注解时需要启动注解 -->
  <context:annotation-config />

  <bean id="lvbu" class="com.test.Lvbu" ></bean>

  <bean id="fang" class="com.test.FangTianHuaJi" >
    <qualifier value="weaponoflvbu"></qualifier>
  </bean>
  <bean id="qing" class="com.test.Qing"></bean>
这里的吕布武器也要添加@Qualifier注解
package com.test;

import org.springframework.beans.factory.annotation.Autowired;
import org.springframework.beans.factory.annotation.Qualifier;

import com.inter.Hero;
import com.inter.Weapon;

public class Lvbu implements Hero{

	//需要在属性头上添加注解
	@Autowired
	//要和配置的对应
	@Qualifier("weaponoflvbu")
	Weapon weapon;

	public Weapon getWeapon() {
		return weapon;
	}

	//set注入,时必须写
	public void setWeapon(Weapon weapon) {
		this.weapon = weapon;
	}

	@Override
	public void fight() {
		System.out.println("吕布拿起武器");
		weapon.attack();
	}

}
也可以更简单的写,直接在@Qalifier();里加id
 <!-- 当我们使用注解时需要启动注解 -->
  <context:annotation-config />

  <bean id="lvbu" class="com.test.Lvbu" ></bean>

  <bean id="fang" class="com.test.FangTianHuaJi" ></bean>
  <bean id="qing" class="com.test.Qing"></bean>

四,spring的自动检测
context:component-scan元素会扫描指定的包以及所有子包,并查找出能够自动注册为Spring Bean的类。base-package属性标示了context:component-scan元素所扫描的包。
为自动检测标注Bean
默认情况下,context:component-scan查找使用构造型(stereotype)注解所标注的类,这些特殊的注解如下:
类型 说明
@component 通用的构造型注解,标示该类为Spring 组件。
@Controller 标识将该类定义为Spring MVC controller。
@Repository 标识将该类定义为数据仓库(例如:Dao层)。
@Service 标识将该类定义为服务(例如:Service层)。
这里我们就是普通的写,所以就使用@component ,其实这几个注解都可以用,只是我们感觉其他的不合适
xml配置
 <context:component-scan base-package="com.test"></context:component-scan>

  <bean id="lvbu" class="com.test.Lvbu" ></bean>
   <!-- 用注解对应了就不用写bean了 -->
package com.test;

import org.springframework.stereotype.Component;

import com.inter.Weapon;

//属于吕布的武器
@Component("weaponOflvbu")
public class FangTianHuaJi implements Weapon {

	@Override
	public void attack() {
		// TODO Auto-generated method stub
       System.out.println("方天画戟卡卡砍");
	}

}
package com.test;

import org.springframework.stereotype.Component;

import com.inter.Weapon;

//属于关羽 的武器
@Component("weaponOfguanyu")
public class Qing implements Weapon{

	@Override
	public void attack() {
		// TODO Auto-generated method stub
		System.out.println("青龙偃月杀杀");
	}


}
package com.test;

import org.springframework.beans.factory.annotation.Autowired;
import org.springframework.beans.factory.annotation.Qualifier;

import com.inter.Hero;
import com.inter.Weapon;

public class Lvbu implements Hero{

	//需要在属性头上添加注解
	@Autowired
	//要和配置的对应,如果一个接口只对应一个实现类的话就都不用写qualifier
	@Qualifier("weaponOflvbu")
	Weapon weapon;

	public Weapon getWeapon() {
		return weapon;
	}

	//set注入,时必须写
	public void setWeapon(Weapon weapon) {
		this.weapon = weapon;
	}

	@Override
	public void fight() {
		System.out.println("吕布拿起武器");
		weapon.attack();
	}

}