一:数据库的安装
第一步 下载数据库到主机,,

第二步 通过xshell将数据库压缩包上传至centos7虚拟主机(#注意:服务器主机需下载上传工具lrzsz 命令:yun -y install lrzsz)

第三步 解压缩数据库安装包
[root@es1 opt]# tar -xf mysql-5.7.25-1.el7.x86_64.rpm-bundle.tar
[root@es1 opt]# ls   #查看有这么些安装包
mysql-5.7.25-1.el7.x86_64.rpm-bundle.tar
mysql-community-client-5.7.25-1.el7.x86_64.rpm
mysql-community-common-5.7.25-1.el7.x86_64.rpm
mysql-community-devel-5.7.25-1.el7.x86_64.rpm
mysql-community-embedded-5.7.25-1.el7.x86_64.rpm
mysql-community-embedded-compat-5.7.25-1.el7.x86_64.rpm
mysql-community-embedded-devel-5.7.25-1.el7.x86_64.rpm
mysql-community-libs-5.7.25-1.el7.x86_64.rpm
mysql-community-libs-compat-5.7.25-1.el7.x86_64.rpm
mysql-community-server-5.7.25-1.el7.x86_64.rpm
mysql-community-test-5.7.25-1.el7.x86_64.rpm
第五步安装依赖:
[root@es1 opt]# yum -y install perl-Data-Dumper perl-JSON perl-Time-Hires
第六步安装数据库
[root@es1 opt]# rpm -Uvh mysql-community-*.rpm
警告:mysql-community-client-5.7.25-1.el7.x86_64.rpm: 头V3 DSA/SHA1 Signature, 密钥 ID 5072e1f5: NOKEY
准备中... ################################# [100%]
正在升级/安装...
1:mysql-community-common-5.7.25-1.e################################# [ 9%]
2:mysql-community-libs-5.7.25-1.el7################################# [ 18%]
3:mysql-community-client-5.7.25-1.e################################# [ 27%]
4:mysql-community-server-5.7.25-1.e################################# [ 36%]
5:mysql-community-devel-5.7.25-1.el################################# [ 45%]
6:mysql-community-embedded-5.7.25-1################################# [ 55%]
7:mysql-community-embedded-devel-5.################################# [ 64%]
8:mysql-community-test-5.7.25-1.el7################################# [ 73%]
9:mysql-community-libs-compat-5.7.2################################# [ 82%]
10:mysql-community-embedded-compat-5################################# [ 91%]
正在清理/删除...
11:mariadb-libs-1:5.5.60-1.el7_5 ################################# [100%]
[root@es1 opt]# systemctl start mysqld #重启数据库

注意:初次使用数据库时因没有设置数据库密码而无法登录
MySQL 5.7 默认采用的存储引擎不再是 MyISAM,而是 InnoDB。初始化时若相关的文件不存在,会自
动创建并设置相关参数
mysql5.7以上的版本数据库管理账号密码不能为空,安装数据库的时候会随机生成密码
第六步 查看数据库初始密码并登录
[root@es1 log]# grep 'temporary password' mysqld.log
2019-04-19T08:12:09.726034Z 1 [Note] A temporary password is generated for root@localhost: eqj.AB1g,bIG
[root@es1 ~]# mysql -uroot -peqj.AB1g,bIG #登录数据库

[root@es1 ~]# systemctl is-enabled mysqld.service #查看数据库服务状态是否是开机自启
[root@es1 ~]# netstat -antlp |grep mysql #查看数据库状态
tcp6 0 0 :::3306 :::* LISTEN 8978/mysqld
第七步 登录数据库
初次安装数据库使用初始密码登录后无法进行任何数据库操作提示如下:
ERROR 1820 (HY000): You must reset your password using ALTER USER statement before executing this statement.
我们需要设置密码才可进行操作
1:修改密码前
mysql>show variables like "%password%    //查找变量信息
2:修改密码策略
mysql>set global validate_password_policy=0 (0 只检查长度 ,1 检查长度+字符, 2 检查长度+字符+字典)
mysql>set global validate_password_length=6    指定长度
3:修改数据库密码
mysql>alter user root@"localhost" identified by"123456";
修改密码后就可以对数据库进行操作:
二: 数据库的设置及使用
1数据库的配置
数据库的主配置文件 /etc/my.cnf
数据库目录 /var/lib/mysql 存储数据的文件
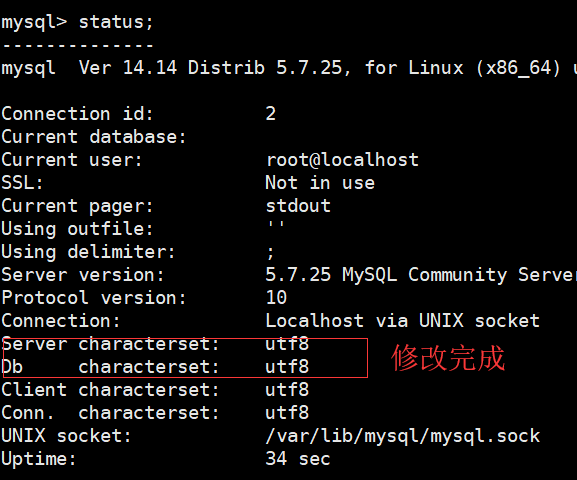
mysql> status
--------------
mysql  Ver 14.14 Distrib 5.7.25, for Linux (x86_64) using  EditLine wrapper

Connection id:		8
Current database:	haha
Current user:		root@localhost
SSL:			Not in use
Current pager:		stdout
Using outfile:		''
Using delimiter:	;
Server version:		5.7.25 MySQL Community Server (GPL)
Protocol version:	10
Connection:		Localhost via UNIX socket
Server characterset:	latin1       #数据库服务使用的编码格式
Db     characterset:	latin1       #写入数据库使用的编码
Client characterset:	utf8
Conn.  characterset:	utf8
修改数据库的编码格式 /etc/my.cnf
[client]
default-character-set=utf8
[mysqld]
character-set-server=utf8
重启数据库
[root@es1 ~]# systemctl restart mysqld
2数据库的使用
1 选择库,创建库
命名规则 : 区分子母大小写(数字字母下划线)(不可以重名 不能是纯数字 特殊字符 关键词)
在数据库目录下建库建表,所有者所属组是 mysql
在/var/lib/myssql 文件下建库建表,所有者所属组是 root
mysql> show databases;查看库
mysql>create database 库名;
mysql>use 库名 切换库
drop 可以删库删表删用户。
mysql>drop database 库名;
将不同网站的 信息存储在不同的数据库中,如:购物网站的数据信息存储在购物库中方便管理,
2 创建表
mysql> select * frclauseom 表名;
//查看当前库下的表
mysql>show tables; 查看表
mysql>create table 表名(字段 1 、字段 2、字段 3、字段 4);==>字段名
mysql>desc 表名; (查看表字段)
3 插入数据(行)
mysql>select 字段 from 表名;(查看表内容)
mysql>insert into 表名 values(“字段 1 ”,值 1),("字段 2",值 2):
4 删除表
mysql>drop table 表名;//对应数据库文件中的表也会删除
1 查看表的创建命令
mysql>show create table 表名;
2 指定表使用的字符集,
mysql>create table 表(字段 1 值 1)
      >default characted set utf8;        //只对当前表永久生效
3修改表结构
alter table 表名 add  添加新字段  int(4 字节)
alter  table 表名  add  字段名
4 drop 删除已有字段
alter table 表名 drop 字段名(删除须谨慎,预先备份。)
5 modify 修改字段类型(修改时不能与字段已存储的数据冲突,若冲突不允许修改,不修改部分须原样写上)
alter  table  表名  modify 字 段中不修改的字符+要修改的字符
6 change 修改字段名(改字段名同时可以改类型)
alter  table  表名  change  原字段   新字段(相同部分原样写上)
7 移动字段位置(将字段 1 移到字段 2 的后面)
Alter  table  表名  modify  字段 1 类型   after  字段 2
alter table t5 modify age int(2)unsigned default 19 after name;
8 Rename   修改表名
altert  table   表名 rename 新表名(新表名必须唯一);
mysql>system 在系统状态下执行系统命令;
3数据库的字符类型
char(255 字符)
varchar(65532 字符)尽量少用
blob
text 超大文本
数值类型:整数 tyinint(微小整数-128~127)unsigned(无符号 必须在类型的后面)
         int(2^32 -1)常用类型。 smallint mediumint bgint (无符号存储范围)
浮点型 :带小数点的 float:(N(数字总位数),M(小数总位数));
       double:
枚举类型:只能在列举的范围内选择。
年 year yyyy 2017 (0-69  2000-2069 ; >69  >1969)
月 date yyyymmdd 20171120
日 time hhmmss
日期时间 datetime/timestmap yyyymmddhhmmss
设置表的字符集
4 数据库的字符类型 及索引
1、mysql 键值:限制如何给字段赋值给字段的值排序
索引的优点与缺点
定义:类似于“书的目录”
优点:通过创建唯一索引可以保证数据库表中每一行数据的唯一性,方便查找,提高数据查询速度 。
缺点:①站物理存储空间,②修改速度慢。
2、普通索引 index(①一个表中可以有多个index字段②可以赋空值,③可以重复)
经常把做查询条件的字段设置为index字段
查看:    desc 表名;  (index字段的key标志是 null(空))
         show  index  from 表名G;
BTREE 二叉树算法(分段)
创建:
①已有表添加索引 create index 索引名 on 表(字段名);
②建表时建索引  create table 表名(字段 1 类型 1,字段 2类型 2, index(字段名));
验证:show index from 表名G;
删除 drop index 索引名 表名;
3、唯一索引 unique(字段的值不能重复,可以赋空值)
查看
创建
①建表时     create table 表名(字段 1,字段 2,字段 3 ,unique(字段名_id));
②建表后  create   unique index  索引名   On   表名 (字段名);
验证
删除  drop index 索引名 on 表名;
4、主键 primary key(PRI)(表中只能有一个主键(字段的值不能重复,不能赋空值))
查看(PRI)
创建
建表时建索引
create table 表名(字段 1 类型 1,字段 2 类型 2, primary key(字段名));
create table 表名(字段名 类型 约束, primary key字段列表);
在已有表中添加主键
alter table 表名 add primary key(字段名);
验证
删除 alter table 表 drop primary key;
5、复合主键(不同嗯时重复 即可)
建表时建索引
create  table 表名(字段 1 类型 1,字段 2类型 2, primary key(字段 1,字段 2));
添加主键(将表中一样的记录删除)然后再添加,
alter  table  表名  add  primary  key(字段 1,字段 2);
primary key 与 auto_increment 连用 自动增长
i++   i=$i+1
create  table  表名  (id int(2))  zerofill  primary  key  auto_increment;
条件:(必须是主键,必须是数值类型)
注意:再修改主键位置时,zhineng
6、外键 foreign key
作用:为了保持数据的一致性
约束:给外键字段赋值时,值只能在指定表中指定字段值的范围内选择。
cwtab 财务表
cw_id   name   pay
  9      bob   20000
  7      bob   20000
bjtab 班级表
stu_id   name
1        jim
2        jim
3        lucy
规则:
1、表的存储引擎必须是 innodb,
2、字段类型要一致,宽度一样,
3、(被参照的字段必须是索引的一种,一般是主键)
查看
创建 :
create table 表 1 (字段 1,字段 2, )engine =innodb;指定存储引擎。
create table 表 2 (字段 1,字段 2,字段 3 ,foreign 字段 1 references 表 1 (字段 1) on cascade update   on cascade delete)engine=innodb;
cascade update on cascade delete 同步更新,同步删除。
表 2 参照表 1 中的字段 1;保持数据的一致性。
验证:
同步更新
update 表 1 set 字段值 where 新字段值 (修改记录)
同步删除
delete from  表1  where 字段值; // 删除须谨慎。
查看建表
show create table 表 ;
删除外键
alter table 表 drop foreign key 外键名;
*****注意事项****
修改参考表时,必须在被参考表中的外键的值的范围。存储引擎
定义:mysql 数据库服务器自带的功能程序,不同的存储引擎有不同的功能和存储方式 。用来处理表的处理器。
查看 mysql 数据库服务器支持的存储引擎
show engines;
修改 mysql 服务默认使用的存储引擎。
vim /etc/my.cnf
default-storage-engine=
:wq
#systemctl restat mysqld
登入数据库查看存储引擎
show engines;
建表时指定 (只有 innodb 支持外键功能)
create table 表名( 字段名 列表名) engine=存储引擎名
修改表使用的存储引擎
alter table 表名  engine=存储引擎名;
修改表的搜索引擎 相应的功能和存储位置都会相应的改变
myisam 特点
不支持外键/事务/事务回滚
支持表级锁( 理解为锁住整个表,可以同时读,写不行)
表级锁:开销小,占内存小,加锁快;不会出现死锁;锁定粒度大,发生锁冲突的概率最高,并发度最低。
innodb 特点
支持外键/事务/事务回滚
支持行级锁(仅对指定的记录进行加锁,这样其它进程还是可以对同一个表中的其它记录进行操作。)
行级锁:开销大,占内存大,加锁慢;会出现死锁;锁定粒度最小,发生锁冲突的概率最低,并发度也最高。
事务日志 /var/lib/mysql/
ib_logfile0
ib_logfile1   --sql 命令
ibdata1    --数据信息
事务: 一次数据访问从开始连接到断开连接的过程。
特点 : 唯一性 、一致性 隔离性 原子性
5 数据库的导入导出
默认搜索系统文件目录 /var/lib/mysql-files/
查看默认搜索路径
show variables like "secure_file_priv";
system cp /etc/passwd /var/lib/mysql-files/
导入文件
load data infile "/var/lib/mysql-files/passwd" into table user fields terminated by ":" linesterminated by "/";
修改默认导入路径
[mysqld]
secure_file_priv=/mydata      # 指定默认导出路径
default-storage-engine=myisam   #指定搜索引擎
数据导出:
数据的导出: 把记录存储到系统文件里
#ls -ld /mydata   //查看其权限
#chmod 0+w /mydata/
数据导出
select * from user into out "/mydata/a1.txt";
-----------------------------公式---------------------------------------------
mysql>sql 查询  into outfile  "目录名/文件名";
mysql>sql 查询  into outfile  "目录名/文件名"  fields  terminated  By  "分隔符号" ;
mysql>sql 查询  into outfile " 目 录 名 / 文 件 名 " fields terminated by “符号” lines
terminated by "分隔符号";
6 数据库的查询操作
插入表记录
insert  into 库.表  values(字段列表);
insert  into 库.表(字段名列表)  values (字段值列表);
查询表记录
seclect 字段名列表 from 库表.表
where 条件;
select * from user ;
select id,name,homedir from user;
select id,name,homedir from user where id <=10
前 10 行
select * from user where id=50 第五十行
数据库逻辑运算符
数值比较 = != > >=  <  <=
字符比较 = !=
范围内查找
字段名 in (值列表)
字段名 not in (值列表)
字段名 between 数字 1 and 数字 2
匹配空  is null
匹配非空 is not null
逻辑与  or
逻辑非 and
即有与,又有非,先与后非 如需改变须加()改变其优先级。
distinct 重复
select distinct shell from user where uid<1000
数值计算
在 user 表中添加字段
alter table user
add age tinyint(2) unsigned default 21 after name,
add system tinyint default 60 after age,
add service tinyint(2) default 60 after system;
计算 service system 的和 、平均值。
select name system,service,system+service he,(system+service)/2  pjz,age s_year
from user  where name=“root”;
模糊查询 like
where 字段名 like '表达式'
_任意一个字符
以 r 开头的 4 个字符的
select name from user where name like 'r____';
% 0 个或多个字符
select name from user where name like '_%_';
名字至少是两个或两个以上字符的,
select id,name from user where name like "%" having name is null;
%不包括空值。
select id,name from user where name like "%a%";
名字里面包含字母 a 的
select id,name from user where name like "_a_";
having 在查找结果里查找数据。
正则匹配
seclect 字段名列表 from 库表.表  where 条件;
条件中添加正着匹配
where 字段名 regexp “正着表达式”
select name from user where name regexp '[0-9]';  //查找名字中有数字的用户

.. 包含两个字符 ^..$ 只能是两个字符 s$以 s 结尾的
结尾$ 开头^a.*t$ 以 a 开头以 t 结尾中间任意。
聚集函数 (对字段值做统计)
min 字段名  最小值
max 字段名 最大值
avg 字段名 平均值
sum 字段名  求和
count 字段名 统计字段值的个数
select count(id) from user;    //统计行
select count(name) from user where shell="/bin/bash";  //统计 shell 用户的个数
select count(name) from user where uid<1000;
统计 uid<1000 的用户的个数
select sum(system) from user where uid<10
前十位用户的系统成绩的求和
select avg(service) from user;求服务成绩的平均值。
查询排序
sql 查询 order by 字段名 排序行时(升序 ASC/降序 DESC)
select name,uid from user where shell!="/bin/bash" orde  by  desc ; (降 序 查 询 shell 不 是 /bin/bash)
查询分组
select distinct shell from user;
select shell from user group by shell; 查询 shell 的种类。
select shell from user where uid<=10 group by shell;  //uid<=10 的 shell 的种类

hving shell=“rsyc”
select shell from user group by shell having shell="/bin/bash";查询有没有/bin/bash 的这种 shell。
select 专业 from school where 性别=“女” group by 专业;
//查找学校里面的女生专业
限制显示查询结果记录的行数
limit
select id,name,uid,homedir from user limit 1,2;
前一个数是从第几行开始显示,第二个数是显示几行。
select id,name,uid from user order by desc limit 2; 找出 uid 最大的两行。
sql 查询结果 into outfile “/mydata/top5.txt”
单表查询
select 字段名列表 from 表名 where 条件;
嵌套查询(where 子查询)
select 字段名列表 from 表名 where 条件 (select 字段名列表 from 表名 where 条件);
多表查询。
select name,system from user where system > (select avg(system) from user);
select name from user where name not in (select name from game.cwtab);
修改记录
update  库.表  set 字段名=“值”, 字段名=值;

update  库.表  set 字段名=“值”, 字段名=值 where 条件;
删除记录
delete from 库.表 where 条件;
delete from user where name ="null"
表的复制及改名
1、表的复制
①全复制源表内容:Create  table  新表  select  *  from  源表;
②部分复制源表内容:create   table   新表   select  字段  from  源表;
③复制源表仅字段:create  table  新表  select  *  from  源表  where  false;
2、表的改名:  alter  table   旧表  rename  新表;
多表查询
1、概述:
①将2个或2个以上的表按某个条件连接起来,从中选取需要的数据。
Select  字段名列表  from  表a,表b;(同库多表)
Select  字段名列表  from  库1.表a,库2.表b;(异库多表)
②当多个表中存在相同意义的字段 (字段名可以不同)时可以通过改字段连接多个表。
Select  字段名列表  from  表a,表b  where 条件;(同库多表)
Select  字段名列表  from  库1.表a,库1表a  where 条件(异库多表)
外连接查询
左连接查询select  字段名列表  from  表a  left  join  表b  on  条件;(显示:表b在表a的左边)
右连接查询select  字段名列表  from  表a  right  join  表b  on  条件;(显示:表b在表a的右边
四 密码管理
① 停止Mysql服务程序
② 跳过授权表启动mysql服务程序
#Vim /etc/my.cnf
[mysql]
skip-grant-tables
#systemctl restart mysqld
③ 重设root密码(更新user表记录)
>mysql (跳过授权表后登录数据库)
>update mysql.user set authentication_string=password(“abc123”) where user=”root” and host=”localhost”;
>flush privileges    //刷新授权表
(修改myql库中user表中保存密码authentication_string)
>quit
④ 以正常方式重启MySQL服务程序
注释#skip-grant-tables  重启数据库
以现有密码‘abc123’登录数据库
2设置管理密码
2、设置管理源密码
① 查看模块  #find / -name “validate_password.so”
② 修改配置文件
#vim /etc/my.cnf
Plugin-load=validate_password.so   //加载模块
Validate-password=force_plus_permanent  //永久启用模块
Validate_password_policy=0  //只验证密码长度
Validate_password_length=6  //指定密码长
③ 重起服务
④ 用shell命令行修改登录密码(须输入旧密码验证,不适用跳过授权表启动的情况)
#mysqladmin -hlocalhost -uroot -p password ”新密码”
Enter password: //输入旧密码验证
⑤ 起服务
五 创建授权
1、Mysql授权库和信息表
① User表,存储授权用户的访问权限
② db表,存储授权用户对数据库的访问权限
③ Tables_priv表,存储授权用户对表的访问权限
④ Columns_priv表,存储授权用户对字段的访问权限
2、配置授权
① Grant 权限列表  on 库名.表名 to 用户名@’客户端地址’ identified by ‘密码’
with grant option;       是否有授权权限

权限列表 ①all的时候代表所有权限 ②select查询、insert插入、update更新、delete删除权限
库名表名 :是*.*所有库所有表
客户端地址: ①%匹配所有主机②192.168.4.%匹配一个网段③%tarena.com 匹配一个dns 域
本机地址:用户名@’localhost’

3、自己Show 查看用户的权限
①   Show grantsG;
②   管理员查看其他用户的权限 show grants for 用户名@’客户端地址’;
4、重设授权用户修改密码
① 授权用户修改自己的密码
     Set  password=password(‘新密码’);
② 管理员重设其他用户的密码
  Set  password  for  用户名@’客户端地址’ =password(‘新密码’);
5、撤销用户权限
     Revoke 权限列表  on 库名.表名 from 用户名@’客户端地址’;
     Drop  user  		user@’cilent’;
六 数据库的备份与恢复
1)、物理备份
    备份
① cp -rp /var/lib/mysql/mysql  备份目录/文件名
② tar  -zcvf  xxx.tar.gz  /var/lib/mysql/数据库名
    恢复
① cp  -rp  备份目录/文件名  /var/lib/mysql/
② tar  -zxvf  xxx.tar.gz  -C  /var/lib/mysql/数据库名
③ 修改权限用户所属chown mysql /var/lib/mysql/mysql
2)、逻辑备份
完全备份
① Mysqldump  源库名 > 路径/xxx.sql
完全恢复
② Mysql 目标库名  <  路径/xxx.sql
注意:无论备份还是恢复,都需要验证用户及权限
缺点:备份与修复时锁表导致访问延时。
完全备份
#mkdir  /alldb.sql
#mysqldump -uroot -p --all-databases >/alldb.sql  导出数据
#Ls - lh *.sql
恢复
>create database alldb1;  exit
#mysql -uroot -p alldb1<alldb.sql 导入数据
数据备份的一些参数
--all-databases         所有库
数据库名                指定单个库
数据库名 表名           指定库指定表
-B 数据库1 数据库2    备份多个库