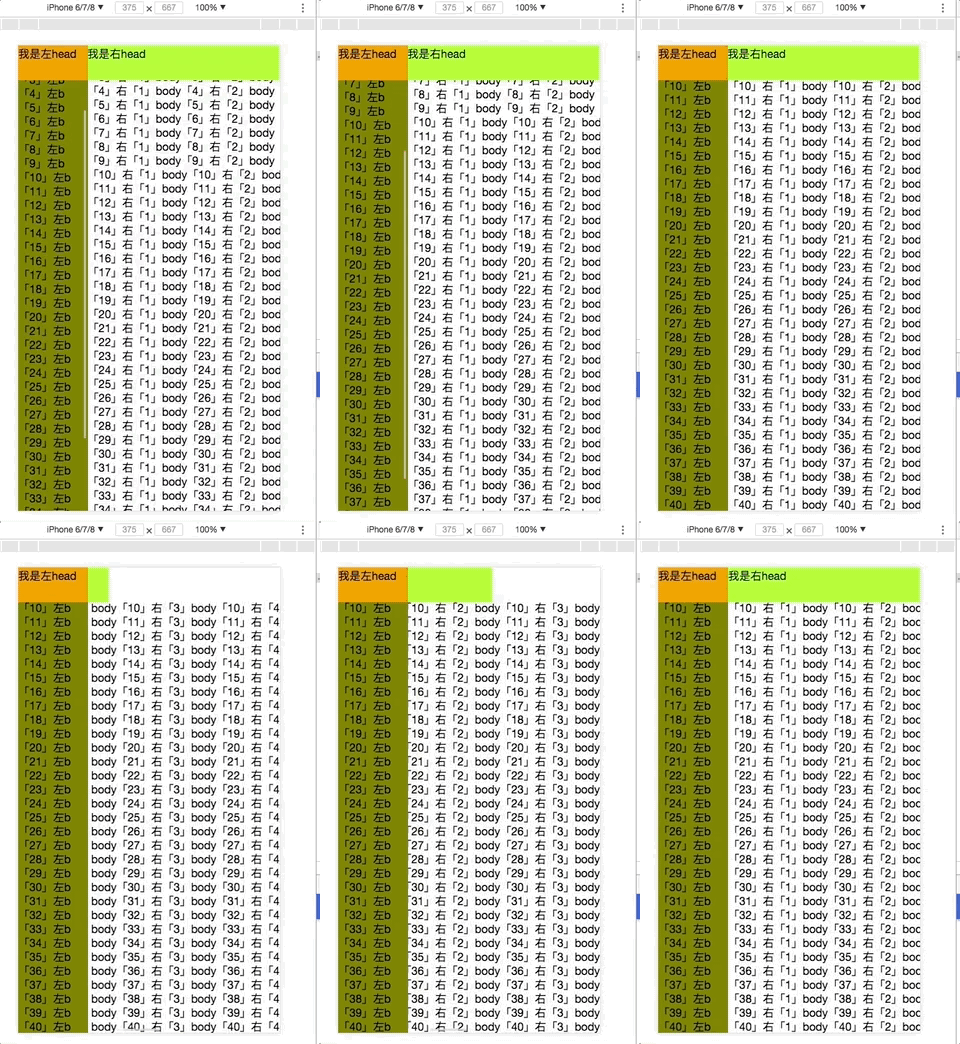
最近移动端做一份报表,需要左右滚动时,固定左边部分;上下滚动时,固定头部部分。
代码在Vue中简单实现
主要思路是:
a.左边部分滚动,实时修改右边部分的滚动条高度
b.头部和内容部分都设置固定高度,当内容部分内容高度大于设置的高度时,产生滚动条
c.左右部分也设置固定宽度,左边设置固定宽度,右边设置成窗口的宽度减去左边部分的宽度,当右边部分的宽度大于设置的宽度时产生滚动条
扩展思路:
a.监控左右(x)滚动条滚动到右边边缘时,可以触发事件(如:加载下一批数据)
b.监控上下(y)滚动条滚动到下边边缘时,可以触发事件(如:加载下一页数据)
……
还可以定时器监控左右的滚动条高度是否一致,修改成一致(防止不同浏览器的兼容问题)
效果图如下:

代码如下:
<template>
    <div class="outermost-layer">
        <div class="left">
            <div class="left-head" :style="{height: `${headHeight}px`}">
                我是左head
            </div>
            <div  :style="{height: `${bodyHeight}px`}" class="left-body"  id="leftBodyId" onscroll="rightBodyId.scrollTop = this.scrollTop;console.log(rightBodyId.scrollTop);console.log(this.scrollTop)">
                <div v-for="i in 40" style="height: 20px">
                    「{{i}}」左b
                </div>
            </div>
        </div>
        <div class="right">
            <div class="right-head" :style="{height: `${headHeight}px`}">
                我是右head
            </div>
            <div  :style="{height: `${bodyHeight}px`}" class="right-body" id="rightBodyId" onscroll="leftBodyId.scrollTop = this.scrollTop;console.log(leftBodyId.scrollTop);console.log(this.scrollTop)">
                <div v-for="i in 40" style="height: 20px">
                    <span v-for="n in 5">「{{i}}」右「{{n}}」body</span>
                </div>
            </div>
        </div>
    </div>

</template>

<!--这里可以防止滚动到顶部时,整体往上偏移,底部出现空白-->
<style>
    #vux_view_box_body{
        padding:0px;
    }
</style>

<script>
    export default {
        name: "home",
        data(){
            return {
                headHeight: 50,
                bodyHeight: window.innerHeight - 50,
            }
        },
        methods:{

        }
    }
</script>

<style scoped>
    .outermost-layer {
        background-color: white;
        padding: 0px;
    }
    .left{
         100px;
        height: 100%;
        background-color: orange;
        float: left;
        display: inline-block;
    }
    .left-head{
         100%;
        /*height: 30px;*/
        clear: both;
    }
    .left-body{
        background-color: olive;
        clear: both;
        /*height: 617px;*/
        /*左边设置滚动条,系统监听左边的滚动条位置,保持高度一致*/
        overflow-y: scroll;
    }
    .right{
         calc(100% - 100px);
        height: 100%;
        float: left;
        overflow-x: scroll;
        display: inline-block;
    }
    .right-head{
        background-color: greenyellow;
        /*height: 30px;*/
        z-index: 10;
        clear: both;
    }
    .right-body{
         1400px;
        /*height: 617px;*/
        clear: both;
        overflow: auto;
    }

</style>