1. Owin
OWIN全名:Open Web Interface for .NET. 它是一个说明,而非一个框架,该声明用来实现Web服务器和框架的松耦合。它提供了模块化、轻量级和便携的设计。类似Node.js, WSGI.
Katana是微软实现的OWIN组件的集合。包含基础设施组件和功能性组件。并且暴露出了OWIN管道用来添加组件。可以在IIS、OwinHost.exe或者自定义的服务器中托管。
比如OWIN提供了新的登录模式,比如,打开Web.config文件,我们看到:
<system.web>
    <authentication mode="None" />
    <compilation debug="true" targetFramework="4.5" />
    <httpRuntime targetFramework="4.5" />
</system.web>
我们看到<authentication mode="None"/>,这里我们不在使用传统的Form认证,而是使用Owin的认证。我们打开Startup.cs文件,看到如下内容:
public partial class Startup
{
    public void Configuration(IAppBuilder app)
    {
        ConfigureAuth(app);
    }
}
这里我们使用ConfigureAuth(app)来配置认证,打开这个方法的定义,可以看到如下方法:
public void ConfigureAuth(IAppBuilder app)
{
    // 使应用程序可以使用 Cookie 来存储已登录用户的信息
    app.UseCookieAuthentication(new CookieAuthenticationOptions
    {
        AuthenticationType = DefaultAuthenticationTypes.ApplicationCookie,
        LoginPath = new PathString("/Account/Login")
    });
    // Use a cookie to temporarily store information about a user logging in with a third party login provider
    app.UseExternalSignInCookie(DefaultAuthenticationTypes.ExternalCookie);

    // 取消注释以下行可允许使用第三方登录提供程序登录
    //app.UseMicrosoftAccountAuthentication(
    //    clientId: "",
    //    clientSecret: "");

    //app.UseTwitterAuthentication(
    //   consumerKey: "",
    //   consumerSecret: "");

    //app.UseFacebookAuthentication(
    //   appId: "",
    //   appSecret: "");

    //app.UseGoogleAuthentication();
}
2. 本地认证Local Authentication
默认就是本地认证:
// 使应用程序可以使用 Cookie 来存储已登录用户的信息
app.UseCookieAuthentication(new CookieAuthenticationOptions
{
    AuthenticationType = DefaultAuthenticationTypes.ApplicationCookie,
    LoginPath = new PathString("/Account/Login")
});
// Use a cookie to temporarily store information about a user logging in with a third party login provider
app.UseExternalSignInCookie(DefaultAuthenticationTypes.ExternalCookie);
3. 添加Facebook认证
// 取消注释以下行可允许使用第三方登录提供程序登录
//app.UseMicrosoftAccountAuthentication(
//    clientId: "",
//    clientSecret: "");

//app.UseTwitterAuthentication(
//   consumerKey: "",
//   consumerSecret: "");

//app.UseFacebookAuthentication(
//   appId: "",
//   appSecret: "");

//app.UseGoogleAuthentication();
取消注释对应的行,并且添加appId和appSecret。
第二步,如果在创建账户后需要做一些其他的操作,修改AccountController.cs中的ExternalLoginConfirmation方法。
4. Identity身份
4.1 使用Claim添加自定义的字段
Identity 是第一个产生出来为每个用户识别身份的。Account的Register方法先生成创建一个IdentityResult,然后再使用SignInAsync。
Claim是一个关于用户的声明,由Identity provider提供,比如用户1有Admin角色。
Asp.Net生成的数据库中有AspNetUsers,AspNetUserRoles和AspNetUserClaims表,其中AspNetUserClaims用来存储用户自定义的一些信息。
比如给用户在注册时添加一个名称:
public async Task<ActionResult> Register(RegisterViewModel model)
{
    if (ModelState.IsValid)
    {
        var user = new ApplicationUser() { UserName = model.Email, Email = model.Email};
        var result = await UserManager.CreateAsync(user, model.Password);
        if (result.Succeeded)
        {
            //添加Claims
            UserManager.AddClaim(user.Id, new Claim(ClaimTypes.GivenName, model.FirstName));
            var service = new CheckingAccountService(HttpContext.GetOwinContext()
                .Get<ApplicationDbContext>());
            service.CreateCheckingAccount(model.FirstName, model.LastName,
                user.Id, 0);
            await SignInAsync(user, isPersistent: false);
            return RedirectToAction("Index", "Home");
        }
        else
        {
            AddErrors(result);
        }
    }

    // 如果我们进行到这一步时某个地方出错,则重新显示表单
    return View(model);
}
获取Claims
var identity = (ClaimsIdentity) User.Identity;
var name = identity.FindFirstValue(ClaimTypes.GivenName) ?? identity.GetUserName();
4.2 在model中添加自定义的字段
打开IdentityModels.cs,在ApplicationUser中添加:
public class ApplicationUser : IdentityUser
{
    public async Task<ClaimsIdentity> GenerateUserIdentityAsync(UserManager<ApplicationUser> manager)
    {
        var userIdentity = await manager.CreateIdentityAsync(this, DefaultAuthenticationTypes.ApplicationCookie);
        return userIdentity;
    }
    public string Pin { get; set; }
}
5 基于角色的认证
5.1 为每个用户添加余额显示
每个Controller都有一个User属性,获取当前UserId的方法如下:
var userId = User.Identity.GetUserId();
比如,我们要获取之前定义的账户余额,可以打开CheckingAccountController.cs中添加下面的代码
private ApplicationDbContext db = new ApplicationDbContext();

//
// GET: /CheckingAccount/Details/
public ActionResult Details()
{
    var userId = User.Identity.GetUserId();
    var checkingAccount = db.CheckoutAccounts.First(c => c.ApplicationUserId == userId);
    return View(checkingAccount);
}
这样每个用户就都能看到自己的账户余额了。
5.2 显示用户账户余额列表
在CheckingAccountController.cs中添加:
public ActionResult List()
{
    return View(db.CheckoutAccounts.ToList());
}
现在,我们为List添加视图,右键:
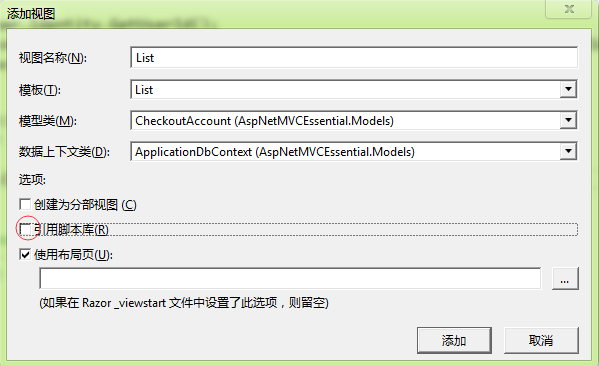
注意,如果按照上图配置发生错误,并且错误是“运行所选代码生成器时出错”,那么应该将数据上下文类留空,这样就可以了。
然后编辑生成的模板,将编辑改为:
@Html.ActionLink("详细", "DetailsForAdmin", new { id=item.Id }) |
并且,在CheckingAccountController.cs中添加:
[Authorize(Roles = "Admin")]
public ActionResult DetailsForAdmin(int id)
{
    var checkingAccount = db.CheckoutAccounts.First(c => c.Id == id);
    return View("Details", checkingAccount);
}
请注意,我们添加了[Authorize(Roles="Admin")]来限定只有Admin组的才能访问,下一节我们讲介绍如何使用角色分配。
6 给用户赋值角色
打开MigrationsConfigurations,在Seed方法中添加如下:
protected override void Seed(AspNetMVCEssential.Models.ApplicationDbContext context)
{
    //UserStore一定要使用context作为参数
    var userStore = new UserStore<ApplicationUser>(context);
    var userManager = new UserManager<ApplicationUser>(userStore);

    if (!context.Users.Any(u => u.UserName == "liulixiang1988"))
    {
        //1、创建用户
        var user = new ApplicationUser { UserName = "liulixiang1988", Email = "liulixiang1988@gmail.com" };
        //下面这句会创建一个用户并且会立即执行,不需调用SaveChanges
        userManager.Create(user, "passW0rd");

        //2、创建用户相关的账户
        var service = new CheckingAccountService(context);
        service.CreateCheckingAccount("liulixiang1988", "管理员", user.Id, 1000);

        //3、添加角色并保存
        context.Roles.AddOrUpdate(r => r.Name, new IdentityRole { Name = "Admin" });
        context.SaveChanges();

        //4、给用户添加角色,指定Id和角色名
        userManager.AddToRole(user.Id, "Admin");

    }
}