AOP—面向切面编程(Aspect Oriented Programing),它是由Gregor Kiczales在施乐的Palo Alto研究小组于1997年提出的。在传统的编程实践中,对于系统中有些行为,我们无法封装在单个的模块中,而且这些功能与行为通常并不实现系统的业务功能,但辅助系统业务功能的实现,并散布在实现系统业务功能的多个模块中。如果采用OOP的编程方式,通常会造成这些功能的代码纠缠于实际的业务代码中,造成代码纠结,同时带来了代码的侵入性。
为此,我们希望能够将那些无法封装在单个模块中的功能与行为,集中于一个横切面(Cross-cutting)上,然后在这个横切面上进行代码编写,编写完成之后通过织入(Weaving)机制,将这个横切面织入到系统的业务功能模块中,使得业务功能的实现都需要通过该横切面,从而实现在实际的业务功能之前或者之后也同时实现了该横切面所提供的功能和行为。如下图所示:
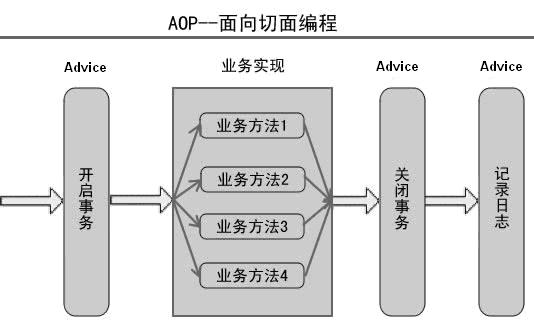
程序的运行过程如下图所示:

AOP中的常用概念有:Advice(增强/通知),所需要实现的横切面的功能,比如日志,事务处理等;PointCut(切点),程序运行中的某个阶段点,如某个方法调用前、后,异常抛出等,在这个阶段点处,Advice所定义的功能和行为被织入到实际的业务功能中;Joinpoint(连接点),指具体的某个类的某个方法的切点位置,比如UserInfo类的getUserName()方法执行前、后等;Introduction(引阶),是一种比较特殊的增强类型,它不是在目标方法周围织入增强,而是为目标类创建新的方法和属性,所以引阶增强的连接点是类级别的;target(目标对象),指将被加入横切代码Advice的执行对象;织入(Weaving),将Advice加入到目标对象的制定链接点的过程等。
织入分为3种类型,一是编译期织入,指在代码编写时织入的代码;二是类加载期织入,指在类加载器加载类时织入;三是运行期织入,指在程序运行时动态加入的代码(动态代理)。
切面(Aspect),包含横切代码和连接点信息,一个切点无法构成一个切面,必须有切点+增强,或者是一个增强构成一个切面。切面的分类有:
- Advisor:一般切面,它包含一个增强(advice)
- PointcutAdvisor:代表具有切点的切面,它包含advice和pointcut两个类
- IntroductionAdvisor:引阶切面,是引阶增强的特殊切面
Spring AOP 是Spring 框架的重要组成部分,它实现了AOP联盟约定的接口。Spring AOP 是由纯Java开发完成的。Spring AOP 只实现了方法级别的连接点,在J2EE应用中,AOP拦截到方法级的操作已经足够。
Spring AOP 在运行时才创建Advice 对象。Spring AOP有这些优点:允许开发者使用声明式企业服务,比如事务服务、安全性服务;开发者可以开发满足业务需求的自定义方面;开发Spring AOP Advice 很方便,可以借助代理类快速搭建Spring AOP 应用。
为实现AOP,开发者需要开发AOP Advice。AOP 通知Advice 包含了方面的逻辑和切点信息。当创建一个Advice 对象的时候,你就编写了实现横切(cross-cutting)功能。 Spring 的连接点是用方法拦截器实现的,这就意味着你编写的Spring AOP 通知将在方法调用的不同点织入程序中。由于在调用一个方法时有几个不同的时间点,Spring 可以在不同的时间点织入程序。Spring AOP中,提供了四种通知的接口:
MethodBeforeAdvice:(前置)实现该接口的方面代码将被织入到目标对象调用方法之前
AfterReturningAdvice:(后置)实现该接口的方面代码将被织入到目标对象调用方法之后
MethodInterceptor:(环绕)实现该接口的方面代码将被织入到目标对象调用方法的前后
ThrowsAdvice:(异常)实现该接口的方面代码将在目标对象调用方法抛出异常时执行
如果要实现相应功能,则需要实现上述对应的接口。例如:实现Before 通知(Advice)需要实现方法 void before(Method method, Object[] args, Object target) ,实现 After 通知(Advice) 需要实现方法 void afterReturning (Method method, Object[] args, Object target)。
接下来,我先写一个自定义的AOP,再写一个Spring-AOP,最后再写一个基于Spring注解的AOP。
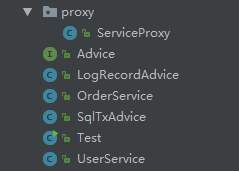
1.自定义AOP。
package test5_aop.proxy;

import net.sf.cglib.proxy.Enhancer;
import net.sf.cglib.proxy.MethodInterceptor;
import net.sf.cglib.proxy.MethodProxy;
import test5_aop.Advice;


import java.lang.reflect.Method;
import java.util.ArrayList;
import java.util.Arrays;
import java.util.List;

/**
 * 业务代理类
 */
public class ServiceProxy {
    private static List<Advice> adviceList=new ArrayList<>();
    public static void addAdvice(Advice advice){
        adviceList.add(advice);
    }
    public static Object newProxyInstance(Object target) {
        //1.工具类
        Enhancer enhancer = new Enhancer();
        //2.设置父类
        enhancer.setSuperclass(target.getClass());
        //3.设置回调函数
        enhancer.setCallback(new MethodInterceptor() {
            @Override
            public Object intercept(Object o, Method method, Object[] objects, MethodProxy methodProxy) throws Throwable {
                for(Advice advice:adviceList){
                    advice.doBefore();
                }
                method.invoke(target, objects);//业务功能
                for(Advice advice:adviceList){
                    advice.doAfter();
                }
                return method;
            }
        });
        //4.创建子类
        return enhancer.create();
    }
}
---------------------------------------------------------
package test5_aop;

/**
 * 业务类,模拟处理订单业务
 */
public class OrderService {
    public void testOrderService(){
        System.out.println("OrderService.testOrderService核心功能");
    }
}
---------------------------------------------------------
package test5_aop;

/**
 * 用户操作业务类
 */
public class UserService {
    public void testUserService(){
        System.out.println("UserService.testUserService核心功能");
    }
}
-------------------------------------------------------
package test5_aop;

/**
 * 事务接口,业务之前与之后的处理事务
 */
public interface Advice {
    //业务之前的事务
    void doBefore();
    //业务之后的事务
    void doAfter();
}
------------------------------------------------------
package test5_aop;

/**
 * 处理sql操作的事务
 */
public class SqlTxAdvice implements Advice {
    @Override
    public void doBefore() {
        System.out.println("开始sql操作事务");
    }

    @Override
    public void doAfter() {
        System.out.println("结束sql操作事务");
    }
}
-----------------------------------------------------
package test5_aop;

/**
 * 日志记录事务
 */
public class LogRecordAdvice implements Advice {
    @Override
    public void doBefore() {

    }

    @Override
    public void doAfter() {
        System.out.println("记录日志功能");
    }
}
----------------------------------------------------
package test5_aop;


import test5_aop.proxy.ServiceProxy;

import java.util.ArrayList;
import java.util.List;

/**
 * 测试类
 */
public class Test {
    public static void main(String[] args) {
        //注册操作日志和sql的事务
        ServiceProxy.addAdvice(new SqlTxAdvice());
        ServiceProxy.addAdvice(new LogRecordAdvice());
        //将事务织入业务中
        UserService userService= (UserService) ServiceProxy.newProxyInstance(new UserService());
        OrderService orderService= (OrderService) ServiceProxy.newProxyInstance(new OrderService());
        //测试业务功能
        userService.testUserService();
        System.out.println("--------------------------");
        orderService.testOrderService();
    }
}
上述代码执行结果如下:
开始sql操作事务
UserService.testUserService核心功能
结束sql操作事务
记录日志功能
--------------------------
开始sql操作事务
OrderService.testOrderService核心功能
结束sql操作事务
记录日志功能
接下来,我们再写一个基于Spring框架实现的AOP。项目文件包架构如下:

首先,在项目中添加Spring框架依赖,然后配置spring-config.xml文件如下:
<?xml version="1.0" encoding="UTF-8"?>
<beans xmlns="http://www.springframework.org/schema/beans"
       xmlns:xsi="http://www.w3.org/2001/XMLSchema-instance"
       xmlns:context="http://www.springframework.org/schema/context"
       xmlns:aop="http://www.springframework.org/schema/aop"
       xsi:schemaLocation="http://www.springframework.org/schema/beans
       http://www.springframework.org/schema/beans/spring-beans.xsd
       http://www.springframework.org/schema/context
        http://www.springframework.org/schema/context/spring-context.xsd
       http://www.springframework.org/schema/aop
        http://www.springframework.org/schema/aop/spring-aop.xsd">
    <!--Spring框架扫描组件的基本路径,可以使用注解-->
    <context:component-scan base-package="test7_aop.service"></context:component-scan>

    <!--配置切入点增强的功能;该配置文件实现了事务织入-->
    <!--业务发生之前织入-->
    <bean id="beforeAdvice" class="test7_aop.advice.BeforeAdvice"></bean>
    <!--业务完成后织入-->
    <bean id="afterReturnAdvice" class="test7_aop.advice.AfterReturnAdvice"></bean>
    <!--异常发生后织入-->
    <bean id="afterThrowAdvice" class="test7_aop.advice.AfterThrowAdvice"></bean>
    <!--在业务之后织入-->
    <bean id="afterFinally" class="test7_aop.advice.AfterFinally"></bean>
    <!--环绕业务之前与之后-->
    <bean id="aroundAdvice" class="test7_aop.advice.AroundAdvice"></bean>

    <!--aop配置-->
    <aop:config>
        <!--注册一个连接点-->
        <aop:pointcut id="pointcut_1" expression="bean(userServiceImpl)"></aop:pointcut>
        <!--向连接点织入事务-->
        <aop:aspect ref="beforeAdvice">
            <aop:before method="doBefore1" pointcut-ref="pointcut_1"></aop:before>
            <aop:before method="doBefore2" pointcut-ref="pointcut_1"></aop:before>
        </aop:aspect>

        <aop:aspect ref="afterReturnAdvice">
            <aop:after-returning method="doAfter1" pointcut-ref="pointcut_1"></aop:after-returning>
            <aop:after-returning method="doAfter2" pointcut-ref="pointcut_1"></aop:after-returning>
        </aop:aspect>

        <aop:aspect ref="afterThrowAdvice">
            <aop:after-throwing method="doAfterThrow" pointcut-ref="pointcut_1" throwing="throwable"></aop:after-throwing>
        </aop:aspect>

        <aop:aspect ref="afterFinally">
            <aop:after method="doAfterFinally" pointcut-ref="pointcut_1"></aop:after>
        </aop:aspect>

        <aop:aspect ref="aroundAdvice">
            <aop:around method="doAround" pointcut-ref="pointcut_1" arg-names="proceedingJoinPoint"></aop:around>
        </aop:aspect>

    </aop:config>
</beans>
在运用Spring框架时,对spring-config.xml文件的正确配置是一个首要的重点。在完成文件配置后,接下来下代码如下:
package test7_aop.advice;

/**
 * 业务发生前织入
 */
public class BeforeAdvice {
    public void doBefore1(){
        System.out.println("BeforeAdvice.doBefore1");
    }
    public void doBefore2(){
        System.out.println("BeforeAdvice.doBefore2");
    }
}
-----------------------------------------------------
package test7_aop.advice;

import org.aspectj.lang.ProceedingJoinPoint;

/**
 * 业务方法的环绕织入
 */
public class AroundAdvice {

    public Object doAround(ProceedingJoinPoint proceedingJoinPoint) throws Throwable{
        System.out.println("环绕通知,增强在前面的功能");
        //执行目标方法
        Object proceed = proceedingJoinPoint.proceed();
        System.out.println("环绕通知,增强在后面的功能");
        return proceed ;
    }
}
-------------------------------------------------------
package test7_aop.advice;

/**
 * 业务完成后织入
 */
public class AfterFinally {
    public void doAfterFinally(){
        System.out.println("AfterFinally.doAfterFinally");
    }
}
--------------------------------------------------------
package test7_aop.advice;

/**
 * 业务完成后织入
 */
public class AfterReturnAdvice {
    public void doAfter1(){
        System.out.println("BeforeAdvice.doAfter1");
    }
    public void doAfter2(){
        System.out.println("BeforeAdvice.doAfter2");
    }
}
-------------------------------------------------------
package test7_aop.advice;

/**
 * 异常发生后织入
 */
public class AfterThrowAdvice {
    public void doAfterThrow(Throwable throwable){
        System.out.println("AfterThrowAdvice.doAfterThrow..."+throwable);
    }
}
--------------------------------------------------------
package test7_aop.service;

/**
 * 用户操作接口
 */
public interface UserService {
    public void testUserService();
}
-------------------------------------------------------
package test7_aop.service;

import org.springframework.stereotype.Service;

/**
 * 用户操作接口的实现类
 */
@Service
public class UserServiceImpl implements UserService{
    @Override
    public void testUserService() {
//        System.out.println(10/0);//可以测试在异常发生后织入的的事务
        System.out.println("User2ServiceImpl.testUserService核心功能");
    }
}
----------------------------------------------------------
package test7_aop;

import org.springframework.context.ApplicationContext;
import org.springframework.context.support.ClassPathXmlApplicationContext;
import test7_aop.service.UserService;
import test7_aop.service.UserServiceImpl;
/**
 * 测试类
 */
public class Test {
    public static void main(String[] args) {
        //基于spring-config.xml配置文件生成应用上下文,
        //然后基于该应用上下文获得已经织入事务的bean
        ApplicationContext applicationContext = new ClassPathXmlApplicationContext("test7_aop/config/spring-config.xml");
        UserService userService=applicationContext.getBean(UserService.class);
        userService.testUserService();
    }
}
上述代码执行结果如下:
BeforeAdvice.doBefore1
BeforeAdvice.doBefore2
环绕通知,增强在前面的功能
User2ServiceImpl.testUserService核心功能
环绕通知,增强在后面的功能
AfterFinally.doAfterFinally
AfterReturnAdvice.doAfter1
AfterReturnAdvice.doAfter2
另外,我们还可以在项目中添加spring-aspects-4.3.11.RELEASE.jar(暂以该版本为例)的jar包依赖。此时,spring-config.xml配置文件的配置信息如下:
<?xml version="1.0" encoding="UTF-8"?>
<beans xmlns="http://www.springframework.org/schema/beans"
       xmlns:xsi="http://www.w3.org/2001/XMLSchema-instance"
       xmlns:context="http://www.springframework.org/schema/context"
       xmlns:aop="http://www.springframework.org/schema/aop"
       xsi:schemaLocation="http://www.springframework.org/schema/beans
       http://www.springframework.org/schema/beans/spring-beans.xsd
       http://www.springframework.org/schema/context
        http://www.springframework.org/schema/context/spring-context.xsd
       http://www.springframework.org/schema/aop
        http://www.springframework.org/schema/aop/spring-aop.xsd">

    <context:component-scan base-package="test8_aop_anno.service,test8_aop_anno.advice"></context:component-scan>

    <!--支持通过注解进行AOP配置-->
    <aop:aspectj-autoproxy></aop:aspectj-autoproxy>
</beans>
此时执行项目,仍可得到同样的效果,配置文件在配置方面更为简洁。