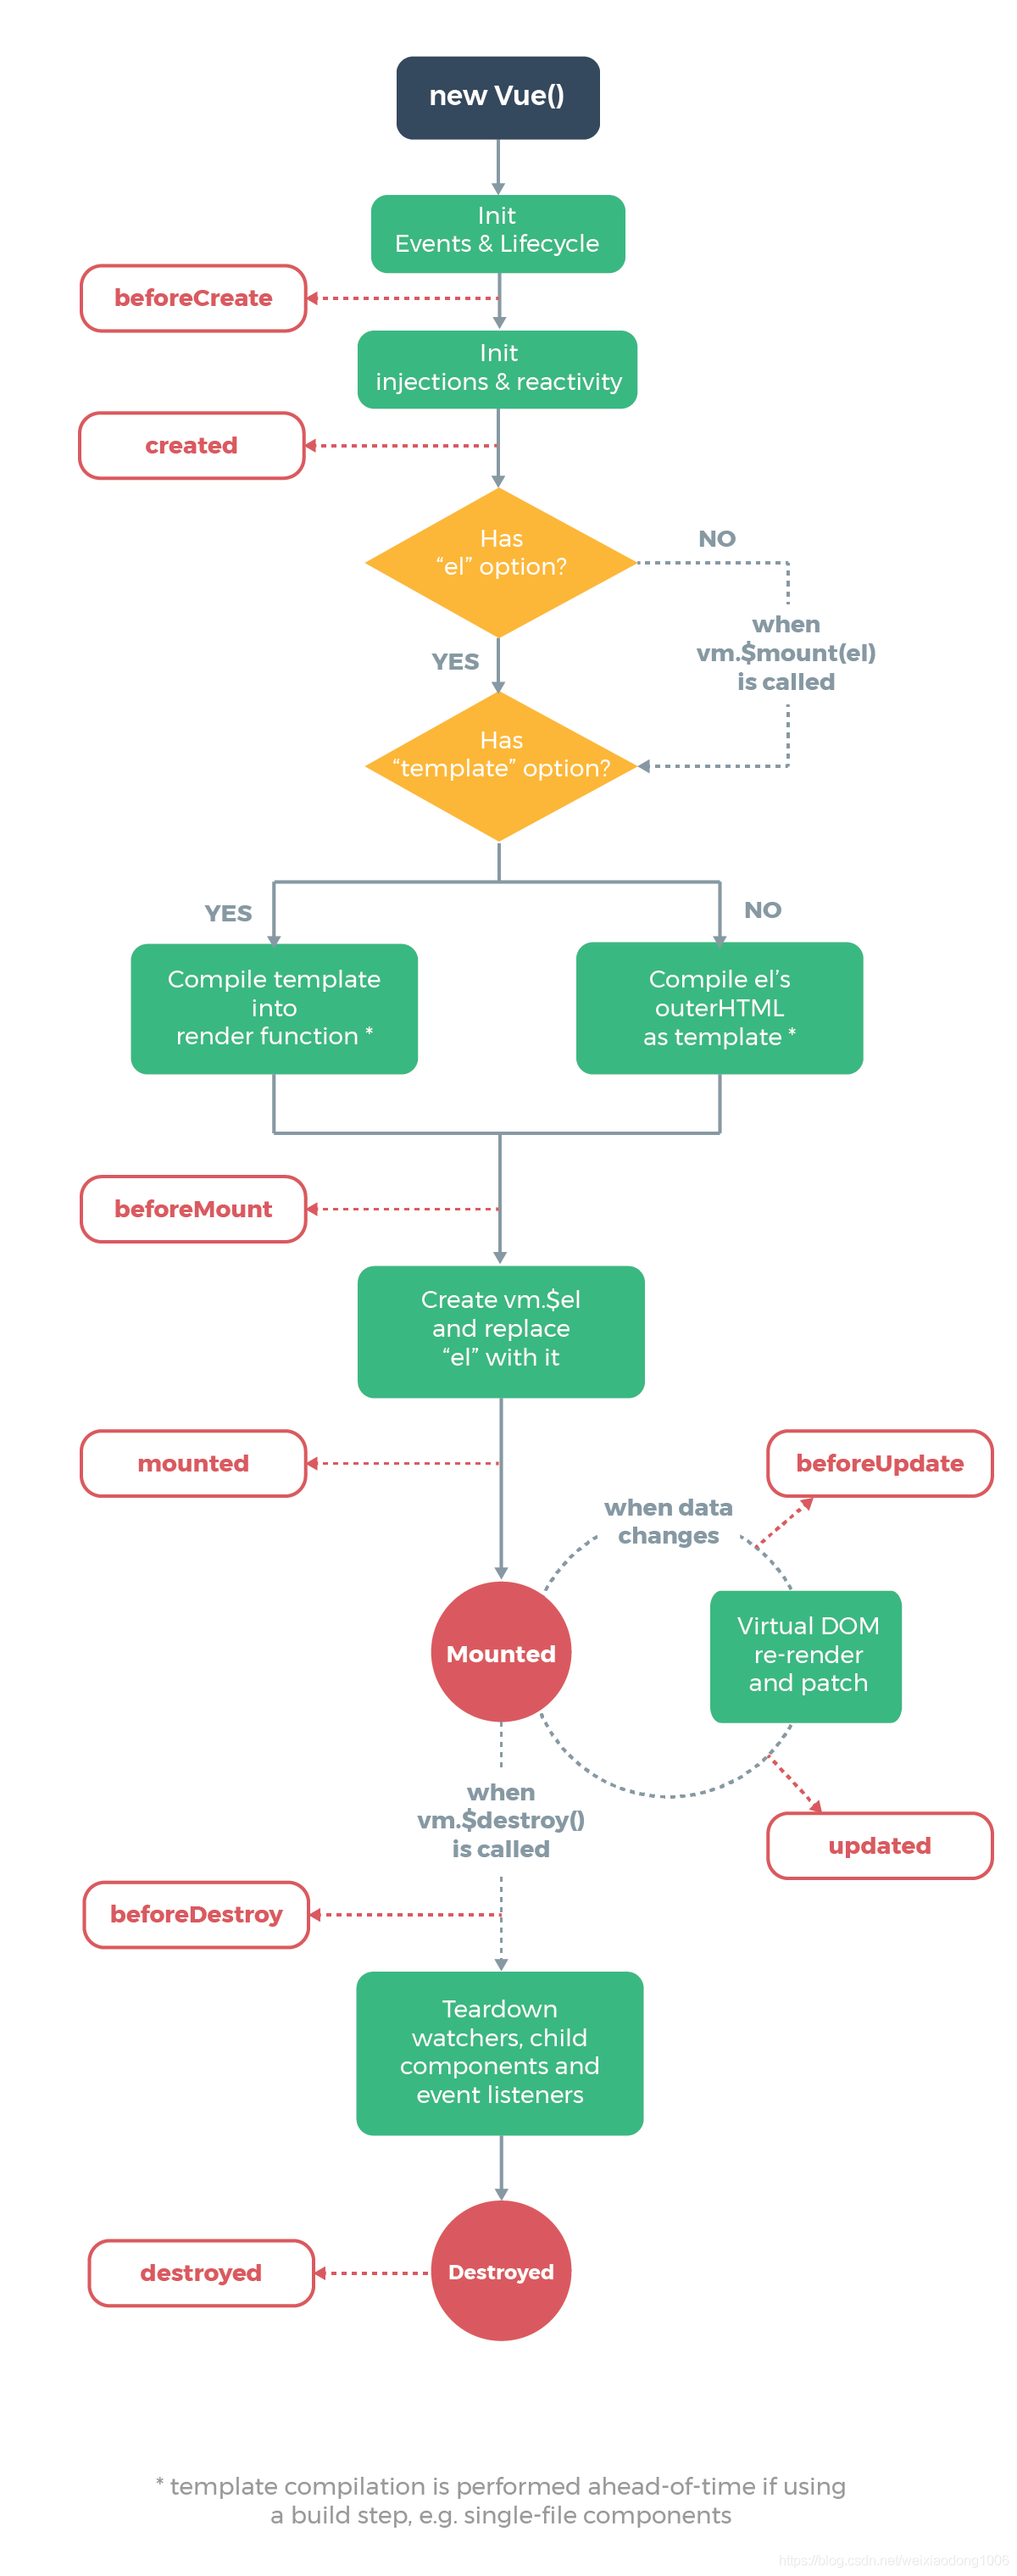
Vue实例从创建到销毁的过程,就是生命周期。Vue中所有功能的实现都是围绕其生命周期进行的,在生命周期的不同阶段调用对应的钩子函数实现组件数据管理与DOM渲染两大重要功能。
一、Vue生命周期共可以分为八个阶段,分别为:
1.beforeCreate(创建前)
2.created(创建后)
3.beforeMount(载入前)
4.mounted(载入后)
5.beforeUpdate(更新前)
6.updated(更新后)
7.beforeDestroy(销毁前)
8.destroyed(销毁后)
二、Vue生命周期的作用是什么?
它的生命周期中有多个事件钩子,让我们在控制整个Vue实例的过程中,更容易形成良好的逻辑。
三、第一次页面加载时,会触发哪些钩子?
第一次页面加载时会触发beforeCreate、created、beforeMount与mounted这几个钩子。
四、简述每个周期具体适合哪些场景
beforeCreate:可以在这里加载loading事件,在加载实例时触发。
created:初始化完成时的事件可以写在这里,比如这次此出处结束loading事件,异步请求也适宜在这里调用。
mounted:挂载元素,获取到DOM节点
updated:如果对数据统一处理,在这里可以写上相应函数。
beforeDestroy:可以做一个确认停止事件的确认框。
五、created与mounted的区别
created:在模板渲染成html前调用,即通常初始化某个属性值,然后再渲染成视图。
mounted:在模板渲染成html后调用,通常是初始化页面完成后,再对html的DOM节点,进行一些操作。
六、关于生命周期的详细介绍
接下来,可以看下面代码来学习:
<!DOCTYPE html>
<html>
<head>
    <meta charset="UTF-8">
    <title></title>
</head>
<body>

<div id="app">
    <p>{{ message }}</p>
    <h1>{{message + '这是在outer HTML中的'}}</h1>
</div>
<script src="https://cdn.jsdelivr.net/npm/vue/dist/vue.js"></script>

<script type="text/javascript">

    const app = new Vue({
        el: '#app',
        data: {
            message : "LJY learns more"
        },
        template:"<h1>{{message +'这是在template模板中的'}}</h1>",
        // render: function(createElement) {
        //     return createElement('h1', 'this is createElement')
        // },
        beforeCreate: function () {
            console.group('beforeCreate 创建前状态===============》');
            console.log("%c%s", "color:red" , "el     : " + this.$el); //undefined
            console.log("%c%s", "color:red","data   : " + this.$data); //undefined
            console.log("%c%s", "color:red","message: " + this.message)
        },
        created: function () {
            console.group('created 创建完毕状态===============》');
            console.log("%c%s", "color:red","el     : " + this.$el); //undefined
            console.log("%c%s", "color:red","data   : " + this.$data); //已被初始化
            console.log("%c%s", "color:red","message: " + this.message); //已被初始化
        },
        beforeMount: function () {
            console.group('beforeMount 挂载前状态===============》');
            console.log("%c%s", "color:red","el     : " + (this.$el)); //已被初始化
            console.log(this.$el);
            console.log("%c%s", "color:red","data   : " + this.$data); //已被初始化
            console.log("%c%s", "color:red","message: " + this.message); //已被初始化
        },
        mounted: function () {
            console.group('mounted 挂载结束状态===============》');
            console.log("%c%s", "color:red","el     : " + this.$el); //已被初始化
            console.log(this.$el);
            console.log("%c%s", "color:red","data   : " + this.$data); //已被初始化
            console.log("%c%s", "color:red","message: " + this.message); //已被初始化
        },
        beforeUpdate: function () {
            console.group('beforeUpdate 更新前状态===============》');
            console.log("%c%s", "color:red","el     : " + this.$el);
            console.log(this.$el);
            console.log("%c%s", "color:red","data   : " + this.$data);
            console.log("%c%s", "color:red","message: " + this.message);
        },
        updated: function () {
            console.group('updated 更新完成状态===============》');
            console.log("%c%s", "color:red","el     : " + this.$el);
            console.log(this.$el);
            console.log("%c%s", "color:red","data   : " + this.$data);
            console.log("%c%s", "color:red","message: " + this.message);
        },
        beforeDestroy: function () {
            console.group('beforeDestroy 销毁前状态===============》');
            console.log("%c%s", "color:red","el     : " + this.$el);
            console.log(this.$el);
            console.log("%c%s", "color:red","data   : " + this.$data);
            console.log("%c%s", "color:red","message: " + this.message);
        },
        destroyed: function () {
            console.group('destroyed 销毁完成状态===============》');
            console.log("%c%s", "color:red","el     : " + this.$el);
            console.log(this.$el);
            console.log("%c%s", "color:red","data   : " + this.$data);
            console.log("%c%s", "color:red","message: " + this.message)
        }
    })
</script>
</body>
</html>
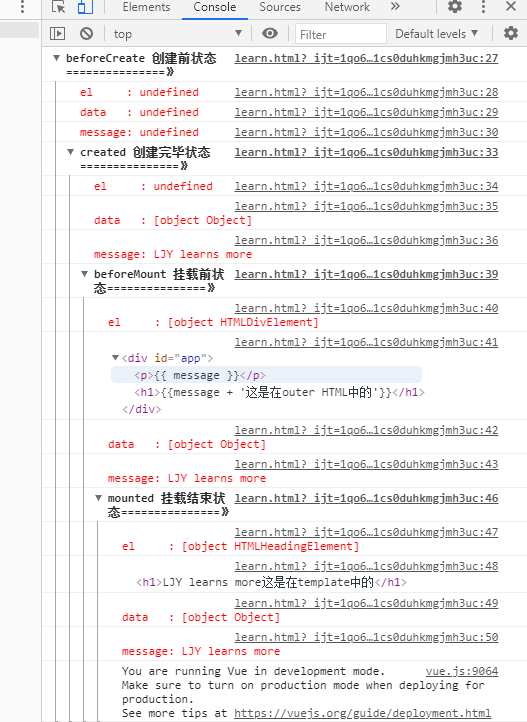
参考上面的运行结果,我们可以发现
在beforeCreate中,el与data并未初始化。在created中完成了data的初始化,而el并没有。在beforeMount中,完成了el与data的初始化,但是el还是{{message}},应用的虚拟Dom技术,先把这个地方给空住,到后面mounted挂载的时候,再把值渲染进去。而在mounted的时候,el与data已经完成加载。
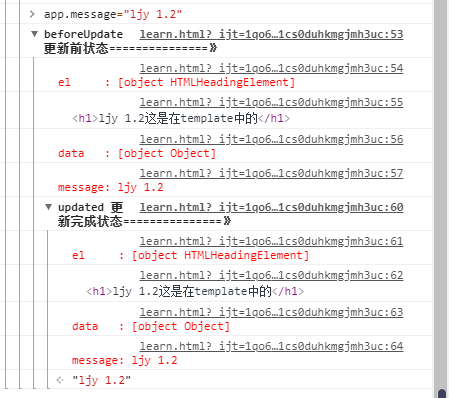
当改变app.message的值时,将会触发update的操作。
当对vue实例执行,app.$destroy()时:

再更新message时:

vue不再对动作进行响应了,但是原先而生成的dom元素还存在,可以理解为执行了destroy操作后,后续就不再受到vue的控制了。
关于mounted与beforeMount的区别:
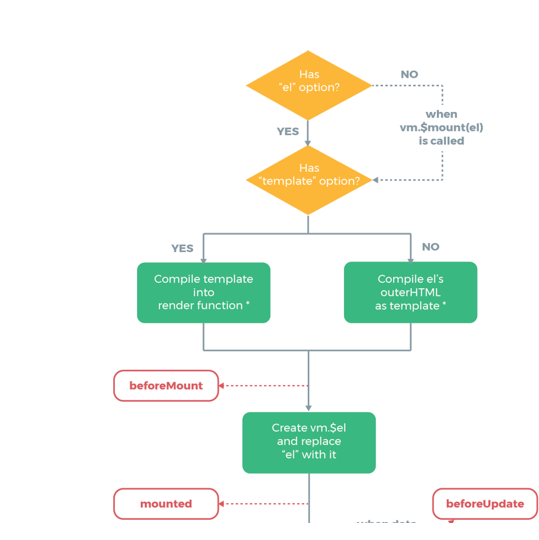
判断vue实例中,是否有el选项,有的话选择继续。如果没有el的话,停止编译直到在该vue实例上调用vm.$mounted(el),之后再继续。之后,判断vue实例中是否有template参数选项,有的话则将其作为模板编译成render函数;若没有template,就将外部HTML作为模板编译。
具体的话,我们来看代码:
var app = new Vue({
        el: '#app',
        data: {
            message : "LJY learns more"
        },
        template:"<h1>{{message +'这是在template模板中的'}}</h1>",
        // render: function(createElement) {
        //     return createElement('h1', 'this is createElement')
        // },
首先,会先去判断是否有el选项,如果有即继续,如果没有的话就停止生命周期。随后判断是否有template选项,如若有的话,就执行。如果没有template这一选项的话,就会执行outer HTML的。但如果把render函数的注释解除掉的话,就会执行render函数。
因此,我们可以看到按优先级来说 render function>template>outerHTML
在beforeMount的时候,$el还只是我们在HTML里面写的节点,然后到mounted的时候,它就把渲染出来的内容挂载到了DOM节点上。这中间的过程其实是执render function的内容;当执行完render function之后,就会调用mounted挂载完毕后,这个实例就算是走完流程。
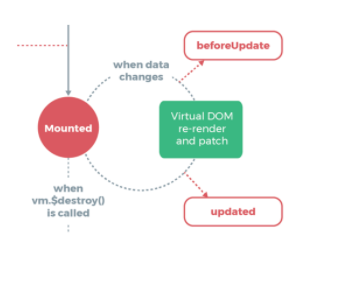
后续的钩子函数执行的过程都是需要外部的触发才会执行,比如说有数据的变化,会调用beforeUpdate,然后经过Virtual DOM,最后upadated更新完毕。
beforeCreate:在实例初始化之后,data observer和event/watcher事件配置之前被调用,此时data、watcher、methods都没有。这时,vue实例还是什么都没有,但是$route对象是存在的,可以根据路由信息进行重定向之类的操作。
created:在实例已经创建完成之后被调用,在这一步,实例已经完成了data observer,属性与方法的运算,watch/event事件回调。然而,挂载阶段还没开始,$el属性目前不可见。此时,this.$data可以访问,watcher、events、methods也出现了,若根据后台接口动态改变data与methods的话,是可行的。
beforeMount:在挂载开始之前被调用,相关的render函数首次被调用。但是render正在执行中,此时DOM还是无法操作的。页面渲染时,所需要的数据应该尽量在这次之前完成赋值。
mounted:在挂载之后被调用,在这一步创建vm.$el并替换el,并挂载在实例上。此时元素已经渲染完成了,依赖于DOM的代码就放在此处,比如监听DOM事件。
beforeUpdate:$vm.data更新之后,虚拟DOM重新渲染与打补丁之前被调用,可以在这个钩子中进一步地修改$vm.data,这不会触发附加的重渲染过程。
updated:虚拟DOM重新渲染和打补丁之后被调用。当这个钩子被调用时,组件DOM的data已经更新,所以可以执行依赖于DOM的操作。但是不要在此时修改data,否则会继续触发beforeUpdate、updated这两个生命周期,进入死循环。
beforeDestroy:实例被销毁之前调用,在这一步,实例依然完全可用,实例要被销毁了。
destroyed:Vue实例销毁后调用,此时,Vue实例指示的所有东西已经解绑,所有的事件监听器都已被移除,所有的子实例也已经被销毁,此时只能加一些toast之类的东西。