GlusterFS在日常生产中遇到的很多,他有这配置简单、稳定等特点;
接下来我们来部署一下GlusterFS,介绍一下它的几种模式;
1解析主机名;
[root@sxb-1 ~]# cat /etc/hosts
127.0.0.1   localhost localhost.localdomain localhost4 localhost4.localdomain4
::1         localhost localhost.localdomain localhost6 localhost6.localdomain6

192.168.88.101    sxb-1
192.168.88.102    sxb-2
192.168.88.103    sxb-3
192.168.88.104    sxb-4
2.配置yum源;拷贝到其他主机;
[root@sxb-1 ~]# vim /etc/yum.repos.d/glusterfs-epel.repo
[glusterfs]
name=GlusterFS is a clustered file-system capable of scaling to several petabytes.
baseurl=https://buildlogs.centos.org/centos/7/storage/x86_64/gluster-6/
enabled=1
gpgcheck=0
[root@sxb-1 ~]# scp /etc/yum.repos.d/glusterfs-epel.repo 192.168.88.102:/etc/yum.repos.d/
glusterfs-epel.repo                               100%  188   145.7KB/s   00:00
[root@sxb-1 ~]# scp /etc/yum.repos.d/glusterfs-epel.repo 192.168.88.103:/etc/yum.repos.d/
glusterfs-epel.repo                               100%  188   177.4KB/s   00:00
[root@sxb-1 ~]# scp /etc/yum.repos.d/glusterfs-epel.repo 192.168.88.104:/etc/yum.repos.d/
glusterfs-epel.repo                               100%  188     1.8KB/s   00:00
3.安装glusterfs-server(四台主机都需要安装);启动服务;
[root@sxb-1 ~]# yum install glusterfs-server^C
[root@sxb-1 ~]# systemctl start glusterd^C
4.将成员主机添加到glusterfs集群中;
[root@sxb-1 ~]# gluster peer probe sxb-1
peer probe: success. Probe on localhost not needed
[root@sxb-1 ~]# gluster peer probe sxb-2
peer probe: success.
[root@sxb-1 ~]# gluster peer probe sxb-3
peer probe: success.
[root@sxb-1 ~]# gluster peer probe sxb-4
peer probe: success.
5.查看一下现在的集群信息;
[root@sxb-1 ~]# gluster peer status
Number of Peers: 3

Hostname: sxb-2
Uuid: a1e1d7ba-2e20-4192-b7d0-ab91d135a38d
State: Peer in Cluster (Connected)

Hostname: sxb-3
Uuid: 59a7034c-1d86-48d6-b6f0-6a063c6d9a9b
State: Peer in Cluster (Connected)

Hostname: sxb-4
Uuid: 75f4e4e0-0e6e-4f34-90c7-5a2918dbb972
State: Peer in Cluster (Connected)
6.创建集群;为我们分别在四台主机上创建一个数据目录这样我们的集群就部署完成了;
[root@sxb-1 ~]# mkdir -p /opt/glusterfs/data1
[root@sxb-1 ~]# gluster volume info
[root@host1 ~]# mkdir -p /opt/glusterfs/data1
[root@host2 ~]# mkdir -p /opt/glusterfs/data2
[root@host3 ~]# mkdir -p /opt/glusterfs/data3
[root@host4 ~]# mkdir -p /opt/glusterfs/data4
我们来了解一下glusterfs的集中模式;
分布卷
默认模式,既GHT,也叫 分布巻:将文件已hash算法随机分不到一台服务器节点中存储。
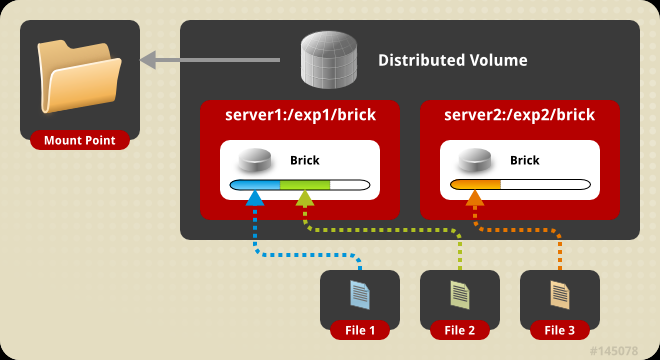
需要两台服务器;
[root@sxb-1 ~]# gluster volume create vloume1 sxb-1:/opt/glusterfs/data1/ sxb-2:/opt/glusterfs/data2
volume create: vloume1: failed: The brick sxb-1:/opt/glusterfs/data1 is being created in the root partition. It is recommended that you don't use the system's root partition for storage backend. Or use 'force' at the end of the command if you want to override this behavior.
集群默认是不可以在root下创建卷,这里我们可以在结尾 加上 force;
[root@sxb-1 ~]# gluster volume create vloume1 sxb-1:/opt/glusterfs/data1/ sxb-2:/opt/glusterfs/data2 force
volume create: vloume1: success: please start the volume to access data
我们可以看到,刚才创建的分布巻vloume1可以看到了;
[root@sxb-1 ~]# gluster volume list
vloume1
查看一下具体信息;
[root@sxb-1 ~]# gluster volume info

Volume Name: vloume1
Type: Distribute
Volume ID: e01c0e8a-d758-41d8-ad96-72d90af77d98
Status: Created
Snapshot Count: 0
Number of Bricks: 2
Transport-type: tcp
Bricks:
Brick1: sxb-1:/opt/glusterfs/data1
Brick2: sxb-2:/opt/glusterfs/data2
Options Reconfigured:
transport.address-family: inet
nfs.disable: on
启用这个卷;
[root@sxb-1 ~]# gluster volume start vloume1
volume start: vloume1: success
接下来进行测试;我们需要给client装一下软件;
[root@localhost ~]# yum install glusterfs gluster-fuse -y
我们对创建的volume1进行挂载;(四台都可以)
mount -t glusterfs  host1.zyg.com:volume1 /mnt
[root@sxb-3 mnt]# df -Th
Filesystem              Type            Size  Used Avail Use% Mounted on
/dev/mapper/centos-root xfs              17G  2.1G   15G  12% /
devtmpfs                devtmpfs        475M     0  475M   0% /dev
tmpfs                   tmpfs           487M     0  487M   0% /dev/shm
tmpfs                   tmpfs           487M  7.7M  479M   2% /run
tmpfs                   tmpfs           487M     0  487M   0% /sys/fs/cgroup
/dev/sda1               xfs            1014M  163M  852M  17% /boot
tmpfs                   tmpfs            98M     0   98M   0% /run/user/0
sxb-3:volume1           fuse.glusterfs   34G   11G   24G  32% /mnt
创建文件测试;可以看到100个文件被分布存在两个服务器上;
[root@sxb-3 mnt]# touch test{1..100}
[root@sxb-1 data1]# ls
test1   test22  test37  test47  test53  test61  test71  test81  test88  test96
test13  test26  test4   test48  test54  test62  test72  test83  test9   test97
test16  test31  test40  test5   test56  test63  test78  test84  test90  test98
test19  test32  test43  test50  test59  test65  test79  test85  test92
test2   test36  test45  test52  test60  test69  test8   test87  test95
[root@sxb-1 data1]# ls /opt/glusterfs/data1/ | wc -l
48
[root@sxb-2 data2]# ls
test10   test17  test25  test33  test42  test57  test68  test76  test91
test100  test18  test27  test34  test44  test58  test7   test77  test93
test11   test20  test28  test35  test46  test6   test70  test80  test94
test12   test21  test29  test38  test49  test64  test73  test82  test99
test14   test23  test3   test39  test51  test66  test74  test86
test15   test24  test30  test41  test55  test67  test75  test89
[root@sxb-2 data2]# ls /opt/glusterfs/data2/ | wc -l
52
复制卷
复制模式,既AFR,创建volume时带replica x数量:将文件复制到replica x 个节点中。
我们停掉刚才的volume1;

[root@sxb-4 ~]# umount /mnt/
[root@sxb-1 data1]# gluster volume stop volume1
Stopping volume will make its data inaccessible. Do you want to continue? (y/n) y

volume stop: volume1: success

[root@sxb-1 data1]# gluster volume delete volume1
Deleting volume will erase all information about the volume. Do you want to contin? (y/n) y
volume delete: volume1: success
创建复制卷;
[root@sxb-1 ~]# gluster volume create volume2 replica 2 transport tcp sxb-1:/opt/glusterfs/data1 sxb-2:/opt/glusterfs/data2 force
volume create: volume2: success: please start the volume to access data
[root@sxb-1 ~]# gluster volume info

Volume Name: volume2
Type: Replicate
Volume ID: 22d08a55-8461-49f5-a30d-2053996f00c7
Status: Created
Snapshot Count: 0
Number of Bricks: 1 x 2 = 2
Transport-type: tcp
Bricks:
Brick1: sxb-1:/opt/glusterfs/data1
Brick2: sxb-2:/opt/glusterfs/data2
Options Reconfigured:
transport.address-family: inet
nfs.disable: on
performance.client-io-threads: off
挂载测试;
[root@sxb-4 ~]# mount -t glusterfs sxb-3:volume2 /mnt
[root@sxb-4 mnt]# touch test{1..10}
[root@sxb-4 mnt]# ls
test1  test10  test2  test3  test4  test5  test6  test7  test8  test9
我们查看volume2的数据;
[root@sxb-1 ~]# ls /opt/glusterfs/data1/
test1  test10  test2  test3  test4  test5  test6  test7  test8  test9
[root@sxb-1 ~]# ls /opt/glusterfs/data1/ | wc -l
10

[root@sxb-2 ~]# ls /opt/glusterfs/data2/
test1  test10  test2  test3  test4  test5  test6  test7  test8  test9
[root@sxb-2 ~]# ls /opt/glusterfs/data2/ | wc -l
10
分布复制卷
分布式复制模式(组合型),最少需要四台服务器才能搭建。创建colume时replica 2 server = 4个节点:是DHT与AFR的组合型。

执行前面的删除卷的操作;
创建分布式复制卷;
[root@sxb-1 ~]#  gluster volume create volume3 replica 2 transport tcp sxb-1:/opt/glusterfs/data1 sxb-2:/opt/glusterfs/data2 sxb-3:/opt/glusterfs/data3 sxb-4:/opt/glusterfs/data4 force
volume create: volume3: success: please start the volume to access data
查看卷;
[root@sxb-1 ~]# gluster volume list
volume3
[root@sxb-1 ~]# gluster volume info

Volume Name: volume3
Type: Distributed-Replicate
Volume ID: f5db81d0-b8bd-4401-bbcd-964731878132
Status: Created
Snapshot Count: 0
Number of Bricks: 2 x 2 = 4
Transport-type: tcp
Bricks:
Brick1: sxb-1:/opt/glusterfs/data1
Brick2: sxb-2:/opt/glusterfs/data2
Brick3: sxb-3:/opt/glusterfs/data3
Brick4: sxb-4:/opt/glusterfs/data4
Options Reconfigured:
transport.address-family: inet
nfs.disable: on
performance.client-io-threads: off
启用卷;挂载使用;
[root@sxb-1 ~]# gluster volume start volume3
volume start: volume3: success

[root@sxb-4 ~]# mount -t glusterfs sxb-3:volume3 /mnt/
测试:
[root@sxb-4 mnt]# touch {1..100}

[root@sxb-1 ~]# gluster volume start volume3
volume start: volume3: success
[root@sxb-1 ~]# ls /opt/glusterfs/data1/ | wc -l
51
[root@sxb-1 ~]# ls /opt/glusterfs/data1/
1   18  23  27  33  44  48  51  58  63  68  70  78  82  88  93  97
11  19  24  28  35  46  49  53  61  64  69  72  79  85  9   94  98
13  20  26  32  38  47  5   54  62  65  7   73  8   86  91  96  99

[root@sxb-2 ~]# ls /opt/glusterfs/data2/ | wc -l
51
[root@sxb-2 ~]# ls /opt/glusterfs/data2/
1   18  23  27  33  44  48  51  58  63  68  70  78  82  88  93  97
11  19  24  28  35  46  49  53  61  64  69  72  79  85  9   94  98
13  20  26  32  38  47  5   54  62  65  7   73  8   86  91  96  99

[root@sxb-3 ~]# ls /opt/glusterfs/data3/ | wc -l
49
[root@sxb-3 ~]# ls /opt/glusterfs/data3/ | wc -l
49
[root@sxb-3 ~]# ls /opt/glusterfs/data3/
10   14  17  22  3   34  39  41  45  55  59  66  74  77  83  89  95
100  15  2   25  30  36  4   42  50  56  6   67  75  80  84  90
12   16  21  29  31  37  40  43  52  57  60  71  76  81  87  92

[root@sxb-4 mnt]# ls /opt/glusterfs/data4/ | wc -l
49
[root@sxb-4 mnt]# ls /opt/glusterfs/data4/
10   14  17  22  3   34  39  41  45  55  59  66  74  77  83  89  95
100  15  2   25  30  36  4   42  50  56  6   67  75  80  84  90
12   16  21  29  31  37  40  43  52  57  60  71  76  81  87  92
可以看到sxb-1和sxb-2复制 sxb-3和sxb-4复制;