Shiros是我们开发中常用的用来实现权限控制的一种工具包,它主要有认证、授权、加密、会话管理、与Web集成、缓存等功能。我是从事javaweb工作的,我就经常遇到需要实现权限控制的项目,之前我们都是靠查询数据获取列表拼接展示的,还有的是及时的判断权限的问题的,现在有了Shiros了,我们就可以统一的进行设置权限问题,Shrios的实现也是很简单的,下面让我们来看看具体实现步骤
web.xml配置
- 因为我们是与spring进行集成的,而spring的基本就是web项目的xml文件。所以我们在web.xml中配置shiros的过滤拦截。正常情况下,我们需要将shiro的filter配置在所有的filter前面,当然和encodingFilter这个filter是不区分前后的。因为两者互相不影响的。
<filter>
        <filter-name>shiroFilter</filter-name>
        <filter-class>org.springframework.web.filter.DelegatingFilterProxy</filter-class>
        <init-param>
            <!-- 该值缺省为false,表示生命周期由SpringApplicationContext管理,设置为true则表示由servlet container管理 -->
            <param-name>targetFilterLifecycle</param-name>
            <param-value>true</param-value>
        </init-param>
    </filter>

    <filter-mapping>
        <filter-name>shiroFilter</filter-name>
        <url-pattern>/*</url-pattern>
    </filter-mapping>
- 好了,到这里shiro就集成到spring项目里面去了。What?对的,你妹看错,就这么简单,shiro就这一步就集成到项目里了。集成式集成了,但是想要完整的实现效果当然我们还是需要继续的往下配置的。在这里请记住我这里的shiroq过滤器的名字叫shiroFilter(后面有用的)。下面我们的shiro需要到spring的配置文件application.xml文件里去配置,在我的项目的我的spring配置文件是spring-service.xml。而在spring-service.xml中又引入了spring-shiro.xml,也就是说最后shiro的配置是配置在spring-shiro.xml文件中。
最终源码在最后下载 -
spring-shiro.xml
- 这里我们将来看看spring-shiro.xml的配置,这里我采取倒叙的方式讲解,我觉的倒叙更加的有助于我们理解代码。首先我们还记得在web.xml中配置的那个filter吧,名字shiroFilter,对spring-shiro.xml配置文件就是通过这个filter展开的。首先我们在web.xml配置的过滤器实际上是配置ShiroFilterFactoryBean,所以在这里需要将ShiroFilterFactoryBean定义为shiroFilter
-
<bean id="shiroFilter" class="org.apache.shiro.spring.web.ShiroFilterFactoryBean">
        <!-- Shiro的核心安全接口,这个属性是必须的 -->
        <property name="securityManager" ref="securityManager"/>
        <!-- 要求登录时的链接(可根据项目的URL进行替换),非必须的属性,默认会自动寻找Web工程根目录下的"/login.html"页面 -->
        <property name="loginUrl" value="/login.html"/>
        <!-- 登录成功后要跳转的连接 -->
        <property name="successUrl" value="/index.html"/>
        <!-- 用户访问未对其授权的资源时,所显示的连接 -->
        <!-- 若想更明显的测试此属性可以修改它的值,如unauthor.jsp,然后用[玄玉]登录后访问/admin/listUser.jsp就看见浏览器会显示unauthor.jsp -->
        <property name="unauthorizedUrl" value="/login.html"
        />
        <!-- Shiro连接约束配置,即过滤链的定义 -->
        <!-- 此处可配合我的这篇文章来理解各个过滤连的作用http://blog.csdn.net/jadyer/article/details/12172839 -->
        <!-- 下面value值的第一个'/'代表的路径是相对于HttpServletRequest.getContextPath()的值来的 -->
        <!-- anon:它对应的过滤器里面是空的,什么都没做,这里.do和.jsp后面的*表示参数,比方说login.jsp?main这种 -->
        <!-- authc:该过滤器下的页面必须验证后才能访问,它是Shiro内置的一个拦截器org.apache.shiro.web.filter.authc.FormAuthenticationFilter -->
        <property name="filterChainDefinitions">
            <value>
                /statics/**=anon
                /login.html=anon
                /sys/schedule.html=perms[sys:schedule:save]
                /sys/login=anon
                /captcha.jpg=anon
                /**=authc
            </value>
        </property>
    </bean>
- 具体的上面的代码注释已经解释的很清楚了,在这里主要讲解下filterChainDefinitions里面的设置属性。里面的value就是我们控制的页面权限设置。filterChainDefinitions的原则是按顺序查找一旦查找到符合的页面要求就不在继续查找了。所以我们需要将有通配符的页面设置在最后。上面配置中有
/sys/schedule.html=perms[sys:schedule:save]
意思就是说访问schedule.html这个页面前提是你得有sys:schedule:save这个权限。至于这个权限在哪里配置。在这里先透露一下。在Realm中获取 
- 在上面的配置我们securityManager属性是shiro 安全核心配置接口,这里需要我们自己填写,这里的配置就是需要我们实现我们的认证,因为不同的项目我们认证权限肯定是不一样的。所以这也是shiro给我们唯一为数不多的代码编写的接口,我们只需要在这接口提供我们自己的认证和角色权限分配就行了。
-
<!-- Shiro默认会使用Servlet容器的Session,可通过sessionMode属性来指定使用Shiro原生Session -->
    <!-- 即<property name="sessionMode" value="native"/>,详细说明见官方文档 -->
    <!-- 这里主要是设置自定义的单Realm应用,若有多个Realm,可使用'realms'属性代替 -->
    <bean id="securityManager" class="org.apache.shiro.web.mgt.DefaultWebSecurityManager">
        <property name="realm" ref="userRealm"/>
    </bean>
- 那么这里有出现了一个realm,这个realm就是我们实现权限和认证的地方。我们只需要通过spring将我们的实现类指定为realm即可
-
<bean id="userRealm" class="io.renren.shiro.UserRealm"/>
- 在讲UserRealm之前我们先来看看shir默认的realm逻辑是咋样的
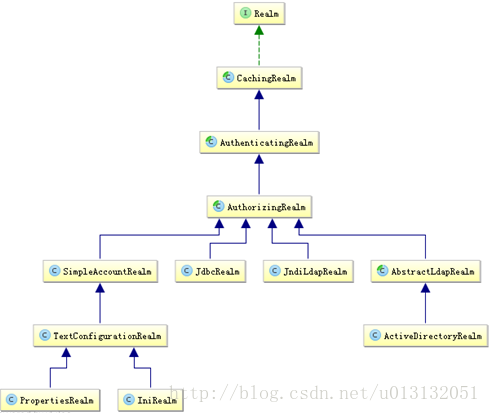
- 通常我们只需要继承AuthorizingRealm(授权),因为AuthorizingRealm里面继承了AuthenticatingRealm(认证),所以我们只需要继承AuthorizingRealm(授权),我们就可以重写授权和认证两个方法了,这两个方法里面就实现权限管理操作。

-
首先来看看在认证登录中我们有哪些值得注意的地方
-
doGetAuthenticationInfo中实现登录认证出现的几种异常
- UnknownAccountException:获取的user为空
- LockedAccountException :此用户被锁住了
- IncorrectCredentialsException : 密码不正确(建议提示为 用户名或密码错误。安全考虑)
- ExcessiveAttemptsException : 密码错误次数太多(现在很多网站上都有相关的操作)
- 最后通过用户名+明文密码+Reaml中的getName进行用户信息组装
-
登录认证就这几点注意,其次就是权限分配了,doGetAuthorizationInfo(授权),在doGetAuthorizationInfo里我们通过PrincipalCollection这个身份集合,当我们只配置了一个Reaml的时候我们可以通过PrincipalCollection中的getPrimaryPrincipal方法获得刚刚传入的Reaml(用户名)就行了,但是当我们配置了多个Reaml的时候可以通过PrincipalCollection中的getRealmNames获取所有的Reaml的用户名就行了。
-
然后通过用户名去数据库获取权限菜单。最后返回一个带有角色和权限的 SimpleAuthorization的信息,意思就是一下角色具有哪些权限。如果就一个角色的时候也可以不指定角色,分别通过setStringPermissions(指定权限)+setRoles(指定角色)
-
到这里shiro的配置就完成了。
-
另外还有一点shiro的配置是处理shiro的生命周期和shiro的注解的启用的,这里就不解释了,直接上代码
-
<!-- Shiro生命周期处理器 -->
    <bean id="lifecycleBeanPostProcessor" class="org.apache.shiro.spring.LifecycleBeanPostProcessor"/>

    <!-- AOP式方法级权限检查  -->
    <bean class="org.springframework.aop.framework.autoproxy.DefaultAdvisorAutoProxyCreator" depends-on="lifecycleBeanPostProcessor">
        <property name="proxyTargetClass" value="true" />
    </bean>
    <!-- 开启shiro注解 -->
    <bean class="org.apache.shiro.spring.security.interceptor.AuthorizationAttributeSourceAdvisor">
        <property name="securityManager" ref="securityManager"/>
    </bean>
spring-shiro.xml源码
-
<?xml version="1.0" encoding="UTF-8"?>
<beans xmlns="http://www.springframework.org/schema/beans"
    xmlns:xsi="http://www.w3.org/2001/XMLSchema-instance" xmlns:context="http://www.springframework.org/schema/context"
    xmlns:aop="http://www.springframework.org/schema/aop" xmlns:tx="http://www.springframework.org/schema/tx"
    xmlns:mvc="http://www.springframework.org/schema/mvc"
    xsi:schemaLocation="
        http://www.springframework.org/schema/beans
        http://www.springframework.org/schema/beans/spring-beans-4.2.xsd
        http://www.springframework.org/schema/context
        http://www.springframework.org/schema/context/spring-context-4.2.xsd
        http://www.springframework.org/schema/tx
        http://www.springframework.org/schema/tx/spring-tx-4.2.xsd
        http://www.springframework.org/schema/aop
        http://www.springframework.org/schema/aop/spring-aop-4.2.xsd
        http://www.springframework.org/schema/mvc
        http://www.springframework.org/schema/mvc/spring-mvc-4.2.xsd">

    <!-- 继承自AuthorizingRealm的自定义Realm,即指定Shiro验证用户登录的类为自定义的UserRealm.java -->
    <bean id="userRealm" class="io.renren.shiro.UserRealm"/>

    <!-- Shiro默认会使用Servlet容器的Session,可通过sessionMode属性来指定使用Shiro原生Session -->
    <!-- 即<property name="sessionMode" value="native"/>,详细说明见官方文档 -->
    <!-- 这里主要是设置自定义的单Realm应用,若有多个Realm,可使用'realms'属性代替 -->
    <bean id="securityManager" class="org.apache.shiro.web.mgt.DefaultWebSecurityManager">
        <property name="realm" ref="userRealm"/>
    </bean>

    <!-- Shiro主过滤器本身功能十分强大,其强大之处就在于它支持任何基于URL路径表达式的、自定义的过滤器的执行 -->
    <!-- Web应用中,Shiro可控制的Web请求必须经过Shiro主过滤器的拦截,Shiro对基于Spring的Web应用提供了完美的支持 -->
    <bean id="shiroFilter" class="org.apache.shiro.spring.web.ShiroFilterFactoryBean">
        <!-- Shiro的核心安全接口,这个属性是必须的 -->
        <property name="securityManager" ref="securityManager"/>
        <!-- 要求登录时的链接(可根据项目的URL进行替换),非必须的属性,默认会自动寻找Web工程根目录下的"/login.html"页面 -->
        <property name="loginUrl" value="/login.html"/>
        <!-- 登录成功后要跳转的连接 -->
        <property name="successUrl" value="/index.html"/>
        <!-- 用户访问未对其授权的资源时,所显示的连接 -->
        <!-- 若想更明显的测试此属性可以修改它的值,如unauthor.jsp,然后用[玄玉]登录后访问/admin/listUser.jsp就看见浏览器会显示unauthor.jsp -->
        <property name="unauthorizedUrl" value="/login.html"
        />
        <!-- Shiro连接约束配置,即过滤链的定义 -->
        <!-- 此处可配合我的这篇文章来理解各个过滤连的作用http://blog.csdn.net/jadyer/article/details/12172839 -->
        <!-- 下面value值的第一个'/'代表的路径是相对于HttpServletRequest.getContextPath()的值来的 -->
        <!-- anon:它对应的过滤器里面是空的,什么都没做,这里.do和.jsp后面的*表示参数,比方说login.jsp?main这种 -->
        <!-- authc:该过滤器下的页面必须验证后才能访问,它是Shiro内置的一个拦截器org.apache.shiro.web.filter.authc.FormAuthenticationFilter -->
        <property name="filterChainDefinitions">
            <value>
                /statics/**=anon
                /login.html=anon
                /sys/schedule.html=perms[sys:schedule:save]
                /sys/login=anon
                /captcha.jpg=anon
                /**=authc
            </value>
        </property>
    </bean>
    <!-- Shiro生命周期处理器 -->
    <bean id="lifecycleBeanPostProcessor" class="org.apache.shiro.spring.LifecycleBeanPostProcessor"/>

    <!-- AOP式方法级权限检查  -->
    <bean class="org.springframework.aop.framework.autoproxy.DefaultAdvisorAutoProxyCreator" depends-on="lifecycleBeanPostProcessor">
        <property name="proxyTargetClass" value="true" />
    </bean>
    <!-- 开启shiro注解 -->
    <bean class="org.apache.shiro.spring.security.interceptor.AuthorizationAttributeSourceAdvisor">
        <property name="securityManager" ref="securityManager"/>
    </bean>
</beans>
转载地址:
https://blog.csdn.net/u013132051/article/details/54949632
-
- 具体的上面的代码注释已经解释的很清楚了,在这里主要讲解下filterChainDefinitions里面的设置属性。里面的value就是我们控制的页面权限设置。filterChainDefinitions的原则是按顺序查找一旦查找到符合的页面要求就不在继续查找了。所以我们需要将有通配符的页面设置在最后。上面配置中有