本来这门课程http://speech.ee.ntu.edu.tw/~tlkagk/courses_ML16.html 作业是用卷积神经网络做半监督学习,这个还没完全解决,于是先从基础的开始,用keras 实现cifar10。
以下是代码
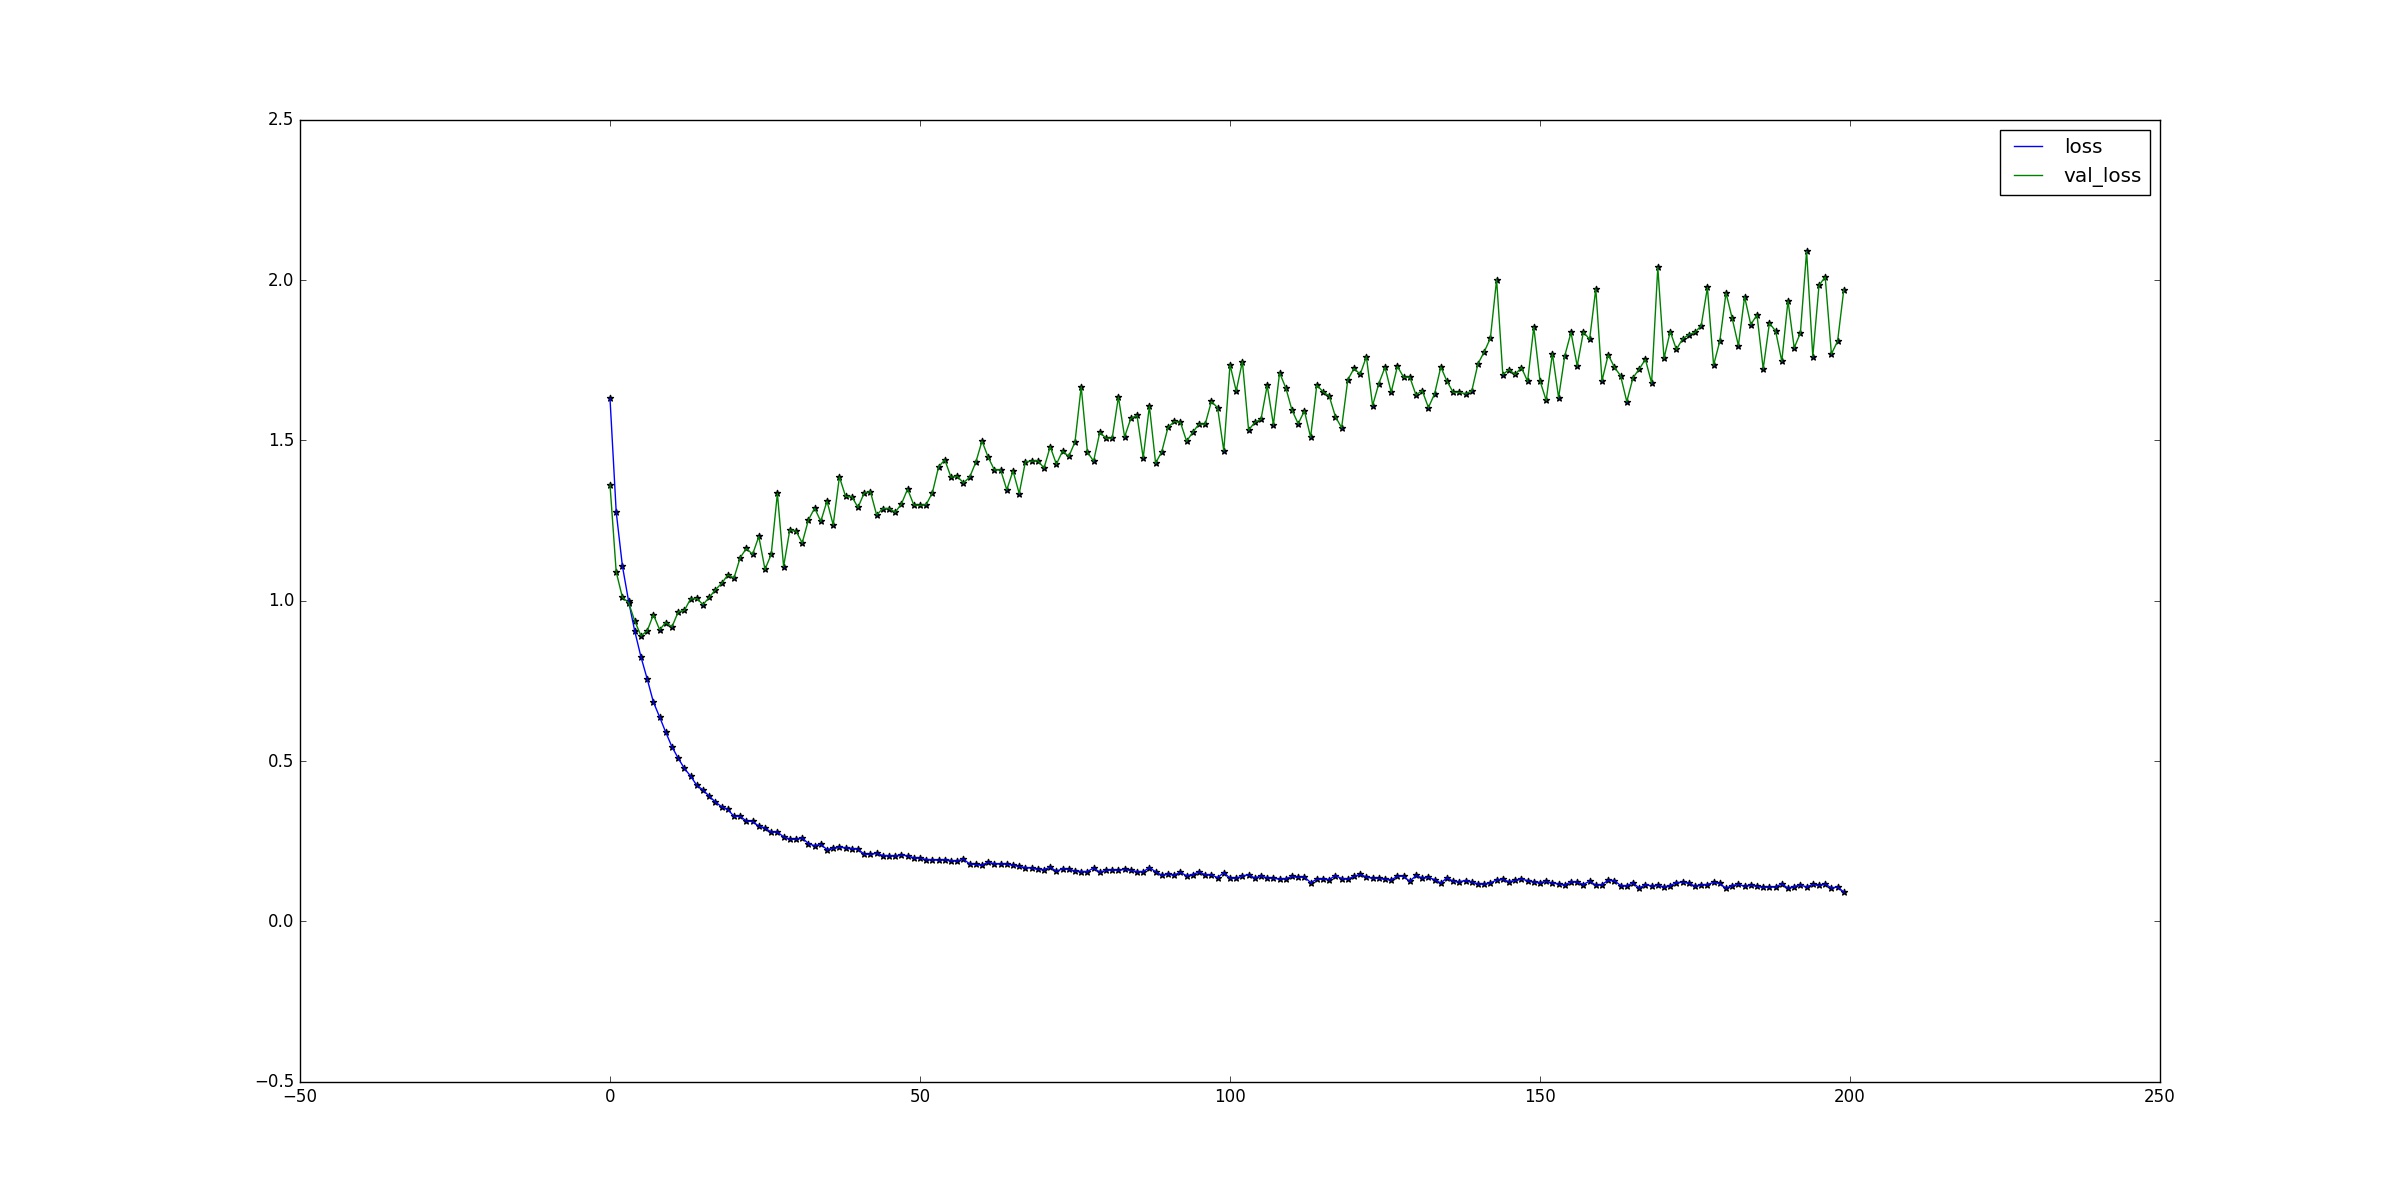
  1 # -*- coding: utf-8 -*-
  2 __author__ = 'Administrator'
  3
  4
  5 from keras.datasets import cifar10
  6 from keras.utils import np_utils
  7 from keras.models import Sequential
  8 from keras.layers import Convolution2D, MaxPooling2D
  9 from keras.layers import Dense, Dropout, Activation, Flatten
 10 from keras.optimizers import SGD
 11 from keras.preprocessing.image import ImageDataGenerator
 12 import matplotlib.pyplot as plt
 13
 14 # 下载数据
 15 (X_train, y_train), (X_test, y_test) = cifar10.load_data()
 16 print('X_train shape:', X_train.shape)
 17 print(X_train.shape[2], 'train samples')
 18
 19 #对训练和测试数据处理,转为float
 20 X_train = X_train.astype('float32')
 21 X_test = X_test.astype('float32')
 22 #对数据进行归一化到0-1 因为图像数据最大是255
 23 X_train /= 255
 24 X_test /= 255
 25
 26 #一共10类
 27 nb_classes = 10
 28
 29 # 将标签进行转换为one-shot
 30 Y_train = np_utils.to_categorical(y_train, nb_classes)
 31 Y_test = np_utils.to_categorical(y_test, nb_classes)
 32
 33 #搭建网络
 34 model = Sequential()
 35 # 2d卷积核,包括32个3*3的卷积核  因为X_train的shape是【样本数,通道数,图宽度,图高度】这样排列的,而input_shape不需要(也不能)指定样本数。
 36 model.add(Convolution2D(32, 3, 3, border_mode='same',
 37                         input_shape=X_train.shape[1:]))#指定输入数据的形状
 38 model.add(Activation('relu'))#激活函数
 39 model.add(Convolution2D(32, 3, 3))
 40 model.add(Activation('relu'))
 41 model.add(MaxPooling2D(pool_size=(2, 2)))                #maxpool
 42 model.add(Dropout(0.25))                                 #dropout
 43 model.add(Flatten())                                     #压扁平准备全连接
 44 #全连接
 45 model.add(Dense(512))                                    #添加512节点的全连接
 46 model.add(Activation('relu'))                           #激活
 47 model.add(Dropout(0.5))
 48 model.add(Dense(nb_classes))                             #添加输出10个节点
 49 model.add(Activation('softmax'))                         #采用softmax激活
 50
 51 #设定求解器
 52 sgd = SGD(lr=0.01, decay=1e-6, momentum=0.9, nesterov=True)
 53 model.compile(loss='categorical_crossentropy',
 54               optimizer=sgd,
 55               metrics=['accuracy'])
 56 #进行训练
 57 batch_size = 32
 58 nb_epoch = 200
 59 data_augmentation = False #是否数据扩充,主要针对样本过小方案
 60
 61 if not data_augmentation:
 62     print('Not using data augmentation.')
 63     result=model.fit(X_train, Y_train,
 64               batch_size=batch_size,
 65               nb_epoch=nb_epoch,
 66               validation_data=(X_test, Y_test),
 67               shuffle=True)
 68 else:
 69     print('Using real-time data augmentation.')
 70
 71     # this will do preprocessing and realtime data augmentation
 72     datagen = ImageDataGenerator(
 73         featurewise_center=False,  # set input mean to 0 over the dataset
 74         samplewise_center=False,  # set each sample mean to 0
 75         featurewise_std_normalization=False,  # divide inputs by std of the dataset
 76         samplewise_std_normalization=False,  # divide each input by its std
 77         zca_whitening=False,  # apply ZCA whitening
 78         rotation_range=0,  # randomly rotate images in the range (degrees, 0 to 180)
 79         width_shift_range=0.1,  # randomly shift images horizontally (fraction of total width)
 80         height_shift_range=0.1,  # randomly shift images vertically (fraction of total height)
 81         horizontal_flip=True,  # randomly flip images
 82         vertical_flip=False)  # randomly flip images
 83
 84     # compute quantities required for featurewise normalization
 85     # (std, mean, and principal components if ZCA whitening is applied)
 86     datagen.fit(X_train)
 87
 88     # fit the model on the batches generated by datagen.flow()
 89     result=model.fit_generator(datagen.flow(X_train, Y_train,
 90                         batch_size=batch_size),
 91                         samples_per_epoch=X_train.shape[0],
 92                         nb_epoch=nb_epoch,
 93                         validation_data=(X_test, Y_test))
 94
 95 #model.save_weights(weights,accuracy=False)
 96
 97 # 绘制出结果
 98 plt.figure
 99 plt.plot(result.epoch,result.history['acc'],label="acc")
100 plt.plot(result.epoch,result.history['val_acc'],label="val_acc")
101 plt.scatter(result.epoch,result.history['acc'],marker='*')
102 plt.scatter(result.epoch,result.history['val_acc'])
103 plt.legend(loc='under right')
104 plt.show()
105 plt.figure
106 plt.plot(result.epoch,result.history['loss'],label="loss")
107 plt.plot(result.epoch,result.history['val_loss'],label="val_loss")
108 plt.scatter(result.epoch,result.history['loss'],marker='*')
109 plt.scatter(result.epoch,result.history['val_loss'],marker='*')
110 plt.legend(loc='upper right')
111 plt.show()
以下是正确率和损失曲线