netlink特点
netlink socket创建流程
代码流程
关键函数
关键变量
相关函数
netlink bind绑定流程
代码流程
相关函数/宏定义
connect调用
代码流程
sendto & sendmsg
关键函数
wireshark 抓取netlink报文
netlink_recvmsg
关键函数
其他资料
/proc中netlink信息
netlink库libnl
netlink选项
netlink protocol
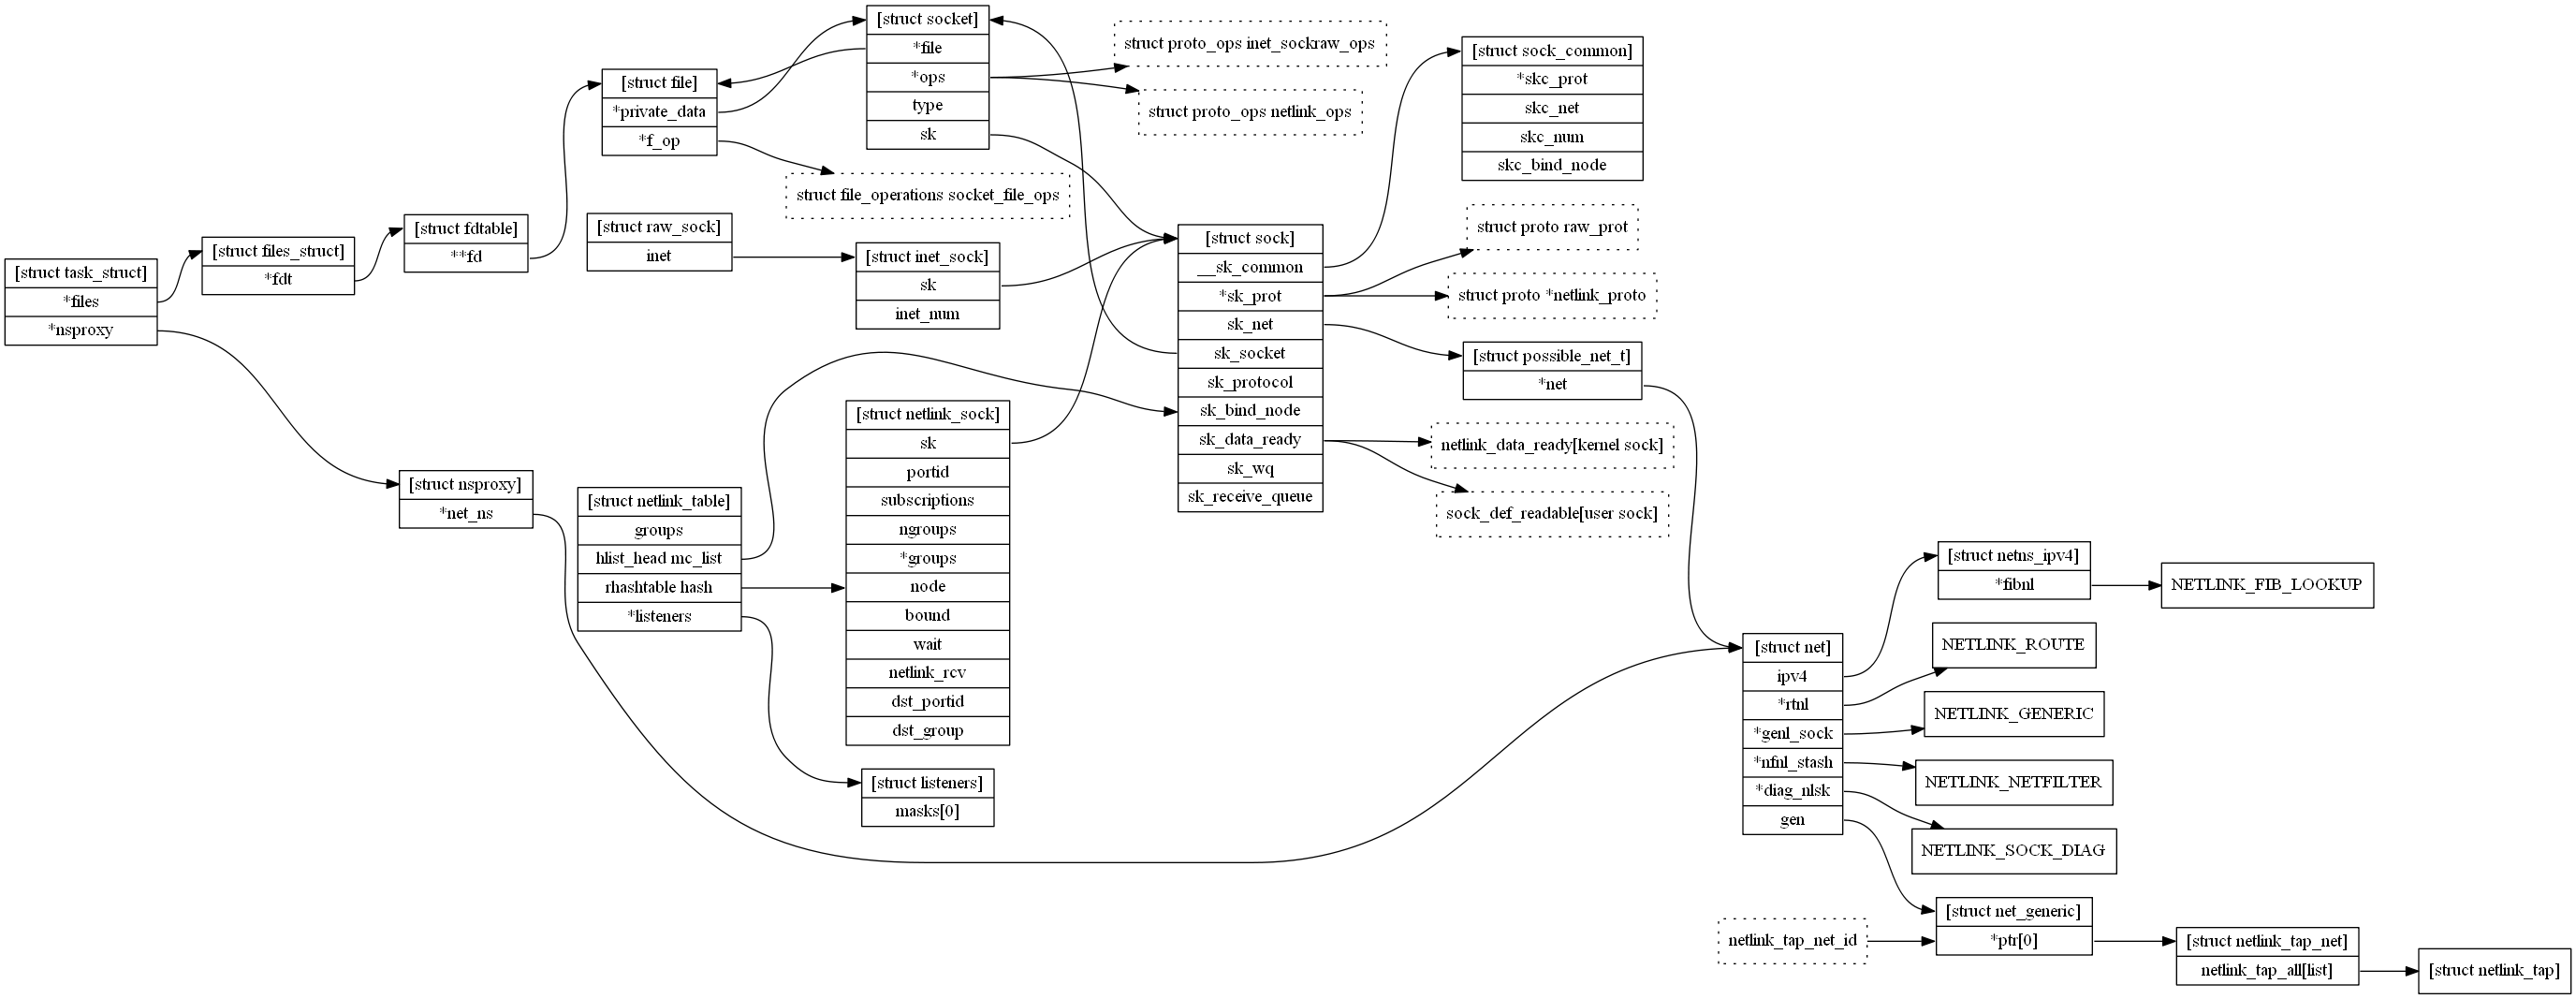
结构图
netlink特点
- 异步收发
- kernel可以主动发送
- 支持多播
netlink socket创建流程
代码流程
netlink socket可以在内核创建也可以在用户空间创建,内核通过netlink_kernel_create来创建,用户空间通过socket系统调用创建,这里重点关注socket系统调用实现
int socket(int domain, int type, int protocol);
SYSCALL_DEFINE3->__sys_socket->sock_create->__sock_create->netlink_create->__netlink_create
关键函数
__sock_create:分配socket内存。如果net_families中没有注册对应的family没有注册,则尝试加载对应的模块request_module("net-pf-%d", family)。接着通过pf->create(net, sock, protocol, kern)来实际调用inet_create进一步创建socket。inet_create:从inetsw中查找type相符合的协议,如果找不到则会尝试按照如下代码加载协议模块。对于raw场景,最终将inet_sockraw_ops和raw_prot初始化到socket和sock中。
request_module("net-pf-%d-proto-%d-type-%d", PF_INET, protocol, sock->type);
request_module("net-pf-%d-proto-%d", PF_INET, protocol);
inet->inet_num = protocol;
inet->inet_sport = htons(inet->inet_num)
err = sk->sk_prot->hash(sk);  //raw_hash_sk 其中会添加/proc/net/sockstat统计
err = sk->sk_prot->init(sk);  //raw_sk_init
PF_INET类型的socket创建时会走入inet_create,netlink socket的创建不会进入inet_create分支,而是进入netlink_create。此处顺便用于说明PF_INET类型的socket的创建流程。
netlink_create与__netlink_create
主要功能是校验参数,初始化nlk。简化代码如下:
if (sock->type != SOCK_RAW && sock->type != SOCK_DGRAM)
 return -ESOCKTNOSUPPORT;

if (protocol < 0 || protocol >= MAX_LINKS)
 return -EPROTONOSUPPORT;

#ifdef CONFIG_MODULES
if (!nl_table[protocol].registered) {
 request_module("net-pf-%d-proto-%d", PF_NETLINK, protocol);
}
#endif
if (nl_table[protocol].registered && try_module_get(nl_table[protocol].module))
 module = nl_table[protocol].module;
else
 err = -EPROTONOSUPPORT;
cb_mutex = nl_table[protocol].cb_mutex;
bind = nl_table[protocol].bind;
unbind = nl_table[protocol].unbind;

err = __netlink_create(net, sock, cb_mutex, protocol, kern);

nlk = nlk_sk(sock->sk);
nlk->module = module;
nlk->netlink_bind = bind;
nlk->netlink_unbind = unbind;__netlink_create简化逻辑如下:
sock->ops = &netlink_ops;

sk = sk_alloc(net, PF_NETLINK, GFP_KERNEL, &netlink_proto, kern);  // 设置sk->sk_net = net
if (!sk)
 return -ENOMEM;

sock_init_data(sock, sk);  //设置sock->sk = sk;

nlk = nlk_sk(sk);
if (cb_mutex) {
 nlk->cb_mutex = cb_mutex;
} else {
 nlk->cb_mutex = &nlk->cb_def_mutex;
 mutex_init(nlk->cb_mutex);
 lockdep_set_class_and_name(nlk->cb_mutex,
       nlk_cb_mutex_keys + protocol,
       nlk_cb_mutex_key_strings[protocol]);
}
init_waitqueue_head(&nlk->wait);

sk->sk_destruct = netlink_sock_destruct;
sk->sk_protocol = protocol;
关键变量
net_families
通过sock_register函数注册相关的协议,例如在netlink_proto_init函数中注册netlink_family_ops,其他如inet_family_ops、inet6_family_ops、unix_family_ops也在inet_init类似注册,例如:
static const struct net_proto_family netlink_family_ops = {
 .family = PF_NETLINK,
 .create = netlink_create,
 .owner = THIS_MODULE, /* for consistency 8) */
};创建socket的时候,在__sock_create中会按照如下代码进行分流
 pf = rcu_dereference(net_families[family]);
//省略.....
err = pf->create(net, sock, protocol, kern);inetsw_array和inetsw
inetsw_array为数组,inetsw为链表。inet_init函数中将inetsw_array中的协议注册到inetsw中。依据INET_PROTOSW_PERMANENT标识将协议分为两类,PERMANENT协议在链表的前半部,新插入的协议在PERMANENT协议和非PERMANENT协议之间。在inet_create函数中将依据套接字type进行分流。
static struct inet_protosw inetsw_array[] =
{
    {
        .type        = SOCK_STREAM,
        .protocol    = IPPROTO_TCP,
        .prot        = &tcp_prot,
        .ops        = &inet_stream_ops,
        .flags        = INET_PROTOSW_PERMANENT |
                  INET_PROTOSW_ICSK,
    },
/* 省略。。。。 */
    {
        .type        = SOCK_RAW,
        .protocol    = IPPROTO_IP, /* wild card */
        .prot        = &raw_prot,
        .ops        = &inet_sockraw_ops,
        .flags        = INET_PROTOSW_REUSE,
    }
};
nl_table
是一个以netlink类型为索引的数组(即以protocol为索引),数组中每个元素为struct netlink_table。主要通过__netlink_kernel_create来进行初始化。创建的内核netlink sock主要保存在net结构中(也有保存在其他结构中的),具体参考上面的结构图。
相关函数
inet_init:把相关协议注册到proto_list中,可以通过/proc/net/protocols来显示;inet_family_ops注册到net_families,用于创建套接字时依据family分流;将tcp_protocol等注册到inet_protos,用于接收数据包的时候,ip层向上分流接收的数据包;将inetsw_array中的协议注册到inetsw中,依据套接字的type分流。netlink_kernel_create
创建kernel netlink套接字,初始化netlink类型对应的nl_table。
sk = sock->sk;

if (!cfg || cfg->groups < 32)
 groups = 32;
else
 groups = cfg->groups;

listeners = kzalloc(sizeof(*listeners) + NLGRPSZ(groups), GFP_KERNEL);

sk->sk_data_ready = netlink_data_ready;
if (cfg && cfg->input)
 nlk_sk(sk)->netlink_rcv = cfg->input;

if (netlink_insert(sk, 0))
 goto out_sock_release;

nlk = nlk_sk(sk);
nlk->flags |= NETLINK_F_KERNEL_SOCKET;

nl_table[unit].groups = groups;
rcu_assign_pointer(nl_table[unit].listeners, listeners);
nl_table[unit].cb_mutex = cb_mutex;
nl_table[unit].module = module;
if (cfg) {
 nl_table[unit].bind = cfg->bind;
 nl_table[unit].unbind = cfg->unbind;
 nl_table[unit].flags = cfg->flags;
 if (cfg->compare)
  nl_table[unit].compare = cfg->compare;
}
nl_table[unit].registered = 1;
netlink bind绑定流程
代码流程
通过bind系统调用只能绑定到32个多播group,通过NETLINK_ADD_MEMBERSHIP套接字选项则可以绑定到更多的group。
SYSCALL_DEFINE3->__sys_bind->netlink_bind
- 通过
netlink_realloc_groups分配内存,按照nl_table[sk->sk_protocol].groups初始化nlk->ngroups和nlk->groups。 - 通过
nlk->netlink_bind来按照bit逐个绑定对应的多播group。 nladdr->nl_pid ? netlink_insert(sk, nladdr->nl_pid) : netlink_autobind(sock)绑定portid。- 通过
netlink_update_subscriptions来更新nl_table[sk->sk_protocol].mc_list。 - 通过
netlink_update_listeners来更新tbl->listeners->masks。
相关函数/宏定义
NLGRPSZ和NLGRPLONGS:参与入参x,当1<=x<=64的时候,NLGRPSZ为8,NLGRPLONGS为1,当65<=x<=128的时候,NLGRPSZ为16,NLGRPLONGS为2。netlink_realloc_groups:对nl_table[sk->sk_protocol].groups按照64bit对齐向上取整,分配对应的bit数,分配的bit数保存到nlk->groups,地址保存到nlk->ngroups。netlink_insert:将nlk_sk(sk)->node插入到nl_table[sk->sk_protocol].hash中,其中hash key为(sock_net(sk), nlk_sk(sk)->portid)组合成的参数netlink_compare_arg。netlink_autobind:首先尝试以进程id(PIDTYPE_TGID)来绑定sk,如果冲突失败的话,则在[S32_MIN, -4097]之间通过一些随机算法来绑定sk。虽然是按照负数来查找portid,但是
nlk_sk(sk)->portid实际是按照u32保存的。netlink_update_subscriptions:依据当前sk是否订阅多播,将当前sk添加到nl_table[sk->sk_protocol].mc_list,或者从其中删除。
 if (nlk->subscriptions && !subscriptions)
  __sk_del_bind_node(sk);
 else if (!nlk->subscriptions && subscriptions)
  sk_add_bind_node(sk, &nl_table[sk->sk_protocol].mc_list);
nlk->subscriptions = subscriptions;netlink_update_listeners:遍tbl->listeners历nl_table[sk->sk_protocol].mc_list,将监听的多播group进行二进制或操作,保存到tbl->listeners->masks中。
 struct netlink_table *tbl = &nl_table[sk->sk_protocol];
 unsigned long mask;
 unsigned int i;
 struct listeners *listeners;

 listeners = nl_deref_protected(tbl->listeners);
 if (!listeners)
  return;

 for (i = 0; i < NLGRPLONGS(tbl->groups); i++) {
  mask = 0;
  sk_for_each_bound(sk, &tbl->mc_list) {
   if (i < NLGRPLONGS(nlk_sk(sk)->ngroups))
    mask |= nlk_sk(sk)->groups[i];
  }
  listeners->masks[i] = mask;
 }
connect调用
代码流程
__sys_connect->netlink_connect
netlink_connect主要逻辑如下:
- 传入AF_UNSPEC可以撤销之前connect的操作。
- 如果之前没有bind,则调用
netlink_autobind来自动绑定。 - 初始化
nlk->dst_portid和nlk->dst_group
if (addr->sa_family == AF_UNSPEC) {
 sk->sk_state = NETLINK_UNCONNECTED;
 nlk->dst_portid = 0;
 nlk->dst_group  = 0;
 return 0;
}

if (!nlk->bound)
 err = netlink_autobind(sock);

if (err == 0) {
 sk->sk_state = NETLINK_CONNECTED;
 nlk->dst_portid = nladdr->nl_pid;
 nlk->dst_group  = ffs(nladdr->nl_groups);  //ffs返回二进制最后一位的位数,比如二进制1101 0000,ffs结果为5
}
sendto & sendmsg
__sys_sendto->sock_sendmsg->netlink_sendmsg
struct sock *sk = sock->sk;
struct netlink_sock *nlk = nlk_sk(sk);
DECLARE_SOCKADDR(struct sockaddr_nl *, addr, msg->msg_name);
struct scm_cookie scm;
u32 netlink_skb_flags = 0;

err = scm_send(sock, msg, &scm, true);

if (msg->msg_namelen) {
    dst_portid = addr->nl_pid;
    dst_group = ffs(addr->nl_groups);
    netlink_skb_flags |= NETLINK_SKB_DST;
} else {
    dst_portid = nlk->dst_portid;
    dst_group = nlk->dst_group;
}

if (!nlk->bound) {
    err = netlink_autobind(sock);
} else {
    /* Ensure nlk is hashed and visible. */
    smp_rmb();
}

skb = netlink_alloc_large_skb(len, dst_group);
NETLINK_CB(skb).portid    = nlk->portid;
NETLINK_CB(skb).dst_group = dst_group;
NETLINK_CB(skb).creds    = scm.creds;
NETLINK_CB(skb).flags    = netlink_skb_flags;

err = -EFAULT;
if (memcpy_from_msg(skb_put(skb, len), msg, len)) {
    kfree_skb(skb);
    goto out;
}

if (dst_group) {
    refcount_inc(&skb->users);
    netlink_broadcast(sk, skb, dst_portid, dst_group, GFP_KERNEL);
}
err = netlink_unicast(sk, skb, dst_portid, msg->msg_flags&MSG_DONTWAIT);- 通过
scm_send获取cred - 如果通过
msg->msg_name传递了目的端地址,则使用该目的地址,否则使用connect设定的目的地址(没有调用connect的话,默认dst_portid和dst_group应该是0)。 - 如果之前没有绑定过,则通过
netlink_autobind来自动绑定。 - 分配skb,并copy要发送的数据到skb中。
- 如果指定了多播,则调用
netlink_broadcast来广播。 - 通过
netlink_unicast来发送单播消息。
- 广播:netlink_broadcast->netlink_broadcast_filtered->do_one_broadcast->netlink_broadcast_deliver->__netlink_sendskb
- 单播:netlink_unicast
- 通过
netlink_getsockbyportid来查找目的sk。该函数依据发送消息的目的portid和net,从nl_table[protocol].hash中查找目的sk,如果目的sk的状态是NETLINK_CONNECTED,则目的sk的nlk->dst_portid需要与发送端的nlk_sk(ssk)->portid相等才行。 - 如果查找到的目的sk为内核创建的sk,则调用
netlink_unicast_kernel发送报文到内核,netlink_unicast_kernel中实际调用nlk->netlink_rcv钩子函数来处理,另外还会通过netlink_deliver_tap_kernel函数将发往内核netlink的报文发送到nlmon虚拟设备上,以支持wireshark抓包。 - 调用
netlink_attachskb来进行超时等待,如果发送端是kernel netlink,对端拥塞的时候,直接给对端标记错误。如果发送端是用户netlink,对端拥塞且设置了套接字的超时参数,则把当前进程添加到nlk->wait等待队列中。 - 最后调用
netlink_sendskb来把报文发送给对端的netlink,实际与广播发送的路径一致,都是调用__netlink_sendskb。
关键函数
scm_send:传递fd或者creds,其中在netlink场景下仅能传递creds,不能传递fd。在unix socket下可以传递套接字。__netlink_sendskb: 将skb添加到sk->sk_receive_queue队列尾部,并调用sk->sk_data_ready唤醒等待队列sk->sk_wq中的进程。内核创建的netlink只接收单播,不接收广播。do_one_broadcast: 还会有一些异常处理,拥塞控制等。比如当前(&sk->sk_rmem_alloc) > (sk->sk_rcvbuf >> 1),则处于拥塞状态,会通过yield()让出运行权。netlink_deliver_tap:由__netlink_sendskb和netlink_deliver_tap_kernel调用,用于wireshark通过nlmon模块抓取netlink报文。nlk->wait和sk->sk_wq区别:如果发送的时候对端拥塞,发送端阻塞在nlk->wait,如果接收的时候缓存中没有数据,接收方阻塞在sk->sk_wq
wireshark 抓取netlink报文
modprobe nlmon; ip link add type nlmon; ip link set nlmon0 up
参考:https://gitlab.com/wireshark/wireshark/-/wikis/Protocols/netlink
netlink_recvmsg
    skb = skb_recv_datagram(sk, flags, noblock, &err);
    if (skb == NULL)
        goto out;

    // 省略:拷贝skb数据到入参msg中
    if (nlk->flags & NETLINK_F_RECV_PKTINFO)
        // 拷贝NETLINK_CB(skb).dst_group到cmsg
        netlink_cmsg_recv_pktinfo(msg, skb);
    if (nlk->flags & NETLINK_F_LISTEN_ALL_NSID)
        // 拷贝NETLINK_CB(skb).nsid到cmsg
        netlink_cmsg_listen_all_nsid(sk, msg, skb);

    if (nlk->cb_running &&
        atomic_read(&sk->sk_rmem_alloc) <= sk->sk_rcvbuf / 2) {
        ret = netlink_dump(sk);
        if (ret) {
            sk->sk_err = -ret;
            sk->sk_error_report(sk);
        }
    }

    scm_recv(sock, msg, &scm, flags);
out:
    netlink_rcv_wake(sk);
关键函数
skb_recv_datagram: 尝试从sk->sk_receive_queue中获取skb数据,如果当前接收队列中没有数据,则可以跟进超时设置,把当前进程阻塞在sk->sk_wq中。
其他资料
/proc中netlink信息
/proc/net/netlink对应netlink_seq_show,实际遍历nl_table[iter->link].hash
netlink库libnl
地址:http://www.infradead.org/~tgr/libnl/
git:https://github.com/tgraf/libnl
其中libnl-utils提供了netlink的细分功能
netlink选项
#define NETLINK_ADD_MEMBERSHIP  1
#define NETLINK_DROP_MEMBERSHIP  2
#define NETLINK_PKTINFO   3
#define NETLINK_BROADCAST_ERROR  4
#define NETLINK_NO_ENOBUFS  5
#ifndef __KERNEL__
#define NETLINK_RX_RING   6
#define NETLINK_TX_RING   7
#endif
#define NETLINK_LISTEN_ALL_NSID  8
#define NETLINK_LIST_MEMBERSHIPS 9
#define NETLINK_CAP_ACK   10
#define NETLINK_EXT_ACK   11
#define NETLINK_GET_STRICT_CHK  12
netlink protocol
#define NETLINK_ROUTE  0 /* Routing/device hook    */
#define NETLINK_UNUSED  1 /* Unused number    */
#define NETLINK_USERSOCK 2 /* Reserved for user mode socket protocols  */
#define NETLINK_FIREWALL 3 /* Unused number, formerly ip_queue  */
#define NETLINK_SOCK_DIAG 4 /* socket monitoring    */
#define NETLINK_NFLOG  5 /* netfilter/iptables ULOG */
#define NETLINK_XFRM  6 /* ipsec */
#define NETLINK_SELINUX  7 /* SELinux event notifications */
#define NETLINK_ISCSI  8 /* Open-iSCSI */
#define NETLINK_AUDIT  9 /* auditing */
#define NETLINK_FIB_LOOKUP 10
#define NETLINK_CONNECTOR 11
#define NETLINK_NETFILTER 12 /* netfilter subsystem */
#define NETLINK_IP6_FW  13
#define NETLINK_DNRTMSG  14 /* DECnet routing messages */
#define NETLINK_KOBJECT_UEVENT 15 /* Kernel messages to userspace */
#define NETLINK_GENERIC  16
/* leave room for NETLINK_DM (DM Events) */
#define NETLINK_SCSITRANSPORT 18 /* SCSI Transports */
#define NETLINK_ECRYPTFS 19
#define NETLINK_RDMA  20
#define NETLINK_CRYPTO  21 /* Crypto layer */
#define NETLINK_SMC  22 /* SMC monitoring */

#define NETLINK_INET_DIAG NETLINK_SOCK_DIAG

#define MAX_LINKS 32