1.textview 组件文本实现替换(快速实现字符资源的调用)
android 应用资源位置在 project(工程名)--->app--->res--->values

在strings.xml文件中进行相关设置,即可快速修改textview组件的文本内容

2.textview 组件字体大小修改(调用字符大小设置资源dimen.xml)
<1>首先在project(工程名)--->app--->res--->values目录下新建dimen.xml

<2>然后在activity_main.xml文件中设置对应关系

3.textview 组件字体颜色修改
<1>首先在project(工程名)--->app--->res--->values目录下调用colors.xml
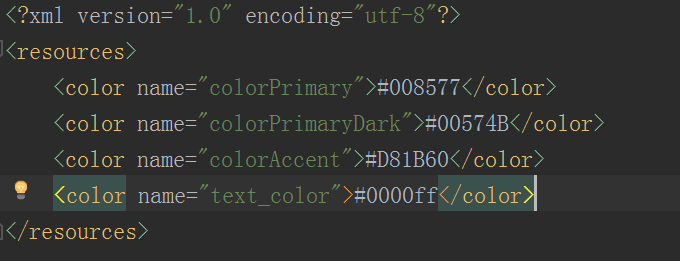
<2>然后在activity_main.xml文件中设置对应关系

5.关于android布局属性tools:context最通俗的解释
一般在根布局文件中会出现 tools:context = 某个activity名称。
这个属性的意思是:如果你在AndroidManifest.xml文件中为某个activity设置了Theme样式,那么,一般情况下,你在layout布局里面是无法直接看到这个效果的。因为一份layout布局可以提供给很多个activity用,layout无法知道自己提供给了哪个activity,而这个activity又设置了怎样的样式。所以,我们要为layout设置这样一个属性,来告诉layout当前提供给了哪个activity使用,从而实时显示这个activity所设置的样式效果(如果有)。
也就是,layout ----> activity ---->Theme,建立起了链接。否则,即使你为activity设置了样式,你的layout布局文件也是不知道的。
6.背景颜色设置
android:background="#fffff0"
注意:区别前景与背景的不同
   <!--android:background="#ff00" 设置背景颜色-->
    <!--android:src="@mipmap/ic_launcher" 设置前景图片-->
    <ImageButton
        android:src="@mipmap/ic_launcher"
        android:background="#ff00"
        android:layout_width="match_parent"
        android:layout_height="wrap_content" />
效果图:
红色为背景,Android图标为前景。

7.设置ImageView图片控件布满整个屏幕
(1)xml文件设置(方式1)
android:scaleType="fitXY"
(2)java后台设置
iv_pic.setScaleType(ImageView.ScaleType.FIT_XY); //设置图片的缩放方式,宽高填充父控件
(3)使得图片自适应imageview的大小(通过裁减的方式)
<ImageView
        android:src="@mipmap/image_demo"
        android:scaleType="centerCrop"
        android:layout_width="100dp"
        android:layout_height="60dp" />
效果图:
8.组件的嵌套模板
<android.support.v7.widget.Toolbar
        android:id="@+id/toolbar"
        android:layout_width="match_parent"
        android:layout_height="wrap_content"
        android:background="?attr/colorPrimary"
        android:minHeight="?attr/actionBarSize"
        android:theme="?attr/actionBarTheme">

        <TextView
            android:id="@+id/textView"
            android:layout_width="wrap_content"
            android:layout_height="wrap_content"
            android:layout_gravity="center"
            android:text="TextView" />
    </android.support.v7.widget.Toolbar>
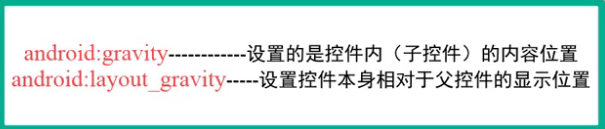
注意:android:layout_gravity="center" 这句代码实现了子容器在父容器内居中的效果
9.子容器放置于父容器的底部
app:layout_constraintBottom_toBottomOf="parent"
10. 组件常用的width(宽度)、height(高度)设置
wrap_content 自适应大小,将强制性地使视图扩展以显示全部内容。以TextView和ImageView控件为例,设置为wrap_content将完整显示其内部的文本和图像。布局元素将根据内容更改大小。
match_parent 将强制性地使构件扩展,以填充布局单元内尽可能多的空间
11.设置多个按钮在页面居中
<LinearLayout
        android:layout_width="match_parent"
        android:layout_height="wrap_content"
        android:gravity="center_horizontal"
        android:orientation="horizontal">

        <Button
            android:id="@+id/btRg_exit"
            android:layout_width="wrap_content"
            android:layout_height="wrap_content"
            android:text="退出" />

        <Button
            android:id="@+id/btRg_submit"
            android:layout_width="wrap_content"
            android:layout_height="wrap_content"
            android:text="提交"
            android:layout_marginLeft="20dp"/>

    </LinearLayout>
android:gravity="center_horizontal" //这句的作用:设置该线性布局内的组件居中(即设置子容器在父容器内居中)
android:layout_marginLeft="20dp" //这句的作用:设置组件与组件的间距(也可以设置子容器距离父容器的左边距,这样可以实现页面垂直方向对齐的效果)
<TextView
        android:layout_width="wrap_content"
        android:layout_height="wrap_content"
        android:text="您的手机防盗卫士:"
        android:gravity="center_vertical"                               //设置textview控件中的文字垂直方向上居中
        android:drawableLeft="@android:drawable/star_big_on"            //在textview控件中放置一张图片,该图片位于文字的左边
        android:textColor="#000"
        android:layout_margin="5dp"
        android:textSize="18dp" />
12.让listview控件占满页面的剩余部分
<!--让listview占满页面的剩余部分-->
    <ListView
        android:layout_width="match_parent"
        android:layout_height="0dp"
        android:layout_weight="1">

    </ListView>
将android:layout_height这个属性设置为0dp 且android:layout_weight="1" 即可实现需求。
注意:
layout_weight(权重):剩余空间的分配规则。
layout_weight 用于给一个线性布局中的诸多视图的重要度赋值。所有的视图都有一个layout_weight值,默认为零,意思是需要显示多大的视图就占据多大的屏幕空 间。若赋一个高于零的值,则将父视 图中的可用空间分割,分割大小具体取决于每一个视图的layout_weight 值以及该值在当前屏幕布局的整体 layout_weight值和在其它视图屏幕布局的layout_weight值中所占的比率而定。
13.将checkbox这个控件设置为无法选中状态
android:clickable="false"
android:focusableInTouchMode="false"
android:focusable="false"
以上3行设置checkbox为无法选中状态
<CheckBox
        android:id="@+id/cb_process_manager"
        android:layout_alignParentRight="true"
        android:layout_centerVertical="true"
        android:clickable="false"
        android:focusableInTouchMode="false"
        android:focusable="false"
        android:layout_width="wrap_content"
        android:layout_height="wrap_content" />