由于MyBatis属于一种半自动的ORM框架,所以主要的工作将是书写Mapping映射文件,但是由于手写映射文件很容易出错,mybatis-gennerator插件帮我们自动生成mybatis所需要的dao、bean、mapper xml文件。
这里主要通过eclipse工具,来讲解实现;
1、建表语句
CREATE TABLE `user` (
  `id` int(11) NOT NULL AUTO_INCREMENT,
  `name` varchar(100) DEFAULT NULL,
  PRIMARY KEY (`id`)
) ENGINE=InnoDB AUTO_INCREMENT=3 DEFAULT CHARSET=utf8;
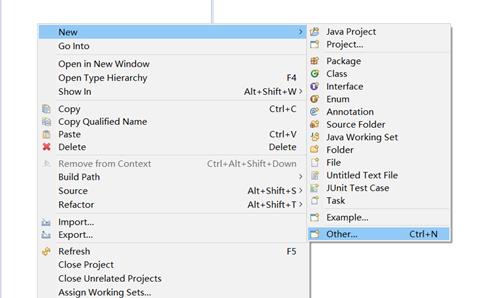
2、新建测试工程

选择maven工程

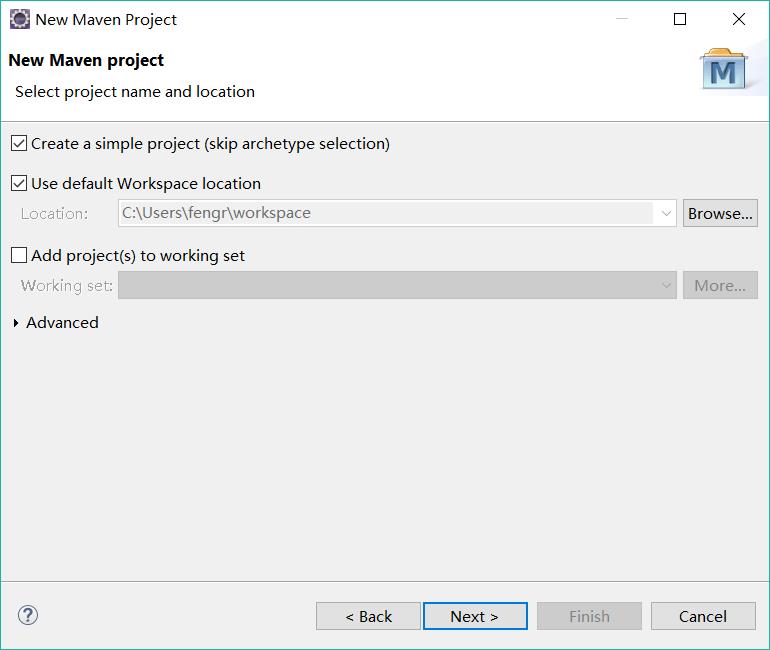
选择create a simple project就行

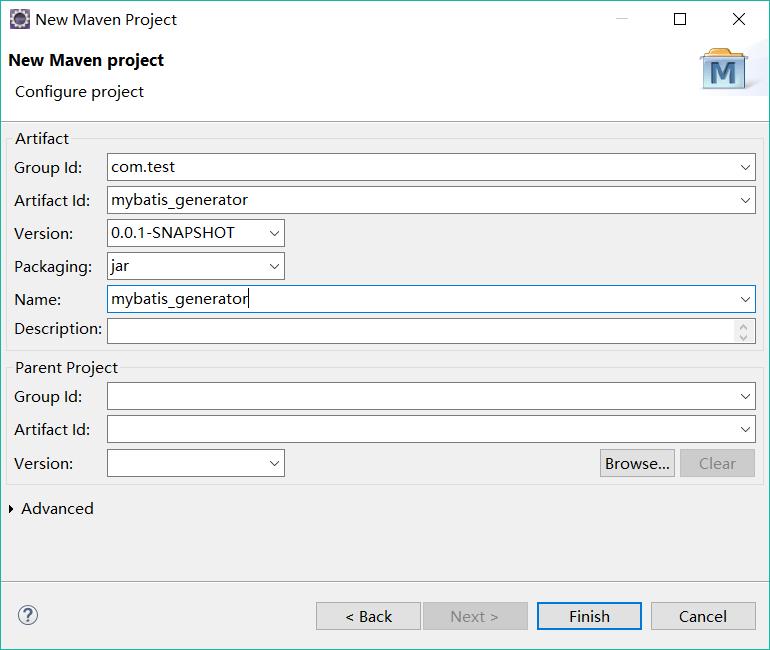
点击finish,测试项目就建完了
3、在maven配置文件pom.xml中添加依赖
<project xmlns="http://maven.apache.org/POM/4.0.0" xmlns:xsi="http://www.w3.org/2001/XMLSchema-instance" xsi:schemaLocation="http://maven.apache.org/POM/4.0.0 http://maven.apache.org/xsd/maven-4.0.0.xsd">
  <modelVersion>4.0.0</modelVersion>
  <groupId>com.test</groupId>
  <artifactId>mybatis_generator</artifactId>
  <version>0.0.1-SNAPSHOT</version>
  <name>mybatis_generator</name>

  <properties>
        <project.build.sourceEncoding>UTF-8</project.build.sourceEncoding>
    </properties>

    <dependencies>
        <dependency>
            <groupId>mysql</groupId>
            <artifactId>mysql-connector-java</artifactId>
            <version>5.1.35</version>
        </dependency>
        <dependency>
            <groupId>org.mybatis.generator</groupId>
            <artifactId>mybatis-generator-core</artifactId>
            <version>1.3.2</version>
        </dependency>
    </dependencies>
    <build>
        <pluginManagement>
            <plugins>
                <plugin>
                    <groupId>org.apache.maven.plugins</groupId>
                    <artifactId>maven-compiler-plugin</artifactId>
                    <configuration>
                        <source>1.7</source>
                        <target>1.7</target>
                    </configuration>
                    <version>3.3</version>
                </plugin>
                <plugin>
                    <groupId>org.mybatis.generator</groupId>
                    <artifactId>mybatis-generator-maven-plugin</artifactId>
                    <version>1.3.2</version>
                    <dependencies>
                        <dependency>
                            <groupId>mysql</groupId>
                            <artifactId>mysql-connector-java</artifactId>
                            <version>5.1.35</version>
                        </dependency>
                    </dependencies>
                    <configuration>
                         <!--配置文件的路径-->
                         <configurationFile>${basedir}/src/main/resources/generatorConfig.xml</configurationFile>
                        <overwrite>true</overwrite>
                    </configuration>
                </plugin>
            </plugins>
        </pluginManagement>
    </build>
</project>
4、在resources下,创建一个generatorConfig.xml配置文件
<?xml version="1.0" encoding="UTF-8"?>
<!DOCTYPE generatorConfiguration
  PUBLIC "-//mybatis.org//DTD MyBatis Generator Configuration 1.0//EN"
  "http://mybatis.org/dtd/mybatis-generator-config_1_0.dtd">
<generatorConfiguration>
    <context id="test" targetRuntime="MyBatis3">
        <plugin type="org.mybatis.generator.plugins.EqualsHashCodePlugin"></plugin>
        <plugin type="org.mybatis.generator.plugins.SerializablePlugin"></plugin>
         <plugin type="org.mybatis.generator.plugins.ToStringPlugin"></plugin>
        <commentGenerator>
            <!-- 这个元素用来去除指定生成的注释中是否包含生成的日期 false:表示保护 -->
            <!-- 如果生成日期,会造成即使修改一个字段,整个实体类所有属性都会发生变化,不利于版本控制,所以设置为true -->
            <property name="suppressDate" value="true" />
            <!-- 是否去除自动生成的注释 true:是 : false:否 -->
            <property name="suppressAllComments" value="false" />
        </commentGenerator>
        <!--数据库链接URL,用户名、密码 -->
        <jdbcConnection driverClass="com.mysql.jdbc.Driver"
            connectionURL="jdbc:mysql://localhost/mytest" userId="root" password="123456">
            </jdbcConnection>
        <javaTypeResolver>
            <!-- This property is used to specify whether MyBatis Generator should
                force the use of java.math.BigDecimal for DECIMAL and NUMERIC fields, -->
            <property name="forceBigDecimals" value="false" />
        </javaTypeResolver>
        <!-- 生成模型的包名和位置 -->
        <javaModelGenerator targetPackage="com.test.pojo"
            targetProject="target">
            <property name="enableSubPackages" value="true" />
            <property name="trimStrings" value="true" />
        </javaModelGenerator>
        <!-- 生成映射文件的包名和位置 -->
        <sqlMapGenerator targetPackage="com.test.mapping"
            targetProject="target">
            <property name="enableSubPackages" value="true" />
        </sqlMapGenerator>
        <!-- 生成DAO的包名和位置 -->
        <javaClientGenerator type="XMLMAPPER"
            targetPackage="com.test.dao" implementationPackage="com.test.dao.impl"  targetProject="target">
            <property name="enableSubPackages" value="true" />
        </javaClientGenerator>

        <!-- 要生成哪些表 -->
        <table tableName="user" domainObjectName="user"
            enableCountByExample="false" enableUpdateByExample="false"
            enableDeleteByExample="false" enableSelectByExample="false"
            selectByExampleQueryId="false"></table>
    </context>
</generatorConfiguration>
5、下载maven依赖包,update project

这个要稍微等一下,需要时间~~~
6、执行mybatis-generator:generate命令,生成文件(注意命令不要拼写错哟)


在控制台 显示 build success,说明已经成功了:

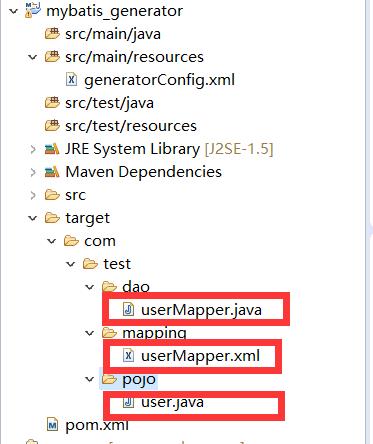
7、在项目上F5刷新,target目录下呢就会出现对应的文件

这是想要的文件自动生成了。
github项目地址:https://github.com/JsonShare/mybatis_generator.git
