二、路由系统
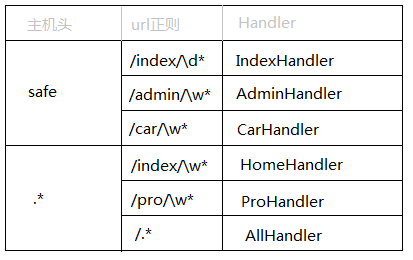
路由系统其实就是 url 和 类 的对应关系,这里不同于其他框架,其他很多框架均是 url 对应 函数,Tornado中每个url对应的是一个类。
#!/usr/bin/env python
# -*- coding:utf-8 -*-

import tornado.ioloop
import tornado.web


class MainHandler(tornado.web.RequestHandler):
    def get(self):
        self.write("Hello, world")


class WorkHanlder(tornado.web.RequestHandler):
    def get(self,page):
     self.write(page)


class StoryHandler(tornado.web.RequestHandler):
    def get(self, story_id):
        self.write("You requested the story " + story_id)


class BuyHandler(tornado.web.RequestHandler):
    def get(self):
        self.write("buy.wupeiqi.com/index")


application = tornado.web.Application([
    (r"/index", MainHandler),
    (r"/story/([0-9]+)", StoryHandler),
   (r"/work/(?P<page>d*)",WorkHanlder),
])


application.add_handlers('buy.wupeiqi.com$', [
    (r'/index',BuyHandler),
])


if __name__ == "__main__":
    application.listen(80)
    tornado.ioloop.IOLoop.instance().start()
分页(一页显示五条内容,每页显示11个页码)


#!/usr/bin/env python
# -*- coding:utf-8 -*-
import tornado.web
import tornado.ioloop
from work.controller import work

settings={
    "template_path":"tpl",
}

application = tornado.web.Application([
    (r"/work/(?P<page>d*)",work.WorkHanlder),
],**settings)

if __name__ == "__main__":
    application.listen(8888)
    tornado.ioloop.IOLoop.instance().start()
#!/usr/bin/env python
# -*- coding:utf-8 -*-
import tornado.web
list_all = ["ssdfsdgsdsgfdf",]
for i in range(100):
    list_all.append("123士大夫是的覅是公司的")
class WorkHanlder(tornado.web.RequestHandler):
    def get(self,page):   #page指的是当前页
        list_asd = []
        try:
            page = int(page)  #如果在浏览器上输入的值为整型则正常转
        except:
            page = 1          #如果输入的值不是int型的,则默认为第一页
        start = (page - 1)*5   #内容的开始取值范围
        end = page*5           #内容的结束取值范围
        list = list_all[start:end] #根据当前页的页码,获取相应页码的内容
        all_page ,c = divmod(len(list_all),5) #每页的内容设置为5,超出时下一页显示
        if c>0:
            all_page+= 1        # 如果余数大于0,说明还需要另一页来显示
        if all_page < 11:       #设置一页显示11个页码  如果总页数为小于11的话,无论点那一页默认显示全部
            s = 1               #页码开始为1
            t = all_page        #页码结束为总页码
        else:                #我们设置格式为显示前5后5
            if page < 6:        #当页码大于11的时候,又分当前页码如果小于6时,显示1-12的页码
                s = 1
                t = 12
            else:              #页码大于11且当前页码大于6时又分下面俩种
                if all_page > page +5 :    #
                    s = page - 5
                    t = page + 5 + 1
                else:
                    s = all_page - 11
                    t = all_page + 1
        for p in range(s,t):
            if p == page:
                temp = "<a href='/work/%s' style='color:red'>%s</a>"%(p,p)
            else:
                temp = "<a href='/work/%s'>%s</a>"%(p,p)
            list_asd.append(temp)
        st = "".join(list_asd)
        self.render("work.html",list_show = list ,list_page =st,)

    def post(self, *args, **kwargs):
        pass
<!DOCTYPE html>
<html lang="en">
<head>
    <meta charset="UTF-8">
    <title>Title</title>
</head>
<body>
{% for item in list_show %}
<h3>{{ item }}</h3>
{% end %}

{% raw list_page %}
</body>
</html>
css文件和js文件的引入方式
<link rel="stylesheet" href="{{static_url('chouti.css')}}">
<script src="{{static_url('jquery-1.9.1.min.js')}}"></script>
Tornado中原生支持二级域名的路由,如:
三、模板引擎
Tornao中的模板语言和django中类似,模板引擎将模板文件载入内存,然后将数据嵌入其中,最终获取到一个完整的字符串,再将字符串返回给请求者。
Tornado 的模板支持“控制语句”和“表达语句”,控制语句是使用 {% 和 %} 包起来的 例如 {% if len(items) > 2 %}。表达语句是使用 {{ 和 }} 包起来的
,例如 {{ items[0] }}。
控制语句和对应的 Python 语句的格式基本完全相同。我们支持 if、for、while 和 try,这些语句逻辑结束的位置需要用 {% end %} 做标记。还通过 extends 和 block 语句实现了模板继承。这些在 template 模块 的代码文档中有着详细的描述。
注:在使用模板前需要在setting中设置模板路径:"template_path" : "tpl"
1、基本使用
#!/usr/bin/env python
# -*- coding:utf-8 -*-

import tornado.ioloop
import tornado.web


class MainHandler(tornado.web.RequestHandler):
    def get(self):
        self.render("index.html", list_info = [11,22,33])

application = tornado.web.Application([
    (r"/index", MainHandler),
])


if __name__ == "__main__":
    application.listen(8888)
    tornado.ioloop.IOLoop.instance().start()
<!DOCTYPE html>
<html>
<head>
    <meta http-equiv="Content-Type" content="text/html; charset=UTF-8"/>
    <title>老男孩</title>
    <link href="{{static_url("css/common.css")}}" rel="stylesheet" />
</head>
<body>

    <div>
        <ul>
            {% for item in list_info %}
                <li>{{item}}</li>
            {% end %}
        </ul>
    </div>

    <script src="{{static_url("js/jquery-1.8.2.min.js")}}"></script>

</body>
</html>
在模板中默认提供了一些函数、字段、类以供模板使用:

escape: tornado.escape.xhtml_escape 的別名
xhtml_escape: tornado.escape.xhtml_escape 的別名
url_escape: tornado.escape.url_escape 的別名
json_encode: tornado.escape.json_encode 的別名
squeeze: tornado.escape.squeeze 的別名
linkify: tornado.escape.linkify 的別名
datetime: Python 的 datetime 模组
handler: 当前的 RequestHandler 对象
request: handler.request 的別名
current_user: handler.current_user 的別名
locale: handler.locale 的別名
_: handler.locale.translate 的別名
static_url: for handler.static_url 的別名
xsrf_form_html: handler.xsrf_form_html 的別名
2、母版
内容的引入:
在母版的body块中写--------------->{% block body %}{% end %}
在子版中写------------------------{% extends 'layout.html'%} ---------->导入母版
-----------------------------------{% block body %}---------------------->格式
-----------------------------------<h1>work</h1>------------------------>内容
-----------------------------------{% end %}------------------------------>格式
<!DOCTYPE html>
<html lang="en">
<head>
    <meta charset="UTF-8">
    <title>Title</title>
    <style>
        .c1{
            height: 40px;
            background-color: #2459a2;
        }
        .c2{
            height: 40px;
            background-color: black;
        }
    </style>
</head>
<body>
<div class="c1"></div>
{% block body %}{% end %}
<div class="c2"></div>
</body>
</html>
{% extends 'layout.html'%}
{% block body %}
<h1>index</h1>
{% end %}
{% extends 'layout.html'%}
{% block body %}
<h1>work</h1>
{% end %}
#!/usr/bin/env python
# -*- coding:utf-8 -*-
import tornado.web

class IndexHanlder(tornado.web.RequestHandler):
    def get(self):
        self.render("index.html")
    def post(self, *args, **kwargs):
        pass
class WorkHanlder(tornado.web.RequestHandler):
    def get(self):
        self.render("work.html")
    def post(self, *args, **kwargs):
        pas
#!/usr/bin/env python
# -*- coding:utf-8 -*-
import tornado.web
import tornado.ioloop
from work.controller import work
from work.controller import extend

settings={
    "template_path":"tpl",
}

application = tornado.web.Application([
    (r"/work",extend.WorkHanlder),
    (r"/index", extend.IndexHanlder),
],**settings)

if __name__ == "__main__":
    application.listen(8888)
    tornado.ioloop.IOLoop.instance().start()
css的引入1:
在母版的head块中写--------------->{% block css %}{% end %}
在子版中写--------------------------{% block css %}------------------------------------------------------------------>格式
------------------------------------<link href="{{static_url('s1.css')}}" rel="stylesheet" />----------------------->内容
------------------------------------{% end %}------------------------------------------------------------------------->格式
css的引入2:
在母版的head块中写--------------->{% block css %}{% end %}
在子版中写--------------------------{% block css %}------------------------------------------------------------------>格式
------------------------------------<style>-----------------------------------------------------------------------------------
---------------------------------- .s1{ 30px; height: 30px; color: #2459a2; background-color: greenyellow; }
----------------------------------- </style>----------------------------------------------------------------------------------
------------------------------------{% end %}------------------------------------------------------------------------->格式
整体body块、css块、js块母版汇总:
<!DOCTYPE html>
<html lang="en">
<head>
    <meta charset="UTF-8">
    <title>Title</title>
    <link href="{{static_url('s1.css')}}" rel="stylesheet" />
    {% block css %}{% end %}         <!-- 这里的css和下面的JavaScript大小写都行,只要母版和子版中的一样就行---->
</head>
<body>

<div class="c1">11111111</div>
{% block body %}{% end %}
<div class="c2">3333333333</div>

<script src="{{static_url('js/jquery-1.8.2.min.js')}}"></script>
{% block javascript %}{% end %}

</body>
</html>
{% extends 'layout.html'%}
{% block css %}
<style>
    .s1{
        width: 30px;
        height: 30px;
        color: #2459a2;
        background-color: greenyellow;
    }
</style>
{% end %}
{% block body %}
<div class="s1">123123</div>
<h1>work</h1>
{% end %}

<ul>
{%  for item in li %}
    <li>{{item}}</li>
{% end %}
</ul>

{% block javascript %}
<script>
    alert("12121212121")
</script>
{% end %}
3、导入
<form action="">
    <input type="text">
    <input type="text">
</form>
<!DOCTYPE html>
<html lang="en">
<head>
    <meta charset="UTF-8">
    <title>Title</title>
</head>
<body>
{% include "form.html" %}
</body>
</html>
四、cookie
1、基本操作
Cookie是由服务器端生成,发送给User-Agent(一般是浏览器),浏览器会将Cookie的key/value保存到某个目录下的文本文件内,下次请求同一网站时就发送该Cookie给服务器(前提是浏览器设置为启用cookie)
在后台设置cookie:
class IndexHanlder(tornado.web.RequestHandler):
    def get(self):
        print(self.cookies) #获取http请求中携带的浏览器中的所有cookie
        print(self.get_cookie("k1"))  # 获取浏览器中的cooki
        self.set_cookie("k1","v1")  #为浏览器设置cookie
在前端(浏览器上使用JavaScript):
    document.cookie               #获取浏览器中所有的cookie
    document.cookie.split(";")   #获取浏览器中具体某一个cookie,需要先分割,再操作
    document.cookie = "k1=999"   #设置cookie
由于Cookie保存在浏览器端,所以在浏览器端也可以使用JavaScript来操作Cookie:
<!DOCTYPE html>
<html lang="en">
<head>
    <meta charset="UTF-8">
    <title>Title</title>
</head>
<body>
<h1>123</h1>
</body>
<script>
/*设置cookie,指定秒数过期*/
function setCookieBySeconds(name,value,expires){
    var current_date = new Date();  //获取当前时间
    current_date.setSeconds(current_date.getSeconds() + expires);
    document.cookie = name + "= "+ value +";expires=" + current_date.toUTCString();
}
/*设置cookie,指定天数过期*/
function setCookieByDays(name,value,expires){
    var current_date = new Date();  //获取当前时间
    current_date.setDate(current_date.getDate() + expires);
    document.cookie = name + "= "+ value +";expires=" + current_date.toUTCString();
}
</script>
</html>

2、加密cookie(签名)
Cookie 很容易被恶意的客户端伪造。加入你想在 cookie 中保存当前登陆用户的 id 之类的信息,你需要对 cookie 作签名以防止伪造。Tornado 通过 set_secure_cookie 和 get_secure_cookie 方法直接支持了这种功能。 要使用这些方法,你需要在创建应用时提供一个密钥,名字为 cookie_secret。 你可以把它作为一个关键词参数传入应用的设置中:
def _create_signature_v1(secret, *parts):
    hash = hmac.new(utf8(secret), digestmod=hashlib.sha1)
    for part in parts:
        hash.update(utf8(part))
    return utf8(hash.hexdigest())

# 加密
def _create_signature_v2(secret, s):
    hash = hmac.new(utf8(secret), digestmod=hashlib.sha256)
    hash.update(utf8(s))
    return utf8(hash.hexdigest())

def create_signed_value(secret, name, value, version=None, clock=None,
                        key_version=None):
    if version is None:
        version = DEFAULT_SIGNED_VALUE_VERSION
    if clock is None:
        clock = time.time

    timestamp = utf8(str(int(clock())))
    value = base64.b64encode(utf8(value))
    if version == 1:
        signature = _create_signature_v1(secret, name, value, timestamp)
        value = b"|".join([value, timestamp, signature])
        return value
    elif version == 2:
        # The v2 format consists of a version number and a series of
        # length-prefixed fields "%d:%s", the last of which is a
        # signature, all separated by pipes.  All numbers are in
        # decimal format with no leading zeros.  The signature is an
        # HMAC-SHA256 of the whole string up to that point, including
        # the final pipe.
        #
        # The fields are:
        # - format version (i.e. 2; no length prefix)
        # - key version (integer, default is 0)
        # - timestamp (integer seconds since epoch)
        # - name (not encoded; assumed to be ~alphanumeric)
        # - value (base64-encoded)
        # - signature (hex-encoded; no length prefix)
        def format_field(s):
            return utf8("%d:" % len(s)) + utf8(s)
        to_sign = b"|".join([
            b"2",
            format_field(str(key_version or 0)),
            format_field(timestamp),
            format_field(name),
            format_field(value),
            b''])

        if isinstance(secret, dict):
            assert key_version is not None, 'Key version must be set when sign key dict is used'
            assert version >= 2, 'Version must be at least 2 for key version support'
            secret = secret[key_version]

        signature = _create_signature_v2(secret, to_sign)
        return to_sign + signature
    else:
        raise ValueError("Unsupported version %d" % version)

# 解密
def _decode_signed_value_v1(secret, name, value, max_age_days, clock):
    parts = utf8(value).split(b"|")
    if len(parts) != 3:
        return None
    signature = _create_signature_v1(secret, name, parts[0], parts[1])
    if not _time_independent_equals(parts[2], signature):
        gen_log.warning("Invalid cookie signature %r", value)
        return None
    timestamp = int(parts[1])
    if timestamp < clock() - max_age_days * 86400:
        gen_log.warning("Expired cookie %r", value)
        return None
    if timestamp > clock() + 31 * 86400:
        # _cookie_signature does not hash a delimiter between the
        # parts of the cookie, so an attacker could transfer trailing
        # digits from the payload to the timestamp without altering the
        # signature.  For backwards compatibility, sanity-check timestamp
        # here instead of modifying _cookie_signature.
        gen_log.warning("Cookie timestamp in future; possible tampering %r",
                        value)
        return None
    if parts[1].startswith(b"0"):
        gen_log.warning("Tampered cookie %r", value)
        return None
    try:
        return base64.b64decode(parts[0])
    except Exception:
        return None


def _decode_fields_v2(value):
    def _consume_field(s):
        length, _, rest = s.partition(b':')
        n = int(length)
        field_value = rest[:n]
        # In python 3, indexing bytes returns small integers; we must
        # use a slice to get a byte string as in python 2.
        if rest[n:n + 1] != b'|':
            raise ValueError("malformed v2 signed value field")
        rest = rest[n + 1:]
        return field_value, rest

    rest = value[2:]  # remove version number
    key_version, rest = _consume_field(rest)
    timestamp, rest = _consume_field(rest)
    name_field, rest = _consume_field(rest)
    value_field, passed_sig = _consume_field(rest)
    return int(key_version), timestamp, name_field, value_field, passed_sig


def _decode_signed_value_v2(secret, name, value, max_age_days, clock):
    try:
        key_version, timestamp, name_field, value_field, passed_sig = _decode_fields_v2(value)
    except ValueError:
        return None
    signed_string = value[:-len(passed_sig)]

    if isinstance(secret, dict):
        try:
            secret = secret[key_version]
        except KeyError:
            return None

    expected_sig = _create_signature_v2(secret, signed_string)
    if not _time_independent_equals(passed_sig, expected_sig):
        return None
    if name_field != utf8(name):
        return None
    timestamp = int(timestamp)
    if timestamp < clock() - max_age_days * 86400:
        # The signature has expired.
        return None
    try:
        return base64.b64decode(value_field)
    except Exception:
        return None


def get_signature_key_version(value):
    value = utf8(value)
    version = _get_version(value)
    if version < 2:
        return None
    try:
        key_version, _, _, _, _ = _decode_fields_v2(value)
    except ValueError:
        return None

    return key_version
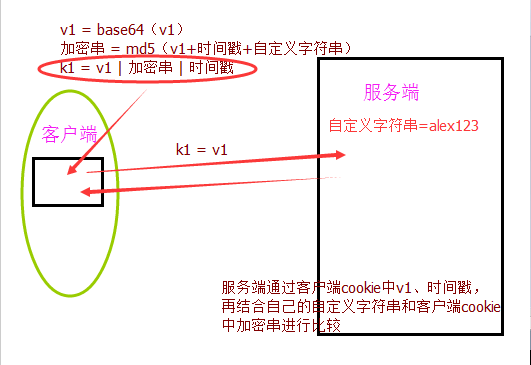
签名Cookie的本质是:
写cookie过程:
- 将值进行base64加密
- 对除值以外的内容进行签名,哈希算法(无法逆向解析)
- 拼接 签名 + 加密值
v1 = base64(v1)
k1 = v1 | 加密串(md5(v1+时间戳+自定义字符串)) | 时间戳
读cookie过程:
- 读取 签名 + 加密值
- 对签名进行验证
- base64解密,获取值内容
五、Session(依赖于cookie)
由于cookie中需要保存客户的很多信息,而且如果信息很多的话,服务端与客户端交互的时候也浪费流量,所以我们需要用很少的一段字符串来保存很多的信息,这就是我们所要引进的session。
cookie 和session 的区别:
1、cookie数据存放在客户的浏览器上,session数据放在服务器上。
2、cookie不是很安全,别人可以分析存放在本地的COOKIE并进行COOKIE欺骗 考虑到安全应当使用session。
3、session会在一定时间内保存在服务器上。当访问增多,会比较占用你服务器的性能 考虑到减轻服务器性能方面,应当使用COOKIE。
4、单个cookie保存的数据不能超过4K,很多浏览器都限制一个站点最多保存20个cookie。
5、所以个人建议: 将登陆信息等重要信息存放为SESSION 其他信息如果需要保留,可以放在COOKIE中

#!/usr/bin/env python
# -*- coding:utf-8 -*-
import tornado.web
import tornado.ioloop
import hashlib
import time
li = {}
class IndexHanlder(tornado.web.RequestHandler):
    def get(self):
        obj = hashlib.md5()
        obj.update(bytes(str(time.time()),encoding="utf-8"))
        random_str = obj.hexdigest()
        li[random_str]={}
        li[random_str]["k1"]=123
        li[random_str]["k2"]=456
        li[random_str]["is_login"]=True
        self.set_cookie("qqqqqq",random_str)
        self.write("成功设置cookie")
    def post(self, *args, **kwargs):
        pass

class ManagerHanlder(tornado.web.RequestHandler):
    def get(self):
        random_str = self.get_cookie("qqqqqq",None)
        current_user_info = li.get(random_str,None)
        if not current_user_info:
            self.redirect("/index")
        else:
            if li[random_str]["is_login"]:
                self.write("欢迎")
            else:
                self.redirect("/index")
        def post(self, *args, **kwargs):
            pass

settings={
    "template_path":"tpl",
     "static_path":"st",
    "cookie_secret":"123"
}

class IndeHanlder(tornado.web.RequestHandler):
    def get(self):
        self.render("1.html")
application = tornado.web.Application([
    (r"/index", IndexHanlder),
    (r"/manager", ManagerHanlder),
],**settings)

if __name__ == "__main__":
    application.listen(8888)
    tornado.ioloop.IOLoop.instance().start()
#!/usr/bin/env/python
# -*- coding:utf-8 -*-
import tornado.web

container = {}
# container = {
#     # "第一个人的随机字符串":{},
#     # "第一个人的随机字符串":{'k1': 111, 'parents': '你'},
# }

class Session:
    def __init__(self, handler):
        self.handler = handler
        self.random_str = None

    def __genarate_random_str(self):
        import hashlib
        import time
        obj = hashlib.md5()
        obj.update(bytes(str(time.time()), encoding='utf-8'))
        random_str = obj.hexdigest()
        return random_str

    def __setitem__(self, key, value):
        # 在container中加入随机字符串
        # 定义专属于自己的数据
        # 在客户端中写入随机字符串
        # 判断,请求的用户是否已有随机字符串
        if not self.random_str:
            random_str = self.handler.get_cookie('__kakaka__')
            if not random_str:
                random_str = self.__genarate_random_str()
                container[random_str] = {}
            else:
                # 客户端有随机字符串
                if random_str in container.keys():
                    pass
                else:
                    random_str = self.__genarate_random_str()
                    container[random_str] = {}
            self.random_str = random_str

        container[self.random_str][key] = value
        self.handler.set_cookie("__kakaka__", self.random_str)

    def __getitem__(self, key):
        # 获取客户端的随机字符串
        # 从container中获取专属于我的数据
        #  专属信息【key】
        random_str =  self.handler.get_cookie("__kakaka__")
        if not random_str:
            return None
        # 客户端有随机字符串
        user_info_dict = container.get(random_str,None)
        if not user_info_dict:
            return None
        value = user_info_dict.get(key, None)
        return value
class BaseHandler(tornado.web.RequestHandler):
    def initialize(self):
        self.session = Session(self)
class IndexHandler(BaseHandler):
    def get(self):
        if self.get_argument('u',None) in ['alex','eric']:
            self.session['is_login'] = True
            self.session['name'] =self.get_argument('u',None)
            print(container)
        else:
            self.write('请你先登录')
class MangerHandler(BaseHandler):
    def get(self):
        val = self.session['is_login']
        if val:
            self.write(self.session['name'])
        else:
            self.write('登录失败')
class LoginHandler(BaseHandler):
    def get(self,*args,**kwargs):
        self.render('login.html',status="")
    def post(self, *args, **kwargs):
        user = self.get_argument('user',None)
        pwd = self.get_argument('pwd',None)
        code = self.get_argument('code',None)
        check_code = self.session['CheckCode']
        if code.upper() == check_code.upper():
            self.write('验证码正确')
        else:
            self.render('login.html',status ='验证码错误')
class CheckCodeHandler(BaseHandler):
    def get(self,*args,**kwargs):
        import io
        import check_code
        mstream = io.BytesIO()
        img, code = check_code.create_validate_code()
        img.save(mstream,'GIF')
        self.session['CheckCode']=code
        self.write(mstream.getvalue())
class CsrfHandler(BaseHandler):
    def get(self,*args,**kwargs):
        self.render("csrf.html")
    def post(self, *args, **kwargs):
        self.write("hahahahaah")

settings = {
    'template_path':'views',
    'static_path':'static',
    "xsrf_cookies":True
}
application = tornado.web.Application([
    (r'/index',IndexHandler),
    (r'/manger',MangerHandler),
    (r'/login',LoginHandler),
    (r'/check_code',CheckCodeHandler),
    (r'/csrf',CsrfHandler),
],**settings)

if __name__ == "__main__":
    application.listen(8888)
    tornado.ioloop.IOLoop.instance().start()
六、验证码
验证码原理在于后台自动创建一张带有随机内容的图片,然后将内容通过img标签输出到页面
安装图像处理模块:
pip3 install pillow
步骤:1、首先下载安装pillow图像处理模块------->2、把check_code.py文件和Monaco.ttf文件放在目录下
#!/usr/bin/env python
# -*- coding:utf-8 -*-
import tornado.ioloop
import tornado.web
import io
import check_code
li = []
class CheckCodeHandler(tornado.web.RequestHandler):
    def get(self):
        mstream = io.BytesIO()
        img, code = check_code.create_validate_code()
        li.append(code)   #这里可以保存到session中
        img.save(mstream, "GIF")
        self.write(mstream.getvalue())
        print(code)

class LoginHandler(tornado.web.RequestHandler):
    def get(self):
        self.render('login.html',status="")
    def post(self, *args, **kwargs):
        user = self.get_argument("user",None)
        pwd = self.get_argument("pwd",None)
        mima = self.get_argument("mima",None)
        if user == "alex" and pwd == "123" and mima.upper() == li[0].upper():  #不区分大小写
            self.write("登录成功")
        else:
            # self.redirect("/login")
            self.render("login.html",status = "验证码错误")

settings = {
    'template_path': 'tpl',
    'static_path': 'static',
    'static_url_prefix': '/static/',
    'cookie_secret': 'aiuasdhflashjdfoiuashdfiuh',
}

application = tornado.web.Application([
    (r"/login", LoginHandler),
    (r"/check_code", CheckCodeHandler),
], **settings)


if __name__ == "__main__":
    application.listen(8888)
    tornado.ioloop.IOLoop.instance().start()
#!/usr/bin/env python
#coding:utf-8
import random
from PIL import Image, ImageDraw, ImageFont, ImageFilter

_letter_cases = "abcdefghjkmnpqrstuvwxy"  # 小写字母,去除可能干扰的i,l,o,z
_upper_cases = _letter_cases.upper()  # 大写字母
_numbers = ''.join(map(str, range(3, 10)))  # 数字
init_chars = ''.join((_letter_cases, _upper_cases, _numbers))

def create_validate_code(size=(120, 30),
                         chars=init_chars,
                         img_type="GIF",
                         mode="RGB",
                         bg_color=(255, 255, 255),
                         fg_color=(0, 0, 255),
                         font_size=18,
                         font_type="Monaco.ttf",
                         length=4,
                         draw_lines=True,
                         n_line=(1, 2),
                         draw_points=True,
                         point_chance = 2):
    '''
    @todo: 生成验证码图片
    @param size: 图片的大小,格式(宽,高),默认为(120, 30)
    @param chars: 允许的字符集合,格式字符串
    @param img_type: 图片保存的格式,默认为GIF,可选的为GIF,JPEG,TIFF,PNG
    @param mode: 图片模式,默认为RGB
    @param bg_color: 背景颜色,默认为白色
    @param fg_color: 前景色,验证码字符颜色,默认为蓝色#0000FF
    @param font_size: 验证码字体大小
    @param font_type: 验证码字体,默认为 ae_AlArabiya.ttf
    @param length: 验证码字符个数
    @param draw_lines: 是否划干扰线
    @param n_lines: 干扰线的条数范围,格式元组,默认为(1, 2),只有draw_lines为True时有效
    @param draw_points: 是否画干扰点
    @param point_chance: 干扰点出现的概率,大小范围[0, 100]
    @return: [0]: PIL Image实例
    @return: [1]: 验证码图片中的字符串
    '''

    width, height = size # 宽, 高
    img = Image.new(mode, size, bg_color) # 创建图形
    draw = ImageDraw.Draw(img) # 创建画笔

    def get_chars():
        '''生成给定长度的字符串,返回列表格式'''
        return random.sample(chars, length)

    def create_lines():
        '''绘制干扰线'''
        line_num = random.randint(*n_line) # 干扰线条数

        for i in range(line_num):
            # 起始点
            begin = (random.randint(0, size[0]), random.randint(0, size[1]))
            #结束点
            end = (random.randint(0, size[0]), random.randint(0, size[1]))
            draw.line([begin, end], fill=(0, 0, 0))

    def create_points():
        '''绘制干扰点'''
        chance = min(100, max(0, int(point_chance))) # 大小限制在[0, 100]

        for w in range(width):
            for h in range(height):
                tmp = random.randint(0, 100)
                if tmp > 100 - chance:
                    draw.point((w, h), fill=(0, 0, 0))

    def create_strs():
        '''绘制验证码字符'''
        c_chars = get_chars()
        strs = ' %s ' % ' '.join(c_chars) # 每个字符前后以空格隔开

        font = ImageFont.truetype(font_type, font_size)
        font_width, font_height = font.getsize(strs)

        draw.text(((width - font_width) / 3, (height - font_height) / 3),
                    strs, font=font, fill=fg_color)

        return ''.join(c_chars)

    if draw_lines:
        create_lines()
    if draw_points:
        create_points()
    strs = create_strs()

    # 图形扭曲参数
    params = [1 - float(random.randint(1, 2)) / 100,
              0,
              0,
              0,
              1 - float(random.randint(1, 10)) / 100,
              float(random.randint(1, 2)) / 500,
              0.001,
              float(random.randint(1, 2)) / 500
              ]
    img = img.transform(size, Image.PERSPECTIVE, params) # 创建扭曲

    img = img.filter(ImageFilter.EDGE_ENHANCE_MORE) # 滤镜,边界加强(阈值更大)

    return img, strs
<!DOCTYPE html>
<html lang="en">
<head>
    <meta charset="UTF-8">
    <title>Title</title>
</head>
<body>
<form action="/login" method="post">
    <p><input name="user" placeholder="用户名" type="text"></p>
    <p><input name="pwd" placeholder="密码" type="text"></p>
    <p>
      <input name="mima" placeholder="验证码" type="text" >
        <img src="/check_code" onclick='ChangeCode();' id='imgCode'>
    </p>
    <input type="submit" value="提交"><span style="color: red">{{status}}</span>
</form>
<script>
    function ChangeCode() {
        var code = document.getElementById('imgCode');
        code.src += '?';
    }
</script>
</body>
</html>
