环境介绍:
| 说明 | 节点 | ip | 系统 |
| Gitlab Server | git.ds.com | 10.0.1.179 | CentOS 7.5.1804 |
| Gitlab Runner | 10.0.1.178 | CentOS 7.5.1804 | |
| Docker Registry Harbor | harbor.ds.com | 10.0.1.183 | CentOS 7.5.1804 |
关于 gitlab server和Harbor的安装这里就表述了。
一、gitlab runner的安装 (gitlab 10版本的)
1、根据具体的系统环境下载对应的二进制执行文件
|
1
2
3
4
5
6
7
8
|
# Linux x86-64sudo wget -O /usr/local/bin/gitlab-runner https://gitlab-runner-downloads.s3.amazonaws.com/latest/binaries/gitlab-runner-linux-amd64# Linux x86sudo wget -O /usr/local/bin/gitlab-runner https://gitlab-runner-downloads.s3.amazonaws.com/latest/binaries/gitlab-runner-linux-386# Linux armsudo wget -O /usr/local/bin/gitlab-runner https://gitlab-runner-downloads.s3.amazonaws.com/latest/binaries/gitlab-runner-linux-arm |
通过下面的地址你可以找到左右版本的二进制文件
https://docs.gitlab.com/runner/install/bleeding-edge.html#download-any-other-tagged-release
2、给刚下载的二进制执行文件添加执行权限
|
1
|
sudo chmod +x /usr/local/bin/gitlab-runner |
3、安装docker
|
1
|
curl -sSL https://get.docker.com/ | sh |
4、创建一个gitlab ci用户
|
1
|
useradd --comment 'GitLab Runner' --create-home gitlab-runner --shell /bin/bash |
5、将gitlab ci用户添加到docker运行用户的组里面
|
1
|
usermod -aG root gitlab-runner |
由于我的docker是用root用户运行的所以我这边将gitlab-runner用户加到root的组里面了。

6、开始运行GitLab-Runner
|
1
2
|
gitlab-runner install --user=gitlab-runner --working-directory=/home/gitlab-runnergitlab-runner start |
二、注册Runners
1、打开gitlab页面找到runners的注册令牌
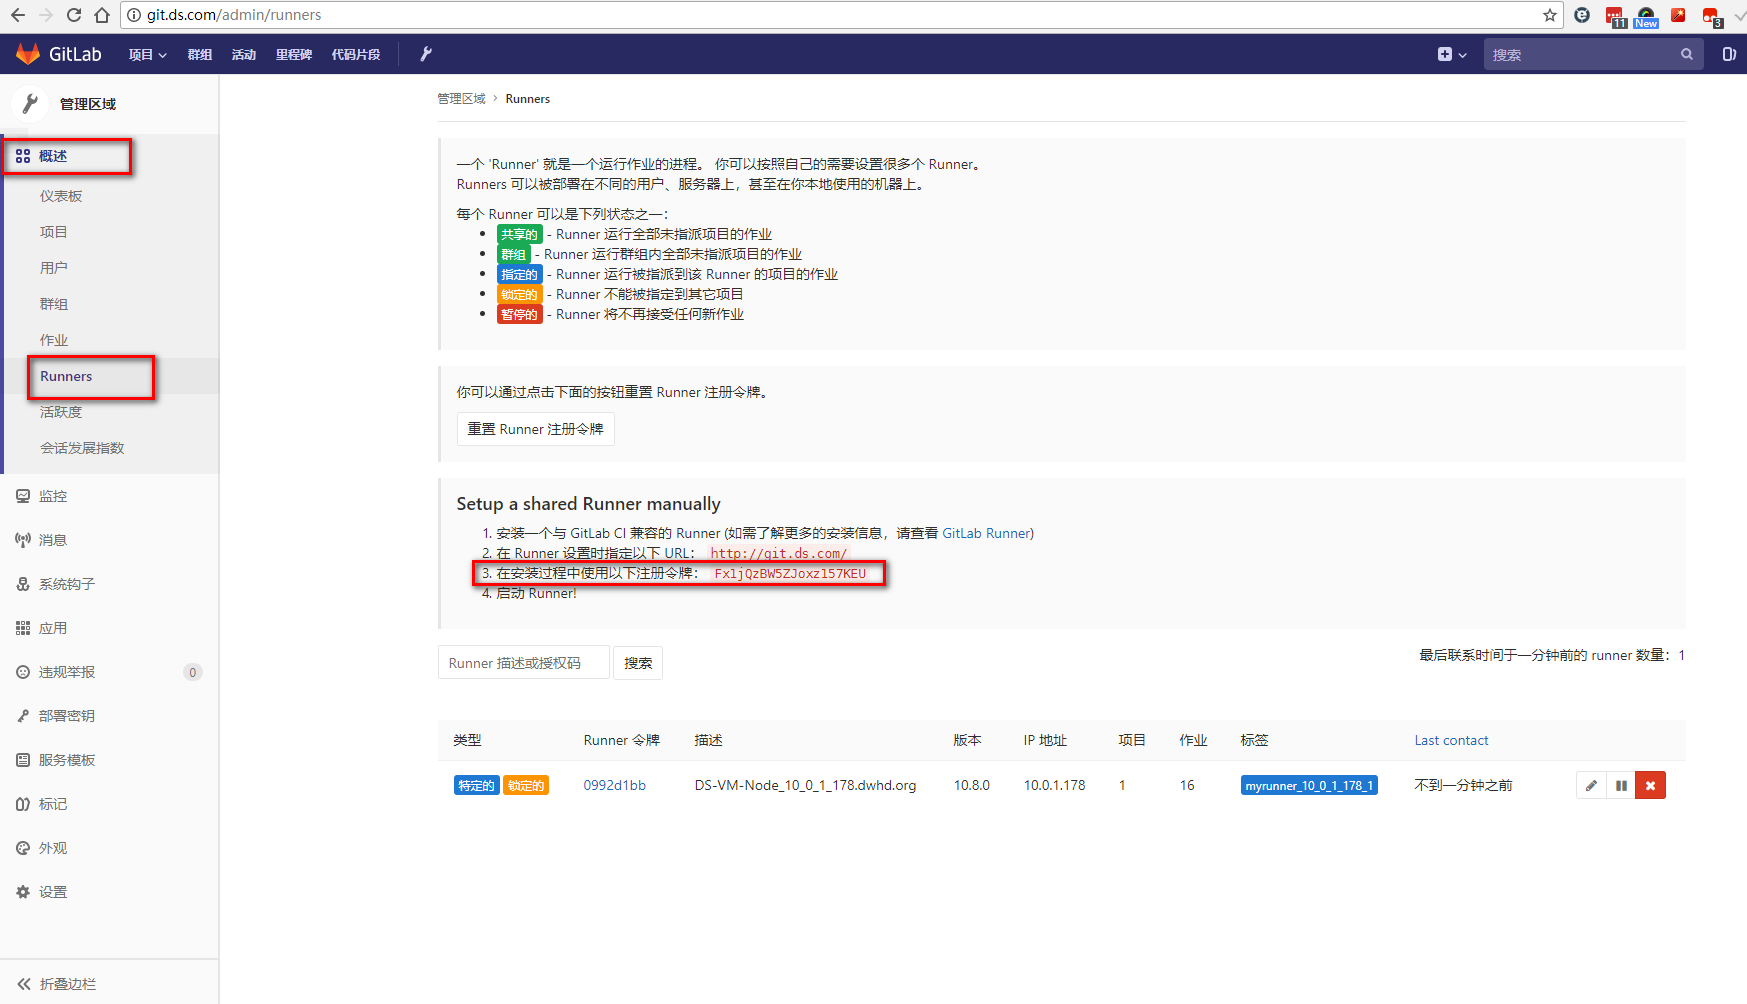
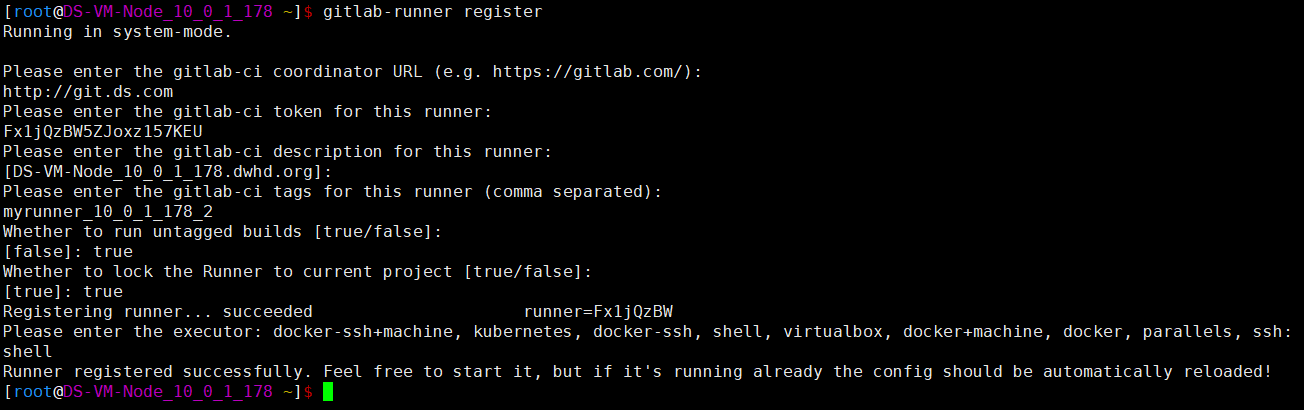
2、去gitlab runner的节点上做注册动作
|
1
|
gitlab-runner register |
|
01
02
03
04
05
06
07
08
09
10
11
12
13
14
15
16
17
18
19
20
|
[root@DS-VM-Node_10_0_1_178 ~]$ gitlab-runner registerRunning in system-mode.Please enter the gitlab-ci coordinator URL (e.g. https://gitlab.com/):http://git.ds.comPlease enter the gitlab-ci token for this runner:Fx1jQzBW5ZJoxz157KEUPlease enter the gitlab-ci description for this runner:[DS-VM-Node_10_0_1_178.dwhd.org]:Please enter the gitlab-ci tags for this runner (comma separated):myrunner_10_0_1_178_2Whether to run untagged builds [true/false]:[false]: trueWhether to lock the Runner to current project [true/false]:[true]: trueRegistering runner... succeeded runner=Fx1jQzBWPlease enter the executor: docker-ssh+machine, kubernetes, docker-ssh, shell, virtualbox, docker+machine, docker, parallels, ssh:shellRunner registered successfully. Feel free to start it, but if it's running already the config should be automatically reloaded![root@DS-VM-Node_10_0_1_178 ~]$ |
3、重启一下runner使之生效
|
1
|
gitlab-runner restart |
4、去gitlab上检查
能发现到一个刚注册的runner

5、将这个runner指定到指定项目上去

三、测试
新建了一个gitlab项目。
git clone https://github.com/lvelvis/ngx-docker.git