来源:https://blog.csdn.net/jinhaijing/article/details/83902191
使用@Value赋值的几种类型;
//1、基本数值
//2、可以写SpEL; #{}。 SpEL(Spring Expression Language),即Spring表达式语言,是比JSP的EL更强大的一种表达式语言。
//3、可以写${};取出配置文件【properties】中的值(在运行环境变量里面的值)
SPEL详细:https://www.jianshu.com/p/e0b50053b5d3
一、新建person.properties文件
内容:
person.nickName=小张三
二、新建配置类 MainConfigOfPropertyValues.java
使用@PropertySource读取外部配置文件中的k/v保存到运行的环境变量中;加载完外部的配置文件以后使用${}取出配置文件的值;并注入Person对象
package com.atguigu.config;

import org.springframework.context.annotation.Bean;
import org.springframework.context.annotation.Configuration;
import org.springframework.context.annotation.PropertySource;

import com.atguigu.bean.Person;

//使用@PropertySource读取外部配置文件中的k/v保存到运行的环境变量中;加载完外部的配置文件以后使用${}取出配置文件的值
@PropertySource(value={"classpath:/person.properties"})
@Configuration
public class MainConfigOfPropertyValues {

    @Bean
    public Person person(){
        return new Person();
    }
 }
三、新建Person类
属性上面@Value()表示赋值
@Value("#{20-2}"):使用了正则表达式的值
@Value("${person.nickName}"):表示引用到了person.properties中定义的person.nickName的值,在配置了中加载了properties文件
package com.atguigu.bean;

import org.springframework.beans.factory.annotation.Value;

public class Person {

    //使用@Value赋值;
    //1、基本数值
    //2、可以写SpEL; #{}
    //3、可以写${};取出配置文件【properties】中的值(在运行环境变量里面的值)

    @Value("张三")
    private String name;
    @Value("#{20-2}")
    private Integer age;

    @Value("${person.nickName}")
    private String nickName;


    public String getNickName() {
        return nickName;
    }
    public void setNickName(String nickName) {
        this.nickName = nickName;
    }
    public String getName() {
        return name;
    }
    public void setName(String name) {
        this.name = name;
    }
    public Integer getAge() {
        return age;
    }
    public void setAge(Integer age) {
        this.age = age;
    }

    public Person(String name, Integer age) {
        super();
        this.name = name;
        this.age = age;
    }
    public Person() {
        super();
        // TODO Auto-generated constructor stub
    }
    @Override
    public String toString() {
        return "Person [name=" + name + ", age=" + age + ", nickName=" + nickName + "]";
  }
}
这种方式也等同于spring的xml中:
<context:property-placeholder location="classpath:person.properties"/>
    <!-- 包扫描、只要标注了@Controller、@Service、@Repository,@Component -->
    <context:component-scan base-package="com.atguigu" use-default-filters="false"></context:component-scan>
    <bean id="person" class="com.atguigu.bean.Person"  >
        <property name="age" value="#{20-2}"></property>
        <property name="name" value="小张三"></property>
        <property name="nickName" value="${person.nickName}"></property>

</bean>
四、新建测试类
打印Person对象的值
package com.atguigu.test;

import org.junit.Test;
import org.springframework.context.annotation.AnnotationConfigApplicationContext;
import org.springframework.core.env.ConfigurableEnvironment;

import com.atguigu.bean.Person;
import com.atguigu.config.MainConfigOfLifeCycle;
import com.atguigu.config.MainConfigOfPropertyValues;

public class IOCTest_PropertyValue {
    AnnotationConfigApplicationContext applicationContext = new AnnotationConfigApplicationContext(MainConfigOfPropertyValues.class);
    @Test
    public void test01(){
        printBeans(applicationContext);
        System.out.println("=============");

        Person person = (Person) applicationContext.getBean("person");
        System.out.println(person);

        applicationContext.close();
    }

    //打印spring启动后加载的对象
    private void printBeans(AnnotationConfigApplicationContext applicationContext){
        String[] definitionNames = applicationContext.getBeanDefinitionNames();
        for (String name : definitionNames) {
            System.out.println(name);
        }
    }

}
结果:

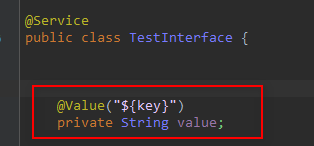
如何偷懒?
在使用Springboot项目搭建的项目时,配置文件application.properties中
已经被加载到了项目中,在项目中可以通过该注解获取配置文件中的信息,此法简简单单
配置文件
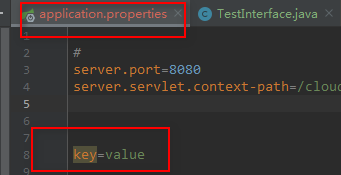
取值