Docker的安装
安装文档
Ubuntu下的安装
安装环境
NAME="Ubuntu"
VERSION="18.04.4 LTS (Bionic Beaver)"
ID=ubuntu
ID_LIKE=debian
PRETTY_NAME="Ubuntu 18.04.4 LTS"
VERSION_ID="18.04"
HOME_URL="https://www.ubuntu.com/"
SUPPORT_URL="https://help.ubuntu.com/"
BUG_REPORT_URL="https://bugs.launchpad.net/ubuntu/"
PRIVACY_POLICY_URL="https://www.ubuntu.com/legal/terms-and-policies/privacy-policy"
VERSION_CODENAME=bionic
UBUNTU_CODENAME=bionic
- 卸载旧环境
sudo apt-get remove docker docker-engine docker.io containerd runc
- 安装一些必要的安装包,用于通过HTTPS来获取仓库
$ sudo apt-get update

$ sudo apt-get install
    apt-transport-https
    ca-certificates
    curl
    gnupg-agent
    software-properties-common
- 添加 Docker 的官方 GPG 密钥
$ curl -fsSL https://download.docker.com/linux/ubuntu/gpg | sudo apt-key add -
可以通过以下验证
$ sudo apt-key fingerprint 0EBFCD88

#### 结果
pub   rsa4096 2017-02-22 [SCEA]
      9DC8 5822 9FC7 DD38 854A  E2D8 8D81 803C 0EBF CD88
uid           [ unknown] Docker Release (CE deb) <docker@docker.com>
sub   rsa4096 2017-02-22 [S]
- 设置稳定版仓库
## 官方
$ sudo add-apt-repository
   "deb [arch=amd64] https://download.docker.com/linux/ubuntu
   $(lsb_release -cs)
   stable"
## 阿里云
sudo add-apt-repository "deb [arch=amd64] http://mirrors.aliyun.com/docker-ce/linux/ubuntu $(lsb_release -cs) stable"
- 正式安装docker(安装社区版本)
## 更新apt软件包索引
sudo apt-get update
## 安装最新版的docker,这里安装的是最新的
sudo apt-get install docker-ce docker-ce-cli containerd.io

## 定制安装
$ sudo apt-get install docker-ce=<VERSION_STRING> docker-ce-cli=<VERSION_STRING> containerd.io

## 获取缓存和版本号
apt-cache madison docker-ce
- 验证是否安装成功,跑一个
hello-world,或者docker version
sudo docker run hello-world
-
设置开机自启动并启动 Docker-ce(和CentOS有区别)
安装成功后默认开启,可忽略该步骤 -
查看hello-world镜像存不存在系统中
sudo docker image
- 卸载docker
# 卸载依赖
sudo apt-get purge docker-ce docker-ce-cli containerd.io

# 删除资源
sudo rm -rf /var/lib/docker
- 阿里云镜像加速
-
登录阿里云,找到容器镜像服务
-
找到镜像加速器
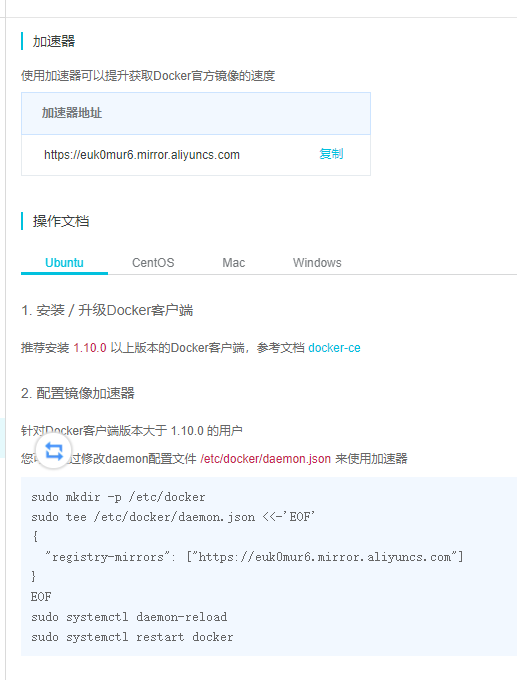
-
配置使用
sudo mkdir -p /etc/docker
sudo tee /etc/docker/daemon.json <<-'EOF'
{
  "registry-mirrors": ["https://euk0mur6.mirror.aliyuncs.com"]
}
EOF
sudo systemctl daemon-reload
sudo systemctl restart docker
Centos的安装
- 环境
[root@VM-0-13-centos /]# uname -r
3.10.0-1127.13.1.el7.x86_64

[root@VM-0-13-centos /]# cat /etc/os-release
NAME="CentOS Linux"
VERSION="7 (Core)"
ID="centos"
ID_LIKE="rhel fedora"
VERSION_ID="7"
PRETTY_NAME="CentOS Linux 7 (Core)"
ANSI_COLOR="0;31"
CPE_NAME="cpe:/o:centos:centos:7"
HOME_URL="https://www.centos.org/"
BUG_REPORT_URL="https://bugs.centos.org/"

CENTOS_MANTISBT_PROJECT="CentOS-7"
CENTOS_MANTISBT_PROJECT_VERSION="7"
REDHAT_SUPPORT_PRODUCT="centos"
REDHAT_SUPPORT_PRODUCT_VERSION="7"
- 卸载旧环境
yum remove docker
                  docker-client
                  docker-client-latest
                  docker-common
                  docker-latest
                  docker-latest-logrotate
                  docker-logrotate
                  docker-engine
- 安装基本环境
yum install -y yum-utils
- 设置镜像的仓库
yum-config-manager
    --add-repo
    https://download.docker.com/linux/centos/docker-ce.repo #默认国外

yum-config-manager
    --add-repo
    http://mirrors.aliyun.com/docker-ce/linux/centos/docker-ce.repo #阿里云镜像
- 安装docker
yum install docker-ce docker-ce-cli containerd.io
- 启动Docker
systemctl start docker
- 查看是否安装成功
docker version
- run hello world
docker run hello-world
- 配置腾讯云
# 创建文件
vim /etc/docker/daemon.json

# 编写内容
{
   "registry-mirrors": [
       "https://mirror.ccs.tencentyun.com"
  ]
}

# 重启环境服务
systemctl daemon-reload
service docker restart

# 查看是否生效,如果返回的信息中有设置的镜像,说明设置成功
docker info