SpringBoot+RESTful+JSON
一、RESTful架构
REST全称是Representational State Transfer,中文意思是表述(编者注:通常译为表征)性状态转移。 它首次出现在2000年Roy Fielding的博士论文中,Roy Fielding是HTTP规范的主要编写者之一。 他在论文中提到:"我这篇文章的写作目的,就是想在符合架构原理的前提下,理解和评估以网络为基础的应用软件的架构设计,得到一个功能强、性能好、适宜通信的架构。REST指的是一组架构约束条件和原则。" 如果一个架构符合REST的约束条件和原则,我们就称它为RESTful架构。
REST本身并没有创造新的技术、组件或服务,而隐藏在RESTful背后的理念就是使用Web的现有特征和能力, 更好地使用现有Web标准中的一些准则和约束。虽然REST本身受Web技术的影响很深, 但是理论上REST架构风格并不是绑定在HTTP上,只不过目前HTTP是唯一与REST相关的实例。 所以我们这里描述的REST也是通过HTTP实现的REST。
1.统一资源接口
RESTful架构应该遵循统一接口原则,统一接口包含了一组受限的预定义的操作,不论什么样的资源,都是通过使用相同的接口进行资源的访问。接口应该使用标准的HTTP方法如GET,PUT和POST,并遵循这些方法的语义。
如果按照HTTP方法的语义来暴露资源,那么接口将会拥有安全性和幂等性的特性,例如GET和HEAD请求都是安全的, 无论请求多少次,都不会改变服务器状态。而GET、HEAD、PUT和DELETE请求都是幂等的,无论对资源操作多少次, 结果总是一样的,后面的请求并不会产生比第一次更多的影响(幂等)。
下面列出了GET,DELETE,PUT和POST的典型用法:
| GET | DELETE | PUT | POST |
|
|
|
|
小结:
<1>POST和PUT用于创建资源时有什么区别?
POST和PUT在创建资源的区别在于,所创建的资源的名称(URI)是否由客户端决定。 例如为我的博文增加一个java的分类,生成的路径就是分类名/categories/java,那么就可以采用PUT方法。
<2>PATCH这种不是HTTP标准方法。
<3>统一资源接口对URI有什么指导意义?
统一资源接口要求使用标准的HTTP方法对资源进行操作,所以URI只应该来表示资源的名称,而不应该包括资源的操作。
通俗来说,URI不应该使用动作来描述。例如,下面是一些不符合统一接口要求的URI:
-
-
-
- GET /getUser/1
- POST /createUser
- PUT /updateUser/1
- DELETE /deleteUser/1
-
-
二、RESTful风格
简而言之,什么是REST? 就是看Url就知道要什么,看http method就知道干什么。
在Web开发的过程中,method常用的值是get和post。可事实上,method值还可以是put和delete等等其他值。
既然method值如此丰富,那么就可以考虑使用同一个url,但是约定不同的method来实施不同的业务,这就是Restful的基本考虑。
CRUD是最常见的操作,在使用Restful 风格之前,通常的增加做法是这样的:/addCategory?name=xxx
可是使用了Restuful风格之后,增加就变成了:/category
CRUD如下表所示,URL就都使用一样的 "/category",区别只是在于method不同,服务器根据method的不同来判断浏览器期望做的业务行为。

1.CategoryController.java
CRUD的RequestMapping都修改为了/category,以前用的注解叫做@RequestMapper,现在分别叫做 GetMapper, PutMapper, PostMapper 和 DeleteMapper 用于表示接受对应的Method。
 1 package com.example.springbootrestfuldemo.controller;
 2
 3
 4 import com.example.springbootrestfuldemo.dao.CategoryDAO;
 5 import com.example.springbootrestfuldemo.pojo.Category;
 6 import com.sun.org.apache.xpath.internal.operations.Mod;
 7 import org.springframework.beans.factory.annotation.Autowired;
 8 import org.springframework.data.domain.Page;
 9 import org.springframework.data.domain.PageRequest;
10 import org.springframework.data.domain.Pageable;
11 import org.springframework.data.domain.Sort;
12 import org.springframework.stereotype.Controller;
13 import org.springframework.ui.Model;
14 import org.springframework.web.bind.annotation.*;
15
16 import java.util.List;
17
18 @Controller
19 public class CategoryController {
20     @Autowired
21     CategoryDAO categoryDAO;
22
23     //restful风格
24
25     //1.返回5条记录
26     @GetMapping("/category")
27     public String listCategory(Model model,@RequestParam(value = "start", defaultValue = "0") int start, @RequestParam(value = "size", defaultValue = "5") int size) throws Exception {
28         start = start<0?0:start;
29         Sort sort = new Sort(Sort.Direction.DESC, "id");
30         Pageable pageable = new PageRequest(start, size, sort);
31         Page<Category> page =categoryDAO.findAll(pageable);
32         model.addAttribute("page",page);
33         return "listCategories";
34     }
35     //2.保存一条记录
36     @PutMapping("/category")
37     public String addCategories(Category category) throws Exception {
38         System.out.println("保存一条记录");
39         categoryDAO.save(category);
40         return "redirect:/category";
41     }
42     //3.删除一条记录
43     @DeleteMapping("/category/{id}")
44     public String deleteCategory(Category category){
45         System.out.println("删除一条记录!");
46         categoryDAO.delete(category);
47         return "redirect:/category";
48     }
49
50     //4.更新一条记录
51     @PostMapping("/category/{id}")
52     public String updateCategory(Category category){
53         System.out.println("更新一条记录!");
54         categoryDAO.save(category);
55         return "redirect:/category";
56     }
57     //6.跳转到编辑页
58     @GetMapping("/category/{id}")
59     public String addCategory(@PathVariable("id") int id, Model model) throws Exception{
60         System.out.println("编辑视图");
61         Category category=categoryDAO.getOne(id);
62         model.addAttribute("c",category);
63         return "editCategory";
64     }
65
66 }
2.listCategories.html
 1 <!DOCTYPE html>
 2 <html lang="en" xmlns:th="http://www.thymeleaf.org">
 3 <head>
 4     <meta http-equiv="Content-Type" content="text/html; charset=UTF-8" />
 5     <title>Title</title>
 6 </head>
 7 <body>
 8 <div class="showing">
 9     <h2>springboot+jpa+thymeleaf+Restful</h2>
10     <div style="500px;margin:20px auto;text-align: center">
11         <table align="center" border="1" cellspacing="0">
12             <thead>
13             <tr>
14                 <th>id</th>
15                 <th>name</th>
16                 <td>编辑</td>
17                 <td>删除</td>
18             </tr>
19             </thead>
20             <tbody>
21             <tr th:each="c: ${page}">
22                 <td align="center" th:text="${c.id}"></td>
23                 <td align="center" th:text="${c.name}"></td>
24                 <td align="center" ><a th:href="@{/category/{id}(id=${c.id})}">编辑</a></td>
25                 <td>
26                     <form  th:action="@{/category/{id}(id=${c.id})}" action="/category" method="post">
27                         <input type="hidden" name="_method" value="DELETE"/>
28                         <button type="submit">删除</button>
29                     </form>
30                 </td>
31             </tr>
32             </tbody>
33         </table>
34         <br />
35         <div>
36             <a th:href="@{/category(start=0)}">[首  页]</a>
37             <a th:href="@{/category(start=${page.number -1})}">[上一页]</a>
38             <a th:if="${page.number!=page.totalPages -1}" th:href="@{/category(start=${page.number +1})}">[下一页]</a>
39             <a th:href="@{/category(start=${page.totalPages -1})}">[末  页]</a>
40         </div>
41         <form action="/category" method="post">
42             <!--修改提交方式为PUT-->
43             <input type="hidden" name="_method" value="PUT"/>
44             name:<input name="name"/><br/>
45             <button type="submit">提交</button>
46         </form>
47
48
49     </div>
50 </div>
51 </body>
52 </html>
<1>增加
A:action修改为"/category"
B:增加如下<input type="hidden" name="_method" value="PUT">,虽然这个form的method是post, 但是spingboot看到这个_method的值是put后,会把其修改为put.
1         <form action="/category" method="post">
2             <!--修改提交方式为PUT-->
3             <input type="hidden" name="_method" value="PUT"/>
4             name:<input name="name"/><br/>
5             <button type="submit">提交</button>
6         </form>
<2>删除
原来的删除是通过超链接进行跳转,通过jQuery或者js可以将超链接的提交方式改变成成表单提交。然而我不会,所以用笨办法,<td>里面直接放一个form。
1                 <td>
2                     <form  th:action="@{/category/{id}(id=${c.id})}" action="/category" method="post">
3                         <input type="hidden" name="_method" value="DELETE"/>
4                         <button type="submit">删除</button>
5                     </form>
6                 </td>
<3>修改
注意thymeleaf构建url的方式
1 <td align="center" ><a th:href="@{/category/{id}(id=${c.id})}">编辑</a></td>
3.editCategory.html
修改action中的地址
 1 <!DOCTYPE html>
 2 <html lang="en" xmlns:th="http://www.thymeleaf.org">
 3 <head>
 4     <meta http-equiv="Content-Type" content="text/html; charset=UTF-8" />
 5     <title>Title</title>
 6 </head>
 7 <body>
 8 <div class="showing">
 9     <h2>springboot+jpa</h2>
10
11     <div style="margin:0px auto; 500px">
12
13         <form th:action="@{/category/{id}(id=${c.id})}"  method="post">
14
15             name: <input name="name"  th:value="${c.name}" /> <br/>
16
17             <input name="id" type="hidden" th:value="${c.id}" />
18             <button type="submit">提交</button>
19
20         </form>
21     </div>
22 </div>
23 </body>
24 </html>
4.完整代码:https://github.com/lyj8330328/springboot-restful-demo
三、分别是以json方式:提交,获取单个和获取多个
提交:http://localhost:8080/submit.html
获取单个:http://localhost:8080/getOne.html
获取多个:http://localhost:8080/getMany.html
基于Restful 风格的springboot进行修改。
1.修改Category.java
①增加个toString() 方便,便于显示
②增加个注解:@JsonIgnoreProperties({ "handler","hibernateLazyInitializer" }) ,否则会出错
 1 package com.example.springbootjpademo.pojo;
 2
 3 import com.fasterxml.jackson.annotation.JsonIgnoreProperties;
 4
 5 import javax.persistence.*;
 6
 7 @Entity
 8 @Table(name = "category")
 9 @JsonIgnoreProperties({ "handler","hibernateLazyInitializer" })
10 public class Category {
11     @Id
12     @GeneratedValue(strategy = GenerationType.IDENTITY)
13     @Column(name = "id")
14     private int id;
15
16     @Column(name = "name")
17     private String name;
18     public int getId() {
19         return id;
20     }
21     public void setId(int id) {
22         this.id = id;
23     }
24     public String getName() {
25         return name;
26     }
27     public void setName(String name) {
28         this.name = name;
29     }
30
31     public String toString() {
32         return "Category [id=" + id + ", name=" + name + "]";
33     }
34 }
2.CategoryController.java
控制器里提供3个方法,分别用来处理json 提交,json获取单个对象,json获取多个对象。
 1 package com.example.springbootjpademo.controller;
 2
 3 import com.example.springbootjpademo.dao.CategoryDAO;
 4 import com.example.springbootjpademo.pojo.Category;
 5 import org.springframework.beans.factory.annotation.Autowired;
 6 import org.springframework.data.domain.Page;
 7 import org.springframework.data.domain.PageRequest;
 8 import org.springframework.data.domain.Pageable;
 9 import org.springframework.data.domain.Sort;
10 import org.springframework.stereotype.Controller;
11 import org.springframework.ui.Model;
12 import org.springframework.web.bind.annotation.*;
13
14 import java.util.List;
15 //@Controller
16 @RestController
17 public class CategoryController {
18     @Autowired
19     CategoryDAO categoryDAO;
20
21     @GetMapping("/category")
22     public List<Category> listCategory(@RequestParam(value = "start", defaultValue = "0") int start,@RequestParam(value = "size", defaultValue = "5") int size) throws Exception {
23         start = start<0?0:start;
24         Sort sort = new Sort(Sort.Direction.DESC, "id");
25         Pageable pageable = new PageRequest(start, size, sort);
26         Page<Category> page =categoryDAO.findAll(pageable);
27         return page.getContent();
28     }
29
30     @GetMapping("/category/{id}")
31     public Category getCategory(@PathVariable("id") int id) throws Exception {
32         Category c= categoryDAO.getOne(id);
33         System.out.println(c);
34         return c;
35     }
36     @PutMapping("/category")
37     public void addCategories(@RequestBody Category category) throws Exception {
38         Category category1=new Category();
39         category1.setName(category.getName());
40         categoryDAO.save(category1);
41         System.out.println("springboot接受到浏览器以JSON格式提交的数据:"+category);
42     }
43 }
3.submit.html
 1 <!DOCTYPE html>
 2 <html>
 3 <head>
 4     <meta http-equiv="Content-Type" content="text/html; charset=utf-8" />
 5     <title>用AJAX以JSON方式提交数据</title>
 6     <script type="text/javascript" src="js/jquery.min.js"></script>
 7 </head>
 8 <body>
 9 <form >
10     id:<input type="text" id="id" value="123" /><br/>
11     名称:<input type="text" id="name" value="category xxx"/><br/>
12     <input type="button" value="提交" id="sender" />
13 </form>
14 <div id="messageDiv"></div>
15
16 <script>
17     $('#sender').click(function(){
18         var id=document.getElementById('id').value;
19         var name=document.getElementById('name').value;
20         var category={"name":name,"id":id};
21         var jsonData = JSON.stringify(category);
22         var page="category";
23
24         $.ajax({
25             type:"put",
26             url: page,
27             data:jsonData,
28             dataType:"json",
29             contentType : "application/json;charset=UTF-8",
30             success: function(result){
31             }
32         });
33         alert("提交成功,请在springboot控制台查看服务端接收到的数据");
34
35     });
36 </script>
37 </body>
38
39 </html>
4.getOne.html
 1 <!DOCTYPE html>
 2 <html>
 3 <head>
 4 <meta http-equiv="Content-Type" content="text/html; charset=utf-8">
 5 <title>用AJAX以JSON方式获取数据</title>
 6 <script type="text/javascript" src="js/jquery.min.js"></script>
 7 </head>
 8 <body>
 9     <input type="button" value="通过AJAX获取一个Hero对象---" id="sender">
10
11     <div id="messageDiv"></div>
12
13     <script>
14     $('#sender').click(function(){
15         var url="category/12";
16         $.get(
17                 url,
18                 function(data) {
19                     console.log(data);
20                      var json=data;
21                      var name =json.name;
22                      var id = json.id;
23                      $("#messageDiv").html("分类id:"+ id + "<br>分类名称:" +name );
24
25          });
26     });
27     </script>
28 </body>
29 </html>
5.getMany.html
 1 <!DOCTYPE html>
 2 <html>
 3 <head>
 4 <meta http-equiv="Content-Type" content="text/html; charset=utf-8">
 5 <title>用AJAX以JSON方式获取数据</title>
 6 <script type="text/javascript" src="js/jquery.min.js"></script>
 7 </head>
 8 <body>
 9     <input type="button" value="通过AJAX获取多个分类对象" id="sender">
10
11     <div id="messageDiv"></div>
12
13     <script>
14     $('#sender').click(function(){
15         var url="category?start=0&size=100";
16         $.get(
17                 url,
18                 function(data) {
19                     var categorys = data;
20                      for(i in categorys){
21                          var old = $("#messageDiv").html();
22                          var category = categorys[i];
23                          $("#messageDiv").html(old + "<br>"+category.id+"   -----   "+category.name);
24                      }
25          });
26     });
27     </script>
28 </body>
29
30 </body>
31 </html>
6.直接调试,即采用AJAX的方式。也可采用Postman,结果如下:
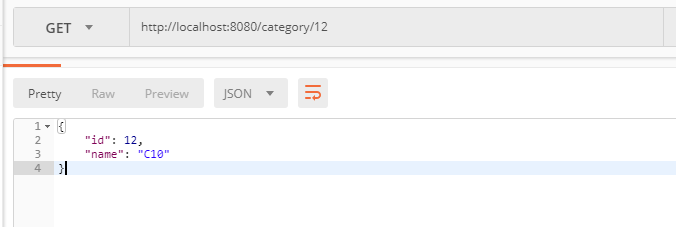
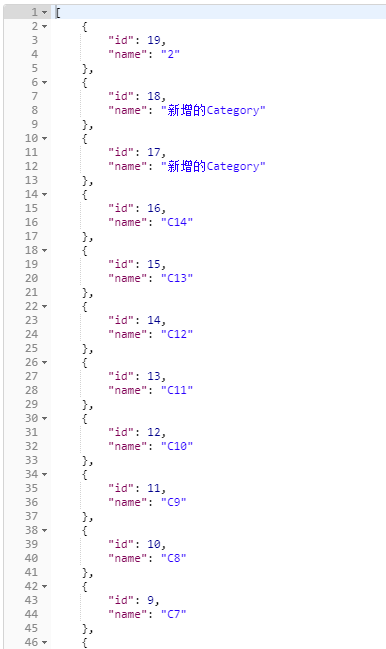
<1>请求http://localhost:8080/category,应返回5条记录,默认分页大小为5。注意请求的方式必须是GET,否则会报错。

<2>请求http://localhost:8080/category/12,返回id=12的对象。

<3>获取全部数据http://localhost:8080/category?start=0&size=100

7.代码:https://github.com/lyj8330328/springboot-jpa-demo
四、总结
1.访问方式
通过http://localhost:8080/submit.html这种形式访问视图,必须将视图文件放入src/main目录下的webapp文件夹中,这样才能访问到视图,放在resources下的templates中就会出错。
2.注解
<1>@JsonIgnoreProperties({ "handler","hibernateLazyInitializer" })
因为懒加载这个对象属性只是一个代理对象,如果json直接当作一个存在的属性去序列化就会出现错误。
<2>@RestController
@RestController is a stereotype annotation that combines @ResponseBody and @Controller.
意思是:
@RestController注解相当于@ResponseBody + @Controller合在一起的作用。
1)如果只是使用@RestController注解Controller,则Controller中的方法无法返回视图,返回的内容就是Return 里的内容。
2)如果需要返回到指定页面,则需要用 @Controller配合视图解析器InternalResourceViewResolver才行。
3)如果需要返回JSON,XML或自定义mediaType内容到页面,则需要在对应的方法上加上@ResponseBody注解。