两步解决JupyterLab添加目录插件的问题
写在前面
- 做这件事的原因:
- 简简单单:想给
jupyter lab安装目录 - 兄弟,给jupyterlab安装目录,看我就够了,我百度了好久,找的一堆啥啊,我如果用jupyter notebook还跟你比比这么多干嘛鸭?
- 简简单单:想给
- 如果有错别字呢,哪里写错了呢,请在评论区告诉我嗷,同时,可能会有一些奇奇怪怪的符号夹在文字中,这是因为我用的是MarkDown语法,其中一些符号可能在这个平台(比如CSDN)不支持呢。
解决方案
-
众所周知,安装jupyterlab的插件需要以下几步
-
安装一个插件jupyter_contrib_nbextensions
pip install jupyter_contrib_nbextensions -
配置 nbextension
jupyter contrib nbextension install --user -
安装toc
jupyter labextension install @jupyterlab/toc
-
-
好了问题来了,Node.js和npm你没有叭,难受了
An error occured. ValueError: Please install Node.js and npm before continuing installation. You may be able to install Node.js from your package manager, from conda, or directly from the Node.js website (https://nodejs.org). See the log file for details: C:UsersLITIANAppDataLocalTempjupyterlab-debug-amd3fad2.log-
啊,这,这道题我会啊,装不就完事儿了啊:
所以, 【解决方案的第1步】 :安装nvm,然后通过这个nvm来安装node和npm,是不是想直到为什么不直接装,你去官网把node都下好了,为什么我给你看这个?
问的好,看这:Node.js 安装配置,下面的凭论会告诉你原因的,使用 nvm 管理不同版本的 node 与 npm:
nvm是 Nodejs 版本管理器,它让我们方便的对切换Nodejs 版本。
-
安装好了,我们就要开始 【解决方案的第2步】 :用nvm安装node和npm
nvm install 14.15.3 64-bit欸?这个时候报错了:
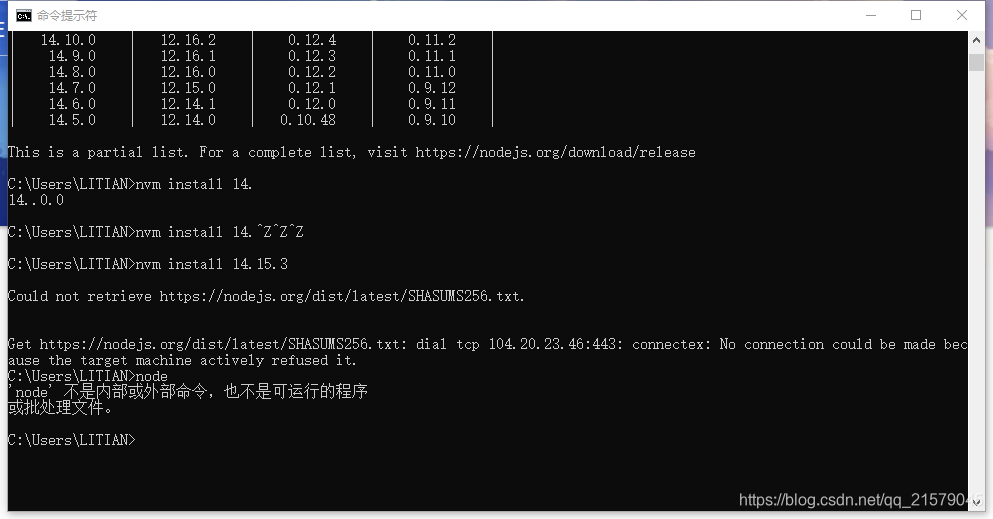
Could not retrieve https://nodejs.org/dist/latest/SHASUMS256.txt. Get https://nodejs.org/dist/latest/SHASUMS256.txt: dial tcp 104.20.23.46:443: connectex: No connection could be made because the target machine actively refused it.这尼玛谁顶得住啊。别担心,解决方案在下面:使用nvm-windows安装NodeJs遇到的问题
概括呢:
就是说去nvm的安装目录下,找一个settings.txt
打开之后,在后面加上:
node_mirror:npm.taobao.org/mirrors/node/
npm_mirror:npm.taobao.org/mirrors/npm/
然后保存,再开cmd运行
nvm install 14.15.3 64-bit诶~就很舒服。安装完之后记得选择这个使用嗷:
nvm use 14.15.3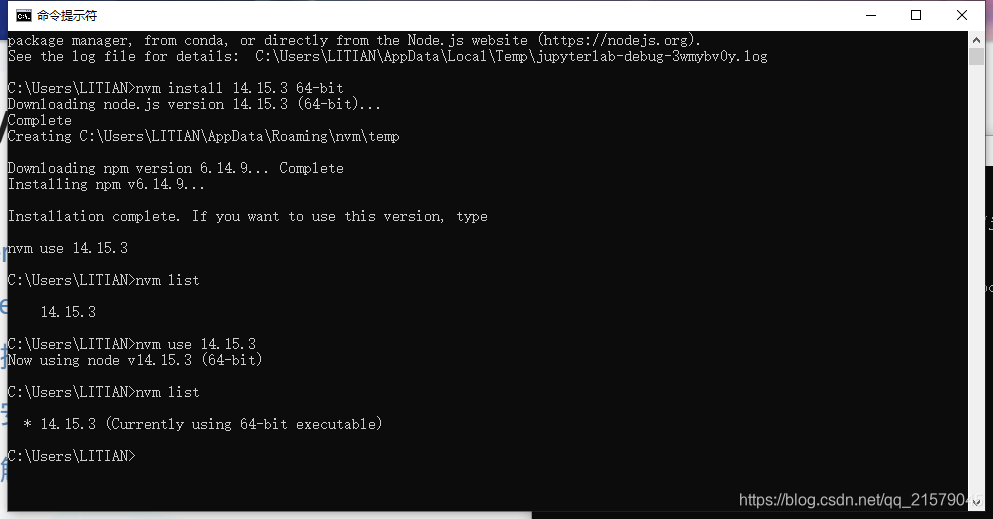
-
好了,真的好了,运行等了很久的语句叭
jupyter labextension install @jupyterlab/toc诶 ~ 舒服!
-
-
除此之外呢,如果还想安装其他插件呢,看这个链接嗷:解决 jupyter labextension install 报错
jupyter labextension install @jupyterlab/git
jupyter labextension install @jupyterlab/github
jupyter labextension install @jupyterlab/debugger
jupyter labextension install @lckr/jupyterlab_variableinspector
自动格式化代码
jupyter labextension install jupyterlab_code_formatter
ipynbpymd文件互相转换
jupyter labextension install jupytext
markdown拼写核对
jupyter labextension install jupyterlab_spellchecker
自动补全与跳转定义
jupyter labextension install @krassowski/jupyterlab-lsp
-
结果展示!
我的CSDN:https://blog.csdn.net/qq_21579045
我的博客园:https://www.cnblogs.com/lyjun/
我的Github:https://github.com/TinyHandsome
纸上得来终觉浅,绝知此事要躬行~
欢迎大家过来OB~
by 李英俊小朋友