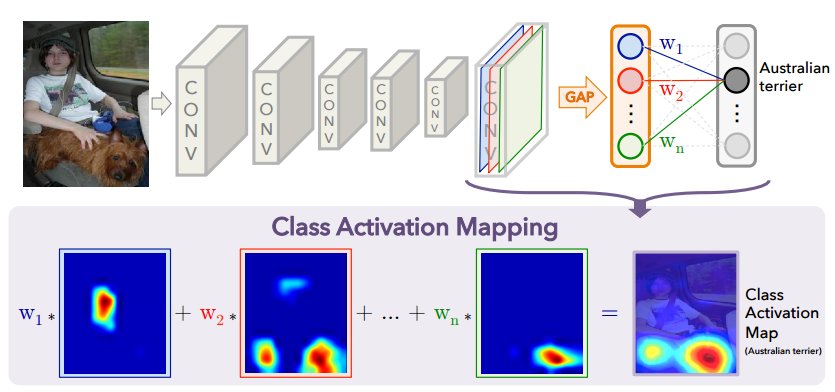
Cam(Class Activation Mapping)是一个很有意思的算法,他能够将神经网络到底在关注什么可视化的表现出来。但同时它的实现却又如此简介,相比NIN,googLenet这些使用GAP(Global Average Pooling)用来代替全连接层,他却将其输出的权重和featuremap相乘,累加,将其用图像表示出来。
其网络架构如下

Class Activation Mapping具体论文
当然Cam的目的并不仅仅是将其表示出来,神经网络所关注的地方,通常就是物体所在的地方,因此它可以辅助训练检测网络。
因此就有了PlacesNet。
网络上基本都是基于AlexNet等网络,其实任何网络,只要加一层全局池化层就可以帮助我们将CNN关注什么表示出来,因此我对Tensorflow官方Mnist的CNN网络进行少量的修改,实现了CAM。只是将最后的全连接层,改为了全局池化层。
CAM的核心公式很简单
[S_c = sum_{k} {W_k^c} {sum_{x,y} {f_k(x,y)}}
]
将全局平均池化层输出的权重乘上feature map累加
import tensorflow as tf
from tensorflow.examples.tutorials.mnist import input_data
import matplotlib.pyplot as plt
import numpy as np
%matplotlib inline

mnist = input_data.read_data_sets("/tmp/data/", one_hot=True)
/home/lyn/anaconda3/lib/python3.6/importlib/_bootstrap.py:205: RuntimeWarning: compiletime version 3.5 of module 'tensorflow.python.framework.fast_tensor_util' does not match runtime version 3.6
  return f(*args, **kwds)


Extracting /tmp/data/train-images-idx3-ubyte.gz
Extracting /tmp/data/train-labels-idx1-ubyte.gz
Extracting /tmp/data/t10k-images-idx3-ubyte.gz
Extracting /tmp/data/t10k-labels-idx1-ubyte.gz
在读入数据后,设定基本的学习参数
# Training Parameters
learning_rate = 0.001
num_steps = 10000
batch_size = 128
display_step = 10

# Network Parameters
num_input = 784 # MNIST data input (img shape: 28*28)
num_classes = 10 # MNIST total classes (0-9 digits)

# tf Graph input
X = tf.placeholder(tf.float32, [None, num_input])
Y = tf.placeholder(tf.int32, [None, num_classes])
# Create some wrappers for simplicity
def conv2d(x, W, b, strides=1):
    # Conv2D wrapper, with bias and relu activation
    x = tf.nn.conv2d(x, W, strides=[1, strides, strides, 1], padding='SAME')
    x = tf.nn.bias_add(x, b)
    return tf.nn.relu(x)


def maxpool2d(x, k=2):
    # MaxPool2D wrapper
    return tf.nn.max_pool(x, ksize=[1, k, k, 1], strides=[1, k, k, 1],
                          padding='SAME')
在实际使用中我们需要获得得feature map,与全局池化层相乘并累加
def conv_layers(x,weights,biases):
    x = tf.reshape(x, shape=[-1, 28, 28, 1])

    # Convolution Layer
    conv1 = conv2d(x, weights['wc1'], biases['bc1'])
    # Max Pooling (down-sampling)
    conv1 = maxpool2d(conv1, k=2)
    # Convolution Layer
    conv2 = conv2d(conv1, weights['wc2'], biases['bc2'])
    # Max Pooling (down-sampling)
    conv2 = maxpool2d(conv2, k=2)
    return conv2

def out_layer(conv2,weights,biases):
    gap = tf.nn.avg_pool(conv2,ksize=[1,7,7,1],strides=[1,7,7,1],padding="SAME")
    gap = tf.reshape(gap,[-1,128])
    out = tf.add(tf.matmul(gap, weights['out']), biases['out'])
    return out

def generate_heatmap(conv2,label,weights):
    conv2_resized = tf.image.resize_images(conv2,[28,28])
    label_w = tf.gather(tf.transpose(weights['out']),label)
    label_w = tf.reshape(label_w,[-1,128,1])
    conv2_resized = tf.reshape(conv2_resized,[-1,28*28,128])
    classmap = tf.matmul( conv2_resized, label_w )
    classmap = tf.reshape( classmap, [-1, 28,28] )
    return classmap
# Store layers weight & bias
weights = {
    # 5x5 conv, 1 input, 32 outputs
    'wc1': tf.Variable(tf.random_normal([5, 5, 1, 32])),
    # 5x5 conv, 32 inputs, 64 outputs
    'wc2': tf.Variable(tf.random_normal([5, 5, 32, 128])),
    'out': tf.Variable(tf.random_normal([128, num_classes]))
}

biases = {
    'bc1': tf.Variable(tf.random_normal([32])),
    'bc2': tf.Variable(tf.random_normal([128])),
    'bd1': tf.Variable(tf.random_normal([1024])),
    'out': tf.Variable(tf.random_normal([num_classes]))
}

# Construct model
conv2 = conv_layers(X, weights, biases)
logits = out_layer(conv2,weights, biases)
prediction = tf.nn.softmax(logits)
classmap = generate_heatmap(conv2,tf.argmax(prediction,1),weights)
loss_op = tf.reduce_mean(tf.nn.softmax_cross_entropy_with_logits(
    logits=logits, labels=Y))
optimizer = tf.train.AdamOptimizer(learning_rate=learning_rate)
train_op = optimizer.minimize(loss_op)


# Evaluate model
correct_pred = tf.equal(tf.argmax(prediction, 1), tf.argmax(Y, 1))
accuracy = tf.reduce_mean(tf.cast(correct_pred, tf.float32))

# Initialize the variables (i.e. assign their default value)
init = tf.global_variables_initializer()
sess = tf.Session()
sess.run(init)

for step in range(1, num_steps+1):
    batch_x, batch_y = mnist.train.next_batch(batch_size)
    # Run optimization op (backprop)
    sess.run(train_op, feed_dict={X: batch_x, Y: batch_y})
    if step % display_step == 0 or step == 1:
        # Calculate batch loss and accuracy
        loss, acc = sess.run([loss_op, accuracy], feed_dict={X: batch_x,
                                                             Y: batch_y})
        print("Step " + str(step) + ", Minibatch Loss= " +
              "{:.4f}".format(loss) + ", Training Accuracy= " +
              "{:.3f}".format(acc))

print("Optimization Finished!")

# Calculate accuracy for 256 MNIST test images
print("Testing Accuracy:",
    sess.run(accuracy, feed_dict={X: mnist.test.images[:256],
                                  Y: mnist.test.labels[:256],}
            ))
sess.run(conv2,feed_dict={X:mnist.test.images[:10],Y:mnist.test.labels[:10]})
classmaps = sess.run(classmap,feed_dict={X:mnist.test.images[:10],Y:mnist.test.labels[:10]})
Testing Accuracy: 0.976562
for i in range(9):
    plt.subplot(33*10+i+1)
    plt.axis("off")
    plt.imshow(classmaps[i],cmap="gray")
    plt.title("label is"+str(np.argmax(mnist.test.labels[i])))

黑色为正权重点,白色为负权重点。
当然由于网络太浅,使用了全局平均池化以后,训练时间大大增长,准确率也不如之前。