- 前言
- 1. SpringBoot 源码常用注解拾遗
- 组合注解
- @Value 【Spring 提供】
- @ConfigurationProperties 【SpringBoot 提供】
- @Import 【Spring 提供】
- @Conditional 【Spring提供】
- 2. SpringBoot 启动过程
- 创建 SpringApplication 对象
- 运行 run() 方法
- 3. SpringBoot 自动配置原理
- @SpringBootApplication 注解
- @EnableAutoConfiguration 注解
- 最后
前言
小伙伴们是否想起曾经被 SSM 整合支配的恐惧?相信很多小伙伴都是有过这样的经历的,一大堆配置问题,各种排除扫描,导入一个新的依赖又得添加新的配置。自从有了 SpringBoot 之后,咋们就起飞了!各种零配置开箱即用,而我们之所以开发起来能够这么爽,自动配置的功劳少不了,今天我们就一起来讨论一下 SpringBoot 自动配置原理。
本文主要分为三大部分:
- SpringBoot 源码常用注解拾遗
- SpringBoot 启动过程
- SpringBoot 自动配置原理
1. SpringBoot 源码常用注解拾遗
这部分主要讲一下 SpringBoot 源码中经常使用到的注解,以扫清后面阅读源码时候的障碍。
组合注解
当可能大量同时使用到几个注解到同一个类上,就可以考虑将这几个注解到别的注解上。被注解的注解我们就称之为组合注解。
- 元注解:可以注解到别的注解上的注解。
- 组合注解:被注解的注解我们就称之为组合注解。
@Value 【Spring 提供】
@Value就相当于传统 xml 配置文件中的 value 字段。
假设存在代码:
@Component
public class Person {

@Value("i am name")
private String name;

}
上面代码等价于的配置文件:
<bean class="Person">
<property name ="name" value="i am name"></property>
</bean>
我们知道配置文件中的 value 的取值可以是:
- 字面量
- 通过
${key}方式从环境变量中获取值 - 通过
${key}方式全局配置文件中获取值 #{SpEL}
所以,我们就可以通过
@Value(${key})的方式获取全局配置文件中的指定配置项。
@ConfigurationProperties 【SpringBoot 提供】
如果我们需要取 N 个配置项,通过 @Value 的方式去配置项需要一个一个去取,这就显得有点 low 了。我们可以使用 @ConfigurationProperties。
标有
@ConfigurationProperties的类的所有属性和配置文件中相关的配置项进行绑定。(默认从全局配置文件中获取配置值),绑定之后我们就可以通过这个类去访问全局配置文件中的属性值了。
下面看一个实例:
- 在主配置文件中添加如下配置
person.name=kundy
person.age=13
person.sex=male
- 创建配置类,由于篇幅问题这里省略了 setter、getter 方法,但是实际开发中这个是必须的,否则无法成功注入。另外,@Component 这个注解也还是需要添加的。
@Component
@ConfigurationProperties(prefix = "person")
public class Person {

    private String name;
    private Integer age;
    private String sex;

}
这里 @ConfigurationProperties 有一个
prefix参数,主要是用来指定该配置项在配置文件中的前缀。
- 测试,在 SpringBoot 环境中,编写个测试方法,注入 Person 类,即可通过 Person 对象取到配置文件的值。
@Import 【Spring 提供】
@Import注解支持导入普通 java 类,并将其声明成一个bean。主要用于将多个分散的 java config 配置类融合成一个更大的 config 类。
@Import注解在 4.2 之前只支持导入配置类。- 在4.2之后
@Import注解支持导入普通的 java 类,并将其声明成一个 bean。
**@Import 三种使用方式 **
- 直接导入普通的 Java 类。
- 配合自定义的 ImportSelector 使用。
- 配合 ImportBeanDefinitionRegistrar 使用。
1. 直接导入普通的 Java 类
- 创建一个普通的 Java 类。
public class Circle {

    public void sayHi() {
        System.out.println("Circle sayHi()");
    }

}
- 创建一个配置类,里面没有显式声明任何的 Bean,然后将刚才创建的 Circle 导入。
@Import({Circle.class})
@Configuration
public class MainConfig {

}
- 创建测试类。
public static void main(String[] args) {

ApplicationContext context = new AnnotationConfigApplicationContext(MainConfig.class);
    Circle circle = context.getBean(Circle.class);
    circle.sayHi();
}
- 运行结果:
Circle sayHi()
可以看到我们顺利的从 IOC 容器中获取到了 Circle 对象,证明我们在配置类中导入的 Circle 类,确实被声明为了一个 Bean。
2. 配合自定义的 ImportSelector 使用
ImportSelector是一个接口,该接口中只有一个 selectImports 方法,用于返回全类名数组。所以利用该特性我们可以给容器动态导入 N 个Bean。
- 创建普通 Java 类 Triangle。
public class Triangle {

    public void sayHi(){
        System.out.println("Triangle sayHi()");
    }

}
- 创建 ImportSelector 实现类,selectImports 返回 Triangle 的全类名。
public class MyImportSelector implements ImportSelector {

    @Override
    public String[] selectImports(AnnotationMetadata annotationMetadata) {
        return new String[]{"annotation.importannotation.waytwo.Triangle"};
    }

}
- 创建配置类,在原来的基础上还导入了 MyImportSelector。
@Import({Circle.class,MyImportSelector.class})
@Configuration
public class MainConfigTwo {

}
- 创建测试类
public static void main(String[] args) {

ApplicationContext context = new AnnotationConfigApplicationContext(MainConfigTwo.class);
    Circle circle = context.getBean(Circle.class);
    Triangle triangle = context.getBean(Triangle.class);
    circle.sayHi();
    triangle.sayHi();
}
- 运行结果:
Circle sayHi()
Triangle sayHi()
可以看到 Triangle 对象也被 IOC 容器成功的实例化出来了。
3. 配合 ImportBeanDefinitionRegistrar 使用
ImportBeanDefinitionRegistrar也是一个接口,它可以手动注册bean到容器中,从而我们可以对类进行个性化的定制。(需要搭配 @Import 与 @Configuration 一起使用。)
- 创建普通 Java 类 Rectangle。
public class Rectangle {

    public void sayHi() {
        System.out.println("Rectangle sayHi()");
    }

}
- 创建 ImportBeanDefinitionRegistrar 实现类,实现方法直接手动注册一个名叫 rectangle 的 Bean 到 IOC 容器中。
public class MyImportBeanDefinitionRegistrar implements ImportBeanDefinitionRegistrar {

    @Override
    public void registerBeanDefinitions(AnnotationMetadata annotationMetadata, BeanDefinitionRegistry beanDefinitionRegistry) {

    RootBeanDefinition rootBeanDefinition = new RootBeanDefinition(Rectangle.class);
        // 注册一个名字叫做 rectangle 的 bean
        beanDefinitionRegistry.registerBeanDefinition("rectangle", rootBeanDefinition);
    }

}
- 创建配置类,导入 MyImportBeanDefinitionRegistrar 类。
@Import({Circle.class, MyImportSelector.class, MyImportBeanDefinitionRegistrar.class})
@Configuration
public class MainConfigThree {

}
- 创建测试类。
public static void main(String[] args) {

    ApplicationContext context = new AnnotationConfigApplicationContext(MainConfigThree.class);
        Circle circle = context.getBean(Circle.class);
        Triangle triangle = context.getBean(Triangle.class);
        Rectangle rectangle = context.getBean(Rectangle.class);
        circle.sayHi();
        triangle.sayHi();
        rectangle.sayHi();

    }
}
- 运行结果
Circle sayHi()
Triangle sayHi()
Rectangle sayHi()
嗯对,Rectangle 对象也被注册进来了。
@Conditional 【Spring提供】
> @Conditional注释可以实现只有在特定条件满足时才启用一些配置。
下面看一个简单的例子:
- 创建普通 Java 类 ConditionBean,该类主要用来验证 Bean 是否成功加载。
public class ConditionBean {

    public void sayHi() {
        System.out.println("ConditionBean sayHi()");
    }

}
- 创建 Condition 实现类,@Conditional 注解只有一个 Condition 类型的参数,Condition 是一个接口,该接口只有一个返回布尔值的 matches() 方法,该方法返回 true 则条件成立,配置类生效。反之,则不生效。在该例子中我们直接返回 true。
public class MyCondition implements Condition {

    @Override
    public boolean matches(ConditionContext conditionContext, AnnotatedTypeMetadata annotatedTypeMetadata) {
        return true;
    }

}
- 创建配置类,可以看到该配置的 @Conditional 传了我们刚才创建的 Condition 实现类进去,用作条件判断。
@Configuration
@Conditional(MyCondition.class)
public class ConditionConfig {

    @Bean
    public ConditionBean conditionBean(){
        return new ConditionBean();
    }

}
- 编写测试方法。
public static void main(String[] args) {

    ApplicationContext context = new AnnotationConfigApplicationContext(ConditionConfig.class);
    ConditionBean conditionBean = context.getBean(ConditionBean.class);
    conditionBean.sayHi();

}
- 结果分析
因为 Condition 的 matches 方法直接返回了 true,配置类会生效,我们可以把 matches 改成返回 false,则配置类就不会生效了。
除了自定义 Condition,Spring 还为我们扩展了一些常用的 Condition。
| 扩展注解 | 作用 |
|---|---|
| ConditionalOnBean | 容器中存在指定 Bean,则生效。 |
| ConditionalOnMissingBean | 容器中不存在指定 Bean,则生效。 |
| ConditionalOnClass | 系统中有指定的类,则生效。 |
| ConditionalOnMissingClass | 系统中没有指定的类,则生效。 |
| ConditionalOnProperty | 系统中指定的属性是否有指定的值。 |
| ConditionalOnWebApplication | 当前是web环境,则生效。 |
2. SpringBoot 启动过程
在看源码的过程中,我们会看到以下四个类的方法经常会被调用,我们需要对一下几个类有点印象:
- ApplicationContextInitializer
- ApplicationRunner
- CommandLineRunner
- SpringApplicationRunListener
下面开始源码分析,先从 SpringBoot 的启动类的 run() 方法开始看,以下是调用链:SpringApplication.run()-> run(new Class[]{primarySource}, args)-> new SpringApplication(primarySources)).run(args)。
一直在run,终于到重点了,我们直接看 new SpringApplication(primarySources)).run(args)这个方法。
 1.png
1.png
上面的方法主要包括两大步骤:
- 创建 SpringApplication 对象。
- 运行 run() 方法。
创建 SpringApplication 对象
public SpringApplication(ResourceLoader resourceLoader, Class... primarySources) {

    this.sources = new LinkedHashSet();
    this.bannerMode = Mode.CONSOLE;
    this.logStartupInfo = true;
    this.addCommandLineProperties = true;
    this.addConversionService = true;
    this.headless = true;
    this.registerShutdownHook = true;
    this.additionalProfiles = new HashSet();
    this.isCustomEnvironment = false;
    this.resourceLoader = resourceLoader;
    Assert.notNull(primarySources, "PrimarySources must not be null");
    // 保存主配置类(这里是一个数组,说明可以有多个主配置类)
    this.primarySources = new LinkedHashSet(Arrays.asList(primarySources));
    // 判断当前是否是一个 Web 应用
    this.webApplicationType = WebApplicationType.deduceFromClasspath();
    // 从类路径下找到 META/INF/Spring.factories 配置的所有 ApplicationContextInitializer,然后保存起来
    this.setInitializers(this.getSpringFactoriesInstances(ApplicationContextInitializer.class));
    // 从类路径下找到 META/INF/Spring.factories 配置的所有 ApplicationListener,然后保存起来
    this.setListeners(this.getSpringFactoriesInstances(ApplicationListener.class));
    // 从多个配置类中找到有 main 方法的主配置类(只有一个)
    this.mainApplicationClass = this.deduceMainApplicationClass();

}
运行 run() 方法
public ConfigurableApplicationContext run(String... args) {
 // 创建计时器
 StopWatch stopWatch = new StopWatch();
 stopWatch.start();
 // 声明 IOC 容器
 ConfigurableApplicationContext context = null;
 Collection<SpringBootExceptionReporter> exceptionReporters = new ArrayList();
 this.configureHeadlessProperty();
 // 从类路径下找到 META/INF/Spring.factories 获取 SpringApplicationRunListeners
 SpringApplicationRunListeners listeners = this.getRunListeners(args);
 // 回调所有 SpringApplicationRunListeners 的 starting() 方法
 listeners.starting();
 Collection exceptionReporters;
 try {
  // 封装命令行参数
  ApplicationArguments applicationArguments = new DefaultApplicationArguments(args);
  // 准备环境,包括创建环境,创建环境完成后回调 SpringApplicationRunListeners#environmentPrepared()方法,表示环境准备完成
  ConfigurableEnvironment environment = this.prepareEnvironment(listeners, applicationArguments);
  this.configureIgnoreBeanInfo(environment);
  // 打印 Banner
  Banner printedBanner = this.printBanner(environment);
  // 创建 IOC 容器(决定创建 web 的 IOC 容器还是普通的 IOC 容器)
  context = this.createApplicationContext();
  exceptionReporters = this.getSpringFactoriesInstances(SpringBootExceptionReporter.class, new Class[]{ConfigurableApplicationContext.class}, context);
  /*
 * 准备上下文环境,将 environment 保存到 IOC 容器中,并且调用 applyInitializers() 方法
 * applyInitializers() 方法回调之前保存的所有的 ApplicationContextInitializer 的 initialize() 方法
 * 然后回调所有的 SpringApplicationRunListener#contextPrepared() 方法
 * 最后回调所有的 SpringApplicationRunListener#contextLoaded() 方法
 */
  this.prepareContext(context, environment, listeners, applicationArguments, printedBanner);
  // 刷新容器,IOC 容器初始化(如果是 Web 应用还会创建嵌入式的 Tomcat),扫描、创建、加载所有组件的地方
  this.refreshContext(context);
  // 从 IOC 容器中获取所有的 ApplicationRunner 和 CommandLineRunner 进行回调
  this.afterRefresh(context, applicationArguments);
  stopWatch.stop();
  if (this.logStartupInfo) {
   (new StartupInfoLogger(this.mainApplicationClass)).logStarted(this.getApplicationLog(), stopWatch);
  }
  // 调用 所有 SpringApplicationRunListeners#started()方法
  listeners.started(context);
  this.callRunners(context, applicationArguments);
 }
 catch (Throwable var10) {
  this.handleRunFailure(context, var10, exceptionReporters, listeners);
  throw new IllegalStateException(var10);
 }
 try {
  listeners.running(context);
  return context;
 }
 catch (Throwable var9) {
  this.handleRunFailure(context, var9, exceptionReporters, (SpringApplicationRunListeners)null);
  throw new IllegalStateException(var9);
 }
}
小结:
run() 阶段主要就是回调本节开头提到过的4个监听器中的方法与加载项目中组件到 IOC 容器中,而所有需要回调的监听器都是从类路径下的
META/INF/Spring.factories中获取,从而达到启动前后的各种定制操作。
3. SpringBoot 自动配置原理
@SpringBootApplication 注解
SpringBoot 项目的一切都要从
@SpringBootApplication这个注解开始说起。
@SpringBootApplication 标注在某个类上说明:
- 这个类是 SpringBoot 的主配置类。
- SpringBoot 就应该运行这个类的 main 方法来启动 SpringBoot 应用。
该注解的定义如下:
@SpringBootConfiguration
@EnableAutoConfiguration
@ComponentScan(
excludeFilters = {@Filter(
type = FilterType.CUSTOM,
classes = {TypeExcludeFilter.class}
), @Filter(
type = FilterType.CUSTOM,
classes = {AutoConfigurationExcludeFilter.class}
)}
)
public @interface SpringBootApplication {
可以看到 SpringBootApplication注解是一个组合注解(关于组合注解文章的开头有讲到),其主要组合了一下三个注解:
@SpringBootConfiguration:该注解表示这是一个 SpringBoot 的配置类,其实它就是一个 @Configuration 注解而已。@ComponentScan:开启组件扫描。@EnableAutoConfiguration:从名字就可以看出来,就是这个类开启自动配置的。嗯,自动配置的奥秘全都在这个注解里面。
@EnableAutoConfiguration 注解
先看该注解是怎么定义的:
@AutoConfigurationPackage
@Import({AutoConfigurationImportSelector.class})
public @interface EnableAutoConfiguration {
@AutoConfigurationPackage
从字面意思理解就是自动配置包。点进去可以看到就是一个 @Import 注解:
@Import({Registrar.class}),导入了一个 Registrar 的组件。关于 @Import 的用法文章上面也有介绍哦。
我们在 Registrar 类中的 registerBeanDefinitions 方法上打上断点,可以看到返回了一个包名,该包名其实就是主配置类所在的包。
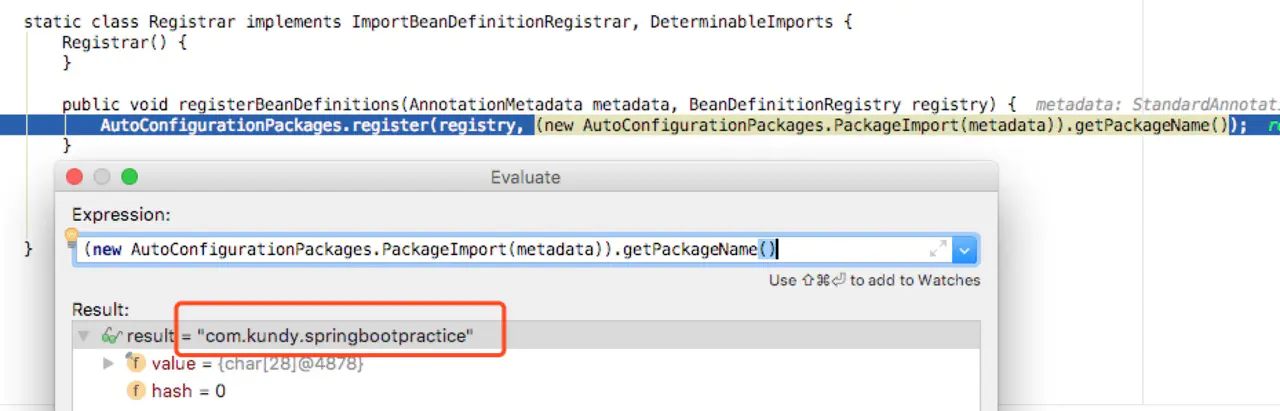
一句话:@AutoConfigurationPackage 注解就是将主配置类(@SpringBootConfiguration标注的类)的所在包及下面所有子包里面的所有组件扫描到Spring容器中。所以说,默认情况下主配置类包及子包以外的组件,Spring 容器是扫描不到的。
@Import({AutoConfigurationImportSelector.class})
该注解给当前配置类导入另外的 N 个自动配置类。(该注解详细用法上文有提及)。
配置类导入规则
那具体的导入规则是什么呢?我们来看一下源码。在开始看源码之前,先啰嗦两句。就像小马哥说的,我们看源码不用全部都看,不用每一行代码都弄明白是什么意思,我们只要抓住关键的地方就可以了。
我们知道 AutoConfigurationImportSelector 的 selectImports 就是用来返回需要导入的组件的全类名数组的,那么如何得到这些数组呢?
在 selectImports 方法中调用了一个 getAutoConfigurationEntry() 方法。
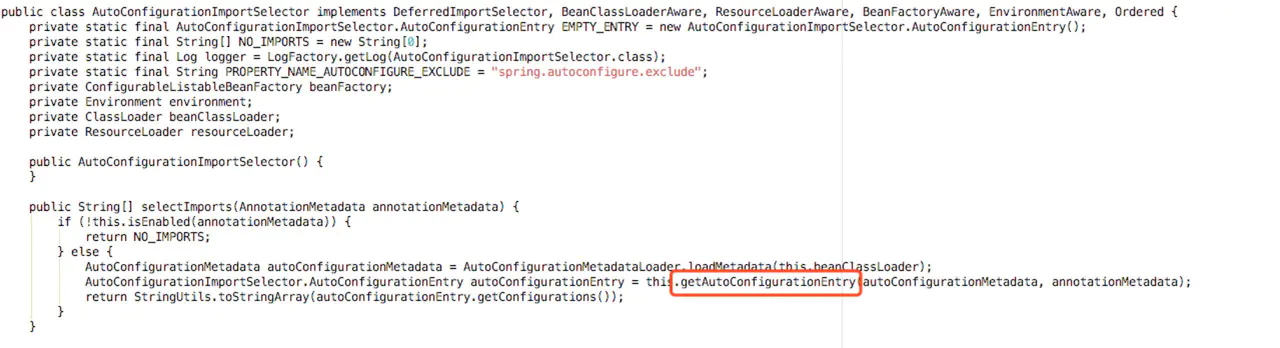
由于篇幅问题我就不一一截图了,我直接告诉你们调用链:在 getAutoConfigurationEntry() -> getCandidateConfigurations() -> loadFactoryNames()。
在这里 loadFactoryNames() 方法传入了 EnableAutoConfiguration.class 这个参数。先记住这个参数,等下会用到。

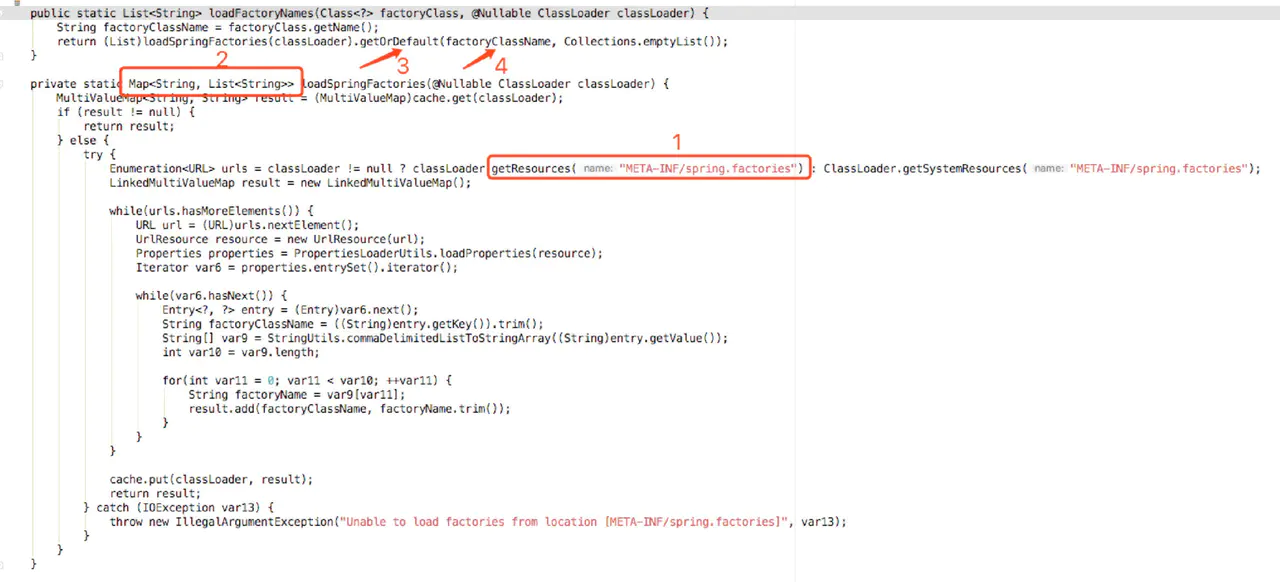
loadFactoryNames() 中关键的三步:
- 从当前项目的类路径中获取所有
META-INF/spring.factories这个文件下的信息。 - 将上面获取到的信息封装成一个 Map 返回。
- 从返回的 Map 中通过刚才传入的
EnableAutoConfiguration.class参数,获取该 key 下的所有值。
META-INF/spring.factories 探究
听我这样说完可能会有点懵,我们来看一下 META-INF/spring.factories这类文件是什么就不懵了。当然在很多第三方依赖中都会有这个文件,一般每导入一个第三方的依赖,除了本身的jar包以外,还会有一个 xxx-spring-boot-autoConfigure,这个就是第三方依赖自己编写的自动配置类。我们现在就以 spring-boot-autocongigure 这个依赖来说。
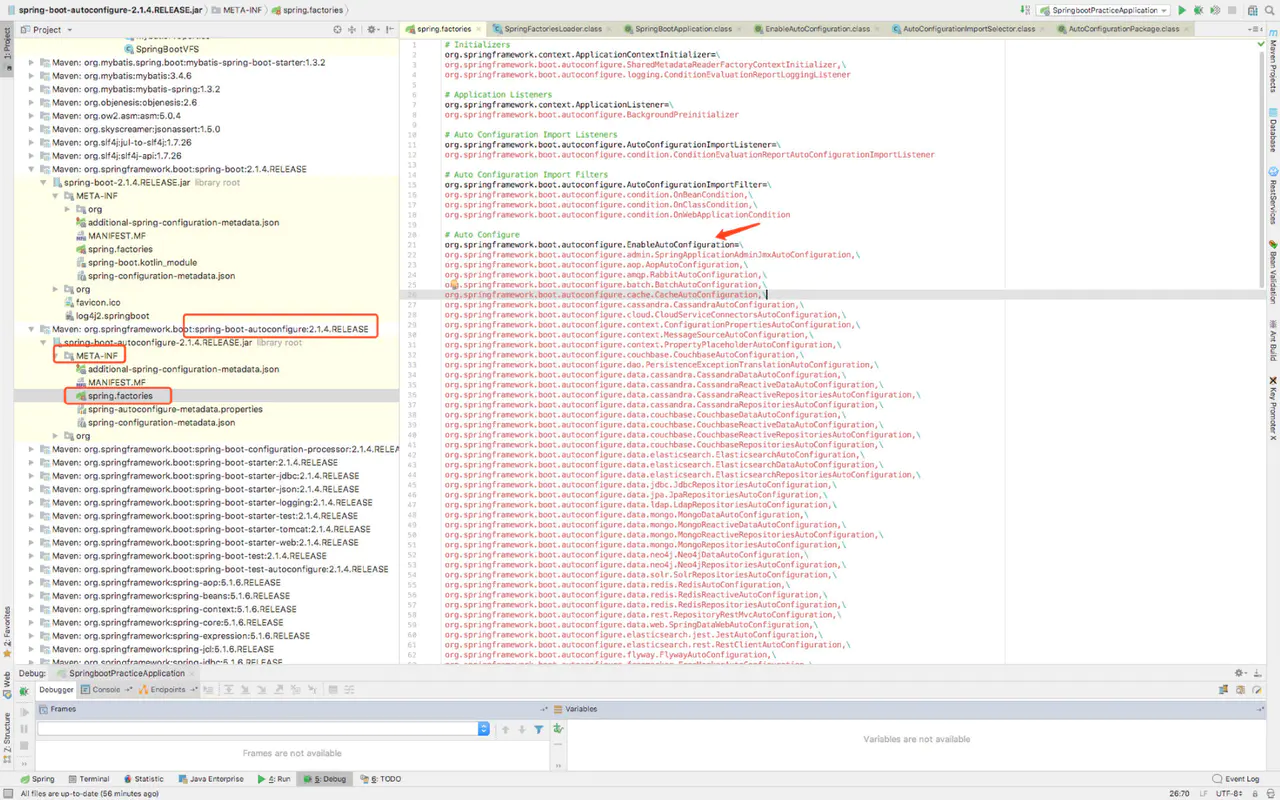
可以看到 EnableAutoConfiguration 下面有很多类,这些就是我们项目进行自动配置的类。
一句话:将类路径下 META-INF/spring.factories里面配置的所有 EnableAutoConfiguration 的值加入到 Spring 容器中。
HttpEncodingAutoConfiguration
通过上面方式,所有的自动配置类就被导进主配置类中了。但是这么多的配置类,明显有很多自动配置我们平常是没有使用到的,没理由全部都生效吧。
接下来我们以 HttpEncodingAutoConfiguration为例来看一个自动配置类是怎么工作的。为啥选这个类呢?主要是这个类比较的简单典型。
先看一下该类标有的注解:
@Configuration
@EnableConfigurationProperties({HttpProperties.class})
@ConditionalOnWebApplication(
type = Type.SERVLET
)
@ConditionalOnClass({CharacterEncodingFilter.class})
@ConditionalOnProperty(
prefix = "spring.http.encoding",
value = {"enabled"},
matchIfMissing = true
)
public class HttpEncodingAutoConfiguration {
- @Configuration:标记为配置类。
- @ConditionalOnWebApplication:web应用下才生效。
- @ConditionalOnClass:指定的类(依赖)存在才生效。
- @ConditionalOnProperty:主配置文件中存在指定的属性才生效。
- @EnableConfigurationProperties({HttpProperties.class}):启动指定类的ConfigurationProperties功能;将配置文件中对应的值和 HttpProperties 绑定起来;并把 HttpProperties 加入到 IOC 容器中。
因为 @EnableConfigurationProperties({HttpProperties.class}) 把配置文件中的配置项与当前 HttpProperties 类绑定上了。然后在 HttpEncodingAutoConfiguration 中又引用了 HttpProperties ,所以最后就能在 HttpEncodingAutoConfiguration 中使用配置文件中的值了。最终通过 @Bean 和一些条件判断往容器中添加组件,实现自动配置。(当然该Bean中属性值是从 HttpProperties 中获取)
HttpProperties
HttpProperties 通过 @ConfigurationProperties 注解将配置文件与自身属性绑定。
所有在配置文件中能配置的属性都是在 xxxProperties 类中封装着;配置文件能配置什么就可以参照某个功能对应的这个属性类。
@ConfigurationProperties(
prefix = "spring.http"
)// 从配置文件中获取指定的值和bean的属性进行绑定
public class HttpProperties {
小结:
- SpringBoot启动会加载大量的自动配置类。
- 我们看需要的功能有没有SpringBoot默认写好的自动配置类。
- 我们再来看这个自动配置类中到底配置了那些组件(只要我们要用的组件有,我们就不需要再来配置了)。
- 给容器中自动配置类添加组件的时候,会从properties类中获取某些属性。我们就可以在配置文件中指定这些属性的值。
xxxAutoConfiguration:自动配置类给容器中添加组件。xxxProperties:封装配置文件中相关属性。
不知道小伙伴们有没有发现,很多需要待加载的类都放在类路径下的META-INF/Spring.factories文件下,而不是直接写死这代码中,这样做就可以很方便我们自己或者是第三方去扩展,我们也可以实现自己 starter,让SpringBoot 去加载。现在明白为什么 SpringBoot 可以实现零配置,开箱即用了吧!