概述:Spring OAuth2.0 是Spring Security中的模块,提供项目安全认证(包括身份,权限,角色认证等)。其作用和 shiro 差不多,同属于安全框架。但在使用角度个人觉得 shiro更易理解更易上手,更多差别还需了解。
其中OAuth2为我们提供了四种授权方式:
1、授权码模式(authorization code)
2、简化模式(implicit)
3、密码模式(resource owner password credentials)
4、客户端模式(client credentials)
而较常用的则为密码模式和授权码模式,而授权码模式又是最为安全的模式,复杂程度成正比。完整的项目结构分为:客户端服务,认证服务,资源服务。客户端需要访问资源服务的资源时,则需要得到认证服务的认证。
一、密码模式
(1)单项目集成(即认证服务即为资源服务)其项目结构如下:

此项目属于Maven项目。
• 配置认证服务器
首先需要配置认证服务所必须的配置,为 AuthorizationServerConfig 和 WebSecurityConfig 两个配置文件,其详情如下:
package com.liuzj.oauth2server.config;

import org.springframework.beans.factory.annotation.Autowired;
import org.springframework.beans.factory.annotation.Qualifier;
import org.springframework.context.annotation.Bean;
import org.springframework.context.annotation.Configuration;
import org.springframework.context.annotation.Primary;
import org.springframework.security.authentication.AuthenticationManager;
import org.springframework.security.core.userdetails.UserDetailsService;
import org.springframework.security.crypto.password.PasswordEncoder;
import org.springframework.security.oauth2.config.annotation.configurers.ClientDetailsServiceConfigurer;
import org.springframework.security.oauth2.config.annotation.web.configuration.AuthorizationServerConfigurerAdapter;
import org.springframework.security.oauth2.config.annotation.web.configuration.EnableAuthorizationServer;
import org.springframework.security.oauth2.config.annotation.web.configurers.AuthorizationServerEndpointsConfigurer;
import org.springframework.security.oauth2.config.annotation.web.configurers.AuthorizationServerSecurityConfigurer;
import org.springframework.security.oauth2.provider.ClientDetailsService;
import org.springframework.security.oauth2.provider.client.JdbcClientDetailsService;
import org.springframework.security.oauth2.provider.token.DefaultTokenServices;
import org.springframework.security.oauth2.provider.token.TokenStore;
import org.springframework.security.oauth2.provider.token.store.JdbcTokenStore;

import javax.sql.DataSource;
import java.util.concurrent.TimeUnit;

/**
 * 这个注解告诉 Spring 这个应用是 OAuth2 的授权服务器,
 * 提供/oauth/authorize,/oauth/token,/oauth/check_token,/oauth/confirm_access,/oauth/error
 *
 * @author liuzj
 * @date  2019-01-15
 */
@Configuration
@EnableAuthorizationServer
public class AuthorizationServerConfig extends AuthorizationServerConfigurerAdapter {

    /**
     * webSecurityConfig 中配置的AuthenticationManager
     */
    @Autowired
    @Qualifier("authenticationManagerBean")
    private AuthenticationManager authenticationManager;

    /**
     * 此项目使用数据库保存 token 等信息所以要配置数据源
     */
    @Autowired
    private DataSource dataSource;

    /**
     * webSecurityConfig 中配置的 userDetailsService
     */
    @Autowired
    @Qualifier("userDetailsServiceImpl")
    private UserDetailsService userDetailsService;

    /**
     * webSecurityConfig 中配置的 passwordEncoder(使用MD5加密)
     */
    @Autowired
    PasswordEncoder passwordEncoder;

    @Bean
    public TokenStore tokenStore() {

        //使用内存中的 token store
//        return new InMemoryTokenStore();

        //使用Jdbctoken store
        return new JdbcTokenStore(dataSource);
    }

    /**
     * 对 oauth_client_details 表的一些操作
     *
     * @return ClientDetailsService
     */
    @Bean
    public ClientDetailsService clientDetails() {
        return new JdbcClientDetailsService(dataSource);
    }

    @Autowired
    TokenStore tokenStore;

    @Autowired
    ClientDetailsService clientDetailsService;

    @Override
    public void configure(ClientDetailsServiceConfigurer clients) throws Exception {
        clients.jdbc(dataSource);
           // 请求token的时候会将client_id,client_secret等信息保存到 oauth_client_details 表中,所以需要手动创建该表
           // 注意:以下注释的代码在请求了一次 token 之后则可以注释掉,否则如果不换 client 名字的话会因为主键冲突无法插入 client 信息。也可以一开始就注释,手动添加记录到数据库
//                .withClient("client")
//                .secret(passwordEncoder.encode("123456"))
//                .authorizedGrantTypes("authorization_code", "refresh_token",
//                        "password", "implicit") // 四种认证模式
//                .scopes("all")
//                .authorities("ROLE_admin","ROLE_user")
//                .redirectUris("http://www.baidu.com")
//                .accessTokenValiditySeconds(120000)
//                .refreshTokenValiditySeconds(50000);

    }

    @Override
    public void configure(AuthorizationServerSecurityConfigurer security) throws Exception {
        security.tokenKeyAccess("permitAll()")
                //允许check_token访问
                .checkTokenAccess("permitAll()")
                //允许表单登录
                .allowFormAuthenticationForClients();
    }

    @Override
    public void configure(AuthorizationServerEndpointsConfigurer endpoints) throws Exception {
        endpoints.authenticationManager(authenticationManager);
        endpoints.tokenStore(tokenStore());
        endpoints.userDetailsService(userDetailsService);
        endpoints.setClientDetailsService(clientDetailsService);
        //配置TokenServices参数
        DefaultTokenServices tokenServices = new DefaultTokenServices();
        tokenServices.setTokenStore(endpoints.getTokenStore());
        tokenServices.setSupportRefreshToken(true);
        tokenServices.setClientDetailsService(endpoints.getClientDetailsService());
        tokenServices.setTokenEnhancer(endpoints.getTokenEnhancer());
        // access_token 过期时间:5s
        tokenServices.setAccessTokenValiditySeconds((int) TimeUnit.DAYS.toSeconds(1));
        // refresh_token 过期时间,默认不过期
//        tokenServices.setReuseRefreshToken(true);
//        tokenServices.setRefreshTokenValiditySeconds((int) TimeUnit.SECONDS.toSeconds(20));

        endpoints.tokenServices(tokenServices);
    }

    @Bean
    @Primary
    public DefaultTokenServices tokenServices() {
        DefaultTokenServices tokenServices = new DefaultTokenServices();
        tokenServices.setSupportRefreshToken(true);
        tokenServices.setTokenStore(tokenStore);
        return tokenServices;
    }

}
package com.liuzj.oauth2server.config;

import com.liuzj.oauth2server.utils.MD5Util;
import org.springframework.beans.factory.annotation.Autowired;
import org.springframework.beans.factory.annotation.Qualifier;
import org.springframework.context.annotation.Bean;
import org.springframework.context.annotation.Configuration;
import org.springframework.security.authentication.AuthenticationManager;
import org.springframework.security.config.annotation.authentication.builders.AuthenticationManagerBuilder;
import org.springframework.security.config.annotation.web.builders.HttpSecurity;
import org.springframework.security.config.annotation.web.configuration.EnableWebSecurity;
import org.springframework.security.config.annotation.web.configuration.WebSecurityConfigurerAdapter;
import org.springframework.security.core.userdetails.UserDetailsService;
import org.springframework.security.crypto.password.PasswordEncoder;

/**
 * 安全配置
 *
 * @author liuzj
 * @date  2019-01-15
 */
@Configuration
@EnableWebSecurity
public class WebSecurityConfig extends WebSecurityConfigurerAdapter {

    /**
     * userDetailsService 获取token的时候对用户进行一些自定义过滤,并将保存用户信息(用户名,密码,角色等)
     */
    @Autowired
    @Qualifier("userDetailsServiceImpl")
    private UserDetailsService userDetailsService;

    /**
     * 使用MD5对client_secreat进行加密,可以使用默认的加密方式也可以自定义,这里使用MD5加密方式
     *
     * @return PasswordEncoder
     */
    @Bean
    public PasswordEncoder passwordEncoder() {
        return new PasswordEncoder() {
            @Override
            public String encode(CharSequence charSequence) {
                return MD5Util.encodeMD5(String.valueOf(charSequence));
            }

            @Override
            public boolean matches(CharSequence charSequence, String s) {
                return s.equals(MD5Util.encodeMD5(String.valueOf(charSequence)));
            }
        };
    }

    @Override
    @Bean
    public AuthenticationManager authenticationManagerBean() throws Exception {
        return super.authenticationManagerBean();
    }

    /**
     * 配置用户签名服务 主要是user-details 机制,
     *
     * @param auth 签名管理器构造器,用于构建用户具体权限控制
     * @throws Exception
     */
    @Override
    protected void configure(AuthenticationManagerBuilder auth) throws Exception {
        auth.userDetailsService(userDetailsService)
                .passwordEncoder(passwordEncoder());
    }

    @Override
    public void configure(HttpSecurity http) throws Exception {
        http.csrf().disable();
        http
                .requestMatchers().antMatchers("/oauth/**","/login/**","/logout/**")
                .and()
                .authorizeRequests()
                .antMatchers("/oauth/**").authenticated()
                .and()
                .formLogin().permitAll(); //新增login form支持用户登录及授权
    }
}
以上有一个 UserDetailsService 这个接口是提供出来我们自己实现的,在实现代码中可以自定义一下过滤规则,比如判断用户的合法性,具体如下:
package com.liuzj.oauth2server.config.selfauthor;

import com.liuzj.oauth2server.domain.User;
import com.liuzj.oauth2server.repositories.UserRepository;
import com.liuzj.oauth2server.utils.MD5Util;
import org.apache.commons.logging.Log;
import org.apache.commons.logging.LogFactory;
import org.springframework.beans.factory.annotation.Autowired;
import org.springframework.security.core.userdetails.UserDetails;
import org.springframework.security.core.userdetails.UserDetailsService;
import org.springframework.security.core.userdetails.UsernameNotFoundException;
import org.springframework.stereotype.Service;

/**
 * 进行登录用户自定义过滤
 *
 * @author liuzj
 * @date 2019-01-15
 */
@Service
public class UserDetailsServiceImpl implements UserDetailsService {


    protected final Log logger = LogFactory.getLog(getClass());

    @Autowired
    private UserRepository userRepository;

    @Override
    public UserDetails loadUserByUsername(final String username)
            throws UsernameNotFoundException {

        User user = userRepository.findByUserName(username);

        logger.info("loadUserByUsername username=" + username);
     // 如果用户不存在则认证失败
        if(user == null){
            throw new UsernameNotFoundException(username + " not found");
        }

        // 注意:此处的密码记得要进行加密,因为在前面配置的时候是使用了 MD5 加密,所以这里也要进行加密
        return new UserInfo(username, MD5Util.encodeMD5(user.getPassword()),user.getRole());
    }

}
以上只是将主要的配置附上,还有 user 表以及 集成 mybatis 等步骤没有写出,请自行倒腾。。。注意:user 对象需要实现 Serializable 接口(可序列化),因为在认证的时候该对象是需要进行IO操作的。
配置好认证服务之后跑如下 SQL 创建几张必须的表(存储 token 以及 client 等信息),因为本案例是使用数据库存储 token 的,当然也可以存在内存以及通过 jwt 方式:
-- ----------------------------
-- Table structure for oauth_access_token
-- ----------------------------
DROP TABLE IF EXISTS `oauth_access_token`;
CREATE TABLE `oauth_access_token`  (
  `token_id` varchar(256) CHARACTER SET utf8 COLLATE utf8_general_ci NULL DEFAULT NULL,
  `token` blob NULL,
  `authentication_id` varchar(250) CHARACTER SET utf8 COLLATE utf8_general_ci NOT NULL,
  `user_name` varchar(256) CHARACTER SET utf8 COLLATE utf8_general_ci NULL DEFAULT NULL,
  `client_id` varchar(256) CHARACTER SET utf8 COLLATE utf8_general_ci NULL DEFAULT NULL,
  `authentication` blob NULL,
  `refresh_token` varchar(256) CHARACTER SET utf8 COLLATE utf8_general_ci NULL DEFAULT NULL,
  PRIMARY KEY (`authentication_id`) USING BTREE
) ENGINE = InnoDB CHARACTER SET = utf8 COLLATE = utf8_general_ci ROW_FORMAT = Dynamic;

-- ----------------------------
-- Table structure for oauth_client_details
-- ----------------------------
DROP TABLE IF EXISTS `oauth_client_details`;
CREATE TABLE `oauth_client_details`  (
  `client_id` varchar(250) CHARACTER SET utf8 COLLATE utf8_general_ci NOT NULL,
  `resource_ids` varchar(256) CHARACTER SET utf8 COLLATE utf8_general_ci NULL DEFAULT NULL,
  `client_secret` varchar(256) CHARACTER SET utf8 COLLATE utf8_general_ci NULL DEFAULT NULL,
  `scope` varchar(256) CHARACTER SET utf8 COLLATE utf8_general_ci NULL DEFAULT NULL,
  `authorized_grant_types` varchar(256) CHARACTER SET utf8 COLLATE utf8_general_ci NULL DEFAULT NULL,
  `web_server_redirect_uri` varchar(256) CHARACTER SET utf8 COLLATE utf8_general_ci NULL DEFAULT NULL,
  `authorities` varchar(256) CHARACTER SET utf8 COLLATE utf8_general_ci NULL DEFAULT NULL,
  `access_token_validity` int(11) NULL DEFAULT NULL,
  `refresh_token_validity` int(11) NULL DEFAULT NULL,
  `additional_information` varchar(4096) CHARACTER SET utf8 COLLATE utf8_general_ci NULL DEFAULT NULL,
  `autoapprove` varchar(256) CHARACTER SET utf8 COLLATE utf8_general_ci NULL DEFAULT NULL,
  PRIMARY KEY (`client_id`) USING BTREE
) ENGINE = InnoDB CHARACTER SET = utf8 COLLATE = utf8_general_ci ROW_FORMAT = Dynamic;

-- ----------------------------
-- Table structure for oauth_refresh_token
-- ----------------------------
DROP TABLE IF EXISTS `oauth_refresh_token`;
CREATE TABLE `oauth_refresh_token`  (
  `token_id` varchar(256) CHARACTER SET utf8 COLLATE utf8_general_ci NULL DEFAULT NULL,
  `token` blob NULL,
  `authentication` blob NULL
) ENGINE = InnoDB CHARACTER SET = utf8 COLLATE = utf8_general_ci ROW_FORMAT = Dynamic;
-- ----------------------------
-- Table structure for user
-- ----------------------------
CREATE TABLE `user` (
  `id` int(11) NOT NULL AUTO_INCREMENT COMMENT '用户ID',
  `name` varchar(255) NOT NULL DEFAULT '' COMMENT '名称',
  `password` varchar(255) NOT NULL DEFAULT '0' COMMENT '密码',
  `role` varchar(255) NOT NULL COMMENT '角色',
  PRIMARY KEY (`id`)
) ENGINE=MyISAM AUTO_INCREMENT=5 DEFAULT CHARSET=utf8;
到此,启动项目,访问连接:http://localhost:8001/oauth/token?username=liuzj&password=123&grant_type=password&client_id=client&client_secret=123456 (POST)
正常情况下如下返回:
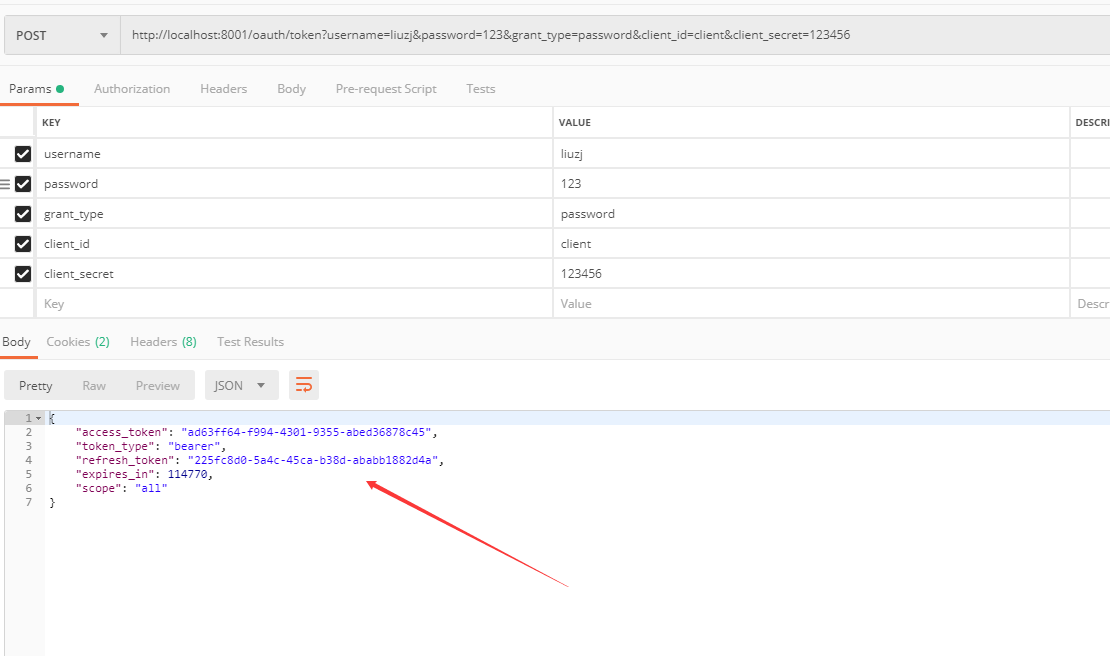
这样就成功通过 账号和密码获取了 token。还可以尝试如下操作:
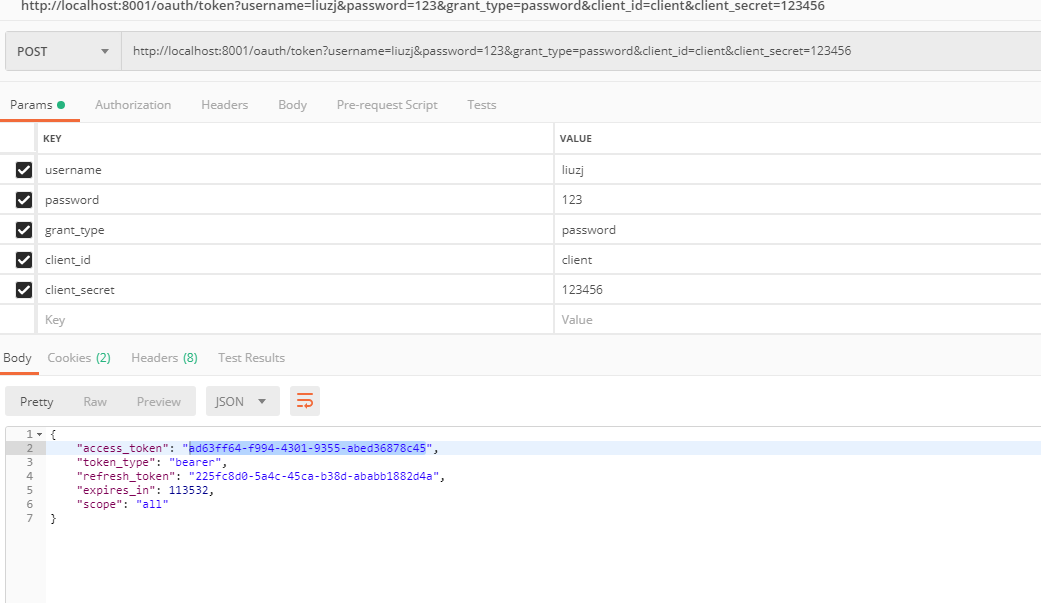
检查 token :http://localhost:8001/oauth/check_token?token=f0cb83c3-6dd7-4c63-ab9f-2bdf3d492b46 (get)
刷新 token: http://localhost:8001/oauth/token?grant_type=refresh_token&refresh_token=cd08de58-b91f-45c6-b165-6b8bd4b7bfdc&client_id=client&client_secret=123456 (post)
• 配置资源服务器
首先配置资源服务器专有配置,如下:
package com.liuzj.oauth2server.config;

import org.springframework.context.annotation.Configuration;
import org.springframework.security.config.annotation.web.builders.HttpSecurity;
import org.springframework.security.oauth2.config.annotation.web.configuration.EnableResourceServer;
import org.springframework.security.oauth2.config.annotation.web.configuration.ResourceServerConfigurerAdapter;

/**
 * 这个类表明了此应用是OAuth2 的资源服务器,此处主要指定受资源服务器保护的资源链接
 * 默认情况下spring security oauth2的http配置会被WebSecurityConfigurerAdapter的配置覆盖
 *
 * @author liuzj
 * @date 2019-01-15
 */
@Configuration
@EnableResourceServer
public class ResourceServerConfig extends ResourceServerConfigurerAdapter {

    @Override
    public void configure(HttpSecurity http) throws Exception {

        http.csrf().disable()//禁用了csrf(跨站请求伪造)功能
                .authorizeRequests()//限定签名成功的请求
                //必须认证过后才可以访问;注意:hasAnyRole 会默认加上ROLE_前缀,而hasAuthority不会加前缀
                .antMatchers("/decision/**","/govern/**").hasAnyRole("user") // 在角色过滤的时候需要注意user角色需要加角色前缀
                .antMatchers("/admin/**").hasRole("admin")
                .antMatchers("/test/**").authenticated()
                // 免验证请求
                .antMatchers("/oauth/**").permitAll();
    }

}
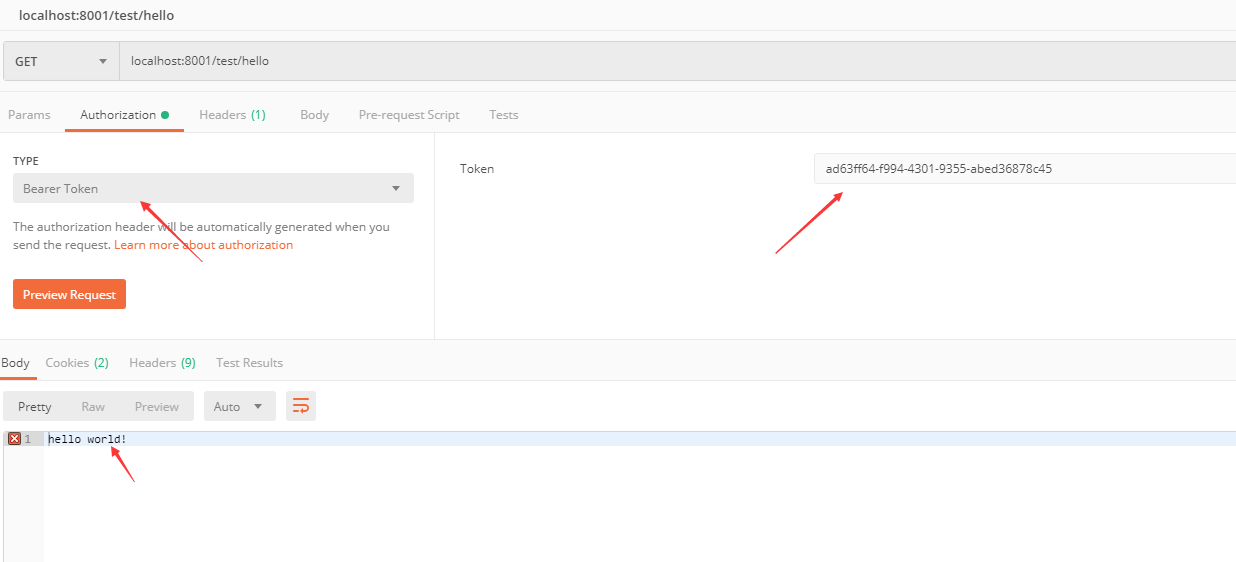
配置好如上配置就搞定了。重启项目测试访问项目接口(接口自行去码):

如果直接访问它便会提示:此资源访问需要认证。所以得先获取 token(上面有讲)带上 token 即可访问接口,如下:
到此密码认证告一段落。