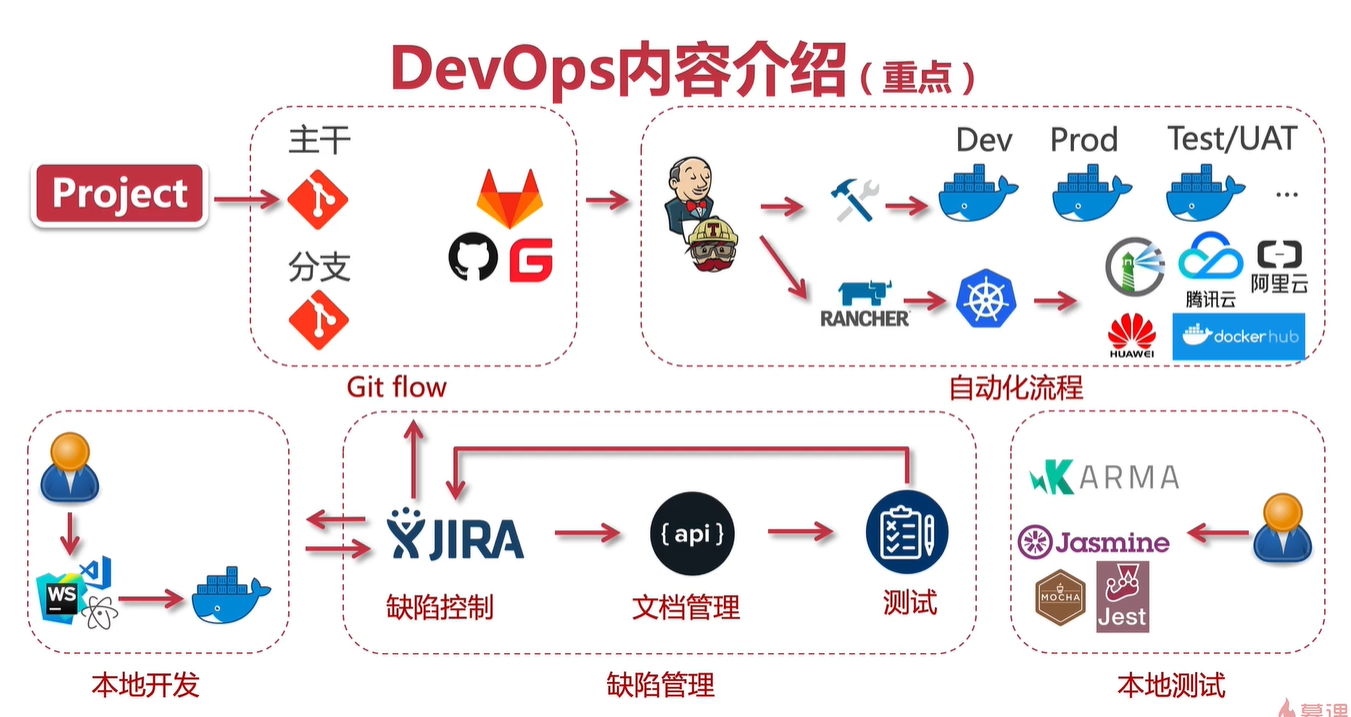
敏捷流程
**api文档工具 **
- ShowDoc
**接口测试 **
- DOClever
**技术文档 **
- Hexo
文档管理
ShowDoc
一个非常适合IT团队的在线API文档、技术文档工具. 可本地化部署
Docker方式安装
安装前请确保你的环境已经装好了docker 。docker的安装教程在网上比较多,可以搜索了解下。这里重点介绍showdoc.
# 原版官方镜像安装命令(中国大陆用户不建议直接使用原版镜像,可以用后面的加速镜像)
docker pull star7th/showdoc
# 中国大陆镜像安装命令(安装后记得执行docker tag命令以进行重命名)
docker pull registry.cn-shenzhen.aliyuncs.com/star7th/showdoc
docker tag registry.cn-shenzhen.aliyuncs.com/star7th/showdoc:latest star7th/showdoc:latest
##后续命令无论使用官方镜像还是加速镜像都需要执行
#新建存放showdoc数据的目录
mkdir -p /showdoc_data/html
chmod  -R 777 /showdoc_data
#启动showdoc容器
docker run -d --name showdoc --user=root --privileged=true -p 4999:80
-v /showdoc_data/html:/var/www/html/ star7th/showdoc
根据以上命令操作的话,往后showdoc的数据都会存放在 /showdoc_data/html 目录下。
你可以打开 http://localhost:4999 来访问showdoc (localhost可改为你的服务器域名或者IP)。账户密码是showdoc/123456,登录后你便可以看到右上方的管理后台入口。建议登录后修改密码。
对showdoc的问题或建议请至https://github.com/star7th/showdoc 出提issue。若觉得showdoc好用,不妨点个star。
如何升级
这里的升级是针对上面docker安装方式的升级。如果你原来是采用非docker安装方式(如php安装方式)的话,请跳过本部分文字,直接去看下部分。
#停止容器
docker stop showdoc
#下载最新代码包
wget https://github.com/star7th/showdoc/archive/master.tar.gz
#解压
tar -zxvf master.tar.gz -C /showdoc_data/
rm -rf  /showdoc_data/html_bak
#备份。如果可以的话,命令中的html_bak还可以加上日期后缀,以便保留不同日期的多个备份
mv /showdoc_data/html  /showdoc_data/html_bak
mv /showdoc_data/showdoc-master /showdoc_data/html  ##// */
#赋予权限
chmod -R 777  /showdoc_data/html
#启动容器
docker start showdoc
#执行安装。默认安装中文版。如果想安装英文版,将下面参数中的zh改为en
curl http://localhost:4999/install/non_interactive.php?lang=zh
#转移旧数据库
cp  -f  /showdoc_data/html_bak/Sqlite/showdoc.db.php /showdoc_data/html/Sqlite/showdoc.db.php
#转移旧附件数据
cp -r -f /showdoc_data/html_bak/Public/Uploads /showdoc_data/html/Public/Uploads
# 执行数据库升级,看到OK字样便证明成功
curl http://localhost:4999?s=/home/update/db
#如果中途出错,请重命名原来的/showdoc_data/html_bak文件为/showdoc_data/html ,然后重启容器便可恢复。
非docker安装方式如何升级到docker安装方式
先参考前文,用docker方式全新安装一个showdoc,并且做好数据持久化。
接下来,假设你原来安装的旧showdoc已上传到服务器的 /tmp/showdoc 目录,那么
#转移旧数据库
cp -r -f /tmp/showdoc/Sqlite/showdoc.db.php /showdoc_data/html/Sqlite/showdoc.db.php
#转移旧附件数据
cp -r -f /tmp/showdoc/Public/Uploads /showdoc_data/html/Public/Uploads
# 执行数据库升级,看到OK字样便证明成功
curl http://localhost:4999?s=/home/update/db
数据备份
备份/showdoc_data/html 目录即可。比如执行下面命令压缩存放
zip -r /showdoc_data/showdoc_bak.zip  /showdoc_data/html
# 其中showdoc_bak.zip可以用日期后缀命名,以便多个备份。你也可以用定时任务来实现定时备份。
其他参考命令
 docker stop showdoc # 停止容器
 docker restart showdoc #重启showdoc容器
 docker rm showdoc #删除showdoc容器
 docker rmi star7th/showdoc #删除showdoc镜像
 docker stop $(docker ps -a -q) ;docker rm $(docker ps -a -q) ; #停止并删除所有容器。危险命令,不懂勿用。
Hexo
github文档管理工具
初始化hexo

> npm install hexo-cli -g
> hexo init blog
> cd blog
> npm install
> hexo server
Github.io 配置 _config.yml
deploy:
  type: git
  repo: git@github.com:ustbmz/ustbmz.github.io.git
  branch: master
  name: ustbmz
  email: ustbmz@163.com
新增文章
> hexo new 'md_filename'
生成静态文件
> hexo g
提交更新,同步至github.io
> hexo d
版本控制
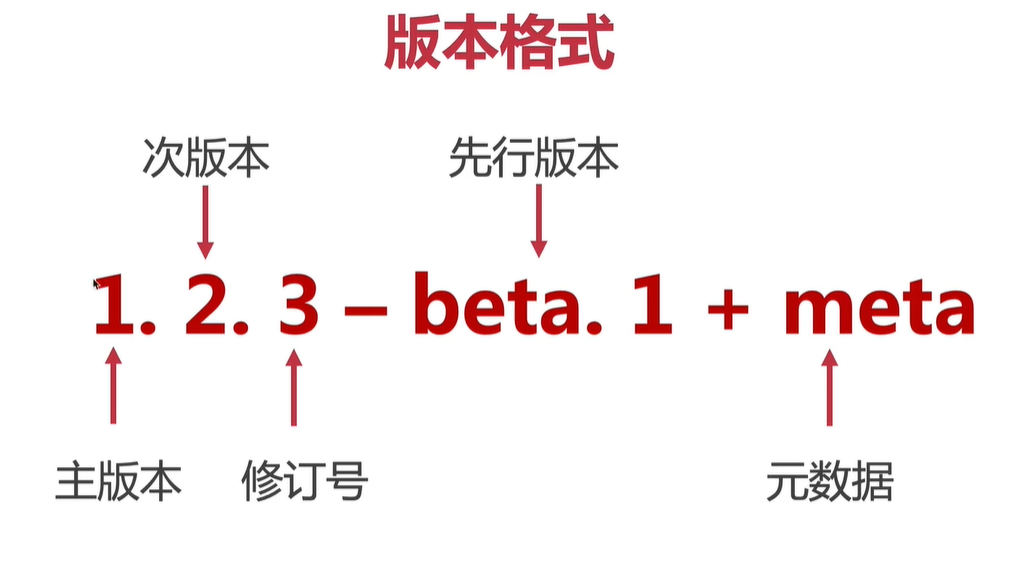
语义化版本
本格式:主版本号.次版本号.修订号,版本号递增规则如下:
- 主版本号:当你做了不兼容的 API 修改,
- 次版本号:当你做了向下兼容的功能性新增,
- 修订号:当你做了向下兼容的问题修正。
先行版本号及版本编译元数据可以加到“主版本号.次版本号.修订号”的后面,作为延伸。
- 版本格式
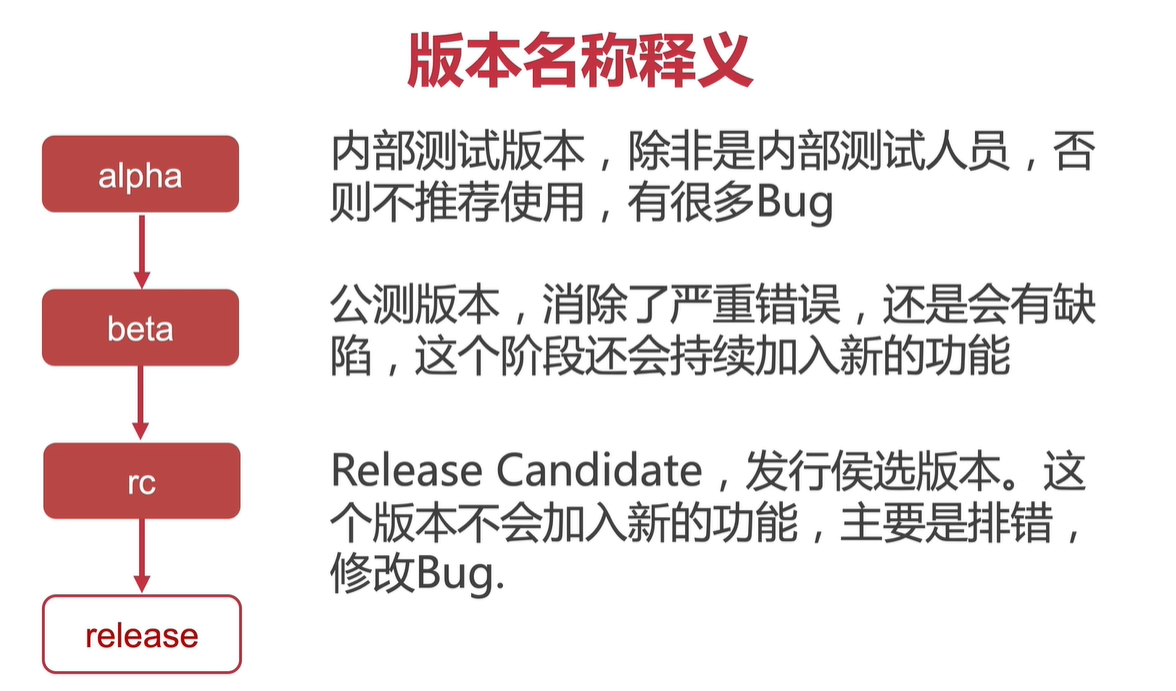
- 版本名称释义
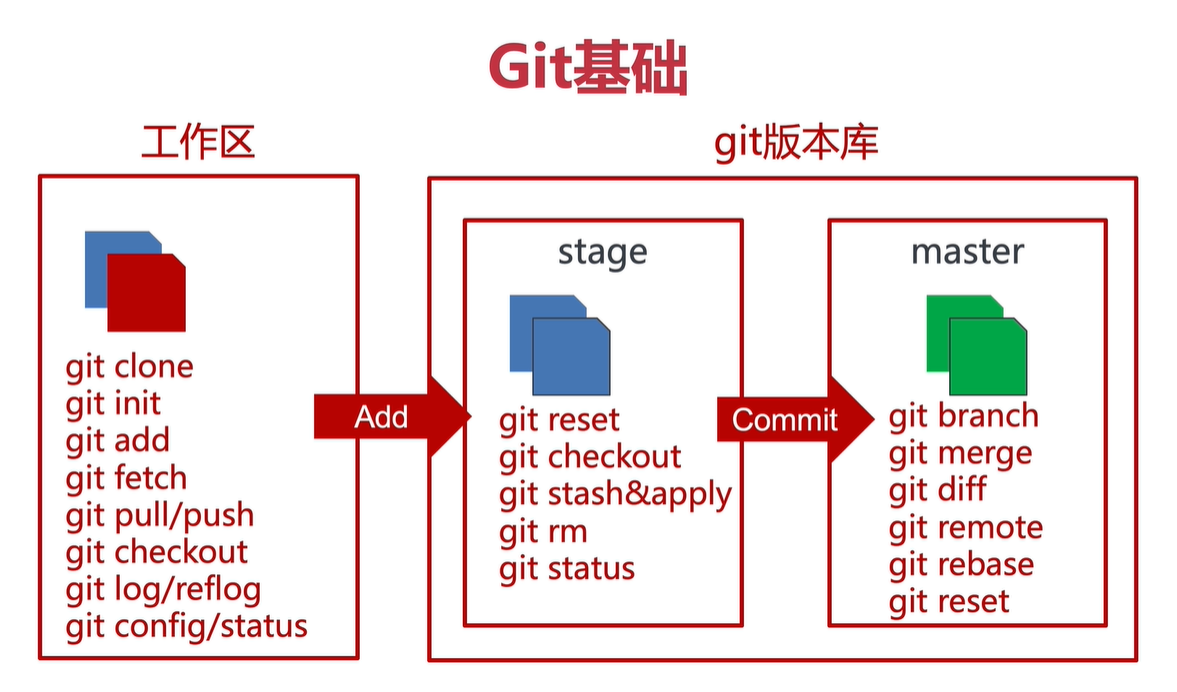
Git基础
常见的git平台
- gitlab
- github
- gitea
- gitee
git 基础命令
查看本地镜像git状态
> git -status

克隆一个git仓库
> git clone git@gitAddress.git
相当于同时执行了
> git init & git remove & git pull

拉取远程git仓库,更新代码并比较,如果有冲突提示
> git pull
> git merge

提交代码
> git add
错误提交后回退,gitlog查看提交日志,通过hash值回退
> git reset
回退至 22c73c git版本
> git reset --hard 22c7f3c
> get checkout

提交至本地仓库
> git -commit

新建分支
> git remote add oraign git@gitAddress.get

查看所有分支
> git remote -v


查看git提交日志
> git log
查看git所有提交日志(包含回退版本记录、分支日志)
> git reflog

查看git全局配置 & 配置用户名邮箱
> git config --global --list
> git config --global user.name 'ustbmz'
> git config --global user.email 'ustbmz@163.com'


查看当前分支
> git branch
创建分支dev
> git branch dev
切换分支
> git checkout dev
创建并切换至dev分支
> git checkout -b dev


暂时不提交当前diff ,加入缓存
stash &&apply
> git stash
取出缓存
> git stash apply
…or create a new repository on the command line
创建一个新的git项目并初始化
echo "# git" >> README.md
git init
git add README.md
git commit -m "first commit"
git remote add origin git@github.com:ustbmz/git.git
git push -u origin master
…or push an existing repository from the command line
添加一个已经存在的git项目
git remote add origin git@github.com:ustbmz/git.git
git push -u origin master
Git Flow
-
上游分支向下游发展
Master --> PRE-Production --> Production
Bug --> new Brunch --> Master --> pre branch --> target branch
-
Master分支为主,主要玩master,production上合并
master -- Stable -- new Branch -- bug fix -- Version
Git常用命令
拉取远程仓库代码
> git pull origin dev

查看远程dev分支有哪儿些更新
此命令不会把有冲突的代码拉取到本地
> git fetch origin dev
合并有冲突的代码
> git merge FETCH_HEAD
查看当前dev分支与远程仓库feature的更新区别
> git fetch origin feature:dev


合并dev1分支至当前dev分支
> git merge dev1

回退至上一次提交
> git reset --hard head^
> git reset --hard head~1
回退至某个版本
> git reset --hard [hashValue]

给当前的提交打上版本号
> git tag v1.0.0
推送tag
> git push origin master --tags
删除远程仓库tags
> git push origin :refs/tags/v1.0.0
删除本地tag
> git tag -d v1.0.0
查看本地所有tags
> git tag --list

删除本地dev1分支
> git branch -D dev1
删除远程分支dev1
> git push origin :dev1

抛弃add但未commit的文件
> git reset HEAD [filename]
抛弃add但未commit的所有文件 !谨慎使用,会抛弃所有未提交的文件
> git reset --hard head
Git合并多次提交
-
合并之前的3次提交
> git add . > git commit -m '' 合并之前的三次提交 > git rebase -i head~3 -
修改 git-rebase-todo文件 (
pick 为选中的合并版本, s 合并的版本
pick 9b69a0f bug config fixs3 s b634f5c git merge master s 47adc84 git merge master # Rebase db22ccc..47adc84 onto db22ccc (3 commands) # # Commands: # p, pick <commit> = use commit # r, reword <commit> = use commit, but edit the commit message # e, edit <commit> = use commit, but stop for amending # s, squash <commit> = use commit, but meld into previous commit # f, fixup <commit> = like "squash", but discard this commit's log message # x, exec <command> = run command (the rest of the line) using shell # b, break = stop here (continue rebase later with 'git rebase --continue') # d, drop <commit> = remove commit # l, label <label> = label current HEAD with a name # t, reset <label> = reset HEAD to a label # m, merge [-C <commit> | -c <commit>] <label> [# <oneline>] # . create a merge commit using the original merge commit's # . message (or the oneline, if no original merge commit was # . specified). Use -c <commit> to reword the commit message. # # These lines can be re-ordered; they are executed from top to bottom. # # If you remove a line here THAT COMMIT WILL BE LOST. # # However, if you remove everything, the rebase will be aborted. # -
push 记录
> git push origin circleci-project-steup
branch创建原则
- 按需创建
- 重要版本管理
- 学会使用tags
搭建云服务Git仓库
Docker-compse Gitlab
use docker-compose.gitlab.yml
sameersbn/docker-gitlab
version: '2.3'

services:
  redis:
    restart: always
    image: redis:5.0.9
    command:
    - --loglevel warning
    volumes:
    - redis-data:/var/lib/redis:Z

  postgresql:
    restart: always
    image: sameersbn/postgresql:11-20200524
    volumes:
    - postgresql-data:/var/lib/postgresql:Z
    environment:
    - DB_USER=gitlab
    - DB_PASS=password
    - DB_NAME=gitlabhq_production
    - DB_EXTENSION=pg_trgm

  gitlab:
    restart: always
    image: sameersbn/gitlab:13.0.3
    depends_on:
    - redis
    - postgresql
    ports:
    - "13800:80"
    - "13822:22"
    volumes:
    - gitlab-data:/home/git/data:Z
    healthcheck:
      test: ["CMD", "/usr/local/sbin/healthcheck"]
      interval: 5m
      timeout: 10s
      retries: 3
      start_period: 5m
    environment:
    - DEBUG=false

    - DB_ADAPTER=postgresql
    - DB_HOST=postgresql
    - DB_PORT=5432
    - DB_USER=gitlab
    - DB_PASS=password
    - DB_NAME=gitlabhq_production

    - REDIS_HOST=redis
    - REDIS_PORT=6379

    - TZ=Asia/Kolkata
    - GITLAB_TIMEZONE=Kolkata

    - GITLAB_HTTPS=false
    - SSL_SELF_SIGNED=false

    - GITLAB_HOST=118.25.150.195
    - GITLAB_PORT=13800
    - GITLAB_SSH_PORT=13822
    - GITLAB_RELATIVE_URL_ROOT=
    - GITLAB_SECRETS_DB_KEY_BASE=long-and-random-alphanumeric-string
    - GITLAB_SECRETS_SECRET_KEY_BASE=long-and-random-alphanumeric-string
    - GITLAB_SECRETS_OTP_KEY_BASE=long-and-random-alphanumeric-string

    - GITLAB_ROOT_PASSWORD=12345678
    - GITLAB_ROOT_EMAIL=ustbmz@163.com

    - GITLAB_NOTIFY_ON_BROKEN_BUILDS=true
    - GITLAB_NOTIFY_PUSHER=false

    - GITLAB_EMAIL=notifications@example.com
    - GITLAB_EMAIL_REPLY_TO=noreply@example.com
    - GITLAB_INCOMING_EMAIL_ADDRESS=reply@example.com

    - GITLAB_BACKUP_SCHEDULE=daily
    - GITLAB_BACKUP_TIME=01:00

    - SMTP_ENABLED=false
    - SMTP_DOMAIN=www.example.com
    - SMTP_HOST=smtp.gmail.com
    - SMTP_PORT=587
    - SMTP_USER=mailer@example.com
    - SMTP_PASS=password
    - SMTP_STARTTLS=true
    - SMTP_AUTHENTICATION=login

    - IMAP_ENABLED=false
    - IMAP_HOST=imap.gmail.com
    - IMAP_PORT=993
    - IMAP_USER=mailer@example.com
    - IMAP_PASS=password
    - IMAP_SSL=true
    - IMAP_STARTTLS=false

    - OAUTH_ENABLED=false
    - OAUTH_AUTO_SIGN_IN_WITH_PROVIDER=
    - OAUTH_ALLOW_SSO=
    - OAUTH_BLOCK_AUTO_CREATED_USERS=true
    - OAUTH_AUTO_LINK_LDAP_USER=false
    - OAUTH_AUTO_LINK_SAML_USER=false
    - OAUTH_EXTERNAL_PROVIDERS=

    - OAUTH_CAS3_LABEL=cas3
    - OAUTH_CAS3_SERVER=
    - OAUTH_CAS3_DISABLE_SSL_VERIFICATION=false
    - OAUTH_CAS3_LOGIN_URL=/cas/login
    - OAUTH_CAS3_VALIDATE_URL=/cas/p3/serviceValidate
    - OAUTH_CAS3_LOGOUT_URL=/cas/logout

    - OAUTH_GOOGLE_API_KEY=
    - OAUTH_GOOGLE_APP_SECRET=
    - OAUTH_GOOGLE_RESTRICT_DOMAIN=

    - OAUTH_FACEBOOK_API_KEY=
    - OAUTH_FACEBOOK_APP_SECRET=

    - OAUTH_TWITTER_API_KEY=
    - OAUTH_TWITTER_APP_SECRET=

    - OAUTH_GITHUB_API_KEY=
    - OAUTH_GITHUB_APP_SECRET=
    - OAUTH_GITHUB_URL=
    - OAUTH_GITHUB_VERIFY_SSL=

    - OAUTH_GITLAB_API_KEY=
    - OAUTH_GITLAB_APP_SECRET=

    - OAUTH_BITBUCKET_API_KEY=
    - OAUTH_BITBUCKET_APP_SECRET=

    - OAUTH_SAML_ASSERTION_CONSUMER_SERVICE_URL=
    - OAUTH_SAML_IDP_CERT_FINGERPRINT=
    - OAUTH_SAML_IDP_SSO_TARGET_URL=
    - OAUTH_SAML_ISSUER=
    - OAUTH_SAML_LABEL="Our SAML Provider"
    - OAUTH_SAML_NAME_IDENTIFIER_FORMAT=urn:oasis:names:tc:SAML:2.0:nameid-format:transient
    - OAUTH_SAML_GROUPS_ATTRIBUTE=
    - OAUTH_SAML_EXTERNAL_GROUPS=
    - OAUTH_SAML_ATTRIBUTE_STATEMENTS_EMAIL=
    - OAUTH_SAML_ATTRIBUTE_STATEMENTS_NAME=
    - OAUTH_SAML_ATTRIBUTE_STATEMENTS_USERNAME=
    - OAUTH_SAML_ATTRIBUTE_STATEMENTS_FIRST_NAME=
    - OAUTH_SAML_ATTRIBUTE_STATEMENTS_LAST_NAME=

    - OAUTH_CROWD_SERVER_URL=
    - OAUTH_CROWD_APP_NAME=
    - OAUTH_CROWD_APP_PASSWORD=

    - OAUTH_AUTH0_CLIENT_ID=
    - OAUTH_AUTH0_CLIENT_SECRET=
    - OAUTH_AUTH0_DOMAIN=
    - OAUTH_AUTH0_SCOPE=

    - OAUTH_AZURE_API_KEY=
    - OAUTH_AZURE_API_SECRET=
    - OAUTH_AZURE_TENANT_ID=

volumes:
  redis-data:
  postgresql-data:
  gitlab-data:
备份Gitlab数据
GitLab defines a rake task to take a backup of your gitlab installation. The backup consists of all git repositories, uploaded files and as you might expect, the sql database.
Before taking a backup make sure the container is stopped and removed to avoid container name conflicts.
docker stop gitlab && docker rm gitlab
Execute the rake task to create a backup.
docker run --name gitlab -it --rm [OPTIONS]
    sameersbn/gitlab:13.0.3 app:rake gitlab:backup:create
A backup will be created in the backups folder of the Data Store. You can change the location of the backups using the GITLAB_BACKUP_DIR configuration parameter.
P.S. Backups can also be generated on a running instance using docker exec as described in the Rake Tasks section. However, to avoid undesired side-effects, I advice against running backup and restore operations on a running instance.
When using docker-compose you may use the following command to execute the backup.
docker-compose rm -sf gitlab
docker-compose run --rm gitlab app:rake gitlab:backup:create
Afterwards you can bring your Instance back with the following command:
docker-compose up -d
-
设置备份时间过期时间 7天
GITLAB_BACKUP_EXPIRY=604800
恢复指定备份版本
GitLab also defines a rake task to restore a backup.
Before performing a restore make sure the container is stopped and removed to avoid container name conflicts.
docker stop gitlab && docker rm gitlab
If this is a fresh database that you're doing the restore on, first you need to prepare the database:
docker run --name gitlab -it --rm [OPTIONS]
    sameersbn/gitlab:13.0.3 app:rake db:setup
Execute the rake task to restore a backup. Make sure you run the container in interactive mode -it.
docker run --name gitlab -it --rm [OPTIONS]
    sameersbn/gitlab:13.0.3 app:rake gitlab:backup:restore
The list of all available backups will be displayed in reverse chronological order. Select the backup you want to restore and continue.
To avoid user interaction in the restore operation, specify the timestamp, date and version of the backup using the BACKUP argument to the rake task.
docker run --name gitlab -it --rm [OPTIONS]
    sameersbn/gitlab:13.0.3 app:rake gitlab:backup:restore BACKUP=1515629493_2018_01_11_10.3.6
When using docker-compose you may use the following command to execute the restore.
docker-compose run --rm gitlab app:rake gitlab:backup:restore # List available backups
docker-compose run --rm gitlab app:rake gitlab:backup:restore BACKUP=1515629493_2018_01_11_10.3.6 # Choose to restore from 1515629493