一:elasticsearch部署:
1.1:环境初始化:
最小化安装 Centos 7.2 x86_64操作系统的虚拟机,vcpu 2,内存4G或更多,操作系统盘50G,主机名设置规则为linux-hostX.exmaple.com,其中host1和host2为elasticsearch服务器,为保证效果特额外添加一块单独的数据磁盘大小为50G并格式化挂载到/data。
1.1.1:主机名和磁盘挂载:
[root@localhost ~]# hostnamectl set-hostname linux-hostx.exmaple.com && reboot #各服务器配置自己的主机名并重启
[root@localhost ~]# hostnamectl set-hostname linux-host2.exmaple.com && reboot
[root@linux-host1 ~]# mkdir /elk
[root@linux-host1 ~]# mount /dev/sdb /elk/
[root@linux-host1 ~]# echo " /dev/sdb /elk/ xfs defaults 0 0" >> /etc/fstab
hostX 。。。。。
1.1.2:防火墙和selinux:
关闭防所有服务器的火墙和selinux,包括web服务器、redis和logstash服务器的防火墙和selinux全部关闭,此步骤是为了避免出现因为防火墙策略或selinux安全权限引起的各种未知问题,以下只显示了host1和host2的命令,但是其他服务器都要执行。
[root@linux-host1 ~]# systemctl disable firewalld
[root@linux-host1 ~]# systemctl disable NetworkManager
[root@linux-host1 ~]# sed -i '/SELINUX/s/enforcing/disabled/' /etc/selinux/config
[root@linux-host1 ~]# echo "* soft nofile 65536" >> /etc/security/limits.conf
[root@linux-host1 ~]# echo "* hard nofile 65536" >> /etc/security/limits.conf
hostX 。。。。。。
1.1.3:各服务器配置本地域名解析:
[root@linux-host1 ~]# vim /etc/hosts
192.168.56.11 linux-host1.exmaple.com
192.168.56.12 linux-host2.exmaple.com
192.168.56.13 linux-host3.exmaple.com
192.168.56.14 linux-host4.exmaple.com
192.168.56.15 linux-host5.exmaple.com
192.168.56.16 linux-host6.exmaple.com
1.1.4:设置epel源、安装基本操作命令并同步时间:
[root@linux-host1 ~]# wget -O /etc/yum.repos.d/epel.repo http://mirrors.aliyun.com/repo/epel-7.repo
[root@linux-host1 ~]# yum install -y net-tools vim lrzsz tree screen lsof tcpdump wget ntpdate
[root@linux-host1 ~]# cp /usr/share/zoneinfo/Asia/Shanghai /etc/localtime
[root@linux-host1 ~]# echo "*/5 * * * * ntpdate time1.aliyun.com &> /dev/null && hwclock -w" >> /var/spool/cron/root
[root@linux-host1 ~]# systemctl restart crond
[root@linux-host1 ~]# reboot #重启检查各项配置是否生效,没有问题的话给虚拟机做快照以方便后期还原
1.2:在host1和host2分别安装elasticsearch:
1.2.1:在两台服务器准备java环境:
因为elasticsearch服务运行需要java环境,因此两台elasticsearch服务器需要安装java环境,可以使用以下方式安装:
方式一:直接使用yum安装openjdk
[root@linux-host1 ~]# yum install java-1.8.0*
方式二:本地安装在oracle官网下载rpm安装包:
[root@linux-host1 ~]# yum localinstall jdk-8u92-linux-x64.rpm
方式三:下载二进制包自定义profile环境变量:
下载地址:http://www.oracle.com/technetwork/java/javase/downloads/jdk8-downloads-2133151.html
[root@linux-host1 ~]# tar xvf jdk-8u121-linux-x64.tar.gz -C /usr/local/
[root@linux-host1 ~]# ln -sv /usr/local/jdk1.8.0_121 /usr/local/jdk
[root@linux-host1 ~]# vim /etc/profile
export JAVA_HOME=/usr/local/jdk
export CLASSPATH=.:$JAVA_HOME/jre/lib/rt.jar:$JAVA_HOME/lib/dt.jar:$JAVA_HOME/lib/tools.jar
export PATH=$PATH:$JAVA_HOME/bin
[root@linux-host1 ~]# source /etc/profile
[root@linux-host1 ~]# java -version
java version "1.8.0_121" #确认可以出现当前的java版本号
Java(TM) SE Runtime Environment (build 1.8.0_121-b13)
Java HotSpot(TM) 64-Bit Server VM (build 25.121-b13, mixed mode)
1.3:官网下载elasticsearch并安装:
下载地址:https://www.elastic.co/downloads/elasticsearch,当前最新版本5.3.0
1.3.1:两台服务器分别安装elasticsearch:
[root@linux-host1 ~]# yum –y localinstall elasticsearch-5.3.0.rpm
1.3.2:编辑各elasticsearch服务器的服务配置文件:
[root@linux-host1 ~]# grep "^[a-Z]" /etc/elasticsearch/elasticsearch.yml
cluster.name: ELK-Cluster #ELK的集群名称,名称相同即属于是同一个集群
node.name: elk-node1 #本机在集群内的节点名称
path.data: /elk/data #数据保存目录
path.logs: /elk/logs #日志保存目
bootstrap.memory_lock: true #服务启动的时候锁定足够的内存,防止数据写入swap
network.host: 0.0.0.0 #监听IP
http.port: 9200
discovery.zen.ping.unicast.hosts: ["192.168.56.11", "192.168.56.12"]
1.3.3:修改内存限制,并同步配置文件:
[root@linux-host1 ~]# vim /usr/lib/systemd/system/elasticsearch.service #修改内存限制
LimitMEMLOCK=infinity #去掉注释
[root@linux-host1 ~]# vim /etc/elasticsearch/jvm.options
22 -Xms2g
23 -Xmx2g #最小和最大内存限制,为什么最小和最大设置一样大?
https://www.elastic.co/guide/en/elasticsearch/reference/current/heap-size.html
#官方配置文档最大建议30G以内。
#将以上配置文件scp到host2并修改自己的node名称
[root@linux-host1~]#scp /etc/elasticsearch/elasticsearch.yml 192.168.56.12:/etc/elasticsearch/
[root@linux-host2 ~]# grep "^[a-Z]" /etc/elasticsearch/elasticsearch.yml
cluster.name: ELK-Cluster
node.name: elk-node2 #与host1不能相同
path.data: /data/elk
path.logs: /data/elk
bootstrap.memory_lock: false
bootstrap.system_call_filter: false
network.host: 0.0.0.0
http.port: 9200
http.cors.enabled: true
http.cors.allow-origin: "*"
discovery.zen.ping.unicast.hosts: ["192.168.56.11", "192.168.56.12"]
1.3.4:目录权限更改:
各服务器创建数据和日志目录并修改目录权限为elasticsearch:
[root@linux-host1 ~]# mkdir /elk/{data,logs}
[root@linux-host1 ~]# ll /elk/
total 0
drwxr-xr-x 2 root root 6 Apr 18 18:44 data
drwxr-xr-x 2 root root 6 Apr 18 18:44 logs
[root@linux-host1 ~]# chown elasticsearch.elasticsearch /elk/ -R
[root@linux-host1 ~]# ll /elk/
total 0
drwxr-xr-x 2 elasticsearch elasticsearch 6 Apr 18 18:44 data
drwxr-xr-x 2 elasticsearch elasticsearch 6 Apr 18 18:44 logs
vim /etc/security/limits.conf
* soft memlock unlimited
* hard memlock unlimited
* soft nofile 131072
* hard nofile 131072
vim /etc/security/limits.d/90-nproc.conf
* soft nproc 2048
1.3.5:启动elasticsearch服务并验证:
[root@linux-host1 ~]# systemctl restart elasticsearch
[root@linux-host1 ~]# tail -f /elk/logs/ELK-Cluster.log
[root@linux-host1 ~]# tail -f /elk/logs/
1.3.6:验证端口监听成功:
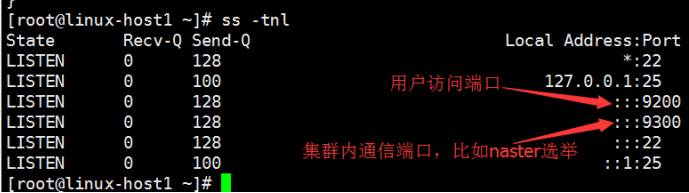
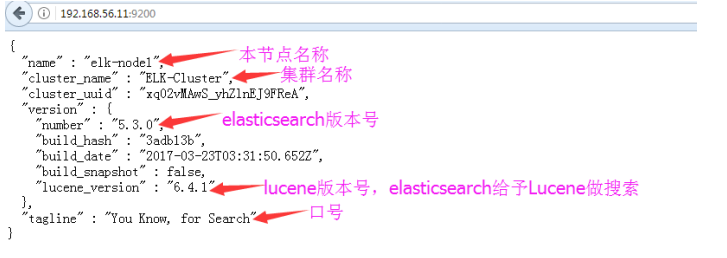
1.3.7:通过浏览器访问elasticsearch服务端口:
1.4:安装elasticsearch插件之head:
插件是为了完成不同的功能,官方提供了一些插件但大部分是收费的,另外也有一些开发爱好者提供的插件,可以实现对elasticsearch集群的状态监控与管理配置等功能。
1.4.1:安装5.x版本的head插件:
在elasticsearch 5.x版本以后不再支持直接安装head插件,而是需要通过启动一个服务方式,git地址:https://github.com/mobz/elasticsearch-head
[root@linux-host1 ~]# yum install -y npm
# NPM的全称是Node Package Manager,是随同NodeJS一起安装的包管理和分发工具,它很方便让JavaScript开发者下载、安装、上传以及管理已经安装的包。
[root@linux-host1 ~]# cd /usr/local/src/
[root@linux-host1 src]#git clone git://github.com/mobz/elasticsearch-head.git
[root@linux-host1 src]# cd elasticsearch-head/
[root@linux-host1 elasticsearch-head]# yum install npm -y
[root@linux-host1 elasticsearch-head]# npm cache clean -f[root@linux-host1 elasticsearch-head]# npm install -g n[root@linux-host1 elasticsearch-head]# n stable
[root@linux-host1 elasticsearch-head]# npm install grunt -save
[root@linux-host2 elasticsearch-head]# ll node_modules/grunt #确认生成文件
[root@linux-host1 elasticsearch-head]# npm install #执行安装
[root@linux-host1 elasticsearch-head]# npm run start & #后台启动服务
1.4.1.1:修改elasticsearch服务配置文件:
开启跨域访问支持,然后重启elasticsearch服务:
[root@linux-host1 ~]# vim /etc/elasticsearch/elasticsearch.yml
http.cors.enabled: true #最下方添加
http.cors.allow-origin: "*"
[root@linux-host1 ~]# /etc/init.d/elasticsearch restart
分片:
curl -XPUT 13.228.119.64:9200/_template/my_template -d'{ "template": "*", "settings": { "index": { "number_of_shards": 6, "number_of_replicas": 1 } }}'
curl -XPUT 13.250.82.220:9200/_template/my_template -d'{ "template": "*", "settings": { "index": { "number_of_shards": 6, "number_of_replicas": 1 } }}'
1.4.1.2:docker版本启动head插件:
[root@linux-host1 ~]# yum install docker -y
[root@linux-host1 ~]# systemctl start docker && systemctl enable docker
[root@linux-host1 ~]# docker run -d -p 9100:9100 mobz/elasticsearch-head:5

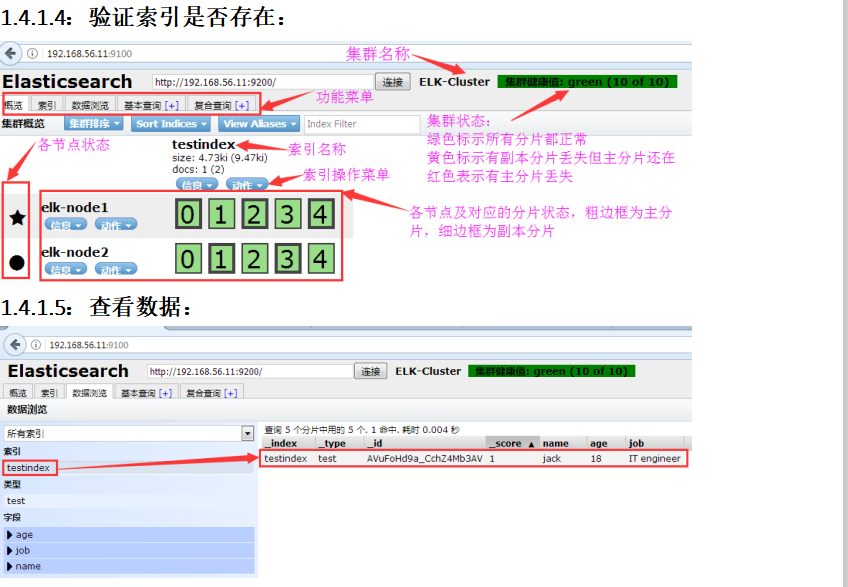
1.4.1.3:测试提交数据:

1.4.1.6:Master与Slave的区别:
Master的职责:
统计各node节点状态信息、集群状态信息统计、索引的创建和删除、索引分配的管理、关闭node节点等
Slave的职责:
同步数据、等待机会成为Master
1.4.1.7:导入本地的docker镜像:
[root@linux-host2 ~]# docker save docker.io/mobz/elasticsearch-head > /opt/elasticsearch-head-docker.tar.gz #导出镜像
[root@linux-host1 src]# docker load < /opt/elasticsearch-head-docker.tar.gz #导入
[root@linux-host1 src]# docker images#验证
REPOSITORY TAG IMAGE ID CREATED SIZE
docker.io/mobz/elasticsearch-head 5 b19a5c98e43b 4 months ago 823.9 MB
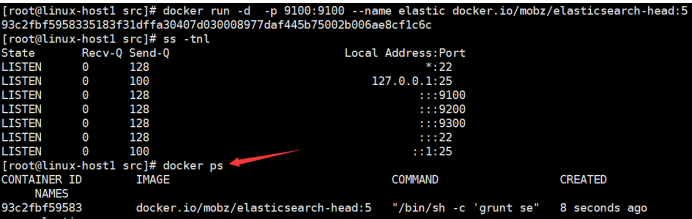
[root@linux-host1 src]# docker run -d -p 9100:9100 --name elastic docker.io/mobz/elasticsearch-head:5 #从本地docker images 启动容器
1.4.2:elasticsearch插件之kopf:
1.4.2.1:kopf:
Git地址为https://github.com/lmenezes/elasticsearch-kopf,但是目前还不支持5.x版本的elasticsearch,但是可以安装在elasticsearc 1.x或2.x的版本安装。