一、基础配置
从RHEL7开始,使用systemctl工具来管理服务程序,包括了service和chkconfig
[root@rhel7 ~]# systemctl list-unit-files|grep enabled
启动一个服务:systemctl start firewalld.service
关闭一个服务:systemctl stop firewalld.service
重启一个服务:systemctl restart firewalld.service
显示一个服务的状态:systemctl status firewalld.service
在开机时启用一个服务:systemctl enable firewalld.service
在开机时禁用一个服务:systemctl disable firewalld.service
查看服务是否开机启动:systemctl is-enabled firewalld.service;echo $?
查看已启动的服务列表:systemctl list-unit-files|grep enabled

一、安装
通过iso文件进行安装,最小安装时,ifconfig等命令是不可使用的。可以通过“ip link show”、“ip address”等命令查看IP地址。
(一)网卡的配置
RedHat7对网卡的命名有了很大不同,可以参考如下命名规则:

本人在虚拟机上安装RedHat Server7.1后,网卡被命名为enp0s3,网卡的配置文件为/etc/sysconfig/network-scripts/ifcfg

-enp0s3。因此IP地址、子网掩码、网关、dns等均可在这个文件中进行配置。下图展示了一个配置文件:
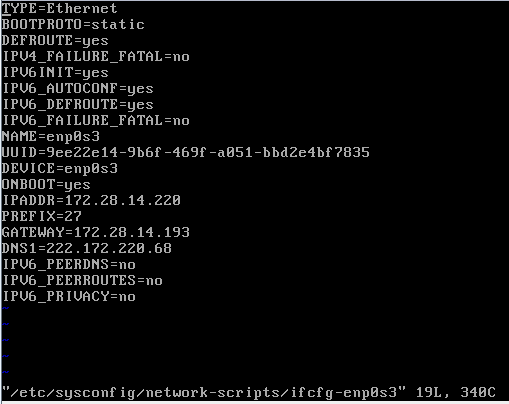
当前是static(静态IP地址),如果要使用dhcp,则修改:
BOOTPROTO=dhcp
ONBOOT=yes  #开启自动启用网络连接,如果设置为no,则启动系统后网卡不能链接
IPADDR=172.28.14.220  #设置IP地址
PREFIX=27  #设置子网掩码
GATEWAY=172.28.14.193  #设置网关
DNS1=222.172.220.68  #设置主DNS
DNS2=xxx.xxx.xxx.xxx  #设置备DNS

完成后service network restart   #重启网络
(二)ssh启动
#/bin/systemctl start sshd.service
(三)添加用户
#groupadd webmanager  ‘添加管理网站的组
‘添加用户名为:webmanager,属组:webmanage,密码:nts20080808,
主目录:/home/website/www.eq.hh.cn
#useradd webmanger  -g webmanage  –p nts20080808  -d /home/website/www.eq.hh.cn
修改用户登录名:
#usermod  -l webmanager webmanger  ‘将用户名webmanger修改为webmanager
修改用户webmanger登录密码:
#passwd webmanger
(四)设置iso文件为本地安装源
1.上传iso文件
将radHat Server7的iso文件rhel-server-7.1-x86_64-dvd.iso上传到服务器的/home/website/download/iso目录下。
2.挂载iso文件
将iso文件挂载为/media/cdrom
#mkdir /media/cdrom

# cd /media/cdrom
#ls ‘可以看到镜像中的文件已经存在了,说明挂载成功

备注:umount /media/cdrom #卸载系统镜像
3.设置开机自动挂载系统镜像文件
vi /etc/fstab #添加代码(/home/website……)。实现开机自动挂载
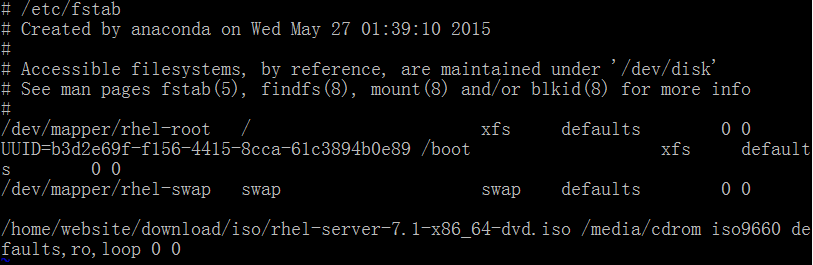
:wq! #保存退出
备注:iso9660使用df -T 查看设备
4.配置本地yum源
#cd /etc/yum.repos.d
#touch rhel-media.repo ‘建立yum配置文件
#vi rhel-media.repo
添加以下内容:
[rhel-media]
name=Red Hat Enterprise Linux 7.1 #自定义名称
baseurl=file:///media/cdrom #本地光盘挂载路径
enabled=1 #启用yum源,0为不启用,1为启用
gpgcheck=1 #检查GPG-KEY,0为不检查,1为检查
gpgkey=file:///media/cdrom/RPM-GPG-KEY-redhat-release #GPG-KEY路径
如下图所示:
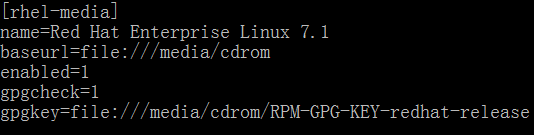
#:wq 保存退出
5.使用yum安装软件
#yum clean all ‘清除yum缓存
#yum makecache ‘缓存本地yum源中的软件包信息
#yum install 软件包名称 (如:yum install httpd)
(五)设置本地字符集
#vi /etc/environment
添加:
LC_ALL=”zh_CN.GBK”
LANG=”zh_CN.GBK”
wq保存退出
#source /etc/environment
二、SSH升级及配置
(一)升级openssh
系统自带的openssh是6.6版的,现在准备升级到最新的6.8版。先到openssh下载最新版。
本次安装需要zlib、openssl库。因此需要先将这些软件的最新版上传到服务器。
1.zlib安装
先到http://www.gzip.org/zlib/下载最新的zlib-1.2.8.tar.gz安装包,并上传到服务器,并解压。
#tar –zxvf zlib-1.2.8.tar.gz
#./configure - -prefix=/usr/local/zlib1.2.8
#make
#make install
以上命令是将zlib安装到/usr/local/zlib1.2.8目录。
2.升级openssl到1.0.2a版本
先到http://www.openssl.org/下载最新的openssl-1.0.2a.tar.gz,上传到安装服务器并解压。
#tar –zxvf openssl-1.0.2a.tar.gz
#cd openssl-1.0.2a
#./config –prefix=/usr/local/openssl1.0.2a --shared
一定记得加上--shared选项, 否则openssh编译的时候会找不到新安装的openssl的library, 会报错: openssl的 header和library版本不匹配
#make
#make test
#make install
make test(这一步很重要哦!是进行 SSL 加密协议的完整测试,如果出现错误就要一定先找出哪里的原因,否则一味继续,可能最终导致 SSH 不能使用,后果很严重的!)
vi /etc/profile,添加
PATH=/usr/local/openssl1.0.2a/bin:$PATH
export PATH
添加完成后保存,source /etc/profile
#openssl version –a
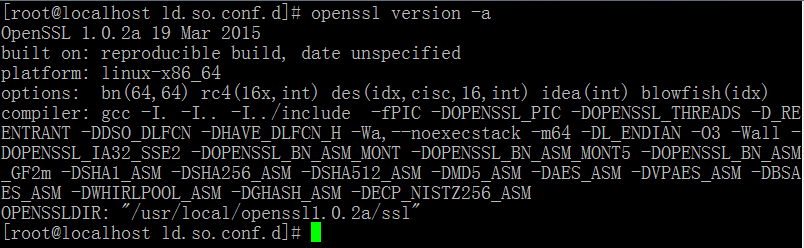
可以看到,openssl已经是最新版了。
3. 安装升级openssh6.8
安装新版之前先检测一下系统原来的版本,然后将其删除。
#rpm –qa | grep openssh
#rpm –e openssh –-nodeps
#rpm –e openssh-clients –nodeps
#rpm –e open-server –nodeps
删除完成后,到官方网站下载最新的openssh-6.8p1.tar.gz,上传到服务器并解压缩。
先将zlib、openssl1.0.2的库文件路径添加到库搜索路径中。
#echo “/usr/local/zlib1.2.8/lib” >> /etc/ld.so.conf.d/dyninst-x86_64.conf
#echo “/usr/local/openssl1.0.2a/lib” >> /etc/ld.so.conf.d/dyninst-x86_64.conf
#sudo ldconfig 这步很重新,一定不要忘记执行
安装openssh6.8p1:
#tar –zxvf openssh-6.8p1.tar.gz
#cd openssh-6.8p1

执行配置命令后,显示:
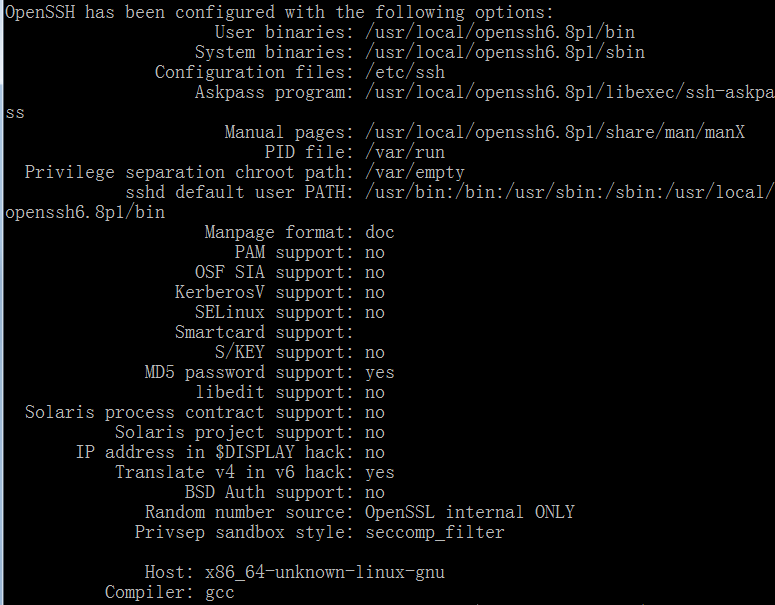
#make & make install
以上安装方法是将openssl安装到/usr/local/openssh6.8.p1目录下,配置文件是/etc/ssh/sshd_config。

提示没有sshd这个服务。下面我们将其添加到service服务中进行管理。
进入用openssh6.8的源文件目录,即之前解压的目录,执行:
#cp –p contrib/redhat/ sshd.init /etc/init.d/sshd (redhat系统)
#chmod +x /etc/init.d/sshd
#chkconfig --add sshd
经过以上处理,如果仍然不能启动sshd,则复制libcrypto.so.1.0.0到/usr/lib64/dyninst,否则启动sshd时会提示找不到这个库。
#cp /usr/local/openssl1.0.2a/lib/libcrypto.so.1.0.0 /usr/lib64/dyninst/
#service sshd start 启动sshd服务。
如果启动过程没有反应或没有成功提示,则vi /etc/init.d/sshd,将SSHD的值设置为实际安装Openssh的目录。如下:


三、jdk8u45的安装
#tar -zxvf jdk-8u45-linux-x64.tar.gz
#mv jdk1.8.45 /usr/local
#vi /etc/profile
添加:
JAVA_HOME=/usr/local/jdk1.8.0_45
JRE_HOME=$JAVA_HOME/jre
CLASSPATH=.:$JAVA_HOME/lib:$JRE_HOME/lib:$CLASSPATH
PATH=$JAVA_HOME/bin:$JRE_HOME/bin:$PATH
Export JAVA_HOME JRE_HOME CLASSPATH PATH
#source /etc/profile
四、MySql5.6.24的安装与配置
(一)Cmake的安装
由于安装MySql5.6.24需要用到cmake程序,因此需要安装cmake。到http://www.cmake.org/download/ 下载最新版的cmake-3.2.2.tar.gz,上传到服务器。
#tar -zxvf cmake-3.2.2.tar.gz
#cd cmake-3.2.2
如果原来没有安装过cmake,则:
#./bootstrap
#gmake
#gmake install
安装过程中出现如下错误:
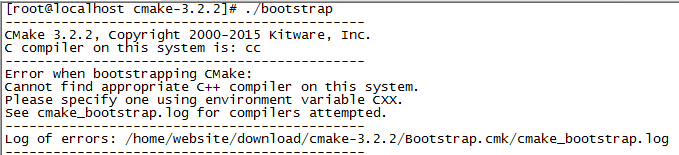
缺少gcc,gcc++环境
#yum –y install gcc
#yum -y install gcc-c++
再次bootstrap,正常了。
如果本机上存在cmake,想安装一个新版本,则:
#cmake .
#gmake
#gmake install
(二)安装Mysql-5.6.24
1.源码安装Mysql5.6.24
#tar –zxvf mysql-5.6.24.tar.gz
#cd mysql-5.6.24
用源码编译安装Mysql5.6.24:
#cmake
-DCMAKE_INSTALL_PREFIX=/usr/local/mysql
-DMYSQL_UNIX_ADDR=/usr/local/mysql/mysql.sock
-DDEFAULT_CHARSET=utf8
-DDEFAULT_COLLATION=utf8_general_ci
-DWITH_MYISAM_STORAGE_ENGINE=1
-DWITH_INNOBASE_STORAGE_ENGINE=1
-DWITH_ARCHIVE_STORAGE_ENGINE=1
-DWITH_BLACKHOLE_STORAGE_ENGINE=1
-DWITH_MEMORY_STORAGE_ENGINE=1
-DWITH_READLINE=1
-DENABLED_LOCAL_INFILE=1
-DMYSQL_DATADIR=/home/mysql/data
-DMYSQL_USER=mysql
-DMYSQL_TCP_PORT=3306
-DENABLE_DOWNLOADS=1
此过程中出现“Curses library not found. Please install appropriate package,”,说明缺少curses-devel包,我们需要安装它们。下载如下rpm包,注意它们的版本要一致,否则无法安装(如果配置了本地yum源,则可以用:yum –y install ncurses-devel安装)。

先检查系统是否安装有相应的包:
#rpm –qa | grep ncurses
有的话一一删除。然后再进行安装
#rpm –ivh ncurses-base-5.9-12.20130511.fc20.noarch.rpm
#rpm –ivh ncurses-libs-5.9-12.20130511.fc20.x86_64.rpm
#rpm –ivh ncurses-devel-5.9-12.20130511.fc20.x86_64.rpm
#rm CMakeCache.txt 删除之前生成的文件
然后再cmake编译安装Mysql5.6.24:
#cmake
-DCMAKE_INSTALL_PREFIX=/usr/local/mysql
-DMYSQL_UNIX_ADDR=/usr/local/mysql/mysql.sock
-DDEFAULT_CHARSET=utf8
-DDEFAULT_COLLATION=utf8_general_ci
-DWITH_MYISAM_STORAGE_ENGINE=1
-DWITH_INNOBASE_STORAGE_ENGINE=1
-DWITH_ARCHIVE_STORAGE_ENGINE=1
-DWITH_BLACKHOLE_STORAGE_ENGINE=1
-DWITH_MEMORY_STORAGE_ENGINE=1
-DWITH_READLINE=1
-DENABLED_LOCAL_INFILE=1
-DMYSQL_DATADIR=/home/mysql/data
-DMYSQL_USER=mysql
-DMYSQL_TCP_PORT=3306
-DENABLE_DOWNLOADS=1
这次编译终于通过了。
#make
#make install
注意:如果需要重装mysql,在/usr/local/src/mysql-5.6.12在执行下make install就可以了,不需要再cmake和make
2.清除安装临时文件
# make clean
3.修改目录拥有者
# chown -Rf mysql:mysql /usr/local/mysql-5.6.24
# chown -Rf mysql:mysql /home/mysql
4.进入mysql执行程序的安装路径
# cd /usr/local/mysql-5.6.24
5.执行初始化配置脚本,创建系统自带的数据库和表(注意路径/home/mysql/data需要换成你自定定义的数据库存放路径)
# scripts/mysql_install_db --user=mysql --datadir=/home/mysql/data
执行以上命令时出现:scripts/mysql_install_db: /usr/bin/perl: 坏的解释器: 没有那个文件或目录错误,原因是:系统是64位,而mysql是32位。解决办法:安装32位环境,或者安装64位myql。
或者:yum -y install perl perl-devel,再执行scripts/mysql_install_db……,出现以下错误提示:
FATAL ERROR: please install the following Perl modules before executing scripts/mysql_install_db:
则yum -y install perl-Module-*
问题终于解决。
#初始化脚本在/usr/local/mysql/下生成了配置文件my.cnf,需要更改该配置文件的所有者:
# chown -Rf mysql:mysql /usr/local/mysql
注意:
(1)Tips:在启动MySQL服务时,会按照一定次序搜索my.cnf,先在/etc目录下找,找不到则会搜索mysql程序目录下是否有my.cnf";
(2)需要注意CentOS 6.4版操作系统的最小安装完成后,即使没有安装mysql,在/etc目录下也会存在一个my.cnf文件,建议将此文件更名为其他的名字,否则该文件会干扰源码安装的MySQL的正确配置,造成无法启动。修改/etc/my.cnf操作如下:
# mv /etc/my.cnf /etc/my.cnf.bak
# 当然也可以删除掉/etc/my.cnf这个文件:
# rm /etc/my.cnf
(3)如果你需要用于生产环境,不要急着做下面的mysql启动操作。建议把上一步骤中mysql初始化生成的/usr/local/mysql/mysql.cnf删除,然后把你优化好的mysql配置文件my.cnf放到/etc下。(这是我做mysql主从复制和mysql优化的经验!)
6.复制服务启动脚本
# cp /usr/local/mysql/support-files/mysql.server /etc/init.d/mysql
7.启动MySQL服务
# service mysql start
8.设置开机自动启动服务
# chkconfig mysql on
9.登录并修改MySQL用户root的密码
#vi /etc/profile
将/usr/local/mysql-5.6.24/bin添加至PATH中。
#source /etc/profile
# mysql -u root
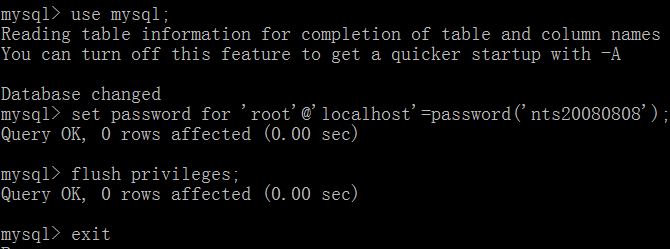
mysql> use mysql;
mysql> GRANT ALL PRIVILEGES ON *.* TO root@"%" IDENTIFIED BY "123456";
mysql> update user set Password = password('123456') where User='root';
mysql> flush privileges;
mysql> exit;
10.检测下上一步MySQL用户root密码是否生效:
[root@yimiju etc]# mysql -u root –pnts20080808

执行:
再次登录,输入正常密码后终于成功了。
[root@yimiju ~]# mysql -u root -p
Enter password: ——这里提示时输入你设置的mysql root帐号密码
#登录成功有如下提示:
Welcome to the MySQL monitor. Commands end with ; or g.
Your MySQL connection id is 422
Server version: 5.6.12-log Source distribution
Copyright (c) 2000, 2013, Oracle and/or its affiliates. All rights reserved.
Oracle is a registered trademark of Oracle Corporation and/or its
affiliates. Other names may be trademarks of their respective
owners.
Type 'help;' or 'h' for help. Type 'c' to clear the current input statement.
mysql>
11.(可选)运行安全设置脚本,强烈建议生产服务器使用:
[root@yimiju ~]# /usr/local/mysql/bin/mysql_secure_installation
NOTE: RUNNING ALL PARTS OF THIS SCRIPT IS RECOMMENDED FOR ALL MySQL
SERVERS IN PRODUCTION USE! PLEASE READ EACH STEP CAREFULLY!
In order to log into MySQL to secure it, we'll need the current
password for the root user. If you've just installed MySQL, and
you haven't set the root password yet, the password will be blank,
so you should just press enter here.
Enter current password for root (enter for none):
OK, successfully used password, moving on...
Setting the root password ensures that nobody can log into the MySQL
root user without the proper authorisation.
You already have a root password set, so you can safely answer 'n'.
Change the root password? [Y/n] n ---------------这里输入n
... skipping.
By default, a MySQL installation has an anonymous user, allowing anyone
to log into MySQL without having to have a user account created for
them. This is intended only for testing, and to make the installation
go a bit smoother. You should remove them before moving into a
production environment.
Remove anonymous users? [Y/n] Y ---------------这里输入Y
... Success!
Normally, root should only be allowed to connect from 'localhost'. This
ensures that someone cannot guess at the root password from the network.
Disallow root login remotely? [Y/n] n ---------------这里输入n
... skipping.
By default, MySQL comes with a database named 'test' that anyone can
access. This is also intended only for testing, and should be removed
before moving into a production environment.
Remove test database and access to it? [Y/n] Y ---------------这里输入Y
- Dropping test database...
ERROR 1008 (HY000) at line 1: Can't drop database 'test'; database doesn't exist
... Failed! Not critical, keep moving...
- Removing privileges on test database...
... Success!
Reloading the privilege tables will ensure that all changes made so far
will take effect immediately.
Reload privilege tables now? [Y/n] Y ---------------这里输入Y
... Success!
All done! If you've completed all of the above steps, your MySQL
installation should now be secure.
Thanks for using MySQL!
Cleaning up...
12.重启服务器,检测mysql是否能开机自动启动
[root@yimiju ~]# reboot
五、安装配置Nginx
(一)安装Nginx
#tar –zxvf nginx

注意:
以上配置中的—with-pcre、--with-openssl、--with-zlib后的文件夹是源码文件夹,不是安装文件夹,如果改成安装文件夹,make时会出现错误。
#make
#make install
(二)配置Nginx
#vi /usr/local/nginx-1.9.0/conf/nginx.conf
worker_processes 8 #设置跟cpu核数一样就行
worker_rlimit_nofile 309600;
events {
worker_connections 309600;
use epoll;
}
server {
listen 80;
#server_name localhost;
server_name 172.28.14.220; 这里根据情况填写,如www.eq.hh.cn
charset utf-8;
#access_log logs/host.access.log main;
location / {
#配置web站点在服务器上的文件位置
root /home/website/www.eq.hh.cn;
index index.html index.htm index.jsp shouye.jsp index.action;
}
#动态文件交由resin或tomcat处理
location ~.(jsp|jspx|action|do)?$ {
proxy_set_header Host $host;
proxy_set_header X-Real-IP $remote_addr;
proxy_set_header X-Forwarded-For $proxy_add_x_forwarded_for;
proxy_pass http://127.0.0.1:8080; #resin服务的位置,如果是tomcat也行
}
#静态文件缓存时间
location ~.*.(htm|html|gif|jpg|jpeg|png|bmp|swf|ioc|rar|zip|txt|flv|mid|doc|docx|ppt|xls|xlsx|mp3|wma)$
{
expires 30d;
}
location ~.*.(js|css)?$
{
expires 1h;
}
#error_page 404 /404.html;
# redirect server error pages to the static page /50x.html
#
error_page 500 502 503 504 /50x.html;
location = /50x.html {
root html;
}
# proxy the PHP scripts to Apache listening on 127.0.0.1:80
#
#location ~ .php$ {
# proxy_pass http://127.0.0.1;
#}
}
六、rhel7的防火墙配置
1.添加tcp端口
#firewall-cmd --zone=public --add-port=8080/tcp

以上这种添加的方法只是暂时的,重新启动系统后无效。添加参数permanent后,可以变成永久生效。
#firewall-cmd --zone=public --permanent --add-port=8080/tcp
--增加zone public开放http service
[root@localhost zones]# firewall-cmd --zone=public --add-service=http
success
[root@localhost zones]# firewall-cmd --permanent --zone=internal --add-service=http
success
[root@localhost zones]# firewall-cmd --reload
success
[root@localhost zones]# firewall-cmd --zone=internal --add-port=443/tcp
success
[root@localhost zones]# firewall-cmd --zone=internal --list-services
dhcpv6-client http ipp-client mdns samba-client ssh
防火墙中的一切都与一个或者多个区域相关联。
配置之后,RHEL 7服务器正常会在公共区域,但是你也许会想将它放置在另一个网络配置防火墙访问。这时使用firewall-cmd –get-default-zone命令,该命令显示你的服务器在哪一个网络。如果你想查看配置特定网络的详细信息,你可以使用列表2中的firewall-cmd –zone=zonename –list-all命令。
列表2.
root@rhelserver ~]# firewall-cmd –get-default-zone
public
[root@rhelserver ~]# firewall-cmd –get-zones
block dmz drop external home internal public trusted work
[root@rhelserver ~]# firewall-cmd –zone=public –list-all
public (default, active)
interfaces: ens33
sources:
services: dhcpv6-client sander ssh
ports:
masquerade: no
forward-ports:
icmp-blocks:
rich rules:
改变当前区域并不难:使用firewall-cmd –set-default-zone=home命令,该命令可用于从公共网络到家庭网络制定一个默认网络。
服务和其他构件
在区域中有一些基本的构件块,其中服务是最重要的。防火墙使用管理员创建在/usr/lib/firewalld/services(系统默认服务) 和/etc/firewalld/services文件下的XML文件,配置的自身服务集。XML文件时通过列表3中的例子创建的。
列表3.
[root@rhelserver services]# cat ftp.xml
<?xml version=”1.0″ encoding=”utf-8″?>
<service>
<short>FTP</short>
<description>FTP is a protocol used for remote file transfer. If you plan to make your FTP server publicly available, enable this option. You need the
vsftpd package installed for this option to be useful.</description>
<port protocol=”tcp” port=”21″/>
<module name=”nf_conntrack_ftp”/>
</service>
每一个服务定义都需要一个简短的名字、描述和端口网络用于指定需要使用的协议、端口和模块名。
列表4.以下是创建防火墙服务的例子
[root@rhelserver services]# cat sander.xml
<?xml version=”1.0″ encoding=”utf-8″?>
<service>
<short>Sander</short>
<description>Sander is a random service to show how service configuration works.</description>
<port port=”666″ protocol=”tcp”/>
</service>
一旦你有了正确的服务文件,使用以下代码复制它。firewall-cmd –list-services命令显示从你服务器上的所有可以找到的服务列表。如果要增加服务则输入firewall-cmd –add-service yourservice将服务放到默认网络上,或者是使用–zone=zonename选择特定网络。
下面描述了它如何工作:
1.使用firewall-cmd –zone=public –list-all命令,显示当前公共区域配置。
[root@rhelserver ~]# firewall-cmd –zone=public –list-all
public (default, active)
interfaces: ens33
sources:
services: dhcpv6-client ssh
ports:
masquerade: no
forward-ports:
icmp-blocks:
rich rules:
2.命令firewall-cmd –zone=public –add-service=ftp,在Linux防火墙的公共区域上添加FTP服务。
3.重复步骤1检查FTP服务是否成功添加,你将看到服务列表。
4.重启服务器,执行步骤1.你将看到FTP服务消失了,在防火墙中,没有永久的事物,除非你使用了permanent选项。
5.将FTP服务添加到公共网络上,并设为永久设置,该步骤使用firewall-cmd –permanent –zone=public –add-service=ftp命令。重启之后该设置生效。
6.输入firewall-cmd –reload提交所有规则同时重载防火墙。使用permanent设置永久防火墙选项是非常重要的。
打破规则
配置防火墙配置服务是推荐的方式,它可以轻而易举地提供防火墙的全局概览。但是如果你想在/etc/firewalld/service文件下自己定义服务,在不使用该文件的情况下也可添加端口。
使用firewall-cmd –permanent –zone=dmz –add-port=22/tcp命令为特定网络指定特定端口,然后使用firewall-cmd –zone=dmz –list-all确认端口已成功添加。这种方式是非兼容方式,使用服务使对不同的主机分配相似的规则变得简单。如果没有服务,文件就很难被分配,配置文件中的规则分配也变得困难。
对于更多的控制,你不能够使用直接规则。原因如下:
1.输入firewall-cmd –direct –add-rule ipv4 filter INPUT 0 -p tcp –dport 80 -j ACCEPT
2.现在输入firewall-cdm –list-all显示你的默认网络的配置,端口80没有添加任何东西。
[root@rhelserver ~]# firewall-cmd –list-all
public (default, active)
Interfaces: ens33
sources:
services: dhcpv6-client ftp ssh
ports:
masquerade: no
forward-ports:
icmp-blocks:
rich rules:
输入完以上命令后,HTTP端口并没有发生改变,这是因为直接规则写给了IP信息包过滤器接口,而不是防火墙。
3.输入firewall-cmd –direct –get-all-rules,或者使用firewall-cmd –direct –get-all-rules显示直接规则。
相比于直接规则,使用iptables(列表5)命令可以写到防火墙里。
列表5.Linux防火墙规则实例
firewall-cmd–permanent–zone=public–add-rich-rule=”rule family=”ipv4″ source address=”192.168.4.0/24″ service name=”tftp” log prefix=”tftp” level=”info” limit value=”1/m” accept”
防火墙规则类似于IP信息包过滤防火墙,提供了大量灵活性。
使用列表5中的一条命令就可以完成和提交许多任务。它指定了IP家族、源地址、服务名等。但是需要注意规则是怎样处理登陆的:定义一个特定的登陆前缀、登陆等级信息,以及每分钟传递信息的极限值。
Linux管理员可以申请监测端口的过滤器,所以规则对于IP地址上的过滤器非常有用。(列表6)
列表6.规则申请Linux防火墙IP地址端口的过滤器
firewall-cmd –permanent –zone=public –add-rich-rule=”rule family=”ipv4″
source address=”192.168.0.4/24″ service name=”http” accept”
分析区域
firewall-cmd命令是众多配置防火墙的方法之一。二者择一的,你可以直接编写网络配置文件。但是如果语法有误,将不会得到任何反馈。但这是一个简洁简单的配置文件,容易修改和在多个服务器上分配。
列表7.你可以通过编写配置文件配置防火墙
<?xml version=”1.0″ encoding=”utf-8″?>
<zone>
<short>Public</short>
<description>For use in public areas. You do not trust the other computers on networks to not harm your computer. Only selected incoming connections are accepted.</description>
<service name=”dhcpv6-client”/>
<service name=”ssh”/>
<rule family=”ipv4″>
<source address=”192.168.4.0/24″/>
<service name=”tftp”/>
<log prefix=”tftp” level=”info”>
<limit value=”1/m”/>
</log>
<accept/>
</rule>
</zone>
列表7中包含了添加到先前例子中的所有代码,可以直接写入区域配置文件,其中不包含直接规则,因为直接规则有自己的配置文件。
[root@rhelserver firewalld]# cat direct.xml
<?xml version=”1.0″ encoding=”utf-8″?>
<direct>
<rule priority=”0″ table=”filter” ipv=”ipv4″ chain=”INPUT”>-p tcp –dport 80 -j ACCEPT</rule>
</direct>