我这主要用pi跑一些任务用没有用来玩物理网
下载系统 Raspbian Stretch Lite(Minimal image based on Debian Stretch)最小化不带桌面
https://www.raspberrypi.org/downloads/raspbian/
刻录工具win32diskimager:http://sourceforge.net/projects/win32diskimager/files/Archive/win32diskimager-v0.9-binary.zip/download
安装Raspbian
树莓派主板上没有BOIS,而且没有时钟芯片,默认从TF卡引导启动系统。官方推荐使用Win32DiskImager.exe直接将Raspbian系统的*.img镜像写入TF卡即可完成安装过程。详细过程如下:
- 解压2016-05-27-raspbian-jessie.zip得到2016-05-27-raspbian-jessie.img;
- 运行Win32DiskImager.exe,将上述*.img系统镜像写入TF卡即可。
安装完成后,TF卡被分成两个分区:
- 67MB vfat格式的引导分区(系统启动后被挂载在/boot目录)
- TF卡剩余空间 ext4格式的磁盘分区
引导进入Raspbian系统后,查看分区情况如下(*tmpfs格式为内存分区):
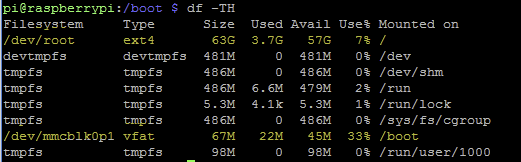
由于Windows下不识别ext4格式的磁盘,在资源管理器中查看TF卡只显示一个67MB大小、名字为boot的盘符。若想恢复TF卡整个空间为windows可识别的fat32/exfat格式,需要使用低级格式化工具HDD Low Level Format Tool(windows磁盘管理器无法处理ext4格式磁盘)。
另外,树莓派官网也为需要安装多个操作系统的群体提供了NOOBS的安装方式。
详情参考:安装配置树莓派的最佳工具——NOOBS
修改raspbian系统配置
raspi-config是Raspbian自带的一个系统配置工具。
运行命令:sudo raspi-config
这里随便百度配置即可,新版本系统linux分区直接扩展到root了。这里需要注意的就是修改键盘
Raspbian用户名和密码
由于root用户默认不允许SSH方式登陆,首次登陆推荐用户pi,密码Raspbian登录系统
树莓派(raspberry pi)是英国产品,默认键盘布局是英国(GB),我们用的键盘布局一般是美国(US)的(104键),调整过程如下:
sudo raspi-config
选择 internationalisation Option
选择 Change Keyboard Layout
选择 Generic 104-key PC
选择 Other
选择 English (US)
选择 English (US)
剩下的选默认值
回到raspi-config主页面,选择Finish
设置WIFI和静态IP
这里最好先用nano编辑,vi编辑的话现在比较麻烦配置好网络更新vim就好了
mky@mkypi:~ $ cat /etc/network/interfaces
# interfaces(5) file used by ifup(8) and ifdown(8)

# Please note that this file is written to be used with dhcpcd
# For static IP, consult /etc/dhcpcd.conf and 'man dhcpcd.conf'

# Include files from /etc/network/interfaces.d:
source-directory /etc/network/interfaces.d


auto wlan0   开机自启动
allow-hotplug wlan0   wifi接口
iface wlan0 inet dhcp     dhcp分配,静态IP这里改成static
wpa-ssid wifi-ssid
wpa-psk wifi密码
需要reboot生效
更新软件源
sudo cp /etc/apt/sources.list /etc/apt/sources.list.bak 备份原来的
sudo nano /etc/apt/sources.list
deb http://mirrors.aliyun.com/raspbian/raspbian/ stretch  main non-free contrib
deb-src http://mirrors.aliyun.com/raspbian/raspbian/ stretch main non-free contrib
注意:
stretch 这个是树莓派版本,版本信息可以在自带的源中看到,改成自己的版本,我这用的阿里源
更新系统
sudo apt-get update && apt-get upgrade -y
安装必要的软件
apt-get vim -y 安装完vim,vi就可以正常使用了