1. 核心包安装
yarn add react-navigation
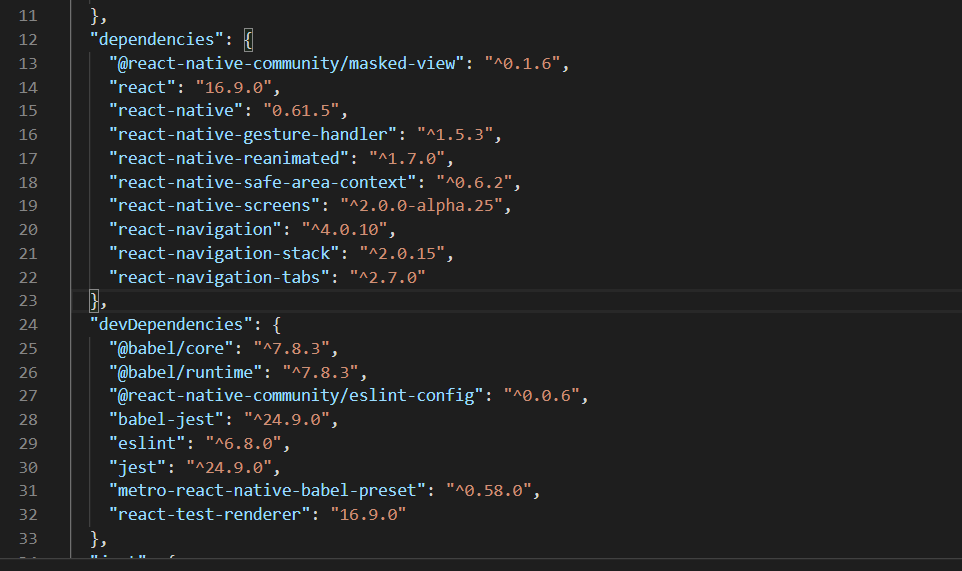
2.安装依赖(前几个官方推荐,最后一个是我app.js里头路由需要的模块)
yarn add react-native-reanimated react-native-gesture-handler react-native-screens react-native-safe-area-context react-navigation-stack
依赖装后我的是这样的:
3.React Native 0.60 及更高版本
(1)ios:iOS 上完成自动链接, 请确保你已经安装了Cocoapods 然后运行命令:
cd ios
pod install
cd ..
(2)安卓:在android/app/build.gradle 中 dependencies 选项添加:
implementation 'androidx.appcompat:appcompat:1.1.0-rc01'
implementation 'androidx.swiperefreshlayout:swiperefreshlayout:1.1.0-alpha02
4.在android/app/src/main/java/MainActivity.java中添加(+为新增内容,添加后自行去掉+):
package com.reactnavigation.example; import com.facebook.react.ReactActivity; + import com.facebook.react.ReactActivityDelegate; + import com.facebook.react.ReactRootView; + import com.swmansion.gesturehandler.react.RNGestureHandlerEnabledRootView; public class MainActivity extends ReactActivity { @Override protected String getMainComponentName() { return "Example"; } + @Override + protected ReactActivityDelegate createReactActivityDelegate() { + return new ReactActivityDelegate(this, getMainComponentName()) { + @Override + protected ReactRootView createRootView() { + return new RNGestureHandlerEnabledRootView(MainActivity.this); + } + }; + } }
5.index.js或者app.js中导入react-native-gesture-handler依赖
import 'react-native-gesture-handler';
6.4.x版本移除了各类导航器,需要手动安装,这里安装一下StackNavigator和BottomTabNavigator:react-navigation-stack @react-native-community/masked-view react-navigation-tabs
yarn add
7.app.js中代码:
import React from 'react';
import { Button,View, Text } from 'react-native';
import { createAppContainer } from 'react-navigation';
import { createStackNavigator } from 'react-navigation-stack';

class HomeScreen extends React.Component {
  render() {
    return (
      <View style={{ flex: 1, alignItems: 'center', justifyContent: 'center' }}>
        <Text>Home Screen</Text>
        <Button
          title="Go to Details"
          onPress={() => this.props.navigation.navigate('Details')}
        />
      </View>
    );
  }
}

class DetailsScreen extends React.Component {
  render() {
    return (
      <View style={{ flex: 1, alignItems: 'center', justifyContent: 'center' }}>
        <Text>Details Screen</Text>
        <Button
          title="Go back"
          onPress={() => this.props.navigation.goBack()}
        />
      </View>
    );
  }
}

const AppNavigator = createStackNavigator(
  {
    Home: HomeScreen,
    Details: DetailsScreen,
  },
  {
    initialRouteName: 'Home',
  }
);

export default createAppContainer(AppNavigator);
8.跑一下代码:yarn react-native run-react
完美!
可参考文档:
1.navigation官网:https://reactnavigation.org/docs/zh-Hans/tab-based-navigation.html
2.eact-naviagtion 的API部分:https://reactnavigation.org/docs/zh-Hans/bottom-tab-navigator.html
3.本文参考:https://www.javascriptcn.com/read-99050.html
附赠,tab切换功能:
import React from 'react';
import { Text, View ,Image} from 'react-native';
import { createAppContainer } from 'react-navigation';
import { createBottomTabNavigator } from 'react-navigation-tabs';
import Ionicons from 'react-native-vector-icons';
// 下面是 4个组件
class HomeScreen extends React.Component {
render() {
return (
<View style={{ flex: 1, justifyContent: 'center', alignItems: 'center' }}>
<Text>Home!</Text>
</View>
);
}
}
class SettingsScreen extends React.Component {
render() {
return (
<View style={{ flex: 1, justifyContent: 'center', alignItems: 'center' }}>
<Text>Settings!</Text>
</View>
);
}
}
class Xinjia extends React.Component {
render() {
return (
<View style={{ flex: 1, justifyContent: 'center', alignItems: 'center' }}>
<Text>新加坡</Text>
</View>
);
}
}
class Malai extends React.Component {
render() {
return (
<View style={{ flex: 1, justifyContent: 'center', alignItems: 'center' }}>
<Text>马来西亚</Text>
</View>
);
}
}
const TabNavigator = createBottomTabNavigator(
{
Home:{
screen: HomeScreen,
navigationOptions:({navigation})=>({
tabBarLabel:"中国",
tabBarIcon:({focused,horizontal,tintColor})=>{
let image = focused ? require('./xiong.jpg') : require('./mao.jpg');
return <Image style={{height:40, 40}} source={image} />
}
})
},
Setting:{
screen: SettingsScreen,
navigationOptions:{
tabBarLabel:"日本",
// 配置Icon图标有两种方式,(1)使用图片,我觉得简单(2)使用图标库
tabBarIcon:({focused,horizontal,tintColor})=>{
let image = focused ? require('./xiong.jpg') : require('./mao.jpg');
return <Image style={{height:40, 40}} source={image} />
}
}
},
Xin:{
screen: Xinjia,
navigationOptions:{
tabBarLabel:"新加",
// tabBarVisible: false 隐藏标签栏,就是隐藏tabBar
}
},
Malai:{
screen: Malai,
navigationOptions:{
tabBarLabel:"马来"
}
}
},
{
tabBarOptions: {
showIcon: true, // 是否显示选项卡的图标
activeTintColor: 'tomato', // 选中时状态颜色
inactiveTintColor: 'gray', // 未选中状态颜色
labelStyle: { // 选项卡标签的样式对象
fontSize: 12,
},
style: { // 选项卡栏的样式对象
backgroundColor: 'blue',
},
}
}
);
export default createAppContainer(TabNavigator);